ignition CADILLAC ESCALADE ESV 2005 2.G Repair Manual
[x] Cancel search | Manufacturer: CADILLAC, Model Year: 2005, Model line: ESCALADE ESV, Model: CADILLAC ESCALADE ESV 2005 2.GPages: 470, PDF Size: 2.86 MB
Page 236 of 470
CD Changer
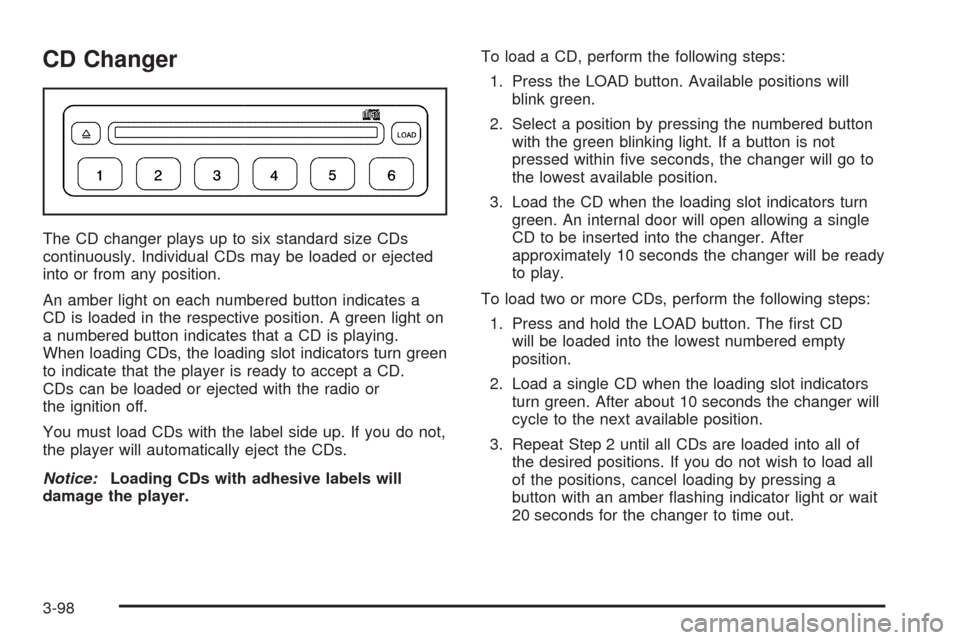
The CD changer plays up to six standard size CDs
continuously. Individual CDs may be loaded or ejected
into or from any position.
An amber light on each numbered button indicates a
CD is loaded in the respective position. A green light on
a numbered button indicates that a CD is playing.
When loading CDs, the loading slot indicators turn green
to indicate that the player is ready to accept a CD.
CDs can be loaded or ejected with the radio or
the ignition off.
You must load CDs with the label side up. If you do not,
the player will automatically eject the CDs.
Notice:Loading CDs with adhesive labels will
damage the player.To load a CD, perform the following steps:
1. Press the LOAD button. Available positions will
blink green.
2. Select a position by pressing the numbered button
with the green blinking light. If a button is not
pressed within �ve seconds, the changer will go to
the lowest available position.
3. Load the CD when the loading slot indicators turn
green. An internal door will open allowing a single
CD to be inserted into the changer. After
approximately 10 seconds the changer will be ready
to play.
To load two or more CDs, perform the following steps:
1. Press and hold the LOAD button. The �rst CD
will be loaded into the lowest numbered empty
position.
2. Load a single CD when the loading slot indicators
turn green. After about 10 seconds the changer will
cycle to the next available position.
3. Repeat Step 2 until all CDs are loaded into all of
the desired positions. If you do not wish to load all
of the positions, cancel loading by pressing a
button with an amber �ashing indicator light or wait
20 seconds for the changer to time out.
3-98
Page 241 of 470

Care of the Cassette Tape Player
A tape player that is not cleaned regularly can cause
reduced sound quality, ruined cassettes, or a damaged
mechanism. Cassette tapes should be stored in their
cases away from contaminants, direct sunlight, and
extreme heat. If they are not, they may not operate
properly or may cause failure of the tape player.
The tape player should be cleaned regularly after every
50 hours of use. The radio may display CLEAN to
indicate that the tape player has been used for 50 hours
without resetting the tape clean timer. If this message
appears on the display, the cassette tape player
needs to be cleaned. It will still play tapes, but it should
be cleaned as soon as possible to prevent damage
to the tapes and player. If there is a reduction in sound
quality, try a known good cassette to see if the tape
or the tape player is at fault. If this other cassette has no
improvement in sound quality, clean the tape player.
For best results, use a scrubbing action, non-abrasive
cleaning cassette with pads which scrub the tape
head as the hubs of the cleaner cassette turn. The
recommended cleaning cassette is available through
your dealer.
When cleaning the cassette tape player with the
recommended non-abrasive cleaning cassette, it is
possible that the cassette may eject, because the cut
tape detection feature on the radio may recognize it as a
broken tape, in error.To prevent the cleaning cassette from being ejected,
use the following steps:
1. Turn the ignition on.
2. Turn the radio off.
3. Press and hold the TAPE DISC button for
�ve seconds. READY will appear on the display and
the cassette symbol will �ash for �ve seconds.
4. Insert the scrubbing action cleaning cassette.
5. Eject the cleaning cassette after the manufacturer’s
recommended cleaning time.
When the cleaning cassette has been ejected, the
cut tape detection feature will be active again.
A non-scrubbing action, wet-type cleaner which uses a
cassette with a fabric belt to clean the tape head
can be used. This type of cleaning cassette will not
eject on its own. A non-scrubbing action cleaner may not
clean as thoroughly as the scrubbing type cleaner.
The use of a non-scrubbing action, dry-type cleaning
cassette is not recommended.
After the player is cleaned, press and hold the eject
button for �ve seconds to reset the CLEAN indicator.
The radio will display --- or CLEANED to show the
indicator was reset.
Cassettes are subject to wear and the sound quality
may degrade over time. Always make sure the cassette
tape is in good condition before the tape player is
serviced.
3-103
Page 243 of 470
XM™ Satellite Radio Antenna
System
The XM™ Satellite Radio antenna is located on the roof
of your vehicle. Keep this antenna clear of snow and
ice build up for clear radio reception.
The performance of the XM™ system may be affected if
the sunroof is open.
Loading items onto the roof of your vehicle can interfere
with the performance of the XM™ system. Make sure
that the XM™ satellite antenna is not obstructed.
Chime Level Adjustment
The radio is the vehicle chime producer. To change the
volume level, press and hold pushbutton 6 with the
ignition on and the radio power off. The chime volume
level will change from the normal level to loud, and
LOUD will appear on the radio display. To change back
to the default or normal setting, press and hold
pushbutton 6 again. The chime level will change from
the loud level to normal, and NORMAL will appear
on the radio display. Each time the chime volume is
changed, three chimes will sound as an example of the
new volume selected. Removing the radio and not
replacing it with a factory radio or chime module will
disable vehicle chimes.
3-105
Page 250 of 470

Avoid needless heavy braking. Some people drive
in spurts — heavy acceleration followed by heavy
braking — rather than keeping pace with traffic. This is
a mistake. Your brakes may not have time to cool
between hard stops. Your brakes will wear out much
faster if you do a lot of heavy braking. If you keep pace
with the traffic and allow realistic following distances,
you will eliminate a lot of unnecessary braking.
That means better braking and longer brake life.
If your engine ever stops while you are driving, brake
normally but do not pump your brakes. If you do,
the pedal may get harder to push down. If your engine
stops, you will still have some power brake assist.
But you will use it when you brake. Once the power
assist is used up, it may take longer to stop and
the brake pedal will be harder to push.Anti-Lock Brake System (ABS)
Your vehicle has anti-lock brakes. ABS is an advanced
electronic braking system that will help prevent a
braking skid.
When you start your engine and begin to drive away,
your anti-lock brake system will check itself. You
may hear a momentary motor or clicking noise while
this test is going on. This is normal.
If there is a problem with
the anti-lock brake system,
this warning light will
stay on. SeeAnti-Lock
Brake System Warning
Light on page 3-39.
Along with ABS, your vehicle has a Dynamic Rear
Proportioning (DRP) system. If there is a DRP problem,
both the brake and ABS warning lights will come on
accompanied by a 10-second chime. The lights
and chime will come on each time the ignition is turned
on until the problem is repaired. See your dealer for
service.
4-6
Page 272 of 470
Driving in Water
Heavy rain can mean �ash �ooding, and �ood waters
demand extreme caution.
Find out how deep the water is before you drive through
it. If it is deep enough to cover your wheel hubs,
axles or exhaust pipe, do not try it — you probably will
not get through. Also, water that deep can damage
your axle and other vehicle parts.
If the water is not too deep, drive slowly through it. At
faster speeds, water splashes on your ignition
system and your vehicle can stall. Stalling can also
occur if you get your tailpipe under water. And, as long
as your tailpipe is under water, you will never be
able to start your engine. When you go through water,
remember that when your brakes get wet, it may
take you longer to stop.
{CAUTION:
Driving through rushing water can be
dangerous. Deep water can sweep your vehicle
downstream and you and your passengers
could drown.
CAUTION: (Continued)
CAUTION: (Continued)
If it is only shallow water, it can still wash
away the ground from under your tires, and
you could lose traction and roll the vehicle
over. Do not drive through rushing water.
SeeDriving in Rain and on Wet Roads on page 4-30for
more information on driving through water.
After Off-Road Driving
Remove any brush or debris that has collected on the
underbody, chassis or under the hood. These
accumulations can be a �re hazard.
After operation in mud or sand, have the brake linings
cleaned and checked. These substances can cause
glazing and uneven braking. Check the body structure,
steering, suspension, wheels, tires and exhaust
system for damage. Also, check the fuel lines and
cooling system for any leakage.
Your vehicle will require more frequent service due to
off-road use. Refer to the Maintenance Schedule
for additional information.
4-28
Page 281 of 470
If you drive regularly in steep country, or if you are
planning to visit there, here are some tips that can make
your trips safer and more enjoyable. SeeOperating
Your All-Wheel-Drive Vehicle Off Paved Roads on
page 4-16for information about driving off-road.
Keep your vehicle in good shape. Check all �uid
levels and also the brakes, tires, cooling system,
and transmission. These parts can work hard
on mountain roads.
Know how to go down hills. The most important
thing to know is this: let your engine do some of
the slowing down. Shift to a lower gear when you go
down a steep or long hill.
{CAUTION:
If you do not shift down, your brakes could get
so hot that they would not work well. You
would then have poor braking or even none
going down a hill. You could crash. Shift down
to let your engine assist your brakes on a
steep downhill slope.
{CAUTION:
Coasting downhill in NEUTRAL (N) or with the
ignition off is dangerous. Your brakes will have
to do all the work of slowing down. They could
get so hot that they would not work well. You
would then have poor braking or even none
going down a hill. You could crash. Always
have your engine running and your vehicle in
gear when you go downhill.
Know how to go uphill. You may want to shift down
to a lower gear. The lower gears help cool your
engine and transmission, and you can climb the
hill better.
Stay in your own lane when driving on two-lane
roads in hills or mountains. Do not swing wide
or cut across the center of the road. Drive at speeds
that let you stay in your own lane.
As you go over the top of a hill, be alert. There
could be something in your lane, like a stalled car or
an accident.
You may see highway signs on mountains that
warn of special problems. Examples are long
grades, passing or no-passing zones, a falling rocks
area, or winding roads. Be alert to these and take
appropriate action.
4-37
Page 293 of 470
Add-On Equipment
When you carry removable items, you may need to put
a limit on how many people you can carry inside
your vehicle. Be sure to weigh your vehicle before you
buy and install the new equipment.
Notice:Overloading your vehicle may cause
damage. Repairs would not be covered by your
warranty. Do not overload your vehicle.
Remember not to exceed the Gross Axle Weight
Rating (GAWR) of the front or rear axle. SeeLoading
Your Vehicle on page 4-44.
Automatic Level Control
The automatic level control rear suspension comes as a
part of the Road Sensing Suspension. SeeRoad
Sensing Suspension on page 4-8.
This type of level control is fully automatic and will
provide a better leveled riding position as well as better
handling under a variety of passenger and loading
conditions. An air compressor connected to the rear
shocks will raise or lower the rear of the vehicle
to maintain proper vehicle height. The system is
activated when the ignition key is turned to RUN and
will automatically adjust vehicle height thereafter.The system may exhaust (lower vehicle height) for up to
10 minutes after the ignition key has been turned to
LOCK. You may hear the air compressor operating
when the height is being adjusted.
If a weight-distributing hitch is being used, it is
recommended to allow the shocks to in�ate, thereby
leveling the vehicle prior to adjusting the height.
Towing
Towing Your Vehicle
Consult your dealer or a professional towing service if
you need to have your disabled vehicle towed. See
Roadside Service on page 7-5.
If you want to tow your vehicle behind another vehicle
for recreational purposes (such as behind a motorhome),
see Recreational Vehicle Towing following.
Recreational Vehicle Towing
Recreational vehicle towing means towing your vehicle
behind another vehicle — such as behind a motorhome.
The two most common types of recreational vehicle
towing are known as “dinghy towing” (towing your vehicle
with all four wheels on the ground) and “dolly towing”
(towing your vehicle with two wheels on the ground and
two wheels up on a device known as a “dolly”).
4-49
Page 323 of 470
How to Reset the Engine Oil Life
System
The Engine Oil Life System calculates when to change
your engine oil and �lter based on vehicle use.
Anytime your oil is changed, reset the system so it can
calculate when the next oil change is required. If a
situation occurs where you change your oil prior to a
CHANGE ENGINE OIL message being turned on, reset
the system.
To reset the CHANGE ENGINE OIL message, see
“Engine Oil Life System” underDIC Operation and
Displays on page 3-50for vehicles equipped with the
DIC, or do the following:
1. Turn the ignition key to RUN with the engine off.
2. Fully press and release the accelerator pedal slowly
three times within �ve seconds.
If the OIL LIFE RESET message �ashes for
10 seconds, the system is resetting.
3. Turn the key to LOCK.
If the CHANGE ENGINE OIL message comes back on
when you start your vehicle, the engine oil life system
has not reset. Repeat the procedure. If it still does
not reset, see your dealer for service.
What to Do with Used Oil
Used engine oil contains certain elements that may be
unhealthy for your skin and could even cause cancer.
Do not let used oil stay on your skin for very long. Clean
your skin and nails with soap and water, or a good
hand cleaner. Wash or properly dispose of clothing or
rags containing used engine oil. See the manufacturer’s
warnings about the use and disposal of oil products.
Used oil can be a threat to the environment. If you
change your own oil, be sure to drain all the oil from the
�lter before disposal. Never dispose of oil by putting it
in the trash, pouring it on the ground, into sewers, or into
streams or bodies of water. Instead, recycle it by
taking it to a place that collects used oil. If you have a
problem properly disposing of your used oil, ask
your dealer, a service station or a local recycling center
for help.
5-17
Page 341 of 470

Adding Washer Fluid
Your vehicle has a message that comes on when the
washer �uid is low. The message is displayed for
15 seconds at the start of each ignition cycle. When the
CHECK WASHER FLUID message is displayed, you
will need to add washer �uid to the windshield washer
�uid reservoir. SeeDIC Warnings and Messages
on page 3-53for more information.
Open the cap with the
washer symbol on it.
Add washer �uid until the
tank is full. SeeEngine
Compartment Overview on
page 5-12for reservoir
location.Notice:When using concentrated washer �uid,
follow the manufacturer’s instructions for
adding water.
Do not mix water with ready-to-use washer �uid.
Water can cause the solution to freeze and
damage your washer �uid tank and other parts
of the washer system. Also, water does not
clean as well as washer �uid.
Fill your washer �uid tank only three-quarters
full when it is very cold. This allows for
expansion if freezing occurs, which could
damage the tank if it is completely full.
Do not use engine coolant (antifreeze) in your
windshield washer. It can damage your washer
system and paint.
5-35
Page 347 of 470
Notice:If you leave your radio or other accessories
on during the jump starting procedure, they could
be damaged. The repairs would not be covered
by your warranty. Always turn off your radio and
other accessories when jump starting your vehicle.
3. Turn off the ignition on both vehicles. Unplug
unnecessary accessories plugged into the cigarette
lighter or accessory power outlets. Turn off the
radio and all lamps that are not needed. This will
avoid sparks and help save both batteries. And
it could save your radio!
4. Open the hoods and locate the positive (+) and
negative (−) terminal locations of the other vehicle.
Your vehicle has a remote positive (+) jump
starting terminal and a remote negative (−) jump
starting terminal. You should always use these
remote terminals instead of the terminals on the
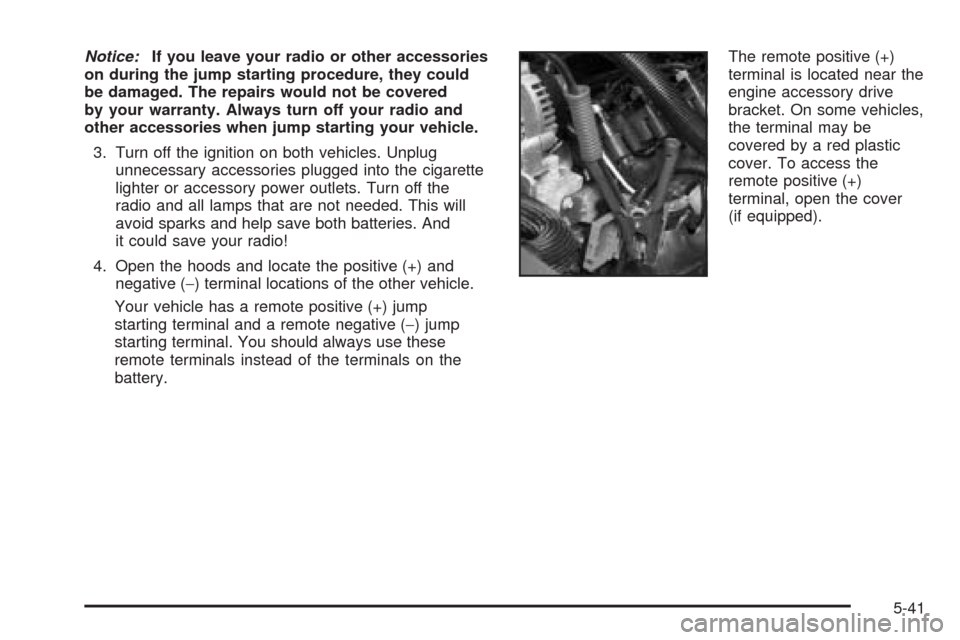
battery.The remote positive (+)
terminal is located near the
engine accessory drive
bracket. On some vehicles,
the terminal may be
covered by a red plastic
cover. To access the
remote positive (+)
terminal, open the cover
(if equipped).
5-41