high CADILLAC ESCALADE ESV 2009 Owners Manual
[x] Cancel search | Manufacturer: CADILLAC, Model Year: 2009, Model line: ESCALADE ESV, Model: CADILLAC ESCALADE ESV 2009Pages: 602, PDF Size: 5.18 MB
Page 5 of 602
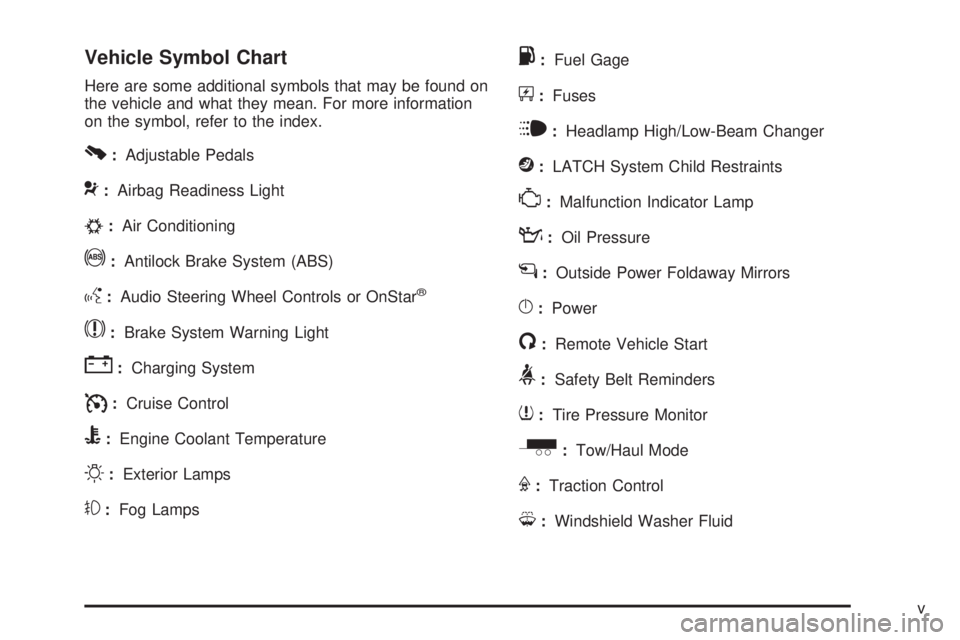
Vehicle Symbol Chart Here are some additional symbols that may be found on
the vehicle and what they mean. For more information
on the symbol, refer to the index.
0 : Adjustable Pedals
9 : Airbag Readiness Light
# : Air Conditioning
! : Antilock Brake System (ABS)
g : Audio Steering Wheel Controls or OnStar ®
$ : Brake System Warning Light
" : Charging System
I : Cruise Control
B : Engine Coolant Temperature
O : Exterior Lamps
# : Fog Lamps . : Fuel Gage
+ : Fuses
i : Headlamp High/Low-Beam Changer
j : LATCH System Child Restraints
* : Malfunction Indicator Lamp
: : Oil Pressure
g : Outside Power Foldaway Mirrors
} : Power
/ : Remote Vehicle Start
> : Safety Belt Reminders
7 : Tire Pressure Monitor
_ : Tow/Haul Mode
F : Traction Control
M : Windshield Washer Fluid
v
Page 11 of 602
Let go of the control when the lower seatback reaches
the desired level of support.
Your vehicle has a memory function which allows seat
settings to be saved and recalled. See Memory
Features on page 1-7 for more information.
Keep in mind that as your seating position changes, as
it may during long trips, so should the position of
your lumbar support. Adjust the seat as needed.
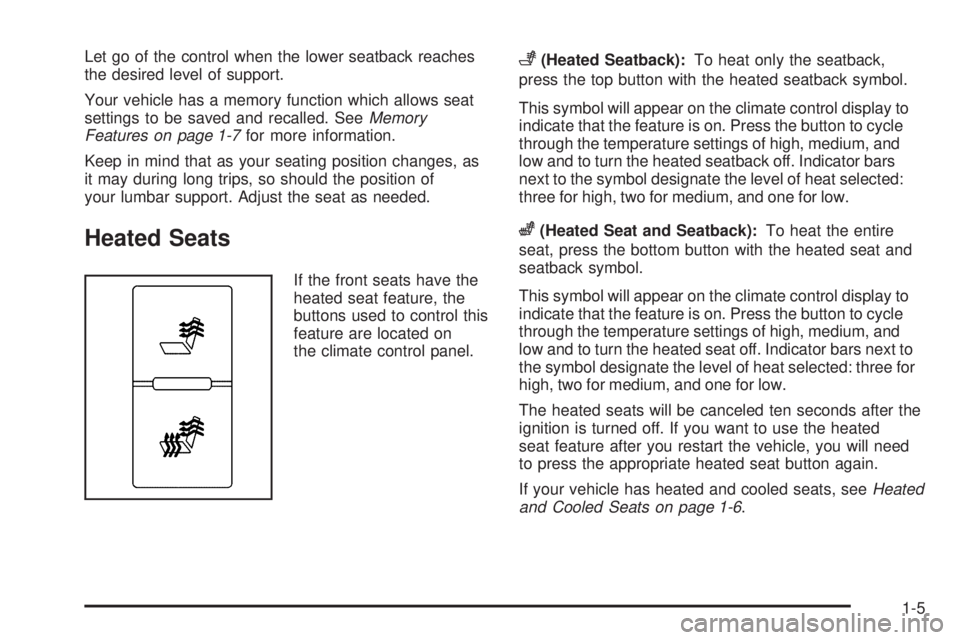
Heated Seats If the front seats have the
heated seat feature, the
buttons used to control this
feature are located on
the climate control panel. + (Heated Seatback): To heat only the seatback,
press the top button with the heated seatback symbol.
This symbol will appear on the climate control display to
indicate that the feature is on. Press the button to cycle
through the temperature settings of high, medium, and
low and to turn the heated seatback off. Indicator bars
next to the symbol designate the level of heat selected:
three for high, two for medium, and one for low.
z (Heated Seat and Seatback): To heat the entire
seat, press the bottom button with the heated seat and
seatback symbol.
This symbol will appear on the climate control display to
indicate that the feature is on. Press the button to cycle
through the temperature settings of high, medium, and
low and to turn the heated seat off. Indicator bars next to
the symbol designate the level of heat selected: three for
high, two for medium, and one for low.
The heated seats will be canceled ten seconds after the
ignition is turned off. If you want to use the heated
seat feature after you restart the vehicle, you will need
to press the appropriate heated seat button again.
If your vehicle has heated and cooled seats, see Heated
and Cooled Seats on page 1-6 .
1-5
Page 12 of 602
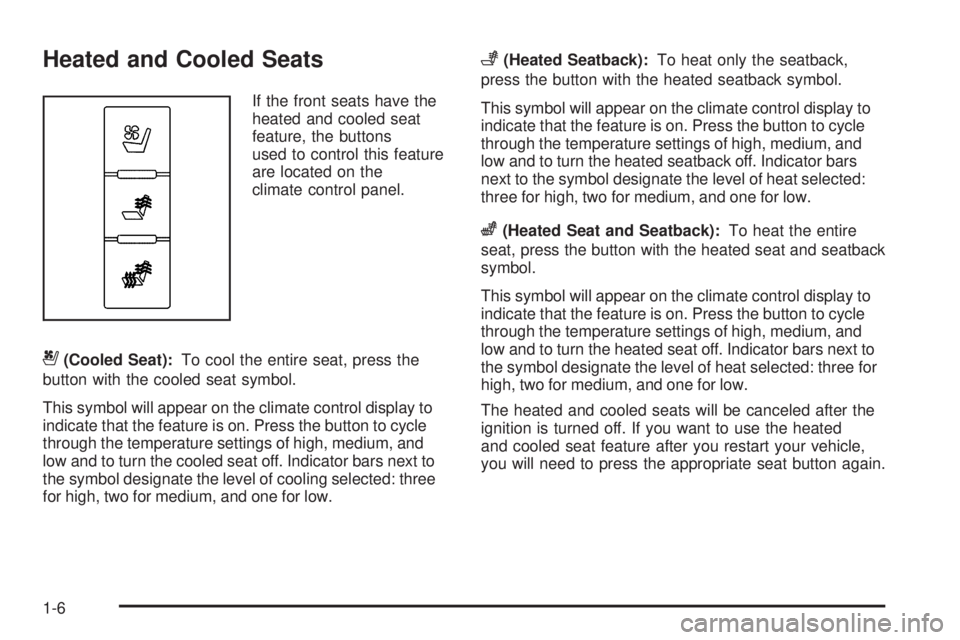
Heated and Cooled Seats If the front seats have the
heated and cooled seat
feature, the buttons
used to control this feature
are located on the
climate control panel.
{ (Cooled Seat): To cool the entire seat, press the
button with the cooled seat symbol.
This symbol will appear on the climate control display to
indicate that the feature is on. Press the button to cycle
through the temperature settings of high, medium, and
low and to turn the cooled seat off. Indicator bars next to
the symbol designate the level of cooling selected: three
for high, two for medium, and one for low. + (Heated Seatback): To heat only the seatback,
press the button with the heated seatback symbol.
This symbol will appear on the climate control display to
indicate that the feature is on. Press the button to cycle
through the temperature settings of high, medium, and
low and to turn the heated seatback off. Indicator bars
next to the symbol designate the level of heat selected:
three for high, two for medium, and one for low.
z (Heated Seat and Seatback): To heat the entire
seat, press the button with the heated seat and seatback
symbol.
This symbol will appear on the climate control display to
indicate that the feature is on. Press the button to cycle
through the temperature settings of high, medium, and
low and to turn the heated seat off. Indicator bars next to
the symbol designate the level of heat selected: three for
high, two for medium, and one for low.
The heated and cooled seats will be canceled after the
ignition is turned off. If you want to use the heated
and cooled seat feature after you restart your vehicle,
you will need to press the appropriate seat button again.
1-6
Page 16 of 602
Center Seat Your vehicle may have a front center seat. The seatback
doubles as an armrest and cupholder/storage area for the
driver and passenger when the center seat is not used.
Do not use it as a seating position when the seatback is
folded down.
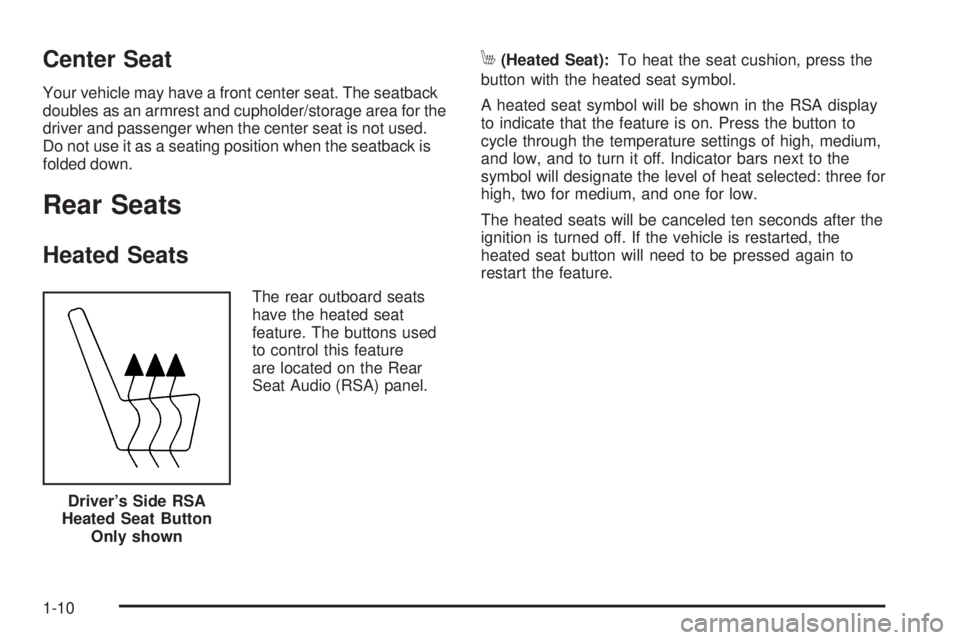
Rear Seats Heated Seats The rear outboard seats
have the heated seat
feature. The buttons used
to control this feature
are located on the Rear
Seat Audio (RSA) panel. M (Heated Seat): To heat the seat cushion, press the
button with the heated seat symbol.
A heated seat symbol will be shown in the RSA display
to indicate that the feature is on. Press the button to
cycle through the temperature settings of high, medium,
and low, and to turn it off. Indicator bars next to the
symbol will designate the level of heat selected: three for
high, two for medium, and one for low.
The heated seats will be canceled ten seconds after the
ignition is turned off. If the vehicle is restarted, the
heated seat button will need to be pressed again to
restart the feature.
Driver’s Side RSA
Heated Seat Button
Only shown
1-10
Page 41 of 602
How to Wear Safety Belts Properly This section is only for people of adult size.
Be aware that there are special things to know about
safety belts and children. And there are different
rules for smaller children and infants. If a child will be
riding in the vehicle, see Older Children on page 1-52 or
Infants and Young Children on page 1-55 . Follow
those rules for everyone’s protection.
It is very important for all occupants to buckle up.
Statistics show that unbelted people are hurt more often
in crashes than those who are wearing safety belts.
Occupants who are not buckled up can be thrown out of
the vehicle in a crash. And they can strike others in
the vehicle who are wearing safety belts.
First, before you or your passenger(s) wear a safety
belt, there is important information you should know.
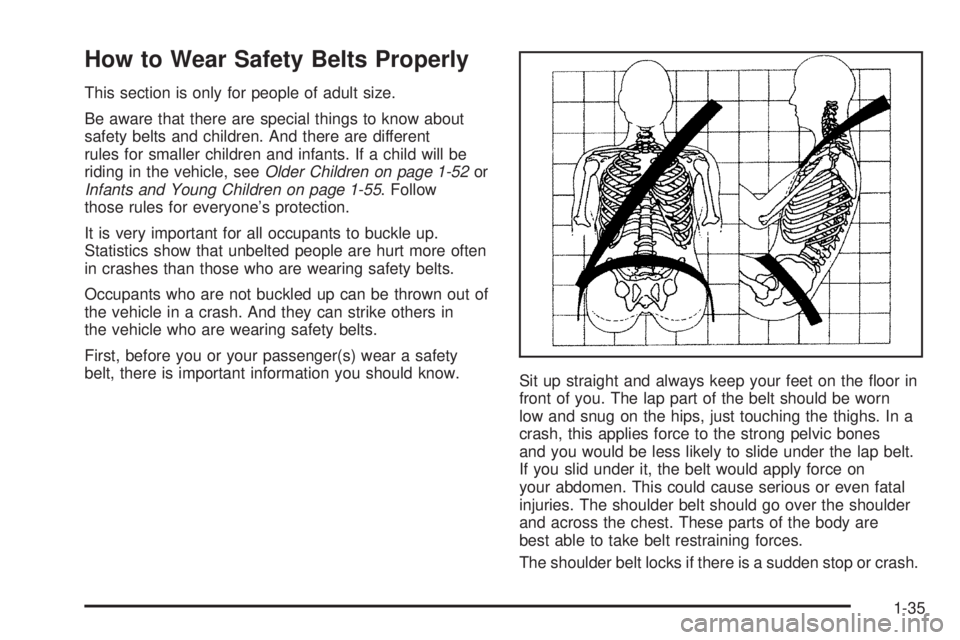
Sit up straight and always keep your feet on the oor in
front of you. The lap part of the belt should be worn
low and snug on the hips, just touching the thighs. In a
crash, this applies force to the strong pelvic bones
and you would be less likely to slide under the lap belt.
If you slid under it, the belt would apply force on
your abdomen. This could cause serious or even fatal
injuries. The shoulder belt should go over the shoulder
and across the chest. These parts of the body are
best able to take belt restraining forces.
The shoulder belt locks if there is a sudden stop or crash.
1-35
Page 43 of 602

Q: What is wrong with this?
A: The lap belt is too loose. It will not give nearly as
much protection this way. { CAUTION: You can be seriously hurt if your lap belt is too
loose. In a crash, you could slide under the lap
belt and apply force on your abdomen. This could
cause serious or even fatal injuries. The lap belt
should be worn low and snug on the hips, just
touching the thighs.
1-37
Page 45 of 602

Q: What is wrong with this?
A: The belt is over an armrest. { CAUTION: You can be seriously injured if your belt goes over
an armrest like this. The belt would be much too
high. In a crash, you can slide under the belt. The
belt force would then be applied on the abdomen,
not on the pelvic bones, and that could cause
serious or fatal injuries. Be sure the belt goes
under the armrests.
1-39
Page 58 of 602

Child Restraints Older Children
Older children who have outgrown booster seats should
wear the vehicle’s safety belts. The manufacturer’s instructions that come with the
booster seat, state the weight and height limitations for
that booster. Use a booster seat with a lap-shoulder
belt until the child passes the below t test:
Sit all the way back on the seat. Do the knees bend
at the seat edge? If yes, continue. If no, return to
the booster seat.
Buckle the lap-shoulder belt. Does the shoulder belt
rest on the shoulder? If yes, continue. If no, try
using the rear safety belt comfort guide. See “Rear
Safety Belt Comfort Guides” under Lap-Shoulder
Belt on page 1-43 for more information. If the
shoulder belt still does not rest on the shoulder,
then return to the booster seat.
Does the lap belt t low and snug on the hips,
touching the thighs? If yes, continue. If no, return to
the booster seat.
Can proper safety belt t be maintained for
length of trip? If yes, continue. If no, return to the
booster seat.
If you have the choice, a child should sit in a position
with a lap-shoulder belt and get the additional restraint a
shoulder belt can provide.
1-52
Page 59 of 602

Q: What is the proper way to wear safety belts?
A: An older child should wear a lap-shoulder belt and
get the additional restraint a shoulder belt can
provide. The shoulder belt should not cross the face
or neck. The lap belt should t snugly below the hips,
just touching the top of the thighs. This applies belt
force to the child’s pelvic bones in a crash. It should
never be worn over the abdomen, which could cause
severe or even fatal internal injuries in a crash.
Also see “Rear Safety Belt Comfort Guides” under
Lap-Shoulder Belt on page 1-43 .
According to accident statistics, children and infants are
safer when properly restrained in the rear seating
positions than in the front seating positions.
In a crash, children who are not buckled up can strike
other people who are buckled up, or can be thrown
out of the vehicle. Older children need to use safety
belts properly. { CAUTION: Never do this.
Never allow two children to wear the same safety
belt. The safety belt can not properly spread the
impact forces. In a crash, the two children can be
crushed together and seriously injured. A safety
belt must be used by only one person at a time.
1-53
Page 106 of 602
Remote Keyless Entry (RKE)
System The Remote Keyless Entry (RKE) system operates on a
radio frequency subject to Federal Communications
Commission (FCC) Rules and with Industry Canada.
This device complies with Part 15 of the FCC Rules.
Operation is subject to the following two conditions:
1. This device may not cause interference.
2. This device must accept any interference received,
including interference that may cause undesired
operation of the device.
This device complies with RSS-210 of Industry Canada.
Operation is subject to the following two conditions:
1. This device may not cause interference.
2. This device must accept any interference received,
including interference that may cause undesired
operation of the device. Changes or modications to this system by other than
an authorized service facility could void authorization to
use this equipment.
If there is a decrease in the RKE operating range, try this:
Check the distance. The transmitter may be too far
from the vehicle. Stand closer during rainy or snowy
weather.
Check the location. Other vehicles or objects may be
blocking the signal. Take a few steps to the left or
right, hold the transmitter higher, and try again.
Check the transmitter’s battery. See “Battery
Replacement” later in this section.
If the transmitter is still not working correctly, see
your dealer/retailer or a qualied technician for
service.
2-4