remote start CADILLAC ESCALADE ESV 2012 User Guide
[x] Cancel search | Manufacturer: CADILLAC, Model Year: 2012, Model line: ESCALADE ESV, Model: CADILLAC ESCALADE ESV 2012Pages: 538, PDF Size: 8.42 MB
Page 45 of 538

Black plate (13,1)Cadillac Escalade/Escalade ESV Owner Manual - 2012 - 2nd CRC - 11/29/11
Keys, Doors, and Windows 2-13
Vehicle Security This vehicle has theft-deterrent
features; however, they do not make
it impossible to steal.
Anti-theft Alarm System Your vehicle has a content
theft-deterrent alarm system.
This is the security light.
To arm the theft-deterrent system:
1. Open the door.
2. Lock the door with the Remote
Keyless Entry (RKE) transmitter
or the power door lock switch. The security light will come on to
inform the driver the system is
arming. If a door is open when
the doors are locked, the
security light will flash.
If the delayed locking feature is
turned on, the theft ‐ deterrent
system will not start the arming
process until the last door is
closed and the delay timer has
expired. See Delayed Locking
on page 2 ‑ 8 .
3. Close all doors. The security
light should go off after about
30 seconds. The alarm is not
armed until the security light
goes off.
If a locked driver door is opened
without using the RKE transmitter, a
10-second pre-alarm will occur. The
horn will chirp and the lights will
flash. If the key is not placed in the
ignition and turned to START or the
door is not unlocked by pressing the
unlock button on the RKE
transmitter during the 10-second pre-alarm, the alarm will go off. Your
vehicle's headlamps will flash and
the horn will sound for about
30 seconds, then will turn off to save
the battery power.
The theft-deterrent system will not
activate if the doors are locked with
the vehicle's key or the manual door
lock. It activates only if you use the
power door lock switch with the door
open or the RKE transmitter. You
should also remember that you can
start your vehicle with the correct
ignition key if the alarm has been
set off.
To avoid setting off the alarm by
accident: .
If you do not want to activate the
theft-deterrent system, the
vehicle should be locked with
the door key after the doors are
closed. .
Always unlock the doors with the
RKE transmitter. Unlocking a
door any other way will set off
the alarm if it is armed.
Page 87 of 538

Black plate (33,1)Cadillac Escalade/Escalade ESV Owner Manual - 2012 - 2nd CRC - 11/29/11
Seats and Restraints 3-33In many crashes severe enough to
inflate the airbag, windshields are
broken by vehicle deformation.
Additional windshield breakage may
also occur from the right front
passenger airbag. .
Airbags are designed to inflate
only once. After an airbag
inflates, you will need some new
parts for the airbag system.
If you do not get them, the
airbag system will not be there
to help protect you in another
crash. A new system will include
airbag modules and possibly
other parts. The service manual
for your vehicle covers the need
to replace other parts. .
The vehicle has a crash sensing
and diagnostic module which
records information after a
crash. See Vehicle Data
Recording and Privacy on
page 13 ‑ 19 and Event Data
Recorders on page 13 ‑ 19 . .
Let only qualified technicians
work on the airbag systems.
Improper service can mean that
an airbag system will not work
properly. See your dealer for
service.
Passenger Sensing
System If the vehicle has the passenger
airbag status indicator pictured in
the following illustration, then the
vehicle has a passenger sensing
system for the right front passenger
position. The passenger airbag
status indicator, if equipped, is
visible on the overhead console
when the vehicle is started.
In addition, if the vehicle has a
passenger sensing system for the
right front passenger position, the
label on the vehicle's sun visors
refers to “ ADVANCED AIRBAGS ” . United States
Canada and Mexico
The words ON and OFF, or the
symbols for on and off, will be
visible during the system check.
If you are using remote start,
if equipped, to start the vehicle from
a distance, you may not see the
system check. When the system
check is complete, either the word
ON or OFF, or the symbol for on or
off, will be visible. See Passenger
Airbag Status Indicator on
page 5 ‑ 14 .
Page 135 of 538

Black plate (15,1)Cadillac Escalade/Escalade ESV Owner Manual - 2012 - 2nd CRC - 11/29/11
Instruments and Controls 5-15
United States
Canada and Mexico
When the vehicle is started, the
passenger airbag status indicator
will light ON and OFF, or the
symbols for on and off, for several
seconds as a system check. If you
are using remote start, if equipped,
to start the vehicle from a distance,
you may not see the system check. Then, after several more seconds,
the status indicator will light either
ON or OFF, or either the on or off
symbol to let you know the status of
the right front passenger frontal
airbag.
If the word ON or the on symbol is
lit on the passenger airbag status
indicator, it means that the right
front passenger frontal airbag is
enabled (may inflate).
If the word OFF or the off symbol is
lit on the airbag status indicator, it
means that the passenger sensing
system has turned off the right front
passenger frontal airbag.
If, after several seconds, both
status indicator lights remain on,
or if there are no lights at all, there
may be a problem with the lights or
the passenger sensing system.
See your dealer for service. { WARNINGIf the airbag readiness light ever
comes on and stays on, it means
that something may be wrong
with the airbag system. To help
avoid injury to yourself or others,
have the vehicle serviced right
away. See Airbag Readiness
Light on page 5 ‑ 14 for more
information, including important
safety information.
Page 165 of 538

Black plate (45,1)Cadillac Escalade/Escalade ESV Owner Manual - 2012 - 2nd CRC - 11/29/11
Instruments and Controls 5-45ON: The driver seat, and on some
vehicles, the outside mirrors will
automatically move to the stored
driving position when the unlock
button on the Remote Keyless
Entry (RKE) transmitter is pressed.
On some vehicles with the
adjustable throttle and brake pedal
feature, the pedals will also
automatically move.
NO CHANGE: No change will be
made to this feature. The current
setting will remain.
To select a setting, press the
set/reset button while the desired
setting is displayed on the DIC.
REMOTE START
If your vehicle has this feature, it
allows you to turn the remote start
off or on. The remote start feature
allows you to start the engine from
outside of the vehicle using the Remote Keyless Entry (RKE)
transmitter. See Remote Vehicle
Start on page 2 ‑ 5 for more
information.
Press the customization button until
REMOTE START appears on the
DIC display. Press the set/reset
button once to access the settings
for this feature. Then press the
customization button to scroll
through the following settings:
OFF: The remote start feature will
be disabled.
ON (default): The remote start
feature will be enabled.
NO CHANGE: No change will be
made to this feature. The current
setting will remain.
To select a setting, press the
set/reset button while the desired
setting is displayed on the DIC. DISPLAY DIGITAL SPEED
This feature allows you to enable or
disable the digital speedometer on
the DIC.
Press the customization button
until DISPLAY DIGITAL SPEED
appears on the DIC display. Press
the set/reset button once to access
the settings for this feature. Then
press the customization button to
scroll through the following settings:
OFF: The digital speedometer will
be disabled.
ON (default): The digital
speedometer will be enabled.
NO CHANGE: No change will be
made to this feature. The current
setting will remain.
To select a setting, press the
set/reset button while the desired
setting is displayed on the DIC.
Page 167 of 538

Black plate (47,1)Cadillac Escalade/Escalade ESV Owner Manual - 2012 - 2nd CRC - 11/29/11
Instruments and Controls 5-47This system provides a way to
replace up to three remote control
transmitters used to activate
devices such as garage door
openers, security systems, and
home automation devices.
Do not use this system with any
garage door opener that does not
have the stop and reverse feature.
This includes any garage door
opener model manufactured before
April 1, 1982.
Read the instructions completely
before attempting to program the
transmitter. Because of the steps
involved, it may be helpful to have
another person assist with
programming the transmitter.
Be sure to keep the original remote
control transmitter for use in other
vehicles, as well as for future
programming. Only the original
remote control transmitter is needed
for Fixed Code programming. The programmed buttons should be
erased when the vehicle is sold or
the lease ends. See “ Erasing
Universal Home Remote Buttons ”
in this section.
Park the vehicle outside of the
garage when programming a garage
door. Be sure that people and
objects are clear of the garage door
or gate that is being programmed.
Programming Universal Home
Remote — Rolling CodeFor questions or help programming
the Universal Home Remote
System, call 1-866-572-2728 or
go to www.learcar2u.com.
Most garage door openers sold
after 1996 are Rolling Code units. Programming a garage door opener
involves time-sensitive actions, so
read the entire procedure before
starting. Otherwise, the device will
time out and the procedure will have
to be repeated.
To program up to three devices:
1. From inside the vehicle,
press the two outside buttons
at the same time for one to
two seconds, and immediately
release them.
Page 169 of 538

Black plate (49,1)Cadillac Escalade/Escalade ESV Owner Manual - 2012 - 2nd CRC - 11/29/11
Instruments and Controls 5-49Programming a garage door opener
involves time-sensitive actions, so
read the entire procedure before
starting. Otherwise, the device will
time out and the procedure will have
to be repeated.
To program up to three devices:
1. To verify that the garage door
opener is a Fixed Code unit,
remove the battery cover on the
hand-held transmitter supplied
by the manufacturer of the
garage door opener motor. If there is a row of dip switches
similar to the graphic above,
the garage door opener is a
Fixed Code unit. If you do not
see a row of dip switches,
return to the previous section for
Programming Universal Home
Remote — Rolling Code.
Your hand-held transmitter
can have between 8 to 12 dip
switches depending on the
brand of transmitter.
The garage door opener receiver
(motor head unit) could also
have a row of dip switches that
can be used when programming
the Universal Home Remote. If the total number of switches
on the motor head and
hand-held transmitter are
different, or if the dip switch
settings are different, use the
dip switch settings on the motor
head unit to program the
Universal Home Remote.
The motor head dip switch
settings can also be used when
the original hand-held transmitter
is not available.
Page 200 of 538

Black plate (18,1)Cadillac Escalade/Escalade ESV Owner Manual - 2012 - 2nd CRC - 11/29/11
7-18 Infotainment System If a cellular telephone antenna
needs to be attached to the glass,
make sure that the grid lines for the
AM-FM antenna are not damaged.
There is enough space between the
grid lines to attach a cellular
telephone antenna without
interfering with radio reception.
Notice: Using a razor blade or
sharp object to clear the inside of
the rear side windows may affect
radio reception or damage the
rear side window antenna.
Repairs would not be covered by
the warranty. Do not clear the
inside of the rear side windows
with sharp objects. Notice: Do not apply aftermarket
glass tinting with metallic film.
The metallic film in some tinting
materials will interfere with or
distort the incoming radio
reception. Any damage caused to
the antenna due to metallic tinting
materials will not be covered by
the warranty.
Satellite Radio Antenna The XM Satellite Radio antenna is
located on the roof of the vehicle.
Keep the antenna clear of
obstructions for clear radio
reception.
If the vehicle has a sunroof, the
performance of the XM system
(if equipped) may be affected if
the sunroof is open. Audio Players CD/DVD Player The player can be used for CD,
MP3, and as a DVD video player.
Read this section for more
information about DVD video.
When playing an audio CD the rear
seat operator can power on the
RSE video screen and use the
remote control to navigate through
the tracks on the CD.
CD Player While playing a CD, the navigation
system is available.
When you insert a CD, the CD tab
displays. If a DSP setting is
selected for the CD, it activates
each time you play a CD.
If the ignition or radio is turned off
with a CD in the player, it stays in
the player. When the ignition or
radio is turned on, the CD starts
playing where it stopped, if it was
the last selected audio source.
Page 202 of 538

Black plate (20,1)Cadillac Escalade/Escalade ESV Owner Manual - 2012 - 2nd CRC - 11/29/11
7-20 Infotainment System
y /
© or
¨ /
z (Seek/Scan):
1. To seek tracks, press the up
arrow to go to the next track.
2. Press the down arrow to go to
the start of the current track,
if more than eight seconds have
played.
3. If either arrow is pressed more
than once, the player continues
moving backward or forward
through the CD. The sound
mutes while seeking.
w (Tuning Knob):
1. Turn counterclockwise one notch
to go to the start of the current
track, turn it again to go to the
previous track.
2. Turn clockwise to go to the next
track.
Playing a DVD
DVD video does not display on the
navigation screen unless the vehicle
is in P (Park). It will operate on the
rear seat entertainment screens
while the vehicle is moving. The Rear Seat Entertainment (RSE)
video screen starts play of the DVD
when a DVD video has been
inserted into the CD/DVD slot. The
DVD player can be controlled by the
buttons on the navigation system,
the Rear Seat Audio (RSA) system,
and the remote control. The DVD
player can also be used for the rear
seat passengers with the radio off.
The rear seat passengers can
power on the video screen and use
the remote control to navigate the
disc. See the Rear Seat
Infotainment user guide for more
information.
The DVD player is only compatible
with DVDs of the appropriate region
code that is printed on the jacket of
most DVDs.
The CD/DVD slot is compatible with
most audio CDs, CD-R, CD-RW,
DVD-Video, DVD-R/RW,
DVD+R/RW media along with
MP3 and WMA formats. If an error appears on the display,
see “ CD/DVD Messages ” in this
section.
Once a DVD starts to play, the
menu options and cursor screen
buttons will automatically appear. To
display the menu Options screen
button while a DVD is playing, touch
anywhere on the screen.
There are three ways to play
a DVD: .
Once a DVD is inserted, the
system will automatically start
play of the DVD. .
If you are on a map screen,
press the DVD screen button. .
Press AUDIO, then press the
DVD screen button.
When a DVD is loaded, the rear
seat passengers can power on the
RSE video screen and use the
remote control to navigate through
the DVD.
Page 212 of 538

Black plate (30,1)Cadillac Escalade/Escalade ESV Owner Manual - 2012 - 2nd CRC - 11/29/11
7-30 Infotainment System artist, or album. It may take a
few minutes for the system to
sort the MP3.
y /
© or
¨ /
z (Seek/Scan):
1. To seek tracks, press the up
arrow to go to the next track.
2. Press the down arrow to go to
the start of the current track,
if more than eight seconds have
played.
3. If either arrow is pressed more
than once, the player continues
moving backward or forward
through the CD. The sound
mutes while seeking.
w (Tuning Knob):
1. Turn counterclockwise one notch
to go to the start of the current
track, turn it again to go to the
previous track.
2. Turn clockwise to go to the next
track. When playing an MP3 the rear seat
operator can power on the RSE
video screen and use the remote
control to navigate through the MP3.
Auxiliary Devices Using the Auxiliary Input Jack The navigation system has an
auxiliary input jack located on the
faceplate and in the center console.
This is not an audio output; do not
plug the headphone set into the
front auxiliary input jack. An external
audio device such as an iPod,
laptop computer, MP3 player, CD
player, or cassette tape player, etc.
can be connected to the auxiliary
input jack for use as another audio
source.
Drivers are encouraged to set up
any auxiliary device while the
vehicle is in P (Park). See Defensive
Driving on page 9 ‑ 3 for more
information on driver distraction. To use a portable audio player,
connect a 1/8 in (3.5 mm) cable to
the radio's front auxiliary input jack.
When a device is connected, press
AUDIO, then press AUDIO again
until AUX is selected or press the
AUX screen button to begin playing
audio from the device over the
vehicle speakers.
For optimal sound quality, increase
the portable audio device's volume
to the loudest level.
It is always best to power the
portable audio device through its
own battery while playing.
The vehicle may have a rear
entertainment system (RSE) with a
second and third row screen. The
RSE has audio adapters to allow
you to connect auxiliary devices.
The audio can be heard through the
speakers or through the wireless or
wired headphones. See the Rear
Seat Infotainment user guide for
more information.
Page 218 of 538

Black plate (36,1)Cadillac Escalade/Escalade ESV Owner Manual - 2012 - 2nd CRC - 11/29/11
7-36 Infotainment System Notice: Avoid directly touching
the video screen, as damage may
occur. See “ Cleaning the Video
Screens ” later in this section for
more information.
Remote Control
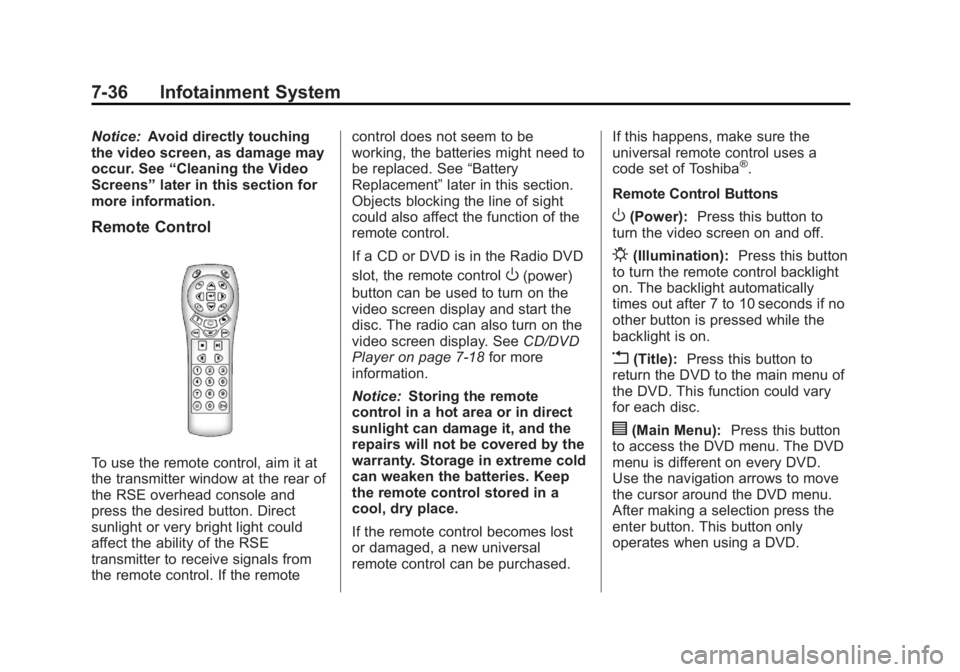
To use the remote control, aim it at
the transmitter window at the rear of
the RSE overhead console and
press the desired button. Direct
sunlight or very bright light could
affect the ability of the RSE
transmitter to receive signals from
the remote control. If the remote control does not seem to be
working, the batteries might need to
be replaced. See “ Battery
Replacement ” later in this section.
Objects blocking the line of sight
could also affect the function of the
remote control.
If a CD or DVD is in the Radio DVD
slot, the remote control
O (power)
button can be used to turn on the
video screen display and start the
disc. The radio can also turn on the
video screen display. See CD/DVD
Player on page 7 ‑ 18 for more
information.
Notice: Storing the remote
control in a hot area or in direct
sunlight can damage it, and the
repairs will not be covered by the
warranty. Storage in extreme cold
can weaken the batteries. Keep
the remote control stored in a
cool, dry place.
If the remote control becomes lost
or damaged, a new universal
remote control can be purchased. If this happens, make sure the
universal remote control uses a
code set of Toshiba ®
.
Remote Control Buttons
O (Power): Press this button to
turn the video screen on and off.
P (Illumination): Press this button
to turn the remote control backlight
on. The backlight automatically
times out after 7 to 10 seconds if no
other button is pressed while the
backlight is on.
v (Title): Press this button to
return the DVD to the main menu of
the DVD. This function could vary
for each disc.
y (Main Menu): Press this button
to access the DVD menu. The DVD
menu is different on every DVD.
Use the navigation arrows to move
the cursor around the DVD menu.
After making a selection press the
enter button. This button only
operates when using a DVD.