lights CADILLAC ESCALADE ESV 2014 Owner's Guide
[x] Cancel search | Manufacturer: CADILLAC, Model Year: 2014, Model line: ESCALADE ESV, Model: CADILLAC ESCALADE ESV 2014Pages: 508, PDF Size: 7.64 MB
Page 245 of 508
Black plate (73,1)Cadillac Escalade/Escalade ESV Owner Manual (GMNA-Localizing-U.S./
Canada/Mexico-6081529) - 2014 - CRC 1st Edition - 4/23/13
Infotainment System 7-73
6. Select the route preference forFastest, Shortest, or Other. The
system calculates and highlights
the route.
7. Press Start Guidance. The route is now ready to be started.
See “Getting Started on Your
Route” in this section for more
information.
To use the point of interest
destination entry method by
selecting a category:
1. Press DEST.
2. Press
i.
3. Press Browse POI Categories to view the list of POI categories.
4. Select a category. The system displays available
POI names in the selected
category.
5. Press GO, located next to the POI. The map screen, with the
destination marked displays. 6. Select the route preference for
Fastest, Shortest, or Other. The
system calculates and highlights
the route.
7. Press Start Guidance. The route is now ready to be started.
See “Getting Started on Your
Route” in this section for more
information.
To use the point of interest
destination entry method by
selecting to do a franchise search:
1. Press DEST.
2. Pressi.
3. Press Franchise Search to view a list of franchise categories.
4. Select a category. The system displays available
POI names in the selected
category.
5. Press GO, located next to the POI. The map screen, with the
destination marked displays. 6. Select the route preference for
Fastest, Shortest, or Other. The
system calculates and highlights
the route.
7. Press Start Guidance. The route is now ready to be started.
See “Getting Started on Your
Route” in this section for more
information.
Address Book
The address book entry method lets
you select a destination by selecting
an address that has been stored in
the address book.
Page 246 of 508
Black plate (74,1)Cadillac Escalade/Escalade ESV Owner Manual (GMNA-Localizing-U.S./
Canada/Mexico-6081529) - 2014 - CRC 1st Edition - 4/23/13
7-74 Infotainment System
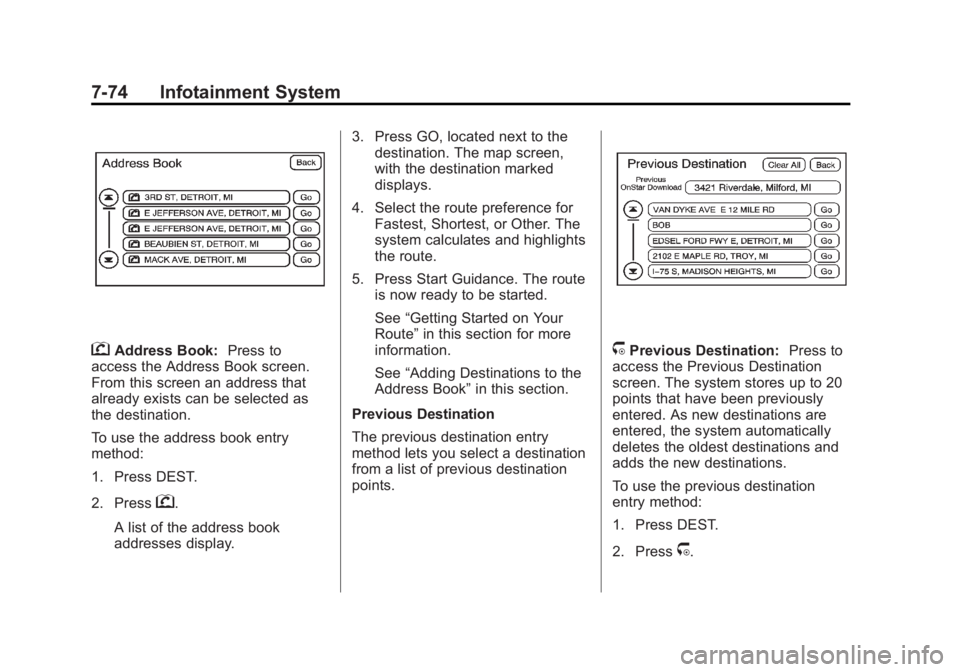
gAddress Book:Press to
access the Address Book screen.
From this screen an address that
already exists can be selected as
the destination.
To use the address book entry
method:
1. Press DEST.
2. Press
g.
A list of the address book
addresses display. 3. Press GO, located next to the
destination. The map screen,
with the destination marked
displays.
4. Select the route preference for Fastest, Shortest, or Other. The
system calculates and highlights
the route.
5. Press Start Guidance. The route is now ready to be started.
See “Getting Started on Your
Route” in this section for more
information.
See “Adding Destinations to the
Address Book” in this section.
Previous Destination
The previous destination entry
method lets you select a destination
from a list of previous destination
points.
/Previous Destination: Press to
access the Previous Destination
screen. The system stores up to 20
points that have been previously
entered. As new destinations are
entered, the system automatically
deletes the oldest destinations and
adds the new destinations.
To use the previous destination
entry method:
1. Press DEST.
2. Press
/.
Page 247 of 508
Black plate (75,1)Cadillac Escalade/Escalade ESV Owner Manual (GMNA-Localizing-U.S./
Canada/Mexico-6081529) - 2014 - CRC 1st Edition - 4/23/13
Infotainment System 7-75
3. Select a previous destinationfrom the list. Use the arrow to
the right of the destination to
view the entire destination name
as necessary. Use the scroll
arrows to the left to scroll
through the list.
4. Press GO, located next to the destination. The map screen,
with the destination marked
displays.
5. Select the route preference for Fastest, Shortest, or Other. The
system calculates and highlights
the route.
6. Press Start Guidance. The route is now ready to be started.
See “Getting Started on Your
Route” in this section for more
information.
From Map
This destination entry method allows
you to select a destination by
scrolling on the map.
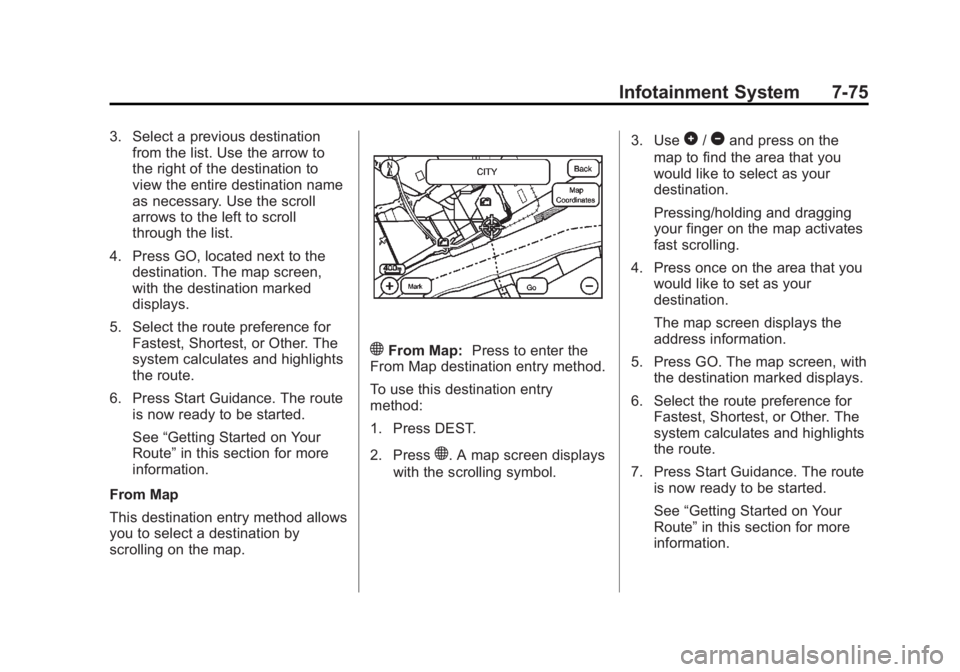
)From Map: Press to enter the
From Map destination entry method.
To use this destination entry
method:
1. Press DEST.
2. Press
). A map screen displays
with the scrolling symbol. 3. Use
0/1and press on the
map to find the area that you
would like to select as your
destination.
Pressing/holding and dragging
your finger on the map activates
fast scrolling.
4. Press once on the area that you would like to set as your
destination.
The map screen displays the
address information.
5. Press GO. The map screen, with the destination marked displays.
6. Select the route preference for Fastest, Shortest, or Other. The
system calculates and highlights
the route.
7. Press Start Guidance. The route is now ready to be started.
See “Getting Started on Your
Route” in this section for more
information.
Page 248 of 508
Black plate (76,1)Cadillac Escalade/Escalade ESV Owner Manual (GMNA-Localizing-U.S./
Canada/Mexico-6081529) - 2014 - CRC 1st Edition - 4/23/13
7-76 Infotainment System
Map Coordinates
The coordinates destination entry
method lets you select a destination
by entering latitude and longitude
coordinates.
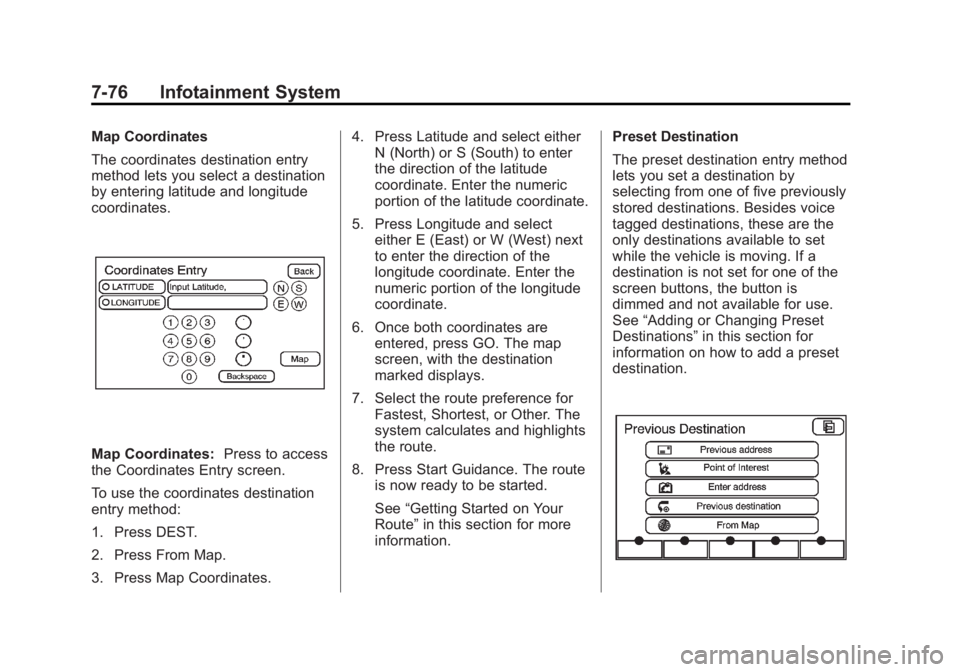
Map Coordinates:Press to access
the Coordinates Entry screen.
To use the coordinates destination
entry method:
1. Press DEST.
2. Press From Map.
3. Press Map Coordinates. 4. Press Latitude and select either
N (North) or S (South) to enter
the direction of the latitude
coordinate. Enter the numeric
portion of the latitude coordinate.
5. Press Longitude and select either E (East) or W (West) next
to enter the direction of the
longitude coordinate. Enter the
numeric portion of the longitude
coordinate.
6. Once both coordinates are entered, press GO. The map
screen, with the destination
marked displays.
7. Select the route preference for Fastest, Shortest, or Other. The
system calculates and highlights
the route.
8. Press Start Guidance. The route is now ready to be started.
See “Getting Started on Your
Route” in this section for more
information. Preset Destination
The preset destination entry method
lets you set a destination by
selecting from one of five previously
stored destinations. Besides voice
tagged destinations, these are the
only destinations available to set
while the vehicle is moving. If a
destination is not set for one of the
screen buttons, the button is
dimmed and not available for use.
See
“Adding or Changing Preset
Destinations” in this section for
information on how to add a preset
destination.
Page 249 of 508
Black plate (77,1)Cadillac Escalade/Escalade ESV Owner Manual (GMNA-Localizing-U.S./
Canada/Mexico-6081529) - 2014 - CRC 1st Edition - 4/23/13
Infotainment System 7-77
To use the preset destination entry
method:
1. Press DEST.
2. Select the desired presetdestination screen button. The
screen buttons are labeled with
the name that was selected for
the destination when it was
stored. The map screen, with the
destination marked displays.
3. Select the route preference for Fastest, Shortest, or Other. The
system calculates and highlights
the route.
4. Press Start Guidance. The route is now ready to be started.
See “Getting Started on Your
Route” in this section for more
information.
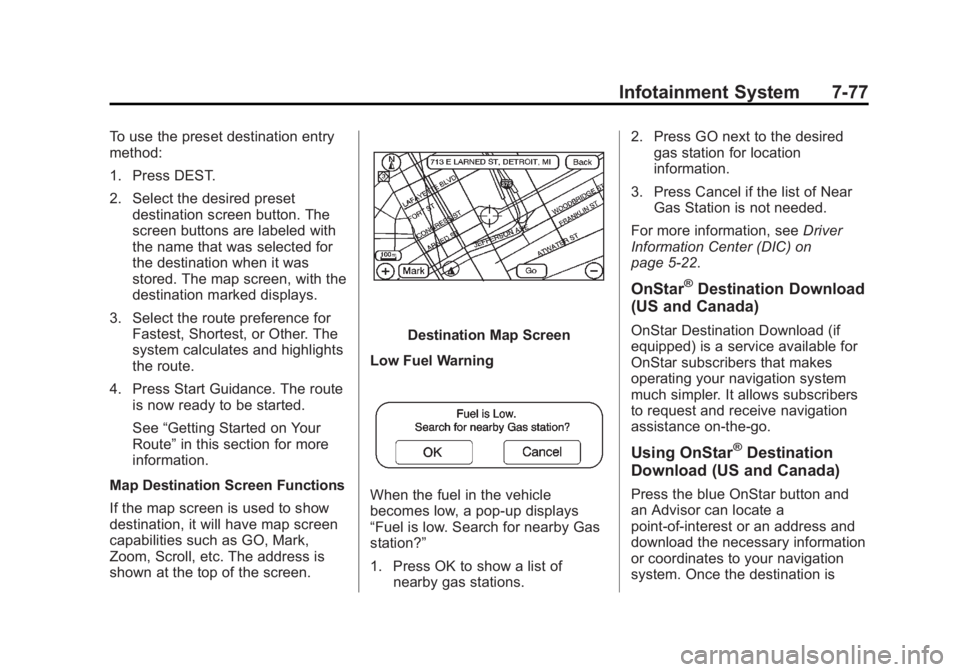
Map Destination Screen Functions
If the map screen is used to show
destination, it will have map screen
capabilities such as GO, Mark,
Zoom, Scroll, etc. The address is
shown at the top of the screen.
Destination Map Screen
Low Fuel Warning
When the fuel in the vehicle
becomes low, a pop-up displays
“Fuel is low. Search for nearby Gas
station?”
1. Press OK to show a list of nearby gas stations. 2. Press GO next to the desired
gas station for location
information.
3. Press Cancel if the list of Near Gas Station is not needed.
For more information, see Driver
Information Center (DIC) on
page 5-22.
OnStar®Destination Download
(US and Canada)
OnStar Destination Download (if
equipped) is a service available for
OnStar subscribers that makes
operating your navigation system
much simpler. It allows subscribers
to request and receive navigation
assistance on-the-go.
Using OnStar®Destination
Download (US and Canada)
Press the blue OnStar button and
an Advisor can locate a
point-of-interest or an address and
download the necessary information
or coordinates to your navigation
system. Once the destination is
Page 253 of 508
Black plate (81,1)Cadillac Escalade/Escalade ESV Owner Manual (GMNA-Localizing-U.S./
Canada/Mexico-6081529) - 2014 - CRC 1st Edition - 4/23/13
Infotainment System 7-81
the current route between the start
point and final destination. Once a
stopover has been added, the
points can be edited or deleted.
To add a stopover:
1. Press DEST.
2. Press the Add Stopover screenbutton. This button only appears
if a route has been calculated.
3. Using the desired method of entering a destination, enter the
stopover. See “Destination”
previously for more information.
4. Select the route preference for Fastest, Shortest, or Other. The
system calculates and highlights
the route.
5. Press Start Guidance. The route is now ready to be started.
6. To add the second and third stopovers, press DEST, then
press the Add screen button,
where the next waypoint should
appear on the route. 7. Select the route preference for
Fastest, Shortest, or Other. The
system calculates and highlights
the route.
8. Press Start Guidance. The route is now ready to be started.
To delete a stopover from the
current route:
1. Press DEST.
2. Press Delete for the desired stopover to delete.
3. The system displays a pop-up confirmation message. Press
Yes to delete the stopover; press
No to cancel this operation.
4. Select the route preference for Fastest, Shortest, or Other. The
system calculates and highlights
the route.
5. Press Start Guidance. The route is now ready to be started.
Suspend Guidance
Press this screen button, from the
Route screen, to put the current
route on hold. Resume Guidance
Press this screen button, from the
Route screen, to resume guidance
on the current route.
Cancel Guidance
Press this screen button, from the
Route screen, to cancel the current
route.
Adding Destinations to the
Address Book
There are two ways to add a
destination to the address book:
.To add the current vehicle
position to the address book,
press the Mark screen button
from the map screen. The
system automatically saves the
current vehicle information in the
address book. When scrolling on
the map the Mark screen button
automatically adds the current
scrolled position information in
the address book.
Page 310 of 508

Black plate (22,1)Cadillac Escalade/Escalade ESV Owner Manual (GMNA-Localizing-U.S./
Canada/Mexico-6081529) - 2014 - CRC 1st Edition - 4/23/13
9-22 Driving and Operating
Do not turn the engine off when the
vehicle is moving. This will cause a
loss of power assist in the brake
and steering systems and disable
the airbags.
If the vehicle must be shut off In an
emergency:
1. Brake using a firm and steadypressure. Do not pump the
brakes repeatedly. This may
deplete power assist, requiring
increased brake pedal force.
2. Shift the vehicle to N (Neutral). This can be done while the
vehicle is moving. After shifting
to N (Neutral), firmly apply the
brakes and steer the vehicle to a
safe location.
3. Come to a complete stop, shift to P (Park), and turn the ignition
to LOCK/OFF. On vehicles with
an automatic transmission, the
shift lever must be in P (Park) to
turn the ignition switch to the
LOCK/OFF position. 4. Set the parking brake. See
Parking Brake on page 9-34.
{Warning
Turning off the vehicle while
moving may cause loss of power
assist in the brake and steering
systems and disable the airbags.
While driving, only shut the
vehicle off in an emergency.
If the vehicle cannot be pulled over,
and must be shut off while driving,
turn the ignition to ACC/
ACCESSORY.
Notice: Using a tool to force the
key to turn in the ignition could
cause damage to the switch or
break the key. Use the correct
key, make sure it is all the way in,
and turn it only with your hand.
If the key cannot be turned by
hand, see your dealer.
B (ACC/ACCESSORY): This
position lets things like the radio
and the windshield wipers operate while the engine is off. Use this
position if the vehicle must be
pushed or towed.
C (ON/RUN):
This position can be
used to operate the electrical
accessories and to display some
instrument panel cluster warning
and indicator lights. This position
can also be used for service and
diagnostics, and to verify the proper
operation of the malfunction
indicator lamp as may be required
for emission inspection purposes.
The switch stays in this position
when the engine is running. The
transmission is also unlocked in this
position on automatic transmission
vehicles when the brake pedal is
applied.
If you leave the key in the ACC/
ACCESSORY or ON/RUN position
with the engine off, the battery could
be drained. You may not be able to
start the vehicle if the battery is
allowed to drain for an extended
period of time.
Page 325 of 508

Black plate (37,1)Cadillac Escalade/Escalade ESV Owner Manual (GMNA-Localizing-U.S./
Canada/Mexico-6081529) - 2014 - CRC 1st Edition - 4/23/13
Driving and Operating 9-37
the appropriate DIC message
displays. This will also disable the
TSC feature.
Traction control and StabiliTrak can
be turned on by pressing and
releasing the TCS/StabiliTrak button
if they are not automatically shut off
for any other reason. This will also
enable the TSC feature.
When the TCS or StabiliTrak system
is turned off, the StabiliTrak light
and the appropriate TCS off or
StabiliTrak off message will be
displayed on the DIC to warn the
driver. The vehicle will still have
brake-traction control when traction
control is off, but will not be able to
use the engine speed management
system. See“Traction Control
Operation” next for more
information.
When TCS has been turned off,
system noises may still be heard as
a result of the brake-traction control
coming on. It is recommended to leave the
system on for normal driving
conditions, but it may be necessary
to turn the system off if the vehicle
is stuck in sand, mud, ice or snow,
and you want to
“rock”the vehicle to
attempt to free it. It may also be
necessary to turn off the system
when driving in extreme off-road
conditions where high wheel spin is
required. See If the Vehicle Is Stuck
on page 9-13.
When the transfer case is in 4LO,
the stability system is automatically
disabled, the StabiliTrak light comes
on, and the appropriate message
will appear on the DIC. Both traction
control and StabiliTrak are
automatically disabled in this
condition.
Traction Control Operation
TCS is part of the StabiliTrak
system. Traction control limits wheel
spin by reducing engine power to
the wheels (engine speed
management) and by applying brakes to each individual wheel
(brake-traction control) as
necessary.
TCS is enabled automatically when
the vehicle is started. It will activate
and the StabiliTrak light will flash if it
senses that any of the wheels are
spinning or beginning to lose
traction while driving. If traction
control is turned off, only the
brake-traction control portion of
traction control will work. The
engine speed management will be
disabled. In this mode, engine
power is not reduced automatically
and the driven wheels can spin
more freely. This can cause the
brake-traction control to activate
constantly.
Notice:
If the wheel(s) of one axle
is allowed to spin excessively
while the StabiliTrak
®, ABS, brake
warning lights, and any relevant
DIC messages are displayed, the
transfer case could be damaged.
The repairs would not be covered
by the vehicle warranty. Reduce
engine power and do not spin the
Page 326 of 508

Black plate (38,1)Cadillac Escalade/Escalade ESV Owner Manual (GMNA-Localizing-U.S./
Canada/Mexico-6081529) - 2014 - CRC 1st Edition - 4/23/13
9-38 Driving and Operating
wheel(s) excessively while these
lights and messages are
displayed.
TCS may activate on dry or rough
roads or under conditions such as
heavy acceleration while turning or
abrupt upshifts/downshifts of the
transmission. When this happens, a
reduction in acceleration may be
noticed, or a noise or vibration may
be heard. This is normal.
If cruise control is being used when
the system activates, the StabiliTrak
light will flash and cruise control will
automatically disengage. Cruise
control may be reengaged when
road conditions allow. SeeCruise
Control on page 9-40.
StabiliTrak may also turn off
automatically if it determines that a
problem exists with the system.
If the problem does not clear itself
after restarting the vehicle, see your
dealer for service. Vehicles with StabiliTrak have a
Trailer Sway Control (TSC) feature.
See
Trailer Sway Control (TSC) on
page 9-65.
Vehicles with StabiliTrak have a Hill
Start Assist (HSA) feature. See Hill
Start Assist (HSA) on page 9-35.
Adding non-dealer accessories can
affect the vehicle's performance.
See Accessories and Modifications
on page 10-3.
Locking Rear Axle
Vehicles with a locking rear axle can
give more traction on snow, mud,
ice, sand, or gravel. It works like a
standard axle most of the time, but
when traction is low, this feature will
allow the rear wheel with the most
traction to move the vehicle.
Road Sensing
Suspension
The Road Sensing
Suspension (RSS) feature provides
superior vehicle ride and handling
under a variety of passenger and
loading conditions.
The system is fully automatic and
uses a computer controller to
continuously monitor vehicle speed,
wheel to body position, lift/dive and
steering position of the vehicle. The
controller then sends signals to
each shock absorber to
independently adjust the damping
level to provide the optimum
vehicle ride.
RSS also interacts with the tow/haul
mode that, when engaged, will
provide additional control of the
shock absorbers. This additional
control results in better ride and
handling characteristics when the
vehicle is loaded or towing a trailer.
See “Tow/Haul Mode” underTowing
Equipment on page 9-60.
Page 332 of 508

Black plate (44,1)Cadillac Escalade/Escalade ESV Owner Manual (GMNA-Localizing-U.S./
Canada/Mexico-6081529) - 2014 - CRC 1st Edition - 4/23/13
9-44 Driving and Operating
Other conditions may affect system
performance, such as vibrations
from a jackhammer or the
compression of air brakes on a very
large truck.
Side Blind Zone
Alert (SBZA)
If equipped, the Side Blind Zone
Alert system is a lane-changing aid
that assists drivers with avoiding
crashes that occur with vehicles in
the side blind zone (or spot) areas.
The SBZA warning display will light
up in the corresponding outside side
mirror and will flash if the turn signal
is on.
{Warning
SBZA does not alert the driver to
vehicles rapidly approaching
outside of the side blind zones,
pedestrians, bicyclists,
or animals. It may not provide
alerts when changing lanes under(Continued)
Warning (Continued)
all driving conditions. Failure to
use proper care when changing
lanes may result in injury, death,
or vehicle damage. Before
making a lane change, always
check mirrors, glance over your
shoulder, and use the turn
signals.
SBZA Detection Zones
The SBZA sensor covers a zone of
approximately one lane over from
both sides of the vehicle, or 3.5 m
(11 ft). The height of the zone is
approximately between 0.5 m (1.5 ft)
and 2 m (6 ft) off the ground. This
zone starts at approximately the
middle of the vehicle and goes back
5 m (16 ft).
How the System Works
The SBZA symbol lights up in the
side mirrors when the system
detects a vehicle in the next lane
over that is in the side blind zone.
This indicates it may be unsafe to
change lanes. Before making a lane
change, check the SBZA display,
check mirrors, glance over your
shoulder, and use the turn signals.
Left Side Mirror DisplayRight Side Mirror Display