ignition CADILLAC ESCALADE ESV 2014 Service Manual
[x] Cancel search | Manufacturer: CADILLAC, Model Year: 2014, Model line: ESCALADE ESV, Model: CADILLAC ESCALADE ESV 2014Pages: 508, PDF Size: 7.64 MB
Page 167 of 508

Black plate (5,1)Cadillac Escalade/Escalade ESV Owner Manual (GMNA-Localizing-U.S./
Canada/Mexico-6081529) - 2014 - CRC 1st Edition - 4/23/13
Lighting 6-5
Headlamp High/
Low-Beam Changer
5 3
(Headlamp High/Low Beam
Changer): To change the
headlamps from low to high beam,
push the turn signal lever toward the
instrument panel. To return to
low-beam headlamps, pull the lever
toward you. Then release it.
When the high beams are on, this
indicator light on the instrument
cluster will also be on.
Flash-to-Pass
Use your high-beam headlamps to
signal to a driver in front that you
want to pass. It works even if the
headlamps are in the automatic
position. To use it, pull the turn signal lever
toward you, then release it.
If the headlamps are in the
automatic position or on low beam,
the high-beam headlamps turn on.
They stay on as long as the lever is
held. The high-beam indicator on
the instrument panel cluster comes
on. Release the lever to return to
normal operation.
Daytime Running
Lamps (DRL)
DRL can make it easier for others to
see the front of the vehicle during
the day. Fully functional daytime
running lamps are required on all
vehicles first sold in Canada.
The DRL system comes on when
the following conditions are met:
.The ignition is on.
.The exterior lamp control is
in AUTO.
.The transmission is not in
P (Park).
.The light sensor determines it is
daytime.
When the DRL system is on, only
the DRL are on. The taillamps,
sidemarker lamps, instrument panel
lights, and other lamps will not
be on.
When it begins to get dark, the
automatic headlamp system
switches from DRL to the
headlamps.
To turn off the DRL, turn the exterior
lamp control to the off position and
then release. For vehicles first sold
in Canada, off will only work when
the vehicle is in P (Park).
Automatic Headlamp
System
When it is dark enough outside, the
automatic headlamp system turns
on the headlamps at the normal
brightness, along with the taillamps,
sidemarker, parking lamps, and the
instrument panel lights. The radio
lights will also be dim.
Page 170 of 508

Black plate (8,1)Cadillac Escalade/Escalade ESV Owner Manual (GMNA-Localizing-U.S./
Canada/Mexico-6081529) - 2014 - CRC 1st Edition - 4/23/13
6-8 Lighting
parking lamps and/or low-beam
headlamps must be on for the fog
lamps to work.
The fog lamp button is located on
the left side of the instrument panel.
#(Fog Lamps):Press to turn the
fog lamps on or off. An indicator
light comes on in the instrument
panel cluster to show that the fog
lamps are on. Remember, fog lamps alone will not
give off as much light as the
headlamps. Never use the fog
lamps in the dark without turning on
the headlamps.
The fog lamps will go off whenever
the high-beam headlamps come on.
When the high beams go off, the fog
lamps will come on again.
The fog lamps will be cancelled
after the ignition is turned off. To use
the fog lamps after restarting the
vehicle, press the fog lamp button
again.
Some localities have laws that
require the headlamps to be on
along with the fog lamps.
Interior Lighting
Instrument Panel
Illumination Control
D(Instrument Panel
Brightness): This feature controls
the brightness of the instrument
panel lights and is located next to
the exterior lamps control.
Push the knob to extend out and
then it can be turned.
Turn the knob clockwise or
counterclockwise to brighten or dim
the instrument panel lights. Turning
the knob to the farthest clockwise
position turns on the dome lamps.
Page 171 of 508
Black plate (9,1)Cadillac Escalade/Escalade ESV Owner Manual (GMNA-Localizing-U.S./
Canada/Mexico-6081529) - 2014 - CRC 1st Edition - 4/23/13
Lighting 6-9
Dome Lamps
The dome lamps are located in the
overhead console.
They come on when any door is
opened and turn off after all the
doors are closed.
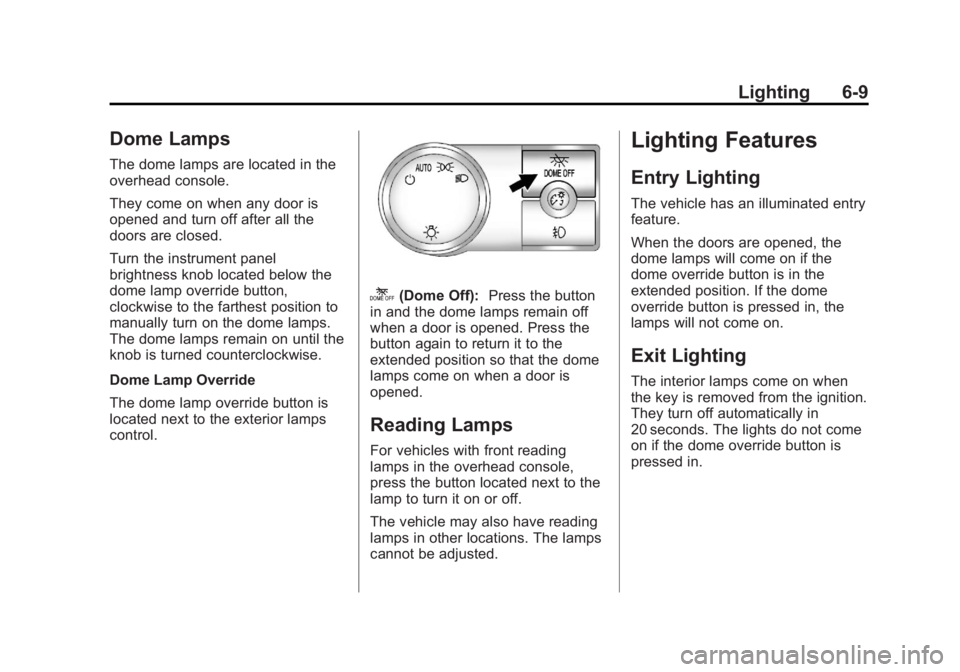
Turn the instrument panel
brightness knob located below the
dome lamp override button,
clockwise to the farthest position to
manually turn on the dome lamps.
The dome lamps remain on until the
knob is turned counterclockwise.
Dome Lamp Override
The dome lamp override button is
located next to the exterior lamps
control.
k(Dome Off):Press the button
in and the dome lamps remain off
when a door is opened. Press the
button again to return it to the
extended position so that the dome
lamps come on when a door is
opened.
Reading Lamps
For vehicles with front reading
lamps in the overhead console,
press the button located next to the
lamp to turn it on or off.
The vehicle may also have reading
lamps in other locations. The lamps
cannot be adjusted.
Lighting Features
Entry Lighting
The vehicle has an illuminated entry
feature.
When the doors are opened, the
dome lamps will come on if the
dome override button is in the
extended position. If the dome
override button is pressed in, the
lamps will not come on.
Exit Lighting
The interior lamps come on when
the key is removed from the ignition.
They turn off automatically in
20 seconds. The lights do not come
on if the dome override button is
pressed in.
Page 172 of 508

Black plate (10,1)Cadillac Escalade/Escalade ESV Owner Manual (GMNA-Localizing-U.S./
Canada/Mexico-6081529) - 2014 - CRC 1st Edition - 4/23/13
6-10 Lighting
Battery Load
Management
The vehicle has Electric Power
Management (EPM) that estimates
the battery's temperature and state
of charge. It then adjusts the voltage
for best performance and extended
life of the battery.
When the battery's state of charge
is low, the voltage is raised slightly
to quickly bring the charge back up.
When the state of charge is high,
the voltage is lowered slightly to
prevent overcharging. If the vehicle
has a voltmeter gauge or a voltage
display on the Driver Information
Center (DIC), you may see the
voltage move up or down. This is
normal. If there is a problem, an
alert will be displayed.The battery can be discharged at
idle if the electrical loads are very
high. This is true for all vehicles.
This is because the generator
(alternator) may not be spinning fast
enough at idle to produce all the
power that is needed for very high
electrical loads.
A high electrical load occurs when
several of the following are on, such
as: headlamps, high beams, fog
lamps, rear window defogger,
climate control fan at high speed,
heated seats, engine cooling fans,
trailer loads, and loads plugged into
accessory power outlets.
EPM works to prevent excessive
discharge of the battery. It does this
by balancing the generator's output
and the vehicle's electrical needs.
It can increase engine idle speed to
generate more power, whenever
needed. It can temporarily reduce
the power demands of some
accessories.Normally, these actions occur in
steps or levels, without being
noticeable. In rare cases at the
highest levels of corrective action,
this action may be noticeable to the
driver. If so, a Driver Information
Center (DIC) message might be
displayed, such as BATTERY LOW
START VEHICLE. If this message
displays, it is recommended that the
driver reduce the electrical loads as
much as possible and restart the
vehicle. See
Battery Voltage and
Charging Messages on page 5-27.
Battery Power Protection
This feature shuts off the dome
lamps if they are left on for more
than 10 minutes when the ignition is
in LOCK/OFF. This helps to prevent
the battery from running down.
Page 190 of 508
Black plate (18,1)Cadillac Escalade/Escalade ESV Owner Manual (GMNA-Localizing-U.S./
Canada/Mexico-6081529) - 2014 - CRC 1st Edition - 4/23/13
7-18 Infotainment System
Satellite Radio Antenna
The XM Satellite Radio antenna is
located on the roof of the vehicle.
Keep the antenna clear of
obstructions for clear radio
reception.
If the vehicle has a sunroof, the
performance of the XM system (if
equipped) may be affected if the
sunroof is open.
Audio Players
CD/DVD Player
The player can be used for CD,
MP3, and as a DVD video player.
Read this section for more
information about DVD video.
When playing an audio CD the rear
seat operator can power on the
RSE video screen and use the
remote control to navigate through
the tracks on the CD.
CD Player
While playing a CD, the navigation
system is available.
When you insert a CD, the CD tab
displays. If a DSP setting is
selected for the CD, it activates
each time you play a CD.If the ignition or radio is turned off
with a CD in the player, it stays in
the player. When the ignition or
radio is turned on, the CD starts
playing where it stopped, if it was
the last selected audio source.
As each new track starts to play, the
track number displays.
If an error appears on the display,
see
“CD/DVD Messages” in this
section.
If viewing a map screen, press the
CD screen button. The display splits
between the audio screen and the
map screen. If you do not want to
view a split screen or you are not on
a map screen, press AUDIO then
press AUDIO again, repeatedly until
CD is selected or press the CD
screen button.
Z(Eject): To eject a disc:
1. Press
Z.
2. The system displays “Ejecting Disc.”
Page 200 of 508
Black plate (28,1)Cadillac Escalade/Escalade ESV Owner Manual (GMNA-Localizing-U.S./
Canada/Mexico-6081529) - 2014 - CRC 1st Edition - 4/23/13
7-28 Infotainment System
radio displays the file name without
the extension (such as .mp3) as the
track name.
Track names longer than
32 characters or four pages are
shortened. The display does not
show parts of words on the last
page of text and the extension of
the filename does not display.
Playing an MP3
While playing a CD, the navigation
system is available.
When you insert a CD, the CD tab
displays. If a DSP setting is
selected for the CD, it will be
activated each time you play a CD.
If you turn off the ignition or radio
with a CD in the player, it stays in
the player. When you turn on the
ignition or radio, the CD starts
playing where it stopped, if it was
the last selected audio source.
As each new track starts to play, the
track number appears on the
display.If an error appears on the display,
see
“CD/DVD Messages” in this
section.
If viewing a map screen, press the
CD screen button. The display splits
between the audio screen and the
map screen. If you do not want to
view a split screen or you are not on
a map screen, press AUDIO, then
press AUDIO again, repeatedly until
CD is selected or press the CD
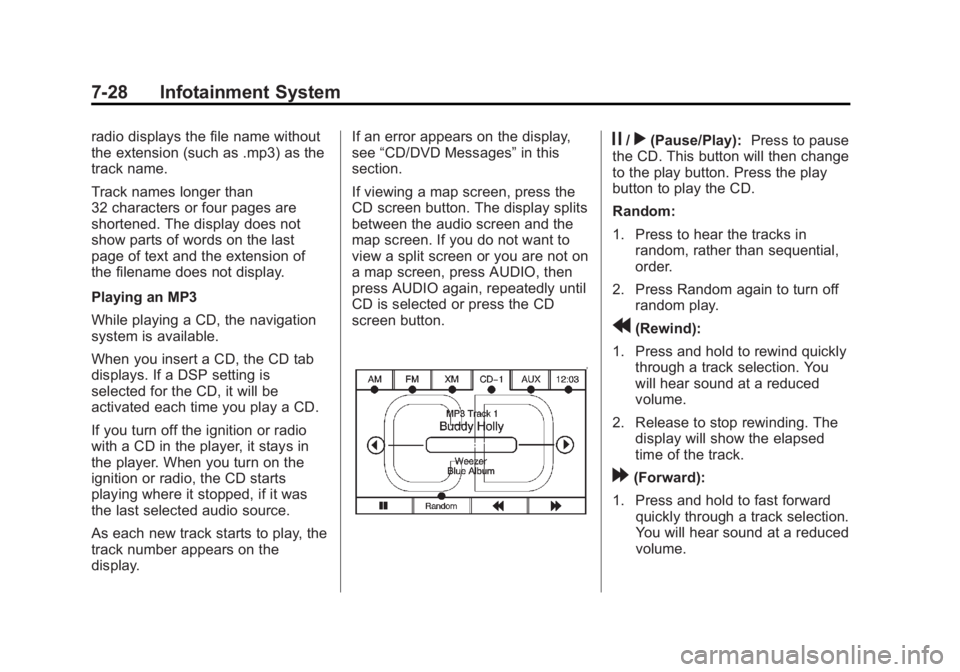
screen button.j/r(Pause/Play): Press to pause
the CD. This button will then change
to the play button. Press the play
button to play the CD.
Random:
1. Press to hear the tracks in random, rather than sequential,
order.
2. Press Random again to turn off random play.
r(Rewind):
1. Press and hold to rewind quickly through a track selection. You
will hear sound at a reduced
volume.
2. Release to stop rewinding. The display will show the elapsed
time of the track.
[(Forward):
1. Press and hold to fast forward quickly through a track selection.
You will hear sound at a reduced
volume.
Page 202 of 508
Black plate (30,1)Cadillac Escalade/Escalade ESV Owner Manual (GMNA-Localizing-U.S./
Canada/Mexico-6081529) - 2014 - CRC 1st Edition - 4/23/13
7-30 Infotainment System
wired headphones. See the Rear
Seat Infotainment user guide for
more information.
Drivers are encouraged to set up
any auxiliary device while the
vehicle is in P (Park). See
Defensive Driving on page 9-3for
more information on driver
distraction.
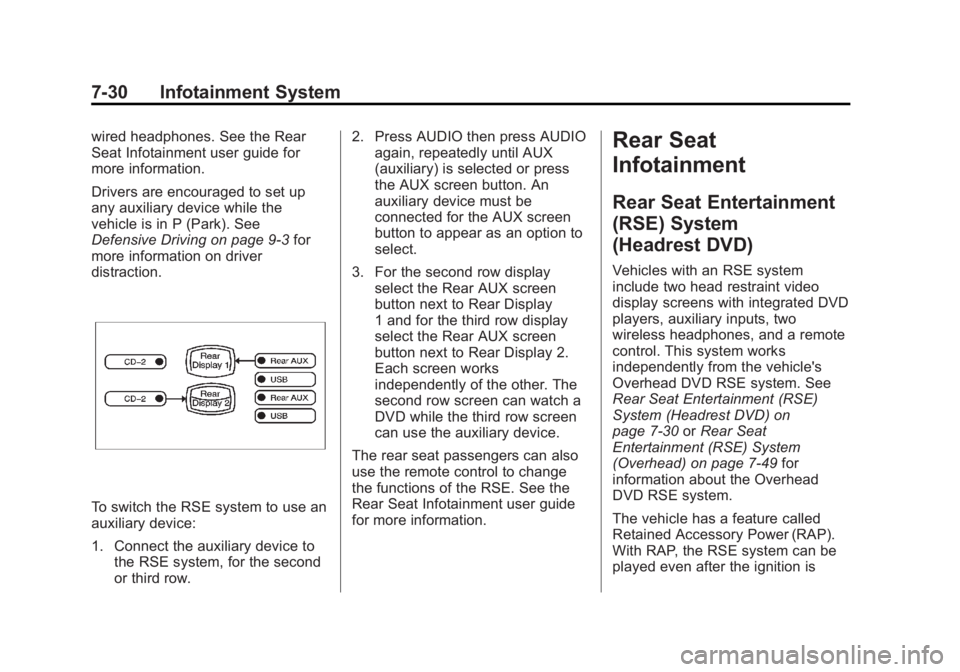
To switch the RSE system to use an
auxiliary device:
1. Connect the auxiliary device to the RSE system, for the second
or third row. 2. Press AUDIO then press AUDIO
again, repeatedly until AUX
(auxiliary) is selected or press
the AUX screen button. An
auxiliary device must be
connected for the AUX screen
button to appear as an option to
select.
3. For the second row display select the Rear AUX screen
button next to Rear Display
1 and for the third row display
select the Rear AUX screen
button next to Rear Display 2.
Each screen works
independently of the other. The
second row screen can watch a
DVD while the third row screen
can use the auxiliary device.
The rear seat passengers can also
use the remote control to change
the functions of the RSE. See the
Rear Seat Infotainment user guide
for more information.
Rear Seat
Infotainment
Rear Seat Entertainment
(RSE) System
(Headrest DVD)
Vehicles with an RSE system
include two head restraint video
display screens with integrated DVD
players, auxiliary inputs, two
wireless headphones, and a remote
control. This system works
independently from the vehicle's
Overhead DVD RSE system. See
Rear Seat Entertainment (RSE)
System (Headrest DVD) on
page 7-30 orRear Seat
Entertainment (RSE) System
(Overhead) on page 7-49 for
information about the Overhead
DVD RSE system.
The vehicle has a feature called
Retained Accessory Power (RAP).
With RAP, the RSE system can be
played even after the ignition is
Page 222 of 508
Black plate (50,1)Cadillac Escalade/Escalade ESV Owner Manual (GMNA-Localizing-U.S./
Canada/Mexico-6081529) - 2014 - CRC 1st Edition - 4/23/13
7-50 Infotainment System
DVD, and/or CD. While Parental
Control is on, a padlock icon
displays.
The radio can be turned back on
with a single press of the power
button, but the RSE system will
remain under Parental Control.
To turn Parental Control off, press
and hold the radio power button for
more than two seconds. The RSE
returns from where it was previously
left and the padlock icon disappears
from the radio display.
Parental Control can also be turned
off by inserting or ejecting any disc,
pressing the play icon on the radio
DVD display menu, or changing an
ignition position.Headphones
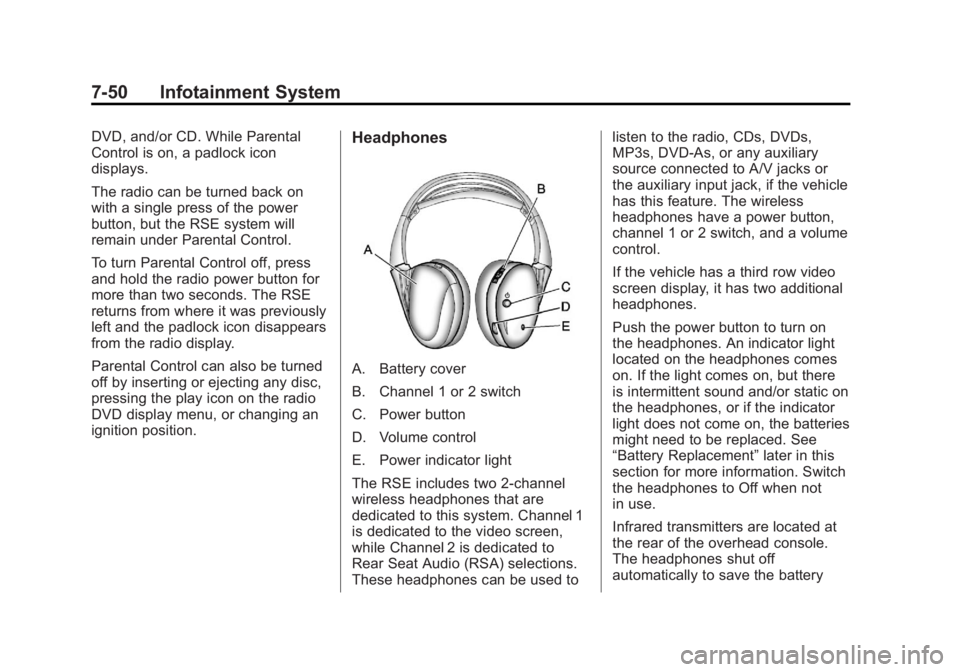
A. Battery cover
B. Channel 1 or 2 switch
C. Power button
D. Volume control
E. Power indicator light
The RSE includes two 2-channel
wireless headphones that are
dedicated to this system. Channel 1
is dedicated to the video screen,
while Channel 2 is dedicated to
Rear Seat Audio (RSA) selections.
These headphones can be used tolisten to the radio, CDs, DVDs,
MP3s, DVD-As, or any auxiliary
source connected to A/V jacks or
the auxiliary input jack, if the vehicle
has this feature. The wireless
headphones have a power button,
channel 1 or 2 switch, and a volume
control.
If the vehicle has a third row video
screen display, it has two additional
headphones.
Push the power button to turn on
the headphones. An indicator light
located on the headphones comes
on. If the light comes on, but there
is intermittent sound and/or static on
the headphones, or if the indicator
light does not come on, the batteries
might need to be replaced. See
“Battery Replacement”
later in this
section for more information. Switch
the headphones to Off when not
in use.
Infrared transmitters are located at
the rear of the overhead console.
The headphones shut off
automatically to save the battery
Page 229 of 508
Black plate (57,1)Cadillac Escalade/Escalade ESV Owner Manual (GMNA-Localizing-U.S./
Canada/Mexico-6081529) - 2014 - CRC 1st Edition - 4/23/13
Infotainment System 7-57
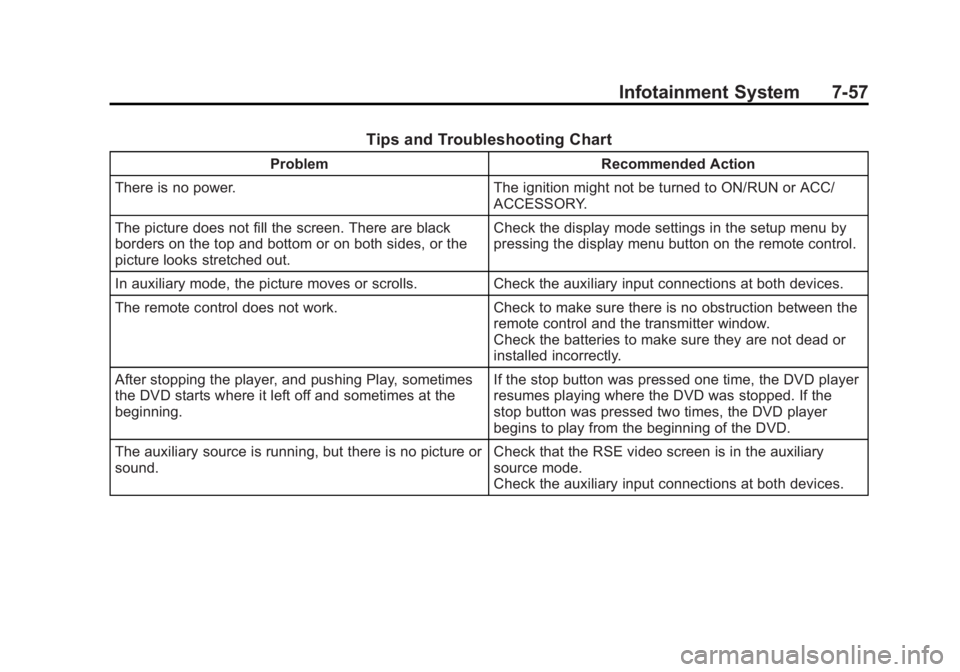
Tips and Troubleshooting Chart
ProblemRecommended Action
There is no power. The ignition might not be turned to ON/RUN or ACC/
ACCESSORY.
The picture does not fill the screen. There are black
borders on the top and bottom or on both sides, or the
picture looks stretched out. Check the display mode settings in the setup menu by
pressing the display menu button on the remote control.
In auxiliary mode, the picture moves or scrolls. Check the auxiliary input connections at both devices.
The remote control does not work. Check to make sure there is no obstruction between the
remote control and the transmitter window.
Check the batteries to make sure they are not dead or
installed incorrectly.
After stopping the player, and pushing Play, sometimes
the DVD starts where it left off and sometimes at the
beginning. If the stop button was pressed one time, the DVD player
resumes playing where the DVD was stopped. If the
stop button was pressed two times, the DVD player
begins to play from the beginning of the DVD.
The auxiliary source is running, but there is no picture or
sound. Check that the RSE video screen is in the auxiliary
source mode.
Check the auxiliary input connections at both devices.
Page 257 of 508

Black plate (85,1)Cadillac Escalade/Escalade ESV Owner Manual (GMNA-Localizing-U.S./
Canada/Mexico-6081529) - 2014 - CRC 1st Edition - 4/23/13
Infotainment System 7-85
5. The system will ask for you tostate the name. You will have
four seconds to state the name.
The system will respond back
with the name and prompt you to
repeat the name for
confirmation.
To delete an address book entry:
1. Press CONFIG.
2. Press the Nav screen button.
3. Press Edit/View Address Book.
4. Select the address book entry to delete.
5. Press Delete to delete the address book entry.
6. A confirmation pop-up will display. Press OK to delete;
press Cancel to cancel the
operation.
To delete the entire address book:
1. Press CONFIG.
2. Press the Nav screen button.
3. Press Edit/View Address Book. 4. A list of all the address book
entries will display. Press and
hold Clear All.
5. A confirmation pop-up will display. Press OK to delete;
press Cancel to cancel the
operation.
Map Database Information
Use the Map Database Information/
Remove Map Data screen button to
view the coverage areas of the map
database or to replace the map
database. 1. Press the Map Database
Information/Remove Map Data
screen button to display the Map
Coverage Area screen.
2. Press the Remove Map Data screen button to remove the
map data. A screen showing,
“The Map can now be safely
removed” displays.
3. Press the confirmation screen button to safely remove the
map data.
If the map data is not removed, the
map database will not be available
for that ignition cycle. Map database
functionality can be restored by
cycling the ignition.
Off-Road Mode
To turn the Off-road mode on or off:
1. Press CONFIG.
2. Press the Nav screen button.
3. Press Off-Road mode. The button will be highlighted when
the feature is on.