turn signal CADILLAC ESCALADE EXT 2003 2.G User Guide
[x] Cancel search | Manufacturer: CADILLAC, Model Year: 2003, Model line: ESCALADE EXT, Model: CADILLAC ESCALADE EXT 2003 2.GPages: 473, PDF Size: 3.31 MB
Page 161 of 473

2(Headlamps):Turn the control to this position to
turn on the headlamps, together with the previously
listed lamps and lights.
When the vehicle is turned off and the headlamps are in
AUTO, the headlamps may automatically remain on
for a set time. You can change this delay time using the
DIC. See
Driver Information Center (DIC) on page 3-47.
You can switch your headlamps from low to high-beam
by pushing the turn signal/multifunction lever toward
the instrument panel.
Automatic Headlamp System
When it is dark enough outside and the headlamp
switch is in AUTO, your automatic headlamp system
will turn on your headlamps at the normal brightness
along with other lamps such as the taillamps,
sidemarker, parking lamps, roof marker lamps and the
instrument panel lights. The radio lights will also be dim.
To turn off the automatic headlamp system, turn the
exterior lamps switch to the off position and then
release.Your vehicle has a light sensor located on the top of the
instrument panel. Be sure it is not covered, or the
system will be on whenever the ignition is on.
The system may also turn on your headlamps when
driving through a parking garage, heavy overcast
weather or a tunnel. This is normal.
There is a delay in the transition between the daytime
and nighttime operation of the Daytime Running
Lamps (DRL) and the automatic headlamp systems so
that driving under bridges or bright overhead street
lights does not affect the system. The DRL and
automatic headlamp system will only be affected when
the light sensor sees a change in lighting lasting
longer than the delay.
If you start your vehicle in a dark garage, the automatic
headlamp system will come on immediately. Once
you leave the garage, it will take approximately
one minute for the automatic headlamp system to
change to DRL if it is light outside. During that delay,
your instrument panel cluster may not be as bright
as usual. Make sure your instrument panel brightness
control is in the full bright position. See ªInstrument
Panel Brightnessº under
Interior Lamps on page 3-18.
3-15
Page 191 of 473

A reading in the low pressure zone may be caused
by a dangerously low oil level or some other problem
causing low oil pressure. Check your oil as soon
as possible. See
DIC Warnings and Messages on
page 3-58.
{CAUTION:
Don't keep driving if the oil pressure is low.
If you do, your engine can become so hot that
it catches ®re. You or others could be burned.
Check your oil as soon as possible and have
your vehicle serviced.
Notice:Damage to your engine from neglected
oil problems can be costly and is not covered
by your warranty.
Cruise Control Light
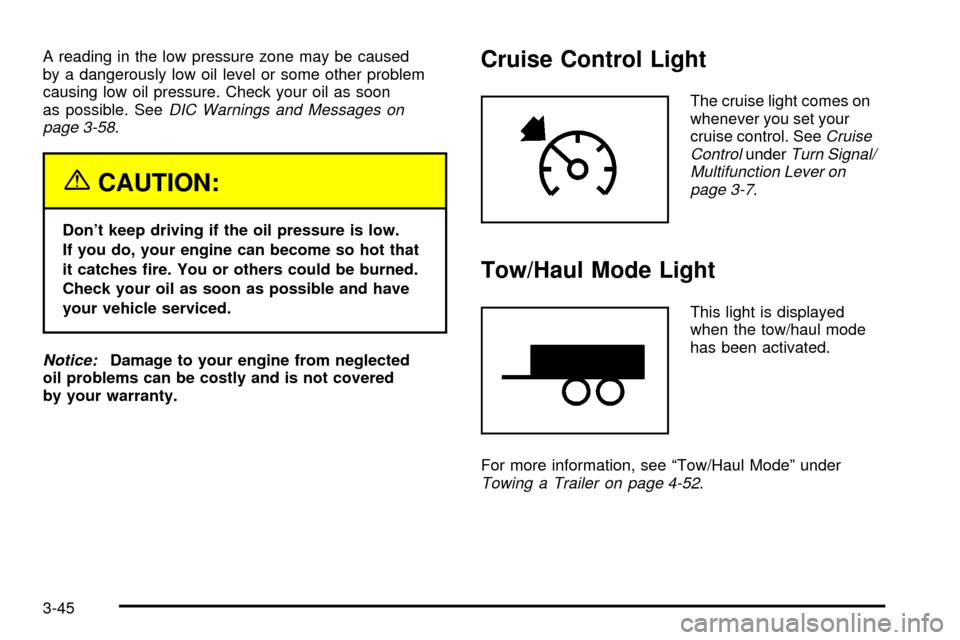
The cruise light comes on
whenever you set your
cruise control. See
Cruise
ControlunderTurn Signal/
Multifunction Lever on
page 3-7
.
Tow/Haul Mode Light
This light is displayed
when the tow/haul mode
has been activated.
For more information, see ªTow/Haul Modeº under
Towing a Trailer on page 4-52.
3-45
Page 207 of 473

SERVICE RIDE CONTROL
If a problem occurs with the suspension system, this
message will appear on the DIC. If this message
appears, stop and turn off the vehicle. Restart the
vehicle and check for the message on the DIC display.
If the message is still displayed, or appears again
when you begin driving, the suspension system needs
service. Pressing the select button will clear it from
the DIC display.
TURN SIGNAL ON
If a turn signal is left on for 3/4 of a mile (1.2 km), this
message will appear on the display and you will hear a
chime. Move the turn signal/multifunction lever to the
off position. Pressing the select button will clear it from
the DIC display.
FUEL LEVEL LOW
If the fuel level is low, this message will appear on the
DIC and you will hear a chime. Refuel as soon as
possible. Pressing the select button will acknowledge
this message immediately and clear it from the DIC
display. It will also clear itself after 10 seconds until the
next ignition cycle. The low fuel light near the fuel
gage will still remain on in either case.
TIGHTEN FUEL CAP
If the vehicle's fuel cap is not tightened properly this
message may appear along with the check engine light
on the instrument panel. See
Malfunction Indicator
Lamp on page 3-42. Reinstall the fuel cap, making sure
to fully install the cap. SeeFilling Your Tank on
page 5-7. The diagnostic system can determine if the
fuel cap has been left off or improperly installed. A loose
or missing fuel cap will allow fuel to evaporate into
the atmosphere. A few driving trips with the cap properly
installed should turn the light and message off.
CHECK WASHER FLUID
If the washer ¯uid level is low, this message will appear
on the DIC. Adding washer ¯uid will clear the message.
Pressing the select button will clear it from the DIC
display. This message will clear itself after 10 seconds
until the next igntion cycle.
3-61
Page 215 of 473

Finding a Station
BAND:Press this button to switch between AM, FM1,
FM2, or XM1, XM2 (USA only, if equipped). The display
will show your selection.
TUNE:Turn this knob to choose radio stations.
qSEEKr:Press the right or the left arrow to seek
to the next or to the previous station and stay there.
The radio will seek only to stations that are in the
selected band and only to those with a strong signal.
qSCANr:Press and hold one of the arrows for
more than two seconds. The radio will produce one beep.
The radio will scan to a station, play for a few seconds,
then go on to the next station. SCAN will be displayed.
Press one of the arrows again to stop scanning.
The radio will scan only to stations that are in the selected
band and only to those with a strong signal.
To scan preset stations, press and hold one of the arrows
for more than four seconds. The radio will produce two
beeps. The radio will scan to the ®rst preset station, play
for a few seconds, then go on to the next preset station.
PSCN will be displayed. Press one of the arrows again or
one of the pushbuttons to stop scanning.
The radio will scan only to preset stations that are in the
selected band and only to those with a strong signal.
Setting Preset Stations
The six numbered pushbuttons let you return to your
favorite stations. You can set up to 30 stations (six AM,
six FM1 and six FM2, or six XM1 and six XM2 (USA only,
if equipped), by performing the following steps:
1. Turn the radio on.
2. Press BAND to select AM, FM1, FM2, or XM1,
or XM2.
3. Tune in the desired station.
4. Press AUTO EQ to select the equalization that best
suits the type of station you are listening to.
5. Press and hold one of the six numbered
pushbuttons. The radio will produce one beep.
Whenever you press that numbered pushbutton, the
station you set will return and the bass and treble
equalization that you selected will also be
automatically selected for that pushbutton.
6. Repeat the steps for each pushbutton.
3-69
Page 220 of 473

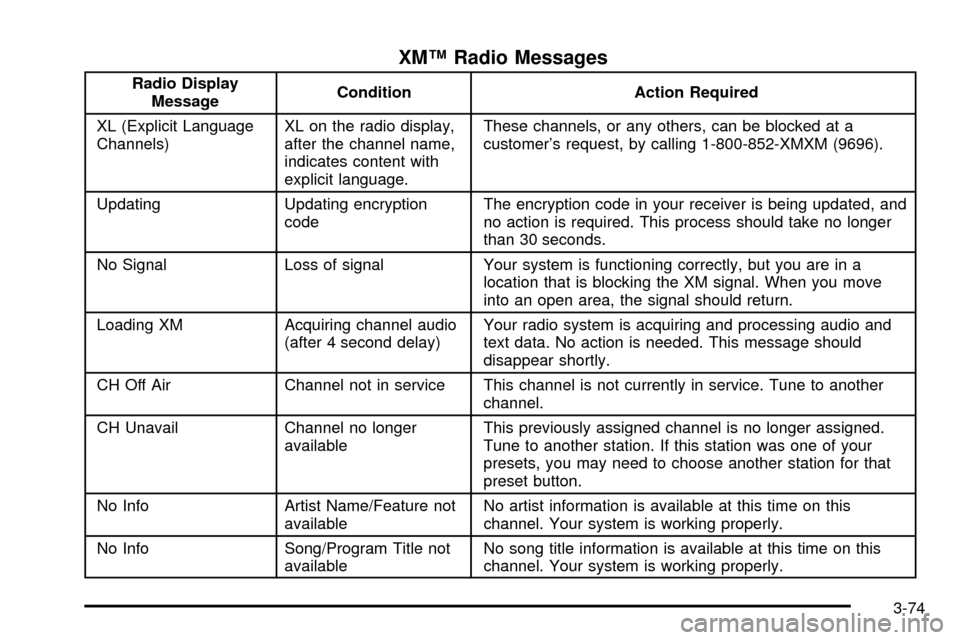
XMŸ Radio Messages
Radio Display
MessageCondition Action Required
XL (Explicit Language
Channels)XL on the radio display,
after the channel name,
indicates content with
explicit language.These channels, or any others, can be blocked at a
customer's request, by calling 1-800-852-XMXM (9696).
Updating Updating encryption
codeThe encryption code in your receiver is being updated, and
no action is required. This process should take no longer
than 30 seconds.
No Signal Loss of signal Your system is functioning correctly, but you are in a
location that is blocking the XM signal. When you move
into an open area, the signal should return.
Loading XM Acquiring channel audio
(after 4 second delay)Your radio system is acquiring and processing audio and
text data. No action is needed. This message should
disappear shortly.
CH Off Air Channel not in service This channel is not currently in service. Tune to another
channel.
CH Unavail Channel no longer
availableThis previously assigned channel is no longer assigned.
Tune to another station. If this station was one of your
presets, you may need to choose another station for that
preset button.
No Info Artist Name/Feature not
availableNo artist information is available at this time on this
channel. Your system is working properly.
No Info Song/Program Title not
availableNo song title information is available at this time on this
channel. Your system is working properly.
3-74
Page 231 of 473

Parental Control Button:This button is located on the
front of the DVD console, behind the video screen,
near the driver of the vehicle. Press this button while a
DVD or CD is playing to freeze the video and mute
the audio. The video screen will display Parental Control
ON and the power indicator light on the DVD player
will ¯ash. It will also disable all other button operations
from the remote control and the DVD player, with
the exception of the eject button. The driver will then be
able to gain the attention of the rear seat passengers.
Press this button again to restore normal operation
of the DVD player.
This button may also be used to turn the DVD player
power on and automatically resume play if the vehicle is
in an enabled power mode.Video Screen
The video screen is located in the overhead console.
To use the video screen, push forward on the release
latch and the screen will fold down. Adjust the screen's
position as desired. When the video screen is not in
use, push it up into its latched position.
The DVD player and display will continue to operate
when the screen is in either the up or the down position.
The video screen contains the infrared transmitters for
the wireless headphones and the infrared receiver
for the remote control. If the screen is in the closed
position, the infrared signals will not be available for the
operation of the headphones and the remote control.
Notice:Avoid directly touching the video screen, as
damage may occur. SeeCleaning the Video Screen
on page 3-101 for more information.
3-85
Page 232 of 473

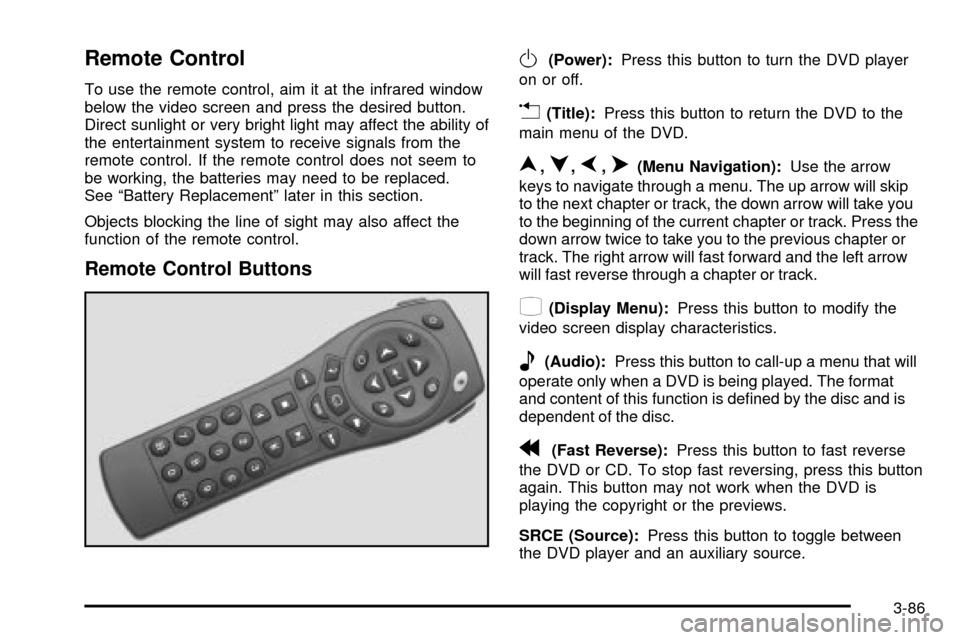
Remote Control
To use the remote control, aim it at the infrared window
below the video screen and press the desired button.
Direct sunlight or very bright light may affect the ability of
the entertainment system to receive signals from the
remote control. If the remote control does not seem to
be working, the batteries may need to be replaced.
See ªBattery Replacementº later in this section.
Objects blocking the line of sight may also affect the
function of the remote control.
Remote Control Buttons
O(Power):Press this button to turn the DVD player
on or off.
v(Title):Press this button to return the DVD to the
main menu of the DVD.
n,q,p,o(Menu Navigation):Use the arrow
keys to navigate through a menu. The up arrow will skip
to the next chapter or track, the down arrow will take you
to the beginning of the current chapter or track. Press the
down arrow twice to take you to the previous chapter or
track. The right arrow will fast forward and the left arrow
will fast reverse through a chapter or track.
z(Display Menu):Press this button to modify the
video screen display characteristics.
e(Audio):Press this button to call-up a menu that will
operate only when a DVD is being played. The format
and content of this function is de®ned by the disc and is
dependent of the disc.
r(Fast Reverse):Press this button to fast reverse
the DVD or CD. To stop fast reversing, press this button
again. This button may not work when the DVD is
playing the copyright or the previews.
SRCE (Source):Press this button to toggle between
the DVD player and an auxiliary source.
3-86
Page 234 of 473

Slow Play:When the DVD is playing, press the pause
button then press the fast forward button. The DVD
will continue playing in a slow play mode. To cancel slow
play mode, press the play/pause button.
u(Next Track/Chapter):Press this button to advance
to the beginning of the next track or chapter. This
button may not work when the DVD is playing the
copyright or the previews.
Battery Replacement
To change the batteries, do the following:
1. Remove the battery compartment door located on
the bottom of the remote control.
2. Replace the two AA batteries in the compartment.
Make sure that they are installed correctly.
3. Close the battery door securely.
Notice:Do not store the remote control in heat or
direct sunlight. This could damage the remote
control and it would not be covered by your vehicles
warranty. Keep the remote control stored in a
cool, dry place.
If the remote control is to be stored for a long period of
time, remove the batteries and keep them in a cool,
dry place.
Headphones
The RSE system includes two sets of wireless infrared
headphones.
Each set of headphones has an ON/OFF control.
An indicator light will illuminate on the headphones when
they are on. If the light does not illuminate, the batteries
may need to be replaced. See ªBattery Replacementº
later in this section for more information. To turn the
headphones OFF activate the ON/OFF control.
Each set of headphones has a volume knob. To adjust
the volume, adjust this knob.
The headphones will automatically turn off if they lose
the infrared signal from the system after approximately
four minutes in order to preserve their battery power.
The signal may be lost if the system is turned off or if the
headphones are out of range of the infrared signal
transmitters that are located below the video display
screen.
3-88
Page 245 of 473

DVD Distortion
You may experience audio distortion in the
IR headphones when operating cellular phones,
scanners, CB radios, Global Positioning Systems
(GPS)*, two-way radios, mobile fax, or walkie talkies.
It may be necessary to turn off the DVD player
when operating one of these devices in or near the
vehicle.
* Excludes the OnStar
žSystem.
Understanding Radio Reception
AM
The range for most AM stations is greater than for FM,
especially at night. The longer range, however, can
cause stations to interfere with each other. AM can pick
up noise from things like storms and power lines. Try
reducing the treble to reduce this noise if you ever get it.
FM Stereo
FM stereo will give you the best sound, but FM signals
will reach only about 10 to 40 miles (16 to 65 km).
Tall buildings or hills can interfere with FM signals,
causing the sound to come and go.
XMŸ Satellite Radio Service (USA Only)
XMŸ Satellite Radio gives you digital radio reception
from coast to coast. Just as with FM, tall buildings
or hills can interfere with satellite radio signals, causing
the sound to come and go. Your radio may display
NO SIGNAL to indicate interference.
Care of Your Cassette Tape Player
A tape player that is not cleaned regularly can cause
reduced sound quality, ruined cassettes or a damaged
mechanism. Cassette tapes should be stored in their
cases away from contaminants, direct sunlight and
extreme heat. If they aren't, they may not operate
properly or may cause failure of the tape player.
Your tape player should be cleaned regularly after every
50 hours of use. Your radio may display CLEAN to
indicate that you have used your tape player for
50 hours without resetting the tape clean timer. If this
message appears on the display, your cassette
tape player needs to be cleaned. It will still play tapes,
but you should clean it as soon as possible to
prevent damage to your tapes and player. If you notice
a reduction in sound quality, try a known good
cassette to see if the tape or the tape player is at fault.
If this other cassette has no improvement in sound
quality, clean the tape player.
3-99
Page 261 of 473

If the brake-traction control system activates constantly
or if the brakes have heated up due to high speed
braking, the brake-traction control will be automatically
disabled. The system will come back on after the
brakes have cooled. This can take up to two minutes
or longer depending on brake usage.
Notice:Don't allow the wheel(s) of one axle to spin
excessively when the traction off, ABS and brake
lights are on and the SERVICE STABILITY MESSAGE
is displayed. In this situation, damage to the
transfer case is possible. This could lead to costly
repairs not covered by your warranty. You should
immediately reduce engine power until the lights
and messages are no longer displayed.The traction control system may activate on dry or
rough roads or under conditions such as heavy
acceleration while turning or abrupt upshifts/downshifts
of the transmission. When this happens you may
notice a reduction in acceleration, or may hear a noise
or vibration. This is normal.
If your vehicle is in cruise control when the system
activates, the STABILITY SYS ACTIVE message will
appear on the Driver Information Center and the cruise
control will automatically disengage. When road
conditions allow you to use cruise again, you may
re-engage the cruise control. See ªCruise Controlº
under
Turn Signal/Multifunction Lever on page 3-7
Stabilitrakžmay also turn off automatically if it
determines that a problem exists with the system.
If the problem does not clear itself after restarting the
vehicle, you should see your dealer for service.
4-12