rear view mirror CADILLAC ESCALADE EXT 2003 2.G Owners Manual
[x] Cancel search | Manufacturer: CADILLAC, Model Year: 2003, Model line: ESCALADE EXT, Model: CADILLAC ESCALADE EXT 2003 2.GPages: 473, PDF Size: 3.31 MB
Page 1 of 473

Seats and Restraint Systems........................... 1-1
Front Seats
............................................... 1-2
Rear Seats
............................................... 1-6
Safety Belts
.............................................. 1-8
Child Restraints
.......................................1-28
Air Bag Systems
......................................1-50
Restraint System Check
............................1-65
Features and Controls..................................... 2-1
Keys
........................................................ 2-3
Doors and Locks
....................................... 2-8
Windows
.................................................2-24
Theft-Deterrent Systems
............................2-26
Starting and Operating Your Vehicle
...........2-28
Mirrors
....................................................2-41
OnStar
žSystem
......................................2-46
HomeLinkžTransmitter
.............................2-48
Storage Areas
.........................................2-52
Sunroof
..................................................2-71
Vehicle Personalization
.............................2-72
Instrument Panel............................................. 3-1
Instrument Panel Overview
.......................... 3-4
Climate Controls
......................................3-24
Warning Lights, Gages and Indicators
.........3-31
Driver Information Center (DIC)
..................3-47
Audio System(s)
.......................................3-66Driving Your Vehicle....................................... 4-1
Your Driving, the Road, and Your Vehicle
..... 4-2
Towing
...................................................4-48
Service and Appearance Care.......................... 5-1
Service
..................................................... 5-3
Fuel
......................................................... 5-4
Checking Things Under the Hood
...............5-10
All-Wheel Drive
........................................5-50
Rear Axle
...............................................5-51
Front Axle
...............................................5-52
Headlamp Aiming
.....................................5-53
Bulb Replacement
....................................5-57
Windshield Wiper Blade Replacement
.........5-65
Tires
......................................................5-66
Appearance Care
.....................................5-93
Vehicle Identi®cation
...............................5-100
Electrical System
....................................5-101
Capacities and Speci®cations
...................5-110
Normal Maintenance Replacement Parts
......5-111
Maintenance Schedule..................................... 6-1
Maintenance Schedule
................................ 6-2
Customer Assistance Information.................... 7-1
Customer Assistance Information
.................. 7-2
Reporting Safety Defects
............................ 7-9
Index.................................................................1
2003 Cadillac Escalade EXT Owner ManualM
Page 54 of 473
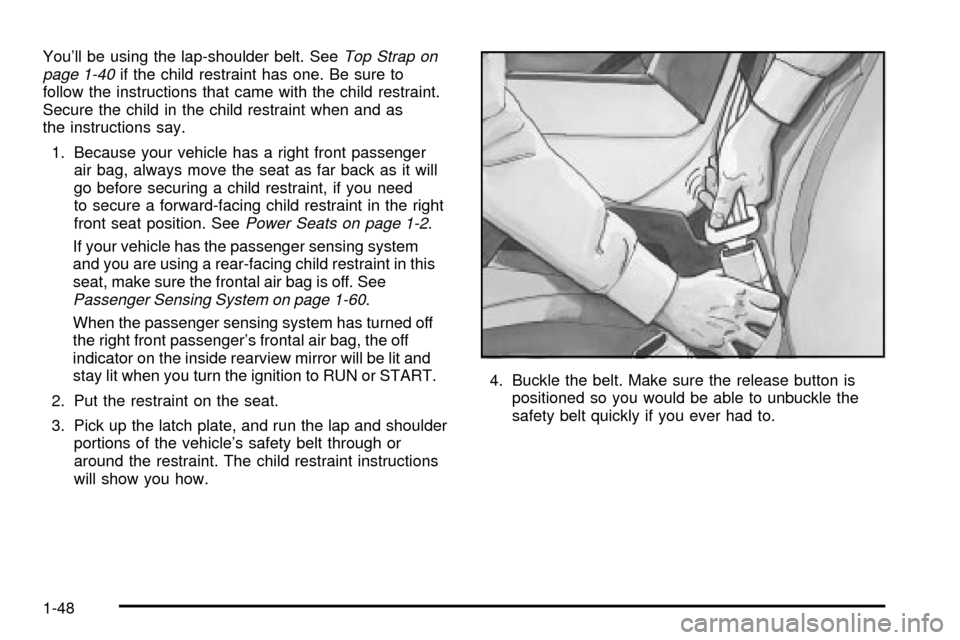
You'll be using the lap-shoulder belt. SeeTop Strap on
page 1-40if the child restraint has one. Be sure to
follow the instructions that came with the child restraint.
Secure the child in the child restraint when and as
the instructions say.
1. Because your vehicle has a right front passenger
air bag, always move the seat as far back as it will
go before securing a child restraint, if you need
to secure a forward-facing child restraint in the right
front seat position. See
Power Seats on page 1-2.
If your vehicle has the passenger sensing system
and you are using a rear-facing child restraint in this
seat, make sure the frontal air bag is off. See
Passenger Sensing System on page 1-60.
When the passenger sensing system has turned off
the right front passenger's frontal air bag, the off
indicator on the inside rearview mirror will be lit and
stay lit when you turn the ignition to RUN or START.
2. Put the restraint on the seat.
3. Pick up the latch plate, and run the lap and shoulder
portions of the vehicle's safety belt through or
around the restraint. The child restraint instructions
will show you how.4. Buckle the belt. Make sure the release button is
positioned so you would be able to unbuckle the
safety belt quickly if you ever had to.
1-48
Page 66 of 473

Passenger Sensing System
If your rearview mirror has one of the indicators pictured
in the following illustrations, your vehicle has a
passenger sensing system. The indicator will be visible
when you turn your ignition key to START or RUN.
The words ON and OFF or the symbol for on and off,
will be visible on the rearview mirror during the system
check. When the system check is complete, either
the word ON or the word OFF, or the symbol for on or
the symbol for off will be visible. See
Passenger Air
Bag Status Indicator on page 3-35. If your rearview
mirror doesn't have either of the indicators pictured,
then your vehicle doesn't have the passenger sensing
system.The passenger sensing system will turn off the right
front passenger's frontal air bag under certain
conditions. The driver's air bag and the side air bags
are not part of the passenger sensing system.
The passenger sensing system works with sensors that
are part of the right front passenger's seat and safety
belt. The sensors are designed to detect the presence
of a properly-seated occupant and determine if the
passenger's frontal air bag should be enabled
(may in¯ate) or not. Passenger Air Bag Status Indicator ± United States
Passenger
Air Bag Status
Indicator ± Canada
1-60
Page 73 of 473

Keys...............................................................2-3
Remote Keyless Entry System.........................2-4
Remote Keyless Entry System Operation...........2-5
Doors and Locks.............................................2-8
Door Locks....................................................2-8
Power Door Locks..........................................2-9
Delayed Locking.............................................2-9
Programmable Automatic Door Locks..............2-10
Rear Door Security Locks..............................2-12
Lockout Protection........................................2-12
Midgate.......................................................2-12
Tailgate.......................................................2-22
Windows........................................................2-24
Power Windows............................................2-25
Sun Visors...................................................2-25
Theft-Deterrent Systems..................................2-26
Content Theft-Deterrent.................................2-26
Passlock
ž....................................................2-27
Starting and Operating Your Vehicle................2-28
New Vehicle Break-In....................................2-28
Ignition Positions..........................................2-28Starting Your Engine.....................................2-29
Adjustable Throttle and Brake Pedal................2-30
Engine Coolant Heater..................................2-31
Automatic Transmission Operation...................2-32
All-Wheel Drive............................................2-35
Parking Brake..............................................2-35
Shifting Into Park (P).....................................2-36
Shifting Out of Park (P).................................2-38
Parking Over Things That Burn.......................2-39
Engine Exhaust............................................2-39
Running Your Engine While You Are Parked.......2-40
Mirrors...........................................................2-41
Automatic Dimming Rearview Mirror with
OnStar
ž, Compass and Temperature
Display....................................................2-41
Outside Power Mirrors...................................2-44
Outside Convex Mirror...................................2-44
Outside Heated Mirrors..................................2-45
Outside Automatic Dimming Mirror with
Curb View Assist.......................................2-45
OnStar
žSystem.............................................2-46
Section 2 Features and Controls
2-1
Page 113 of 473
Mirrors
Automatic Dimming Rearview Mirror
with OnStar
ž, Compass and
Temperature Display
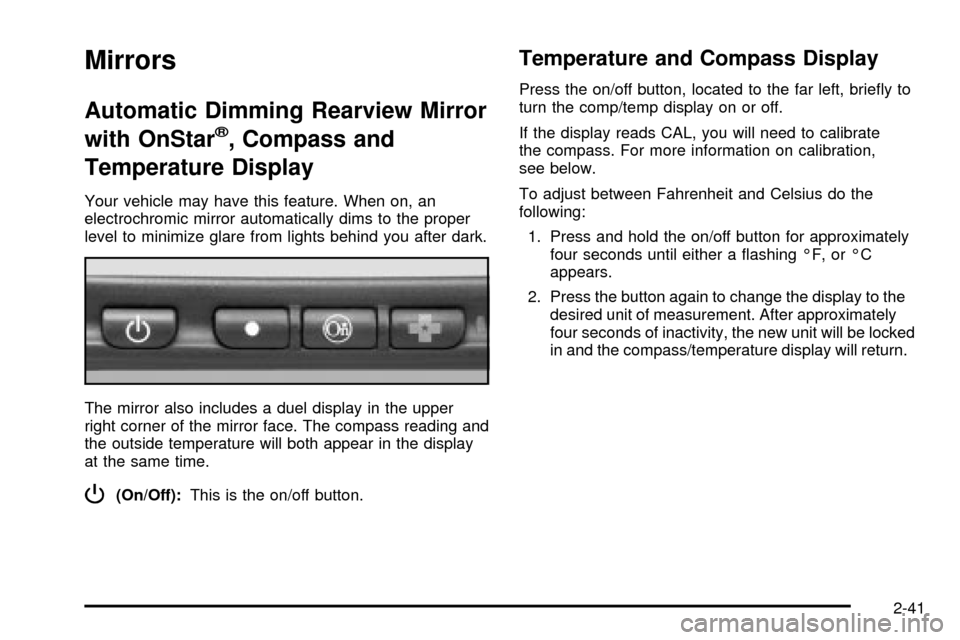
Your vehicle may have this feature. When on, an
electrochromic mirror automatically dims to the proper
level to minimize glare from lights behind you after dark.
The mirror also includes a duel display in the upper
right corner of the mirror face. The compass reading and
the outside temperature will both appear in the display
at the same time.
P(On/Off):This is the on/off button.
Temperature and Compass Display
Press the on/off button, located to the far left, brie¯y to
turn the comp/temp display on or off.
If the display reads CAL, you will need to calibrate
the compass. For more information on calibration,
see below.
To adjust between Fahrenheit and Celsius do the
following:
1. Press and hold the on/off button for approximately
four seconds until either a ¯ashing ÉF, or ÉC
appears.
2. Press the button again to change the display to the
desired unit of measurement. After approximately
four seconds of inactivity, the new unit will be locked
in and the compass/temperature display will return.
2-41
Page 117 of 473
Outside Heated Mirrors
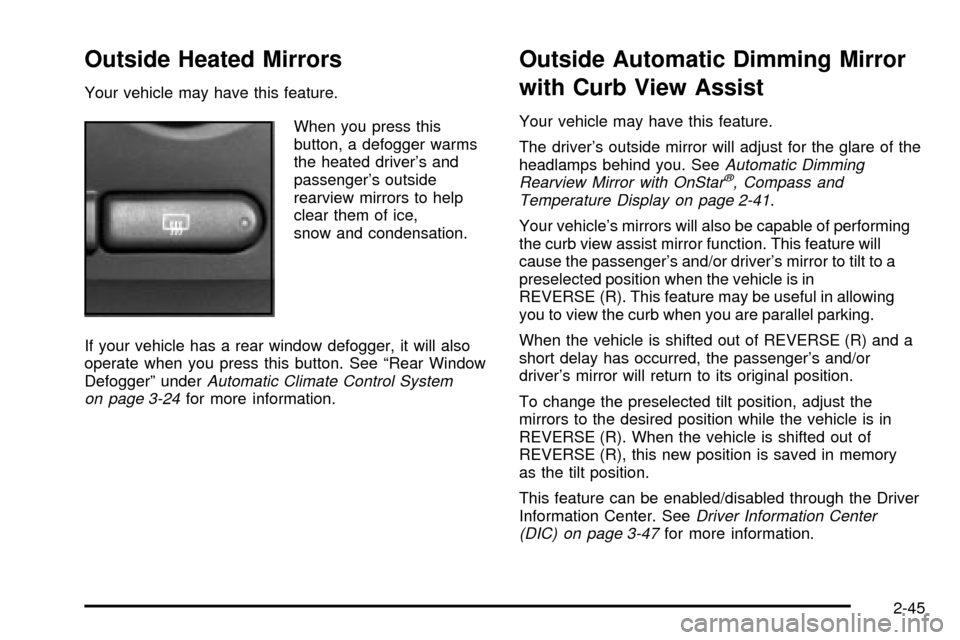
Your vehicle may have this feature.
When you press this
button, a defogger warms
the heated driver's and
passenger's outside
rearview mirrors to help
clear them of ice,
snow and condensation.
If your vehicle has a rear window defogger, it will also
operate when you press this button. See ªRear Window
Defoggerº under
Automatic Climate Control System
on page 3-24for more information.
Outside Automatic Dimming Mirror
with Curb View Assist
Your vehicle may have this feature.
The driver's outside mirror will adjust for the glare of the
headlamps behind you. See
Automatic Dimming
Rearview Mirror with OnStarž, Compass and
Temperature Display on page 2-41.
Your vehicle's mirrors will also be capable of performing
the curb view assist mirror function. This feature will
cause the passenger's and/or driver's mirror to tilt to a
preselected position when the vehicle is in
REVERSE (R). This feature may be useful in allowing
you to view the curb when you are parallel parking.
When the vehicle is shifted out of REVERSE (R) and a
short delay has occurred, the passenger's and/or
driver's mirror will return to its original position.
To change the preselected tilt position, adjust the
mirrors to the desired position while the vehicle is in
REVERSE (R). When the vehicle is shifted out of
REVERSE (R), this new position is saved in memory
as the tilt position.
This feature can be enabled/disabled through the Driver
Information Center. See
Driver Information Center
(DIC) on page 3-47for more information.
2-45
Page 166 of 473
Ultrasonic Rear Parking Assist
(URPA)
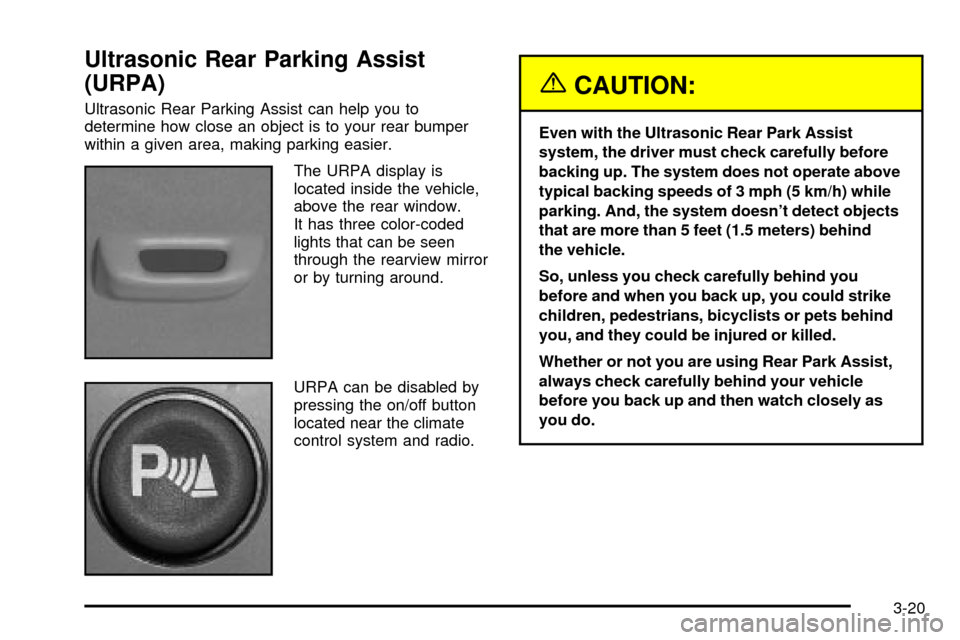
Ultrasonic Rear Parking Assist can help you to
determine how close an object is to your rear bumper
within a given area, making parking easier.
The URPA display is
located inside the vehicle,
above the rear window.
It has three color-coded
lights that can be seen
through the rearview mirror
or by turning around.
URPA can be disabled by
pressing the on/off button
located near the climate
control system and radio.
{CAUTION:
Even with the Ultrasonic Rear Park Assist
system, the driver must check carefully before
backing up. The system does not operate above
typical backing speeds of 3 mph (5 km/h) while
parking. And, the system doesn't detect objects
that are more than 5 feet (1.5 meters) behind
the vehicle.
So, unless you check carefully behind you
before and when you back up, you could strike
children, pedestrians, bicyclists or pets behind
you, and they could be injured or killed.
Whether or not you are using Rear Park Assist,
always check carefully behind your vehicle
before you back up and then watch closely as
you do.
3-20
Page 181 of 473

Passenger Air Bag Status Indicator
If your vehicle has the passenger sensing system
your rearview mirror will have a passenger air bag status
indicator.
When the ignition key is turned to RUN or START,
the passenger air bag status indicator will light ON and
OFF, or the symbol for on and off, for several seconds
as a system check. Then, after several more seconds,
the status indicator will light either ON or OFF, or
either the on or off symbol to let you know the status of
the right front passenger's frontal air bag.If the word ON or the on symbol is lit on the passenger
air bag status indicator, it means that the right front
passenger's frontal air bag is enabled (may in¯ate).
{CAUTION:
If the on indicator comes on when you have a
rear-facing child restraint installed in the right
front passenger's seat, it means that the
passenger sensing system has not turned off
the passenger's frontal air bag. A child in a
rear-facing child restraint can be seriously
injured or killed if the right front passenger's
air bag in¯ates. This is because the back of
the rear-facing child restraint would be very
close to the in¯ating air bag. Don't use a
rear-facing child restraint in the right front
passenger's seat unless the air bag has been
turned off. Passenger Air Bag Status Indicator ± United States
Passenger
Air Bag Status
Indicator ± Canada
3-35
Page 282 of 473

Here are some tips on night driving.
·Drive defensively.
·Don't drink and drive.
·Adjust your inside rearview mirror to reduce the
glare from headlamps behind you.
·Since you can't see as well, you may need to slow
down and keep more space between you and
other vehicles.
·Slow down, especially on higher speed roads. Your
headlamps can light up only so much road ahead.
·In remote areas, watch for animals.
·If you're tired, pull off the road in a safe place
and rest.
No one can see as well at night as in the daytime.
But as we get older these differences increase.
A 50-year-old driver may require at least twice as much
light to see the same thing at night as a 20-year-old.
What you do in the daytime can also affect your night
vision. For example, if you spend the day in bright
sunshine you are wise to wear sunglasses. Your eyes will
have less trouble adjusting to night. But if you're driving,
don't wear sunglasses at night. They may cut down on
glare from headlamps, but they also make a lot of things
invisible.You can be temporarily blinded by approaching
headlamps. It can take a second or two, or even
several seconds, for your eyes to re-adjust to the dark.
When you are faced with severe glare (as from a
driver who doesn't lower the high beams, or a vehicle
with misaimed headlamps), slow down a little. Avoid
staring directly into the approaching headlamps.
Keep your windshield and all the glass on your vehicle
clean Ð inside and out. Glare at night is made much
worse by dirt on the glass. Even the inside of the glass
can build up a ®lm caused by dust. Dirty glass makes
lights dazzle and ¯ash more than clean glass would,
making the pupils of your eyes contract repeatedly.
Remember that your headlamps light up far less of a
roadway when you are in a turn or curve. Keep your eyes
moving; that way, it's easier to pick out dimly lighted
objects. Just as your headlamps should be checked
regularly for proper aim, so should your eyes be
examined regularly. Some drivers suffer from night
blindness Ð the inability to see in dim light Ð and aren't
even aware of it.
4-33
Page 414 of 473
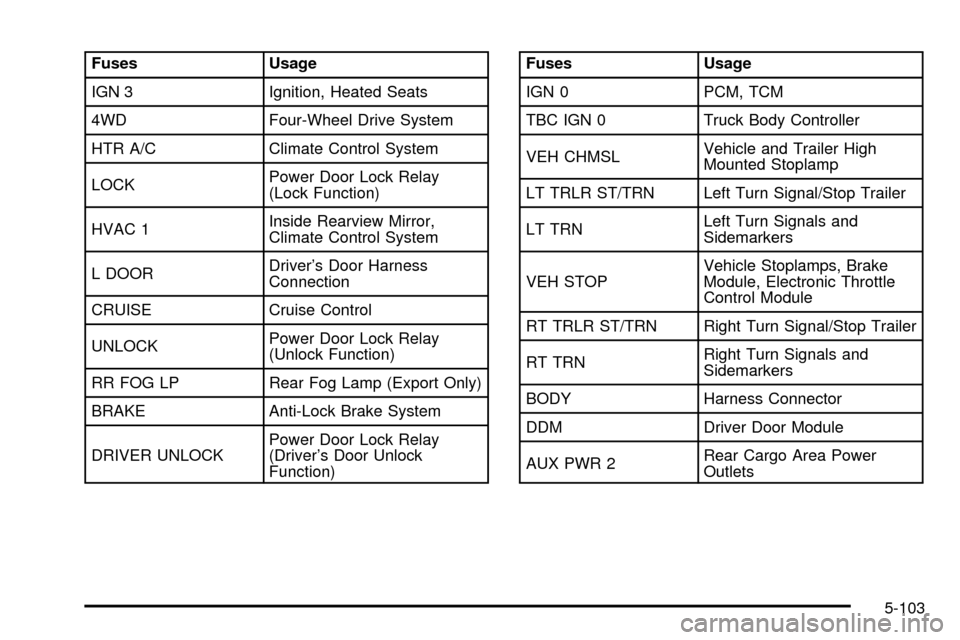
Fuses Usage
IGN 3 Ignition, Heated Seats
4WD Four-Wheel Drive System
HTR A/C Climate Control System
LOCKPower Door Lock Relay
(Lock Function)
HVAC 1Inside Rearview Mirror,
Climate Control System
L DOORDriver's Door Harness
Connection
CRUISE Cruise Control
UNLOCKPower Door Lock Relay
(Unlock Function)
RR FOG LP Rear Fog Lamp (Export Only)
BRAKE Anti-Lock Brake System
DRIVER UNLOCKPower Door Lock Relay
(Driver's Door Unlock
Function)Fuses Usage
IGN 0 PCM, TCM
TBC IGN 0 Truck Body Controller
VEH CHMSLVehicle and Trailer High
Mounted Stoplamp
LT TRLR ST/TRN Left Turn Signal/Stop Trailer
LT TRNLeft Turn Signals and
Sidemarkers
VEH STOPVehicle Stoplamps, Brake
Module, Electronic Throttle
Control Module
RT TRLR ST/TRN Right Turn Signal/Stop Trailer
RT TRNRight Turn Signals and
Sidemarkers
BODY Harness Connector
DDM Driver Door Module
AUX PWR 2Rear Cargo Area Power
Outlets
5-103