torque CADILLAC ESCALADE EXT 2003 2.G Owners Manual
[x] Cancel search | Manufacturer: CADILLAC, Model Year: 2003, Model line: ESCALADE EXT, Model: CADILLAC ESCALADE EXT 2003 2.GPages: 473, PDF Size: 3.31 MB
Page 110 of 473

Torque Lock
If you are parking on a hill and you don't shift your
vehicle into PARK (P) properly, the weight of the vehicle
may put too much force on the parking pawl in the
transmission. You may ®nd it difficult to pull the shift
lever out of PARK (P). This is called torque lock.
To prevent torque lock, set the parking brake and then
shift into PARK (P) properly before you leave the
driver's seat. To ®nd out how, see
Shifting Into Park (P)
on page 2-36.
When you are ready to drive, move the shift lever out of
PARK (P) before you release the parking brake.
If torque lock does occur, you may need to have another
vehicle push yours a little uphill to take some of the
pressure from the parking pawl in the transmission,
so you can pull the shift lever out of PARK (P).
Shifting Out of Park (P)
Your vehicle has an automatic transmission shift lock
control system. You have to fully apply your regular
brakes before you can shift from PARK (P) when the
ignition is in RUN. See
Automatic Transmission
Operation on page 2-32.
If you cannot shift out of PARK (P), ease pressure on the
shift lever and push the shift lever all the way up into
PARK (P) as you maintain brake application. Then, move
the shift lever into the gear you want.
If you ever hold the brake pedal down but still can't shift
out of PARK (P), try this:
1. Turn the key to OFF/ACCESSORY. There is no
shift interlock in this key position.
2. Apply and hold the brake until the end of Step 4.
3. Shift the vehicle to NEUTRAL (N).
4. Start the vehicle and then shift to the drive gear
you want.
5. Have the system ®xed as soon as possible.
2-38
Page 353 of 473

Properly torqued wheel nuts are necessary to help
prevent brake pulsation. When tires are rotated, inspect
brake pads for wear and evenly tighten wheel nuts in
the proper sequence to GM torque speci®cations.
Brake linings should always be replaced as complete
axle sets.
See
Brake System Inspection on page 6-16.
Brake Pedal Travel
See your dealer if the brake pedal does not return to
normal height, or if there is a rapid increase in
pedal travel. This could be a sign of brake trouble.
Brake Adjustment
Every time you make a brake stop, your disc brakes
adjust for wear.
Replacing Brake System Parts
The braking system on a vehicle is complex. Its many
parts have to be of top quality and work well together if
the vehicle is to have really good braking. Your vehicle
was designed and tested with top-quality GM brake
parts. When you replace parts of your braking
system Ð for example, when your brake linings wear
down and you need new ones put in Ð be sure you get
new approved GM replacement parts. If you don't,
your brakes may no longer work properly. For example,
if someone puts in brake linings that are wrong for
your vehicle, the balance between your front and rear
brakes can change Ð for the worse. The braking
performance you've come to expect can change in many
other ways if someone puts in the wrong replacement
brake parts.
5-42
Page 380 of 473

After the tires have been rotated, adjust the front and rear
in¯ation pressures as shown on the Certi®cation/Tire
label. Make certain that all wheel nuts are properly
tightened. See ªWheel Nut Torqueº under
Capacities and
Speci®cations on page 5-110.
{CAUTION:
Rust or dirt on a wheel, or on the parts to
which it is fastened, can make wheel nuts
become loose after a time. The wheel could
come off and cause an accident. When you
change a wheel, remove any rust or dirt from
places where the wheel attaches to the vehicle.
In an emergency, you can use a cloth or a
paper towel to do this; but be sure to use a
scraper or wire brush later, if you need to,
to get all the rust or dirt off. See ªChanging a
Flat Tireº in the Index.
When It Is Time for New Tires
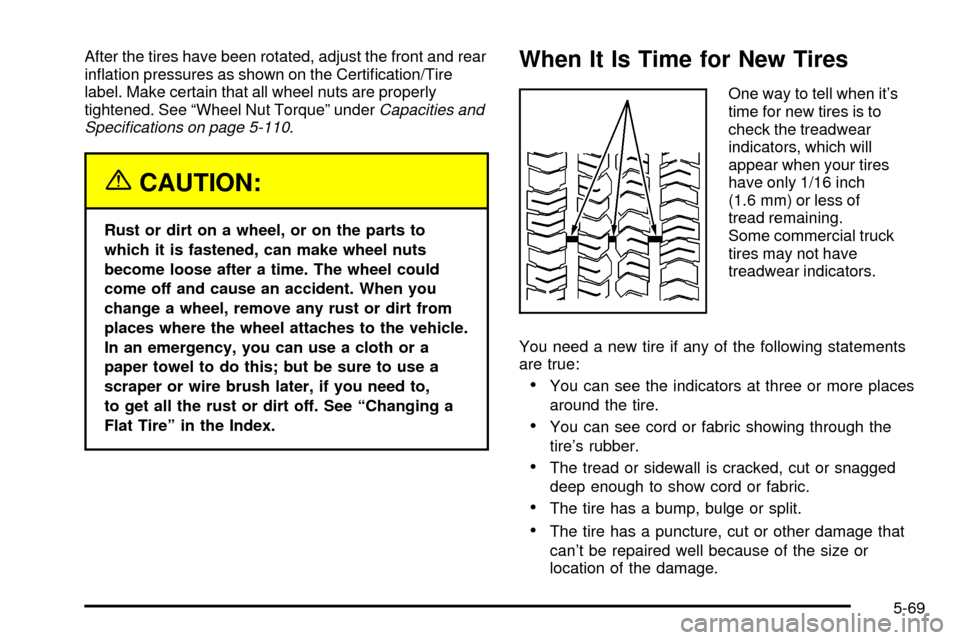
One way to tell when it's
time for new tires is to
check the treadwear
indicators, which will
appear when your tires
have only 1/16 inch
(1.6 mm) or less of
tread remaining.
Some commercial truck
tires may not have
treadwear indicators.
You need a new tire if any of the following statements
are true:
·You can see the indicators at three or more places
around the tire.
·You can see cord or fabric showing through the
tire's rubber.
·The tread or sidewall is cracked, cut or snagged
deep enough to show cord or fabric.
·The tire has a bump, bulge or split.
·The tire has a puncture, cut or other damage that
can't be repaired well because of the size or
location of the damage.
5-69
Page 396 of 473

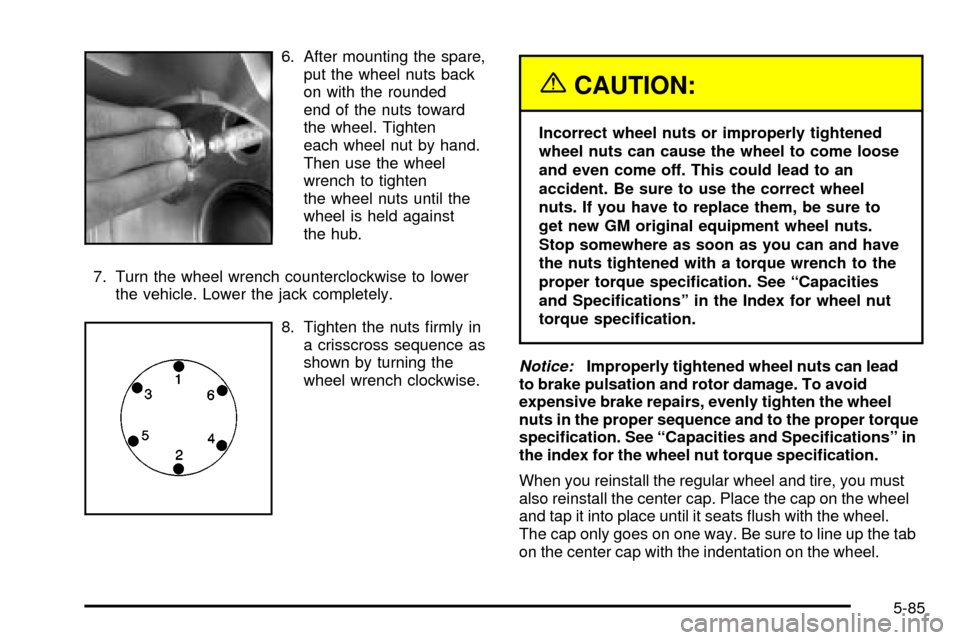
6. After mounting the spare,
put the wheel nuts back
on with the rounded
end of the nuts toward
the wheel. Tighten
each wheel nut by hand.
Then use the wheel
wrench to tighten
the wheel nuts until the
wheel is held against
the hub.
7. Turn the wheel wrench counterclockwise to lower
the vehicle. Lower the jack completely.
8. Tighten the nuts ®rmly in
a crisscross sequence as
shown by turning the
wheel wrench clockwise.
{CAUTION:
Incorrect wheel nuts or improperly tightened
wheel nuts can cause the wheel to come loose
and even come off. This could lead to an
accident. Be sure to use the correct wheel
nuts. If you have to replace them, be sure to
get new GM original equipment wheel nuts.
Stop somewhere as soon as you can and have
the nuts tightened with a torque wrench to the
proper torque speci®cation. See ªCapacities
and Speci®cationsº in the Index for wheel nut
torque speci®cation.
Notice:Improperly tightened wheel nuts can lead
to brake pulsation and rotor damage. To avoid
expensive brake repairs, evenly tighten the wheel
nuts in the proper sequence and to the proper torque
speci®cation. See ªCapacities and Speci®cationsº in
the index for the wheel nut torque speci®cation.
When you reinstall the regular wheel and tire, you must
also reinstall the center cap. Place the cap on the wheel
and tap it into place until it seats ¯ush with the wheel.
The cap only goes on one way. Be sure to line up the tab
on the center cap with the indentation on the wheel.
5-85
Page 421 of 473

Capacities and Speci®cations
Please refer toPart D: Recommended Fluids and Lubricants on page 6-17. All capacities are approximate.
Engine Speci®cations
Engine VIN Code Spark Plug Gap
VORTECŸ 6000 H.O. V8 N 0.060 inches (1.52 mm)
Capacities and Speci®cations
ApplicationCapacities
English Metric
After re®ll, the level must be rechecked. See
Cooling System on page 5-30.
Cooling System 17.0 quarts 16.0 L
After re®ll, the level must be rechecked. Add enough engine oil so that the ¯uid is within the proper operating
range. See
Engine Oil on page 5-14.
Engine Oil with Filter 6.0 quarts 5.7 L
Fuel Tank 31.0 gallons 117.0 L
Air Conditioning Refrigerant R134a 1.6 lbs. 0.7 kg
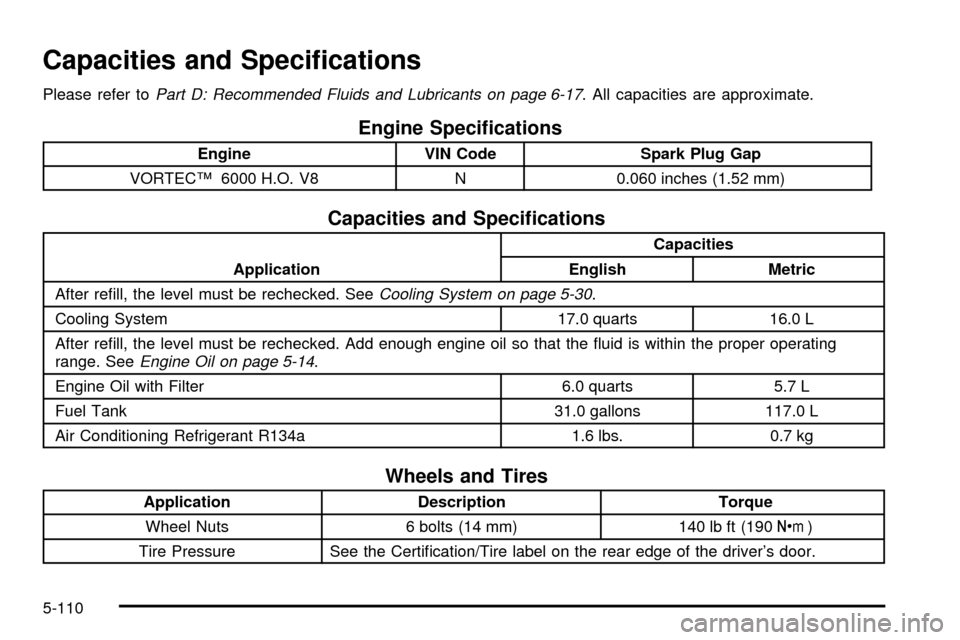
Wheels and Tires
Application Description Torque
Wheel Nuts 6 bolts (14 mm) 140 lb ft (190Y)
Tire Pressure See the Certi®cation/Tire label on the rear edge of the driver's door.
5-110
Page 471 of 473

TIGHTEN FUEL CAP......................................3-61
Tilt Wheel........................................................ 3-7
Tire In¯ation Check.........................................6-11
Tires.............................................................5-66
Buying New Tires........................................5-70
Chains.......................................................5-74
Changing a Flat Tire....................................5-76
If a Tire Goes Flat.......................................5-75
In¯ation Ð Tire Pressure..............................5-67
Inspection and Rotation................................5-68
Spare Tire..................................................5-92
Uniform Tire Quality Grading.........................5-71
Wheel Alignment and Tire Balance.................5-72
Wheel Replacement.....................................5-73
When It Is Time for New Tires......................5-69
To Use the Engine Coolant Heater....................2-31
Top Drain Grates ± Removal and Cleaning.........2-67
Top Strap Anchor Location...............................1-41
Top Strap......................................................1-40
Top-Box Storage.............................................2-70
Torque Lock...................................................2-38
Total Weight on Your Vehicle's Tires..................4-56
Tow/Haul Mode Light.......................................3-45
Tow/Haul Mode Selector Button........................2-34
Towing..........................................................4-48
Recreational Vehicle.....................................4-48
Towing a Trailer..........................................4-52
Your Vehicle...............................................4-48Towing (cont.)
Traction Control Operation................................4-11
TRACTION SYS LIMITED................................3-63
Traction.........................................................3-39
Off Light.....................................................3-39
Road Sensing Suspension.............................. 4-9
Stabilitrak
žSystem......................................4-10
Trailer Brakes.................................................4-57
Trailer Wiring Harness.....................................4-61
Trailer...........................................................4-51
Recommendations.......................................4-51
TRANS HOT IDLE ENGINE.............................3-62
Transfer Case................................................5-50
TRANSMISSION HOT.....................................3-62
Transmission Operation, Automatic....................2-32
Transmission, Transaxle, Transfer Case Unit
Repair Manual............................................7-10
Transmission..................................................5-21
Fluid, Automatic...........................................5-21
Temperature Gage.......................................3-40
Transportation Options...................................... 7-8
Traveling to Remote Areas...............................4-20
Trip Information Button....................................3-48
Truck-Camper Loading Information....................4-51
Turn and Lane Change Signals.......................... 3-8
TURN SIGNAL ON.........................................3-61
Turn Signal/Multifunction Lever........................... 3-7
Turn Signals When Towing a Trailer..................4-58
16