stop start CADILLAC ESCALADE EXT 2004 2.G User Guide
[x] Cancel search | Manufacturer: CADILLAC, Model Year: 2004, Model line: ESCALADE EXT, Model: CADILLAC ESCALADE EXT 2004 2.GPages: 478, PDF Size: 3.43 MB
Page 204 of 478

SERVICE BRAKE SYSTEM
If a problem occurs with the brake system, this message
will appear on the DIC. If this message appears, stop
as soon as possible and turn off the vehicle. Restart the
vehicle and check for the message on the DIC display.
If the message is still displayed, or appears again when
you begin driving, the brake system needs service.
Pressing the select button will clear it from the
DIC display.
SERVICE 4WD
If a problem occurs with the all±wheel drive system, this
message will appear on the DIC. If this message
appears, stop as soon as possible and turn off the
vehicle. Restart the vehicle and check for the message
on the DIC display. If the message is still displayed,
or appears again when you begin driving, the four wheel
drive system needs service. Pressing the select button
will clear it from the DIC display.
SERVICE RIDE CONTROL
If a problem occurs with the suspension system, this
message will appear on the DIC. If this message
appears, stop and turn off the vehicle. Restart the
vehicle and check for the message on the DIC display.
If the message is still displayed, or appears again
when you begin driving, the suspension system needs
service. Pressing the select button will clear it from
the DIC display.
TURN SIGNAL ON
If a turn signal is left on for 3/4 of a mile (1.2 km), this
message will appear on the display and you will hear a
chime. Move the turn signal/multifunction lever to the
off position. Pressing the select button will clear it from
the DIC display.
FUEL LEVEL LOW
If the fuel level is low, this message will appear on the
DIC and you will hear a chime. Refuel as soon as
possible. Pressing the select button will acknowledge
this message immediately and clear it from the DIC
display. It will also clear itself after 10 seconds until the
next ignition cycle. The low fuel light near the fuel
gage will still remain on in either case.
3-62
Page 208 of 478

STABILITY SYS ACTIVE
You may see the STABILITY SYS ACTIVE message on
the DIC. It means that an advanced computer-controlled
system has come on to help your vehicle continue to
go in the direction in which you're steering.
Stabilitrak
žactivates when the computer senses that
your vehicle is just starting to spin, as it might if you hit
a patch of ice or other slippery spot on the road.
When the system activates, you may hear a noise or
feel a vibration in the brake pedal. This is normal. When
the STABILITY SYS ACTIVE message is on, you
should continue to steer in the direction you want to go.
The system is designed to help you in bad weather
or other difficult driving situations by making the most of
whatever road conditions will permit.
SERVICE STABILITY
If you ever see the SERVICE STABILITY message, it
means there may be a problem with your
Stabilitrak
žsystem. If you see this message try to reset
the system (stop; turn off the engine; then start the
engine again). If the SERVICE STABILITY message still
comes on, it means there is a problem. You should
see your dealer for service. The vehicle is safe to drive,
however, you do not have the bene®t of Stabilitrak
ž,
so reduce your speed and drive accordingly.
STABILITY SYS DISABLED
The STABILITY SYS DISABLED message will turn on
when you press the Stabilitrakžbutton, or when the
stability control has been automatically disabled. To limit
wheel spin and realize the full bene®ts of the stability
enhancement system, you should normally leave
Stabilitrak
žon. However, you should turn Stabilitrakžoff
if your vehicle gets stuck in sand, mud, ice or snow
and you want to ªrockº your vehicle to attempt to free it,
or if you are driving in extreme off-road conditions
and require more wheel spin. See
If You Are Stuck: In
Sand, Mud, Ice or Snow on page 4-44If You Are
Stuck: In Sand, Mud, Ice or Snow. To turn the
Stabilitrak
žsystem back on press the Stabilitrakžbutton
again. There are four conditions that can cause this
message to appear. One condition is overheating, which
could occur if Stabilitrak
žactivates continuously for
an extended period of time. The message will also be
displayed if the brake system warning light is on.
See
Brake System Warning Light on page 3-39Brake
System Warning Light. The message could be displayed
if the stability system takes longer than usual to
complete its diagnostic checks due to driving conditions.
Also, if an engine or vehicle related problem has
been detected, and the vehicle needs service, the
message will appear.
The message will turn off as soon as the conditions that
caused the message to be displayed are no longer
present.
3-66
Page 221 of 478

CLEAN:If this message appears on the display, the
cassette tape player needs to be cleaned. It will still play
tapes, but you should clean it as soon as possible to
prevent damage to the tapes and player. See
Care
of Your Cassette Tape Player on page 3-100.
If any error occurs repeatedly or if an error cannot be
corrected, contact your dealer. If your radio displays an
error message, write it down and provide it to your
dealer when reporting the problem.
CD Adapter Kits
It is possible to use a portable CD player with your
cassette tape player after activating the bypass feature
on your tape player.
To activate the bypass feature, perform the
following steps:
1. Turn the ignition on.
2. Turn the radio off.
3. Press and hold the TAPE DISC button for ®ve
seconds. READY will appear on the display and
the tape symbol on the display will ¯ash, indicating
the feature is active.
4. Insert the adapter into the cassette tape slot. It will
power up the radio and begin playing.
The override feature will remain active until the eject
button is pressed.
Playing a CD
Insert a CD partway into the slot, label side up. The
player will pull it in and the CD should begin playing. The
CD symbol will appear on the display. If you want to
insert a CD with the ignition off, ®rst press the eject
button or the DISPL knob.
If you turn off the ignition or radio with the CD in the
player, it will stay in the player. When you turn on
the ignition or the radio, the CD will start playing, where
it stopped, if it was the last selected audio source.
As each new track starts to play, the track number will
appear on the display.
The CD player can play the smaller 8 cm single CDs
with an adapter ring. Full-size CDs and the smaller CDs
are loaded in the same manner.
If playing a CD-R the sound quality may be reduced
due to CD-R quality, the method of recording, the quality
of the music that has been recorded, and the way the
CD-R has been handled. You may experience an
increase in skipping, difficulty in ®nding tracks, and/or
difficulty in loading and ejecting. If these problems occur
try a known good CD.
Do not add paper labels to CDs, they could get caught
in the CD player.
Do not play 3 inch CDs without a standard adapter CD.
If an error appears on the display, see ªCD Messagesº
later in this section.
3-79
Page 222 of 478

1 PREV (Previous):Press this pushbutton to go to the
current track if it has been playing for more than
eight seconds. TRACK and the track number will appear
on the display. If you hold this pushbutton or press it
more than once, the player will continue moving
backward through the CD.
2 NEXT:Press this pushbutton to go to the next track.
TRACK and the track number will appear on the
display. If you hold this pushbutton or press it more than
once, the player will continue moving forward through
the CD.
3 REV (Reverse):Press and hold this pushbutton to
reverse quickly within a track. Press and hold this
pushbutton for less than two seconds to reverse at
six times the normal playing speed. Press and hold it for
more than two seconds to reverse at 17 times the
normal playing speed. Release it to play the passage.
ET and the elapsed time of the track will appear on
the display.
4 FWD (Forward):Press and hold this pushbutton to
advance quickly within a track. Press and hold this
pushbutton for less than two seconds to advance
at six times the normal playing speed. Press and hold it
for more than two seconds to advance at 17 times
the normal playing speed. Release it to play the
passage. ET and the elapsed time of the track will
appear on the display.6 RDM (Random):Press this pushbutton to hear the
tracks in random, rather than sequential, order. RDM ON
will appear on the display. RDM T and the track
number will appear on the display when each track
starts to play. Press this pushbutton again to turn
off random play. RDM OFF will appear on the display.
qSEEKr:Press the left arrow to go to the start
of the current or to the previous track. Press the
right arrow to go to the start of the next track. If you
hold either arrow or press it more than once, the player
will continue moving backward or forward through
the CD.
qSCANr:To scan the CD, press and hold either
SCAN arrow for more than two seconds until SCAN
appears on the display and you hear a beep. Use this
feature to listen to 10 seconds of each track of the
CD. Press either SCAN arrow again, to stop scanning.
DISPL (Display):Press this knob to see how long
the current track has been playing. ET and the elapsed
time of the track will appear on the display. To
change the default on the display (track or elapsed
time), press this knob until you see the display you want,
then hold the knob for two seconds. The radio will
produce one beep and the selected display will now be
the default.
3-80
Page 226 of 478

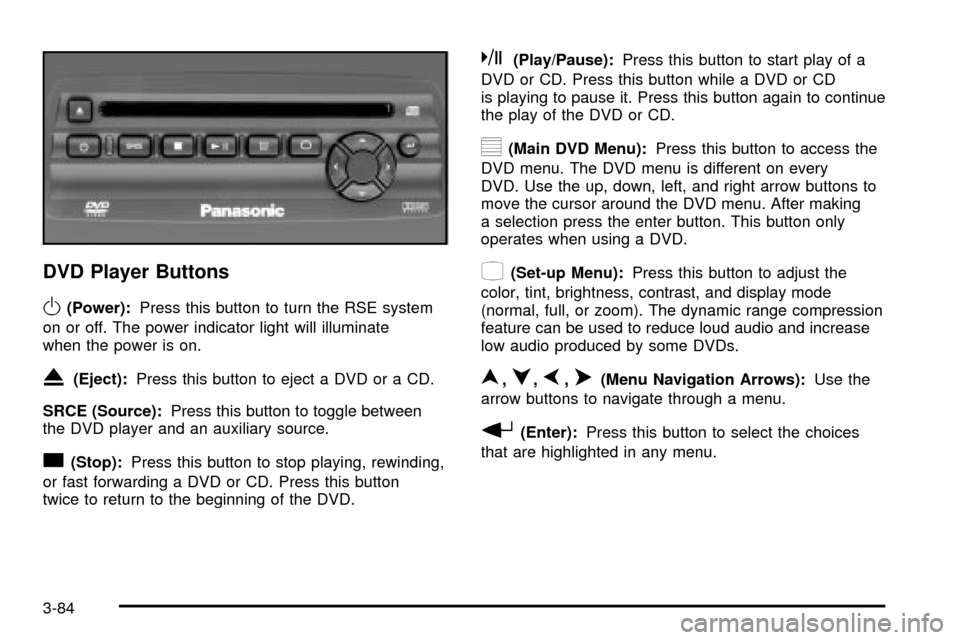
DVD Player Buttons
O(Power):Press this button to turn the RSE system
on or off. The power indicator light will illuminate
when the power is on.
X(Eject):Press this button to eject a DVD or a CD.
SRCE (Source):Press this button to toggle between
the DVD player and an auxiliary source.
c(Stop):Press this button to stop playing, rewinding,
or fast forwarding a DVD or CD. Press this button
twice to return to the beginning of the DVD.
k(Play/Pause):Press this button to start play of a
DVD or CD. Press this button while a DVD or CD
is playing to pause it. Press this button again to continue
the play of the DVD or CD.
y(Main DVD Menu):Press this button to access the
DVD menu. The DVD menu is different on every
DVD. Use the up, down, left, and right arrow buttons to
move the cursor around the DVD menu. After making
a selection press the enter button. This button only
operates when using a DVD.
z(Set-up Menu):Press this button to adjust the
color, tint, brightness, contrast, and display mode
(normal, full, or zoom). The dynamic range compression
feature can be used to reduce loud audio and increase
low audio produced by some DVDs.
n,q,p,o(Menu Navigation Arrows):Use the
arrow buttons to navigate through a menu.
r(Enter):Press this button to select the choices
that are highlighted in any menu.
3-84
Page 227 of 478

Playing a Disc
To play a disc, gently insert the disc with the label side
up into the loading slot. The DVD player will continue
loading the disc and the player will automatically start, if
the vehicle ignition is in RUN, ACCESSORY, or when
RAP is active.
If a disc is already in the player, press the play/pause
button on the face of the DVD player or on the
remote control.
Some DVDs will not allow you to fast forward or skip
the copyright information or previews. Some DVDs will
begin playing after the previews have ®nished. If the
DVD does not begin to play the main title, refer to the
on-screen instructions, as the DVD may be displaying
its main title menu.
Stopping and Resuming Playback
To stop a disc, press and release the stop button on the
DVD player or the remote control. To resume playback,
press the play/pause button on the DVD player or
the remote control. As long as the disc has not been
ejected and the stop button has not been pressed twice,
the movie should resume play from where it was last
stopped. If the disc has been ejected, or if the stop
button has been pressed twice, the disc will resume play
at the beginning of the DVD or CD.
Ejecting a Disc
Press the eject button on the DVD player to eject
the disc.
If a disc is ejected from the player, but is not removed,
the DVD player will reload the disc after a short
period of time. The disc will then be stored in the DVD
player. The DVD player will not resume play of this
disc automatically.
There is not an eject button on the remote control.
DVD Messages
The following errors may be displayed on the video
screen:
Disc Format Error:This message will be displayed if a
disc is inserted upside down, not readable, or the
format is not compatible with the DVD player.
Load/Eject Error:This message will be displayed if the
disc is not properly loaded or ejected.
Disc Play Error:This message will be displayed if the
DVD player cannot play the disc. Scratched or
damaged discs will cause this error.
Region Code Error:This message will be displayed if
the region code of the DVD is not compatible with
the region code of the DVD player.
3-85
Page 229 of 478

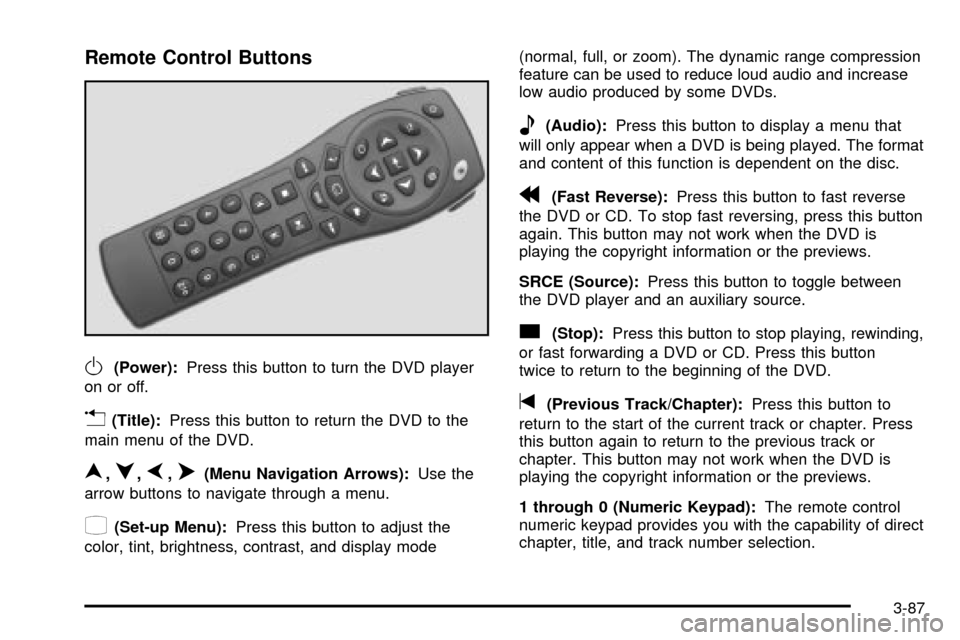
Remote Control Buttons
O(Power):Press this button to turn the DVD player
on or off.
v(Title):Press this button to return the DVD to the
main menu of the DVD.
n,q,p,o(Menu Navigation Arrows):Use the
arrow buttons to navigate through a menu.
z(Set-up Menu):Press this button to adjust the
color, tint, brightness, contrast, and display mode(normal, full, or zoom). The dynamic range compression
feature can be used to reduce loud audio and increase
low audio produced by some DVDs.
e(Audio):Press this button to display a menu that
will only appear when a DVD is being played. The format
and content of this function is dependent on the disc.
r(Fast Reverse):Press this button to fast reverse
the DVD or CD. To stop fast reversing, press this button
again. This button may not work when the DVD is
playing the copyright information or the previews.
SRCE (Source):Press this button to toggle between
the DVD player and an auxiliary source.
c(Stop):Press this button to stop playing, rewinding,
or fast forwarding a DVD or CD. Press this button
twice to return to the beginning of the DVD.
t(Previous Track/Chapter):Press this button to
return to the start of the current track or chapter. Press
this button again to return to the previous track or
chapter. This button may not work when the DVD is
playing the copyright information or the previews.
1 through 0 (Numeric Keypad):The remote control
numeric keypad provides you with the capability of direct
chapter, title, and track number selection.
3-87
Page 230 of 478

\:Press this button, within 3 seconds after inputting
a numeric selection to clear all numeric inputs. Press
this button before inputting the number.
}10:Press the button, to select chapter, title, and
track numbers greater than 9. Press this button before
inputting the number.
P(Illumination):Press this button to turn the remote
control backlight on. The backlight will time out after
about 7 to 10 seconds if no other button is pressed while
the backlight is on.
y(Main DVD Menu):Press this button to access the
DVD menu. The DVD menu is different on every
DVD. Use the up, down, left, and right arrow buttons to
move the cursor around the DVD menu. After making
a selection press the enter button. This button only
operates when using a DVD.
r(Enter):Press this button to select the choices
that are highlighted in any menu.
q(Return):Press this button to exit the current
active menu and return to the previous menu. This
button will operate only when a DVD is being played
and a menu is active.
|(Camera Angle):This button changes camera
angles on DVDs that have this feature when a DVD is
playing. The format and content of this function is
dependent on the disc.
{(Subtitle):This button turns on subtitles and
moves through subtitle options when a DVD is playing.
The format and content of this function is dependent
on the disc.
[(Fast Forward):Press this button to fast forward
the DVD or CD. To stop fast forwarding, press this
button again. This button may not work when the DVD
is playing the copyright information or the previews.
s(Play/Pause):Press this button to start play of a
DVD or CD. Press this button while a DVD or CD is
playing to pause it. Press this button again to continue
the play of the DVD or CD.
Slow Play:When the DVD is playing, press the pause
button then press the fast forward button. The DVD
will continue playing in a slow play mode. To cancel slow
play mode, press the play/pause button.
u(Next Track/Chapter):Press this button to advance
to the beginning of the next track or chapter. This
button may not work when the DVD is playing the
copyright information or the previews.
3-88
Page 235 of 478

Problem Recommended Action
After stopping the player,
I push Play but
sometimes the DVD
starts where I left off and
sometimes at the
beginning.If the stop button was
pressed one time, the DVD
player will resume playing
where the DVD was
stopped. If the stop button
was pressed two times the
DVD player will begin to
play from the beginning of
the DVD.
The auxiliary source is
running but there is no
picture or sound.Check that the DVD
player is in the auxiliary
source mode.
Check the auxiliary input
connections at both
devices.
My disc is stuck in the
player. The Load/Eject
button does not work.Turn the DVD power off,
then on and press the
Load/Eject button on the
DVD player.
Do not attempt to forcibly
remove the disc from the
DVD player. This could
permanently damage the
disc and DVD player.Problem Recommended Action
Sometimes the wireless
headphone audio cuts
out or buzzes.Check for obstructions, low
batteries, reception range,
and interference from
cellular telephone towers
or by using your cellular
telephone in the vehicle.
Check that the
headphones are facing the
front of the vehicle.
I lost the remote and/or
the headphones.See your dealer for
assistance.
The DVD is playing, but
there is no picture or
sound.Check that the DVD player
is in DVD mode.
The audio/video skips
or jumps.The DVD or CD could be
dirty, scratched, or
damaged.
What is the best way to
clean the video screen?Wipe the video screen with
a damp, soft cloth.
The audio from the radio
for the Radio with
Six-Disc CD and XMŸ
has taken over the audio
from the DVD or CD
when using the wired
headphones.The RSE is working
correctly.
Use the wireless
headphones or have the
front seat passengers
listen to another audio
source.
3-93
Page 251 of 478

Anti-lock Brake System
Your vehicle has anti-lock brakes. ABS is an advanced
electronic braking system that will help prevent a
braking skid.
When you start your engine and begin to drive away,
your anti-lock brake system will check itself. You
may hear a momentary motor or clicking noise while
this test is going on. This is normal.
If there is a problem with
the anti-lock brake system,
this warning light will
stay on. See
Anti-Lock
Brake System Warning
Light on page 3-41
.
Along with ABS, your vehicle has a Dynamic Rear
Proportioning (DRP) system. If there is a DRP problem,
both the brake and ABS warning lights will come on
accompanied by a 10-second chime. The lights
and chime will come on each time the ignition is turned
on until the problem is repaired. See your dealer for
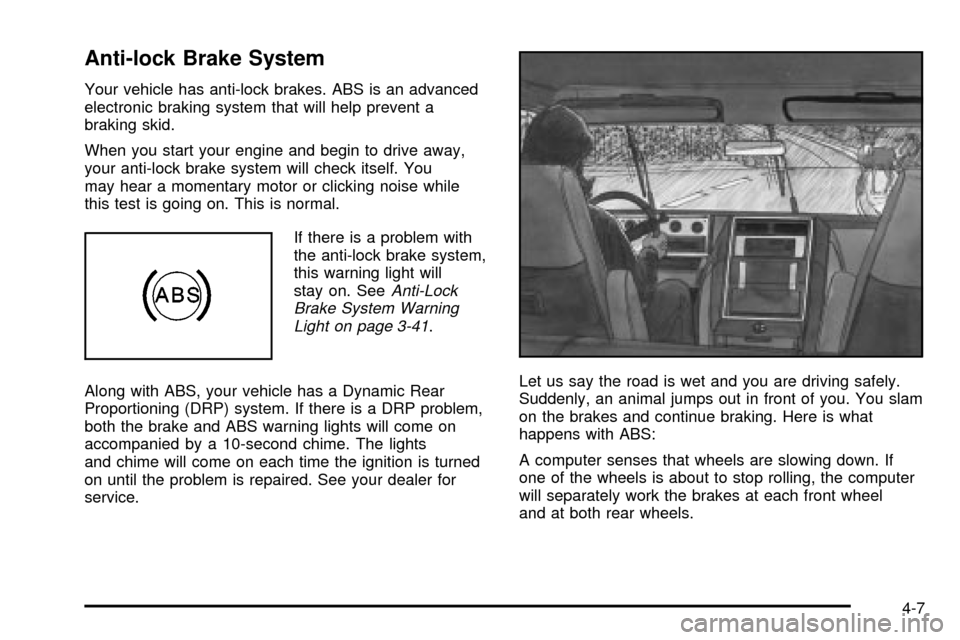
service.Let us say the road is wet and you are driving safely.
Suddenly, an animal jumps out in front of you. You slam
on the brakes and continue braking. Here is what
happens with ABS:
A computer senses that wheels are slowing down. If
one of the wheels is about to stop rolling, the computer
will separately work the brakes at each front wheel
and at both rear wheels.
4-7