stop start CADILLAC ESCALADE EXT 2004 2.G Owner's Guide
[x] Cancel search | Manufacturer: CADILLAC, Model Year: 2004, Model line: ESCALADE EXT, Model: CADILLAC ESCALADE EXT 2004 2.GPages: 478, PDF Size: 3.43 MB
Page 308 of 478

When You Are Ready to Leave After
Parking on a Hill
1. Apply your regular brakes and hold the pedal down
while you:
·start your engine,
·shift into a gear, and
·release the parking brake.
2. Let up on the brake pedal.
3. Drive slowly until the trailer is clear of the chocks.
4. Stop and have someone pick up and store the
chocks.
Maintenance When Trailer Towing
Your vehicle will need service more often when you're
pulling a trailer. See the Maintenance Schedule for more
on this. Things that are especially important in trailer
operation are automatic transmission ¯uid (don't over®ll),
engine oil, axle lubricant, belts, cooling system and
brake system. Each of these is covered in this manual,
and the Index will help you ®nd them quickly. If
you're trailering, it's a good idea to review these sections
before you start your trip.
Check periodically to see that all hitch nuts and bolts
are tight.
Trailer Wiring Harness
Heavy-Duty Trailer Wiring Package
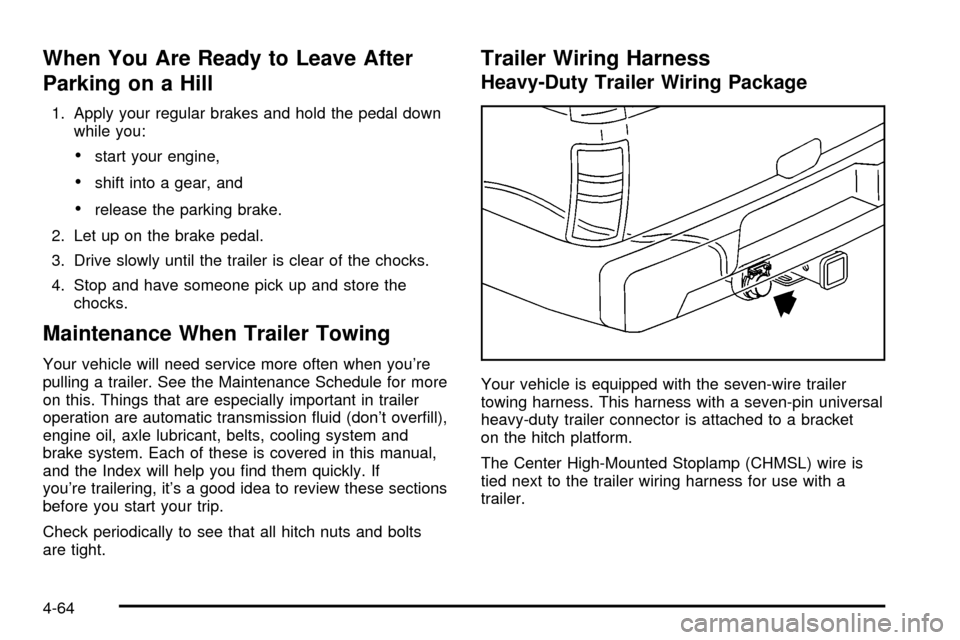
Your vehicle is equipped with the seven-wire trailer
towing harness. This harness with a seven-pin universal
heavy-duty trailer connector is attached to a bracket
on the hitch platform.
The Center High-Mounted Stoplamp (CHMSL) wire is
tied next to the trailer wiring harness for use with a
trailer.
4-64
Page 311 of 478

Service............................................................5-3
Doing Your Own Service Work.........................5-3
Adding Equipment to the Outside of Your
Vehicle......................................................5-4
Fuel................................................................5-4
Gasoline Octane............................................5-4
Gasoline Speci®cations....................................5-5
California Fuel...............................................5-5
Additives.......................................................5-5
Fuels in Foreign Countries...............................5-6
Filling Your Tank............................................5-6
Filling a Portable Fuel Container.......................5-8
Checking Things Under the Hood.....................5-8
Hood Release................................................5-9
Engine Compartment Overview.......................5-10
Engine Oil...................................................5-11
Engine Air Cleaner/Filter................................5-16
Automatic Transmission Fluid.........................5-19
Engine Coolant.............................................5-22
Coolant Surge Tank Pressure Cap..................5-25
Engine Overheating.......................................5-26
Cooling System............................................5-28
Engine Fan Noise.........................................5-34Power Steering Fluid.....................................5-35
Windshield Washer Fluid................................5-36
Brakes........................................................5-38
Battery........................................................5-41
Jump Starting...............................................5-42
All-Wheel Drive..............................................5-48
Rear Axle.......................................................5-49
Front Axle......................................................5-50
Headlamp Aiming...........................................5-51
Headlamp Horizontal Aiming...........................5-52
Headlamp Vertical Aiming..............................5-53
Bulb Replacement..........................................5-55
High Intensity Discharge (HID) Lighting............5-55
Halogen Bulbs..............................................5-55
Headlamps..................................................5-56
Front Turn Signal, Sidemarker and Daytime
Running Lamps.........................................5-60
Center High-Mounted Stoplamp (CHMSL).........5-61
Taillamps.....................................................5-61
Replacement Bulbs.......................................5-62
Windshield Wiper Blade Replacement..............5-62
Section 5 Service and Appearance Care
5-1
Page 325 of 478

When to Change Engine Oil
(GM Oil Life System)
Your vehicle has a computer system that lets you know
when to change the engine oil and ®lter. This is
based on engine revolutions and engine temperature,
and not on mileage. Based on driving conditions,
the mileage at which an oil change will be indicated can
vary considerably. For the oil life system to work
properly, you must reset the system every time the oil is
changed.
When the system has calculated that oil life has been
diminished, it will indicate that an oil change is
necessary. A CHANGE ENGINE OIL message will
come on. Change your oil as soon as possible within
the next two times you stop for fuel. It is possible that, if
you are driving under the best conditions, the oil life
system may not indicate that an oil change is necessary
for over a year. However, your engine oil and ®lter
must be changed at least once a year and at this time
the system must be reset. Your dealer has GM-trained
service people who will perform this work using
genuine GM parts and reset the system. It is also
important to check your oil regularly and keep it at the
proper level.
If the system is ever reset accidentally, you must
change your oil at 3,000 miles (5 000 km) since your
last oil change. Remember to reset the oil life system
whenever the oil is changed.
How to Reset the CHANGE ENGINE OIL
Message
The GM Oil Life System calculates when to change
your engine oil and ®lter based on vehicle use. Anytime
your oil is changed, reset the system so it can
calculate when the next oil change is required. If a
situation occurs where you change your oil prior to a
CHANGE ENGINE OIL message being turned on, reset
the system.
To reset the CHANGE ENGINE OIL message, see ªGM
Oil Life Systemº under
DIC Operation and Displays
on page 3-49for vehicles equipped with the DIC, or do
the following:
1. Turn the ignition key to RUN with the engine off.
2. Fully press and release the accelerator pedal slowly
three times within ®ve seconds.
If the OIL LIFE RESET message ¯ashes for
10 seconds, the system is resetting.
3. Turn the key to LOCK.
If the CHANGE ENGINE OIL message comes back on
when you start your vehicle, the engine oil life system
has not reset. Repeat the procedure. If it still does
not reset, see your dealer for service.
5-15
Page 361 of 478

Headlamp Aiming
Your vehicle has a visual optical headlamp aiming
system equipped with horizontal aim indicators. The aim
has been preset at the factory and should need no
further adjustment. This is true even though your
horizontal aim indicators may not fall exactly on the ª0º
(zero) marks on their scales.
If your vehicle is damaged in an accident, the headlamp
aim may be affected. Aim adjustment to the low beam
may be necessary if it is difficult to see lane markers (for
horizontal aim), or if oncoming drivers ¯ash their high
beams at you (for vertical aim).
If you believe your headlamps need to be re-aimed, we
recommend that you take your vehicle to your dealer
for service. However, it is possible for you to re-aim your
headlamps as described in the following procedure.
Notice:To make sure your headlamps are aimed
properly, read all the instructions before beginning.
Failure to follow these instructions could cause
damage to headlamp parts.
The vehicle should be properly prepared as follows:
·The vehicle should be placed so the headlamps are
25 ft. (7.6 m) from a light colored wall or other ¯at
surface.
·The vehicle must have all four tires on a perfectly
level surface which is level all the way to the wall
or other ¯at surface.
·The vehicle should be placed so it is perpendicular
to the wall or other ¯at surface.
·The vehicle should not have any snow, ice or mud
attached to it.
·The vehicle should be fully assembled and all other
work stopped while headlamp aiming is being done.
·The vehicle should be normally loaded with a
full tank of fuel and one person or 160 lbs. (75 kg)
on the driver's seat.
·Tires should be properly in¯ated.
·Start the vehicle and rock it to level the suspension.
Headlamp aiming is done with the vehicle low beam
lamps. The high beam lamps will be correctly aimed if
the low beam lamps are aimed properly.
5-51
Page 383 of 478

TPM Sensor Identi®cation Codes
Each TPM sensor has a unique identi®cation code. Any
time you rotate your vehicle's tires or replace one or
more of the TPM sensors, the identi®cation codes
will need to be matched to the new tire/wheel position.
Each tire/wheel position is matched to a sensor, by
increasing or decreasing the tire's air pressure.
The sensors are matched to the tire/wheel positions in
the following order: left front (LF); right front (RF);
right rear (RR) and left rear (LR).
You will have one minute to match the ®rst tire/wheel
position, and ®ve minutes overall to match all four
tire/wheel positions. If it takes longer than one minute,
to match the ®rst tire and wheel, or more than ®ve
minutes to match all four tire and wheel positions the
matching process stops and you will need to start over.
The TPM sensor matching process is outlined below:
1. Set the Parking brake.
2. Turn the ignition switch to RUN with the engine off.3. Turn the exterior lamp switch from ªOffº to ªOnº
four times within 3 seconds. A double horn chirp
will sound and the TPM low tire warning light
will begin to ¯ash. The double horn chirp and
¯ashing TPM warning light indicate that the TPM
matching process has started. The TPM warning
light should continue ¯ashing throughout the
matching procedure. The SERVICE TIRE
MONITOR message will be displayed on the Driver
Information Center (DIC).
4. Start with the left (driver's side) front tire.
5. Remove the valve cap from the valve cap stem.
Activate the TPM sensor by increasing or
decreasing the tire's air pressure for 10 seconds,
then stop and listen for a single horn chirp.
The single horn chirp should sound within
15 seconds, con®rming that the sensor identi®cation
code has been matched to this tire and wheel
position. If you do not hear the con®rming single
horn chirp, you will need to start over with step
number one. To let air-pressure out of a tire you can
use the pointy end of the valve cap, a pencil-style
air pressure gage or a key.
5-73
Page 427 of 478

*1Ð Gasoline Engine and Fuel Injection Rail #2.
*2Ð Gasoline Engine and Fuel Injection Rail #1.
*3Ð Gasoline Engine; Oxygen Sensors.
*4Ð Gasoline Engine; Oxygen Sensors.
*5Ð PCM Ignition
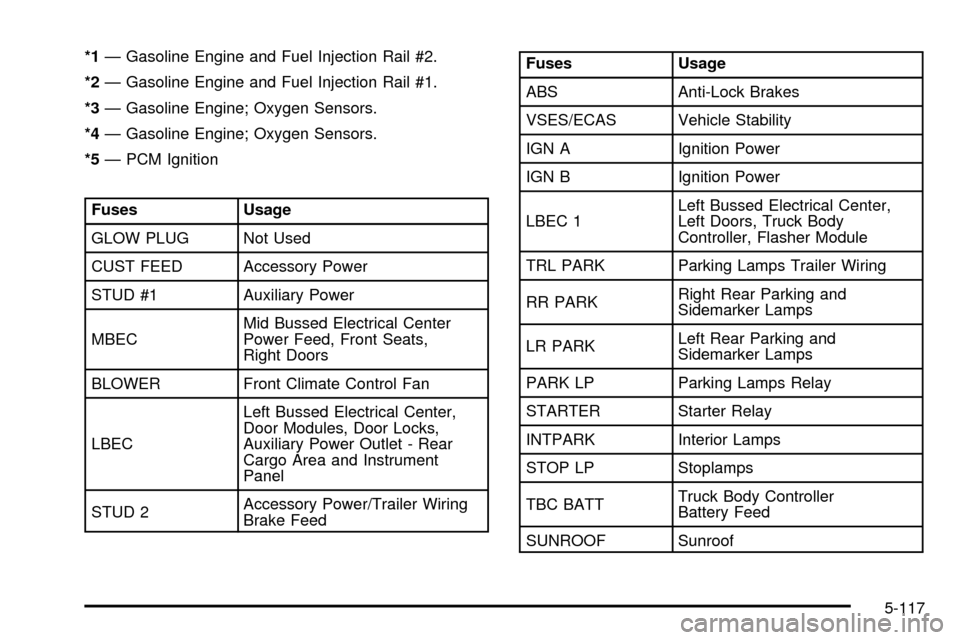
Fuses Usage
GLOW PLUG Not Used
CUST FEED Accessory Power
STUD #1 Auxiliary Power
MBECMid Bussed Electrical Center
Power Feed, Front Seats,
Right Doors
BLOWER Front Climate Control Fan
LBECLeft Bussed Electrical Center,
Door Modules, Door Locks,
Auxiliary Power Outlet - Rear
Cargo Area and Instrument
Panel
STUD 2Accessory Power/Trailer Wiring
Brake Feed
Fuses Usage
ABS Anti-Lock Brakes
VSES/ECAS Vehicle Stability
IGN A Ignition Power
IGN B Ignition Power
LBEC 1Left Bussed Electrical Center,
Left Doors, Truck Body
Controller, Flasher Module
TRL PARK Parking Lamps Trailer Wiring
RR PARKRight Rear Parking and
Sidemarker Lamps
LR PARKLeft Rear Parking and
Sidemarker Lamps
PARK LP Parking Lamps Relay
STARTER Starter Relay
INTPARK Interior Lamps
STOP LP Stoplamps
TBC BATTTruck Body Controller
Battery Feed
SUNROOF Sunroof
5-117