wheel CADILLAC ESCALADE EXT 2004 2.G User Guide
[x] Cancel search | Manufacturer: CADILLAC, Model Year: 2004, Model line: ESCALADE EXT, Model: CADILLAC ESCALADE EXT 2004 2.GPages: 478, PDF Size: 3.43 MB
Page 104 of 478

Tow/Haul Mode Selector Button
Your vehicle is equipped with a tow/haul mode. The
button for this feature is located on the end of the
column shift lever. You can use this feature to assist
when towing or hauling a heavy load. See ªTow/Haul
Modeº under
Towing a Trailer on page 4-55for
more information.The tow/haul mode also interacts with the Road
Sensing Suspension (RSS) feature to enhance the ride
when trailering or with a loaded vehicle. See
Road
Sensing Suspension on page 4-9.
All-Wheel Drive
With this feature, engine power is sent to all four wheels
when extra traction is needed.
This is like four-wheel drive, but there is no separate
lever or switch to engage or disengage the front axle. It
is fully automatic, and adjusts itself as needed for
road conditions.
2-36
Page 117 of 478

Luxury and Leisure Plan
·
All Directions and Connections Plan services
·Personal Concierge
OnStaržPersonal Calling
With OnStaržPersonal Calling, you have a safer way to
stay connected while driving. It's a hands-free wireless
phone that's integrated into your vehicle. You can place
calls nationwide using voice-activated dialing with no
contracts and no additional roaming charges. To ®nd out
more about OnStar
žPersonal Calling, refer to the
OnStaržowner's guide in your vehicle's glove box, or
call OnStaržat 1-888-4-ONSTAR (1-888-466-7827).
OnStaržVirtual Advisor
With OnStaržVirtual Advisor you can listen to your
favorite news, entertainment and information topics,
such as traffic and weather reports, stock quotes
and sports scores. You listen to your e-mail through
your vehicle's speakers, and reply with your hands on
the wheel and your eyes on the road.
OnStaržSteering Wheel Controls
g
: If your vehicle is
equipped with the steering
wheel control buttons
you can use them
to interact with the OnStar
ž
system.
See the OnStar
žmanual provided with your vehicle for
more information.
2-49
Page 143 of 478

Instrument Panel Overview...............................3-4
Hazard Warning Flashers................................3-6
Other Warning Devices...................................3-6
Horn.............................................................3-7
Tilt Wheel.....................................................3-7
Turn Signal/Multifunction Lever.........................3-7
Exterior Lamps.............................................3-15
Interior Lamps..............................................3-19
Ultrasonic Rear Parking Assist (URPA)............3-20
Accessory Power Outlets...............................3-23
Ashtrays and Cigarette Lighter........................3-23
Analog Clock...............................................3-24
Climate Controls............................................3-24
Automatic Climate Control System...................3-24
Outlet Adjustment.........................................3-32
Climate Controls Personalization.....................3-32Warning Lights, Gages and Indicators.............3-33
Warning Lights, Gages, and Indicators.............3-33
Instrument Panel Cluster................................3-34
Speedometer and Odometer...........................3-35
Tachometer.................................................3-35
Safety Belt Reminder Light.............................3-35
Air Bag Readiness Light................................3-36
Passenger Air Bag Status Indicator.................3-36
Charging System Light..................................3-38
Voltmeter Gage............................................3-39
Brake System Warning Light..........................3-39
Anti-Lock Brake System Warning Light.............3-41
Low Tire Pressure Warning Light....................3-41
Traction Off Light..........................................3-42
Engine Coolant Temperature Gage..................3-42
Transmission Temperature Gage.....................3-43
Malfunction Indicator Lamp.............................3-44
Oil Pressure Gage........................................3-46
Cruise Control Light......................................3-47
Tow/Haul Mode Light....................................3-47
Fuel Gage...................................................3-48
Low Fuel Warning Light.................................3-48
Section 3 Instrument Panel
3-1
Page 144 of 478

Driver Information Center (DIC).......................3-49
DIC Operation and Displays...........................3-49
DIC Warnings and Messages.........................3-60
Audio System(s).............................................3-67
Setting the Time...........................................3-68
Radio with Cassette and CD..........................3-68
Navigation/Radio System...............................3-82
Rear Seat Entertainment System....................3-83
Rear Seat Audio (RSA).................................3-94
CD Changer................................................3-95
Theft-Deterrent Feature..................................3-98
Audio Steering Wheel Controls.......................3-99DVD Distortion.............................................3-99
Radio Reception.........................................3-100
Care of Your Cassette Tape Player...............3-100
Care of Your CDs and DVDs........................3-101
Care of Your CD Changer............................3-101
Care of Your CD and DVD Player.................3-102
Cleaning the Video Screen...........................3-102
Fixed Mast Antenna....................................3-102
XMŸ Satellite Radio Antenna System
(48 Contiguous US States)........................3-102
Chime Level Adjustment...............................3-102
Section 3 Instrument Panel
3-2
Page 147 of 478

The main components of your instrument panel are the following:
A. Air Outlets. See
Outlet Adjustment on page 3-32.
B. Exterior Lamps Control. See
Exterior Lamps
on page 3-15.
C. Turn Signal/Multifunction Lever. See
Turn
Signal/Multifunction Lever on page 3-7.
D. OnStaržand Radio Steering Wheel Buttons. SeeOnStaržSystem on page 2-48andAudio Steering
Wheel Controls on page 3-99.
E. Instrument Panel Cluster. See
Instrument Panel
Cluster on page 3-34.
F. Shift Lever/Tow/Haul Selector Button. See
Automatic
Transmission Operation on page 2-34.
G. Audio System. See
Audio System(s) on page 3-67.
H. Dome Override Button. See
Interior Lamps on
page 3-19.
I. Cargo/Top-Box Lamps Button. See
Exterior Lamps
on page 3-15.
J. Fog Lamps Button. See
Exterior Lamps on
page 3-15.K. Driver Information Center (DIC) Buttons. See
Driver
Information Center (DIC) on page 3-49.
L. Parking Brake Release. See
Parking Brake on
page 2-37.
M. Tilt Lever. See
Tilt Wheel on page 3-7.
N. Comfort Control System. See
Automatic Climate
Control System on page 3-24.
O. Compact Disc Changer. See
CD Changer on
page 3-95.
P. Storage Area
Q. Clock. See
Analog Clock on page 3-24.
R. Ultrasonic Rear Parking Assist Button. See
Ultrasonic Rear Parking Assist (URPA) on
page 3-20.
S. StabiliTrakžButton. SeeStabilitrakžSystem on
page 4-9.
T. Glove Box. See
Glove Box on page 2-54.
3-5
Page 149 of 478

Horn
To sound the horn, press the center pad on the
steering wheel.
Tilt Wheel
The tilt steering wheel allows you to adjust the steering
wheel before you drive. You can raise it to the highest
level to give your legs more room when you enter
and exit the vehicle.
The tilt lever is located on
the driver's side of the
steering column under the
turn signal lever.
To tilt the wheel, hold the steering wheel and pull the
lever. Move the steering wheel to a comfortable
level, then release the lever to lock the wheel in place.
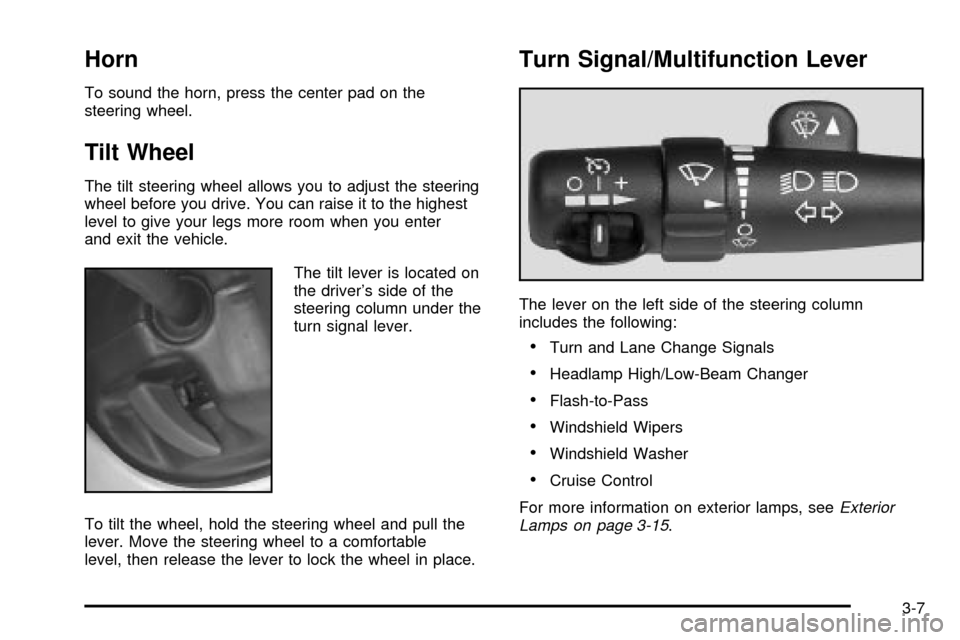
Turn Signal/Multifunction Lever
The lever on the left side of the steering column
includes the following:
·Turn and Lane Change Signals
·Headlamp High/Low-Beam Changer
·Flash-to-Pass
·Windshield Wipers
·Windshield Washer
·Cruise Control
For more information on exterior lamps, see
Exterior
Lamps on page 3-15.
3-7
Page 153 of 478

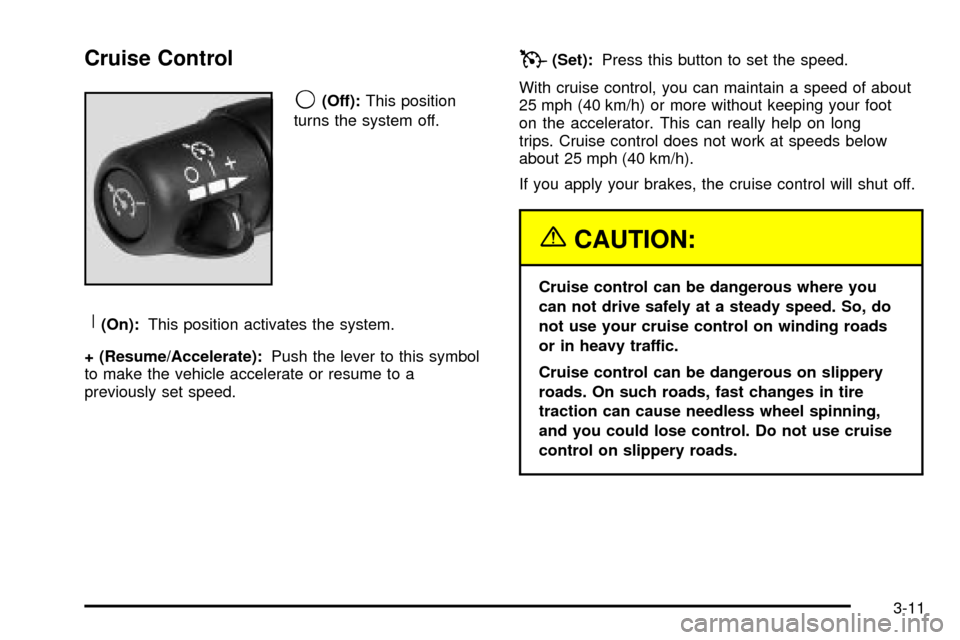
Cruise Control
9
(Off):This position
turns the system off.
R(On):This position activates the system.
+ (Resume/Accelerate):Push the lever to this symbol
to make the vehicle accelerate or resume to a
previously set speed.
T(Set):Press this button to set the speed.
With cruise control, you can maintain a speed of about
25 mph (40 km/h) or more without keeping your foot
on the accelerator. This can really help on long
trips. Cruise control does not work at speeds below
about 25 mph (40 km/h).
If you apply your brakes, the cruise control will shut off.
{CAUTION:
Cruise control can be dangerous where you
can not drive safely at a steady speed. So, do
not use your cruise control on winding roads
or in heavy traffic.
Cruise control can be dangerous on slippery
roads. On such roads, fast changes in tire
traction can cause needless wheel spinning,
and you could lose control. Do not use cruise
control on slippery roads.
3-11
Page 161 of 478

Interior Lamps
Instrument Panel Brightness
The thumbwheel for this feature is located next to the
exterior lamps control.
D(Instrument Panel Lights):Turn the thumbwheel,
located next to the exterior lamps control, up or
down to brighten or dim the instrument panel lights and
the radio display. This will only work if the headlamps
or parking lamps are on.
To turn on the dome lamps, with the vehicle doors
closed, turn the thumbwheel all the way up.
Dome Lamps
The dome lamps will come on when you open a door
and will slowly dim to off when all doors are closed.
You can also turn the dome lamps on by turning
the thumbwheel, located next to the exterior lamp
control, all the way up. In this position, the dome lamps
will remain on whether a door is opened or closed.
E(Dome Override):Press this button, located below
the exterior lamp control, to turn dome lamps off
even when a door is opened. To return the lamps to
automatic operation, press the button again and it
will return to the out position. In this position, the dome
lamps will come on when you open a door.
Entry Lighting
Your vehicle is equipped with an illuminated entry
feature.
When a door is opened, the dome lamps and puddle
lamps will come on if the dome override button is in the
out position. If the dome override button is pressed
in, the lamps will not come on.
Exit Lighting
With exit lighting, the interior lamps will come on when
you remove the key from the ignition. The lamps will not
come on if the dome override button is pressed in.
3-19
Page 174 of 478

Outlet Adjustment
Your vehicle has air outlets located in the center and on
the side of your instrument panel that allow you to
adjust the direction and amount of air¯ow inside the
vehicle. Move the louvers up or down. Use the
thumbwheel next to or underneath the outlet to close
the louvers. For the most efficient air¯ow and
temperature control, keep the outlet in the fully opened
position.
Operation Tips
·
Keep the hood and front air inlets free of ice, snow,
or any other obstruction (such as leaves). The
heater and defroster will work far better, reducing
the chance of fogging the inside of your windows.
·Keep the air path under the front seats clear
of objects. This helps air to circulate throughout your
vehicle.
·Adding outside equipment to the front of your
vehicle, such as hood-air de¯ectors, etc., may affect
the performance of the heating and air conditioning
system. Check with your dealer before adding
equipment to the outside of your vehicle.
Climate Controls Personalization
You can store and recall the climate control settings for
temperature, air delivery mode and fan speed for
two different drivers. The personal choice settings
recalled are determined by the transmitter used to enter
the vehicle.
After the button with the unlock symbol on a remote
keyless entry transmitter is pressed, the climate control
will adjust to the last settings of the identi®ed driver.
The settings can also be changed by pressing one of the
memory buttons (1 or 2) located on the driver's door.
When adjustments are made, the new settings are
automatically saved for that driver.
3-32
Page 191 of 478

Driver Information Center (DIC)
The DIC display is located on the instrument panel
cluster above the steering wheel. The DIC can display
information such as the trip odometer, fuel economy and
personalization features. Vehicles without the DIC
buttons will not have all the features as the regular DIC.
See
Speedometer and Odometer on page 3-35for
information on features for vehicles without a full DIC.
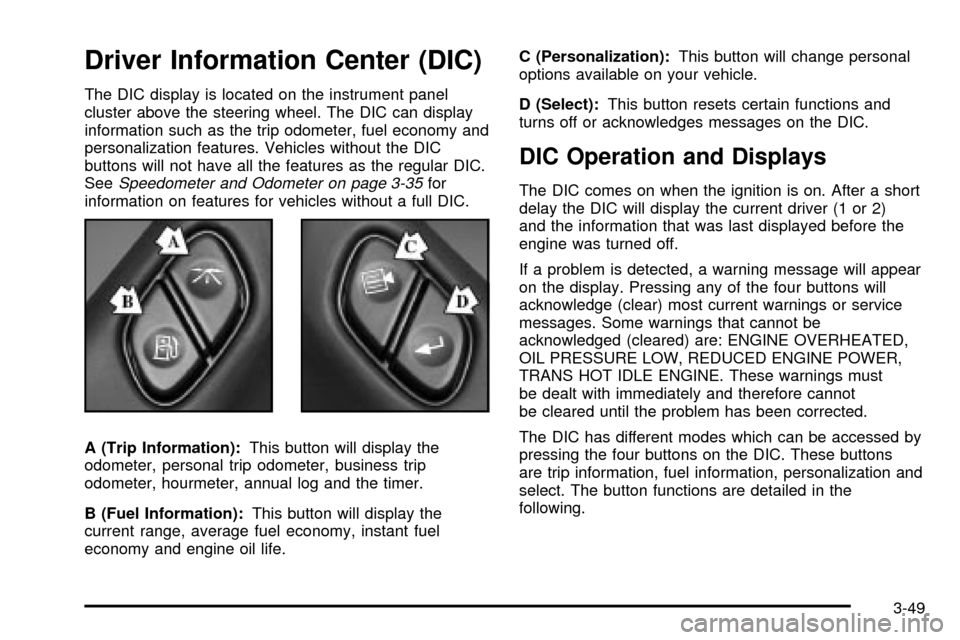
A (Trip Information):This button will display the
odometer, personal trip odometer, business trip
odometer, hourmeter, annual log and the timer.
B (Fuel Information):This button will display the
current range, average fuel economy, instant fuel
economy and engine oil life.C (Personalization):This button will change personal
options available on your vehicle.
D (Select):This button resets certain functions and
turns off or acknowledges messages on the DIC.
DIC Operation and Displays
The DIC comes on when the ignition is on. After a short
delay the DIC will display the current driver (1 or 2)
and the information that was last displayed before the
engine was turned off.
If a problem is detected, a warning message will appear
on the display. Pressing any of the four buttons will
acknowledge (clear) most current warnings or service
messages. Some warnings that cannot be
acknowledged (cleared) are: ENGINE OVERHEATED,
OIL PRESSURE LOW, REDUCED ENGINE POWER,
TRANS HOT IDLE ENGINE. These warnings must
be dealt with immediately and therefore cannot
be cleared until the problem has been corrected.
The DIC has different modes which can be accessed by
pressing the four buttons on the DIC. These buttons
are trip information, fuel information, personalization and
select. The button functions are detailed in the
following.
3-49