remove CADILLAC ESCALADE EXT 2004 2.G Owners Manual
[x] Cancel search | Manufacturer: CADILLAC, Model Year: 2004, Model line: ESCALADE EXT, Model: CADILLAC ESCALADE EXT 2004 2.GPages: 478, PDF Size: 3.43 MB
Page 31 of 478
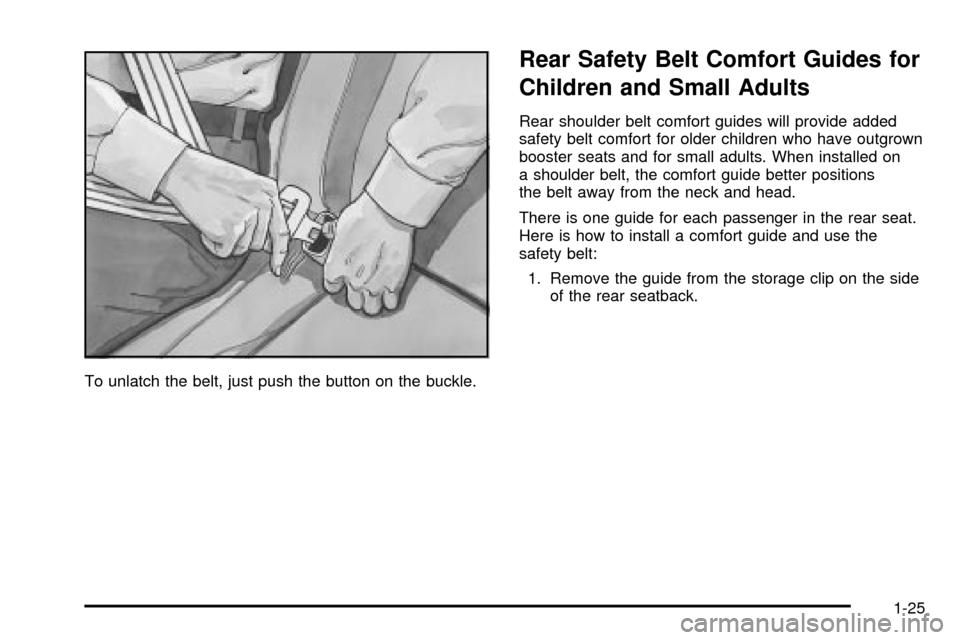
To unlatch the belt, just push the button on the buckle.
Rear Safety Belt Comfort Guides for
Children and Small Adults
Rear shoulder belt comfort guides will provide added
safety belt comfort for older children who have outgrown
booster seats and for small adults. When installed on
a shoulder belt, the comfort guide better positions
the belt away from the neck and head.
There is one guide for each passenger in the rear seat.
Here is how to install a comfort guide and use the
safety belt:
1. Remove the guide from the storage clip on the side
of the rear seatback.
1-25
Page 33 of 478
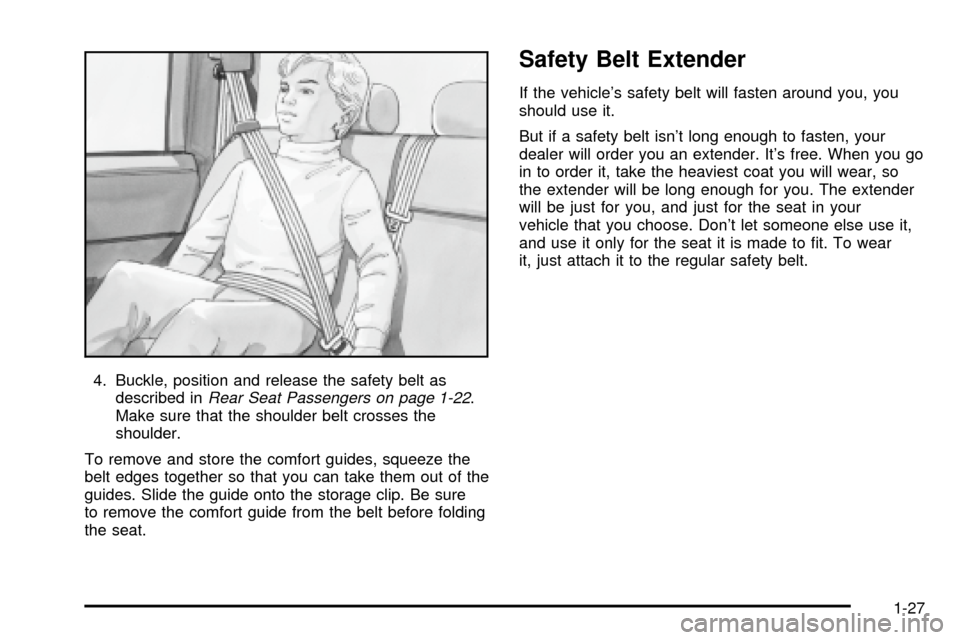
4. Buckle, position and release the safety belt as
described inRear Seat Passengers on page 1-22.
Make sure that the shoulder belt crosses the
shoulder.
To remove and store the comfort guides, squeeze the
belt edges together so that you can take them out of the
guides. Slide the guide onto the storage clip. Be sure
to remove the comfort guide from the belt before folding
the seat.
Safety Belt Extender
If the vehicle's safety belt will fasten around you, you
should use it.
But if a safety belt isn't long enough to fasten, your
dealer will order you an extender. It's free. When you go
in to order it, take the heaviest coat you will wear, so
the extender will be long enough for you. The extender
will be just for you, and just for the seat in your
vehicle that you choose. Don't let someone else use it,
and use it only for the seat it is made to ®t. To wear
it, just attach it to the regular safety belt.
1-27
Page 48 of 478

Securing a Child Restraint Designed
for the LATCH System
1. Find the LATCH anchorages for the seating
position you want to use, where the bottom of the
seatback meets the back of the seat cushion.
2. Put the child restraint on the seat.
3. Attach and tighten the LATCH attachments on the
child restraint to the LATCH anchorages in the
vehicle. The child restraint instructions will show
you how.
4. If the child restraint is forward-facing, attach and
tighten the top tether to the top tether anchorage.
The child restraint instructions will show you
how. Also see
Top Strap on page 1-38.
5. Push and pull the child restraint in different
directions to be sure it is secure.
To remove the child restraint, simply unhook the top
tether from the top tether anchorage and then
disconnect the LATCH attachments from the LATCH
anchorages.
Securing a Child Restraint in a Rear
Seat Position
If your child restraint is equipped with the LATCH
system seeLower Anchorages and Top Tethers for
Children (LATCH System) on page 1-40. SeeTop Strap
on page 1-38if the child restraint has one.
If your child restraint does not have the LATCH system,
you will be using the lap-shoulder belt to secure the
child restraint in this position. Be sure to follow the
instructions that came with the child restraint. Secure
the child in the child restraint when and as the
instructions say.
1. Put the restraint on the seat.
2. Pick up the latch plate, and run the lap and shoulder
portions of the vehicle's safety belt through or
around the restraint. The child restraint instructions
will show you how.
1-42
Page 50 of 478
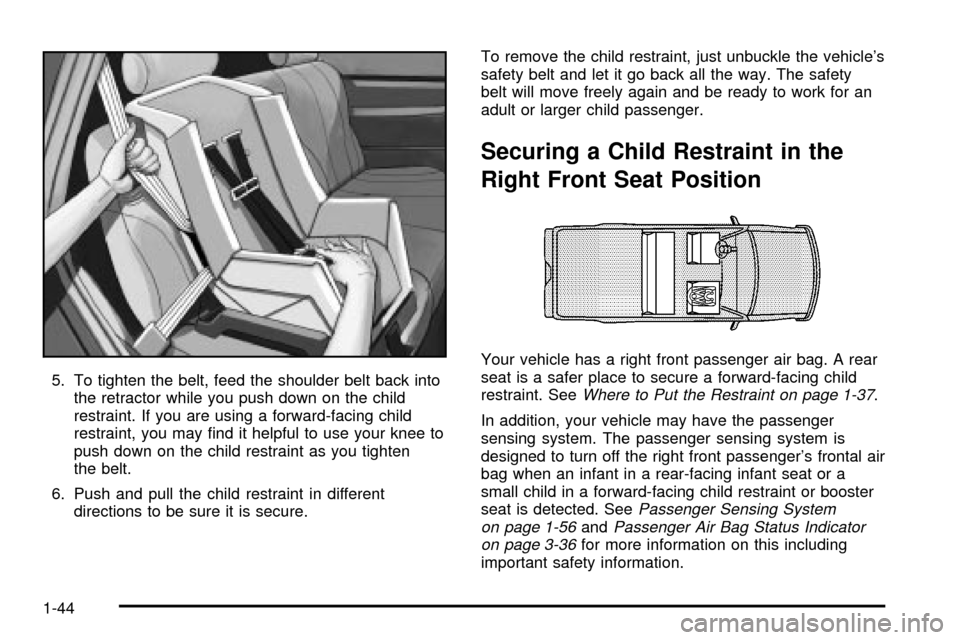
5. To tighten the belt, feed the shoulder belt back into
the retractor while you push down on the child
restraint. If you are using a forward-facing child
restraint, you may ®nd it helpful to use your knee to
push down on the child restraint as you tighten
the belt.
6. Push and pull the child restraint in different
directions to be sure it is secure.To remove the child restraint, just unbuckle the vehicle's
safety belt and let it go back all the way. The safety
belt will move freely again and be ready to work for an
adult or larger child passenger.
Securing a Child Restraint in the
Right Front Seat Position
Your vehicle has a right front passenger air bag. A rear
seat is a safer place to secure a forward-facing child
restraint. See
Where to Put the Restraint on page 1-37.
In addition, your vehicle may have the passenger
sensing system. The passenger sensing system is
designed to turn off the right front passenger's frontal air
bag when an infant in a rear-facing infant seat or a
small child in a forward-facing child restraint or booster
seat is detected. See
Passenger Sensing System
on page 1-56andPassenger Air Bag Status Indicator
on page 3-36for more information on this including
important safety information.
1-44
Page 53 of 478
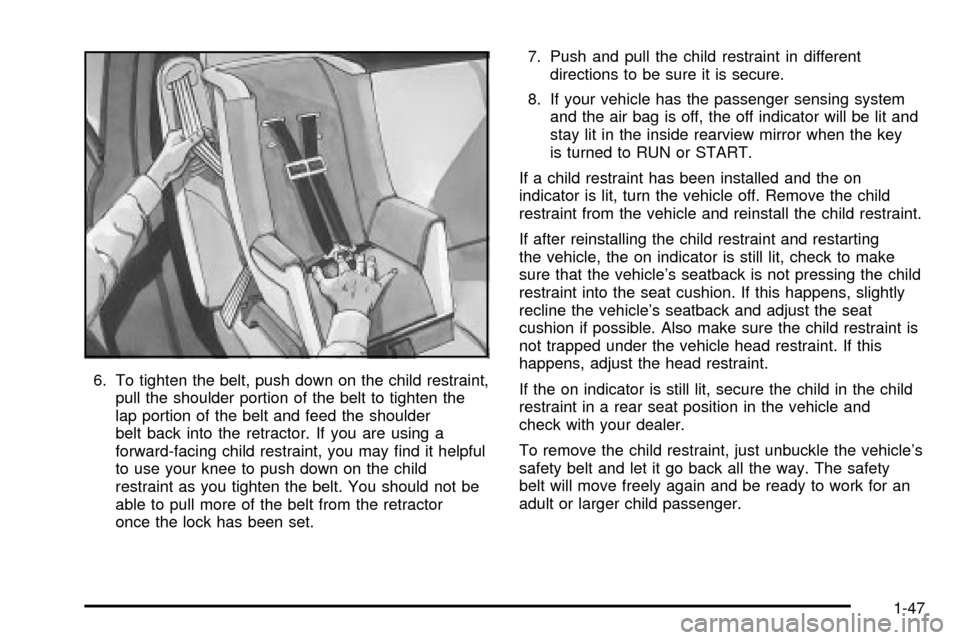
6. To tighten the belt, push down on the child restraint,
pull the shoulder portion of the belt to tighten the
lap portion of the belt and feed the shoulder
belt back into the retractor. If you are using a
forward-facing child restraint, you may ®nd it helpful
to use your knee to push down on the child
restraint as you tighten the belt. You should not be
able to pull more of the belt from the retractor
once the lock has been set.7. Push and pull the child restraint in different
directions to be sure it is secure.
8. If your vehicle has the passenger sensing system
and the air bag is off, the off indicator will be lit and
stay lit in the inside rearview mirror when the key
is turned to RUN or START.
If a child restraint has been installed and the on
indicator is lit, turn the vehicle off. Remove the child
restraint from the vehicle and reinstall the child restraint.
If after reinstalling the child restraint and restarting
the vehicle, the on indicator is still lit, check to make
sure that the vehicle's seatback is not pressing the child
restraint into the seat cushion. If this happens, slightly
recline the vehicle's seatback and adjust the seat
cushion if possible. Also make sure the child restraint is
not trapped under the vehicle head restraint. If this
happens, adjust the head restraint.
If the on indicator is still lit, secure the child in the child
restraint in a rear seat position in the vehicle and
check with your dealer.
To remove the child restraint, just unbuckle the vehicle's
safety belt and let it go back all the way. The safety
belt will move freely again and be ready to work for an
adult or larger child passenger.
1-47
Page 63 of 478

Your vehicle has a rear seat that will accommodate a
rear-facing child restraint. A label on your sun visor says,
ªNever put a rear-facing child seat in the front.º This
is because the risk to the rear-facing child is so great, if
the air bag deploys.
{CAUTION:
A child in a rear-facing child restraint can be
seriously injured or killed if the right front
passenger's air bag in¯ates. This is because
the back of the rear-facing child restraint
would be very close to the in¯ating air bag.
Even though the passenger sensing system is
designed to turn off the passenger's frontal air
bag if the system detects a rear-facing child
restraint, no system is fail-safe, and no one
can guarantee that an air bag will not deploy
under some unusual circumstance, even
though it is turned off. General Motors
recommends that rear-facing child restraints
be secured in the rear seat, even if the air bag
is off.The passenger sensing system is designed to turn off
the right front passenger's frontal air bag if:
·the right front passenger seat is unoccupied
·the system determines that an infant is present in a
rear-facing infant seat
·the system determines that a small child is present
in a forward-facing child restraint
·the system determines that a small child is present
in a booster seat
·a right front passenger takes his/her weight off of
the seat for a period of time
·the right front passenger seat is occupied by a
smaller person, such as a child who has outgrown
child restraints
·or if there is a critical problem with the air bag
system or the passenger sensing system.
When the passenger sensing system has turned off the
passenger's frontal air bag, the off indicator will light
and stay lit to remind you that the air bag is off.
If a child restraint has been installed and the on indicator
is lit, turn the vehicle off. Remove the child restraint
from the vehicle and reinstall the child restraint following
the child restraint manufacturer's directions and refer
to
Securing a Child Restraint in the Right Front
Seat Position on page 1-44.
1-57
Page 75 of 478
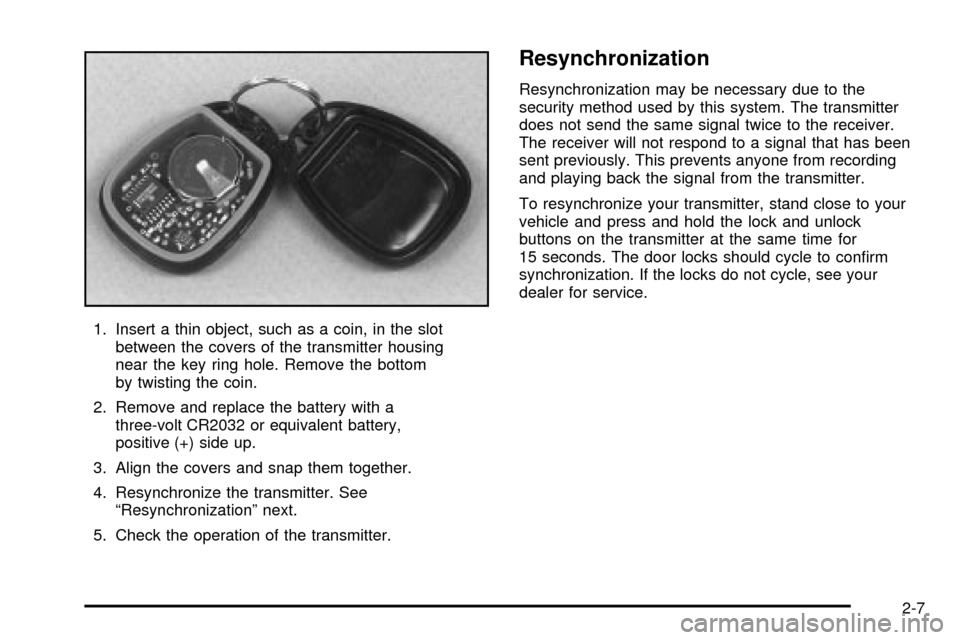
1. Insert a thin object, such as a coin, in the slot
between the covers of the transmitter housing
near the key ring hole. Remove the bottom
by twisting the coin.
2. Remove and replace the battery with a
three-volt CR2032 or equivalent battery,
positive (+) side up.
3. Align the covers and snap them together.
4. Resynchronize the transmitter. See
ªResynchronizationº next.
5. Check the operation of the transmitter.
Resynchronization
Resynchronization may be necessary due to the
security method used by this system. The transmitter
does not send the same signal twice to the receiver.
The receiver will not respond to a signal that has been
sent previously. This prevents anyone from recording
and playing back the signal from the transmitter.
To resynchronize your transmitter, stand close to your
vehicle and press and hold the lock and unlock
buttons on the transmitter at the same time for
15 seconds. The door locks should cycle to con®rm
synchronization. If the locks do not cycle, see your
dealer for service.
2-7
Page 77 of 478
Power Door Locks
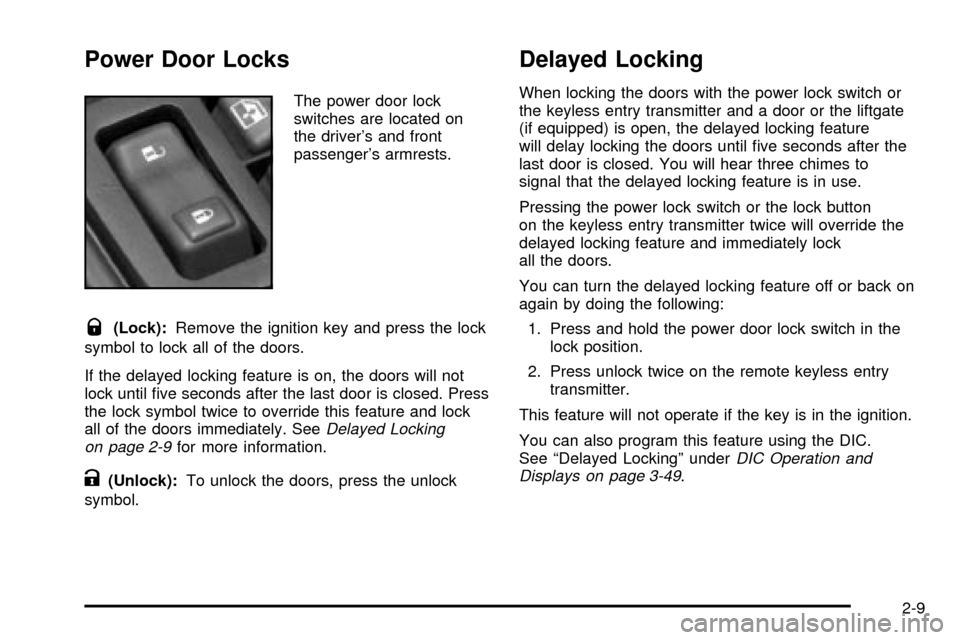
The power door lock
switches are located on
the driver's and front
passenger's armrests.
Q(Lock):Remove the ignition key and press the lock
symbol to lock all of the doors.
If the delayed locking feature is on, the doors will not
lock until ®ve seconds after the last door is closed. Press
the lock symbol twice to override this feature and lock
all of the doors immediately. See
Delayed Locking
on page 2-9for more information.
K(Unlock):To unlock the doors, press the unlock
symbol.
Delayed Locking
When locking the doors with the power lock switch or
the keyless entry transmitter and a door or the liftgate
(if equipped) is open, the delayed locking feature
will delay locking the doors until ®ve seconds after the
last door is closed. You will hear three chimes to
signal that the delayed locking feature is in use.
Pressing the power lock switch or the lock button
on the keyless entry transmitter twice will override the
delayed locking feature and immediately lock
all the doors.
You can turn the delayed locking feature off or back on
again by doing the following:
1. Press and hold the power door lock switch in the
lock position.
2. Press unlock twice on the remote keyless entry
transmitter.
This feature will not operate if the key is in the ignition.
You can also program this feature using the DIC.
See ªDelayed Lockingº under
DIC Operation and
Displays on page 3-49.
2-9
Page 79 of 478

Programmable Unlocking Feature
The following is the list of available programming
options:
Mode 1:Driver's door unlocks when the transmission is
shifted into PARK (P).
Mode 2:All doors unlock when the transmission is
shifted into PARK (P). This is the mode that is
pre-programmed in the factory for your vehicle.
Mode 3:All doors unlock when the key is removed
from the ignition.
Mode 4:No automatic door unlock.
The following instructions tell you how to change the
automatic door unlock mode. Choose one of the
four programming options listed above before entering
the program mode. To enter the program mode, do
the following:
1. Begin with the ignition off. Then pull the turn
signal/multifunction lever toward you and hold
it there while you perform the next step.2. Turn the key to RUN and LOCK twice. Then, with
the key in LOCK, release the turn
signal/multifunction lever. Once you do this, the
doors will lock and unlock, the horn will chirp twice,
and a 30-second timer will begin. You are now
ready to program the automatic door unlock feature.
3. Press the unlock side of the power lock switch once.
You will hear one, two, three, or four chimes. The
number of chimes tells you which unlock mode
is currently selected. Continue to press the
door unlock switch until the number of chimes that
you hear matches the number of the mode that
you want. If you take longer than 30 seconds, the
locks will automatically lock and unlock and the horn
will chirp twice to indicate that you have left the
program mode. If this occurs, you can repeat
the procedure beginning with Step 1 to re-enter the
programming mode.
You can exit the program mode any time by turning the
ignition to RUN (the doors will automatically lock and
unlock and the horn will chirp twice to indicate that you
are leaving the program mode). If the lock/unlock
switches are not pressed while in the programming
mode, the current automatic settings will not be
modi®ed.
See your dealer for more information.
2-11
Page 83 of 478

Rear Glass Removal and Storage
{CAUTION:
If the removable rear glass is not stored
properly, it could be thrown about the vehicle
in a crash or sudden maneuver. People in the
vehicle could be injured. Whenever you store
the rear glass in the vehicle, always be sure
that it is stored securely in the midgate
storage pocket.
Do not remove the rear glass when the rear defroster is
on. If you remove the rear glass with the rear defroster
on, you may see a discharge spark coming from
the latch area.
To remove the rear glass do the following:
1. Fold the rear seats. See
Rear Seat Operation on
page 1-6for more information. The front seats
may have to be moved forward slightly to allow the
rear seats to fold completely.
Although the rear glass can be removed without
folding the rear seats, you will not be able to access
the rear glass storage pocket. Be sure to fold the
seats
beforeremoving the rear glass.2. Squeeze and pull down the latch levers (A), located
near the upper corners of the rear glass, to unlatch.
Once unlatched, the glass-catch release button (C)
will catch the rear glass and prevent it from
falling forward. Follow the next step to release the
button and remove the rear glass.
2-15