tow CADILLAC ESCALADE EXT 2006 2.G Repair Manual
[x] Cancel search | Manufacturer: CADILLAC, Model Year: 2006, Model line: ESCALADE EXT, Model: CADILLAC ESCALADE EXT 2006 2.GPages: 484, PDF Size: 2.98 MB
Page 370 of 484
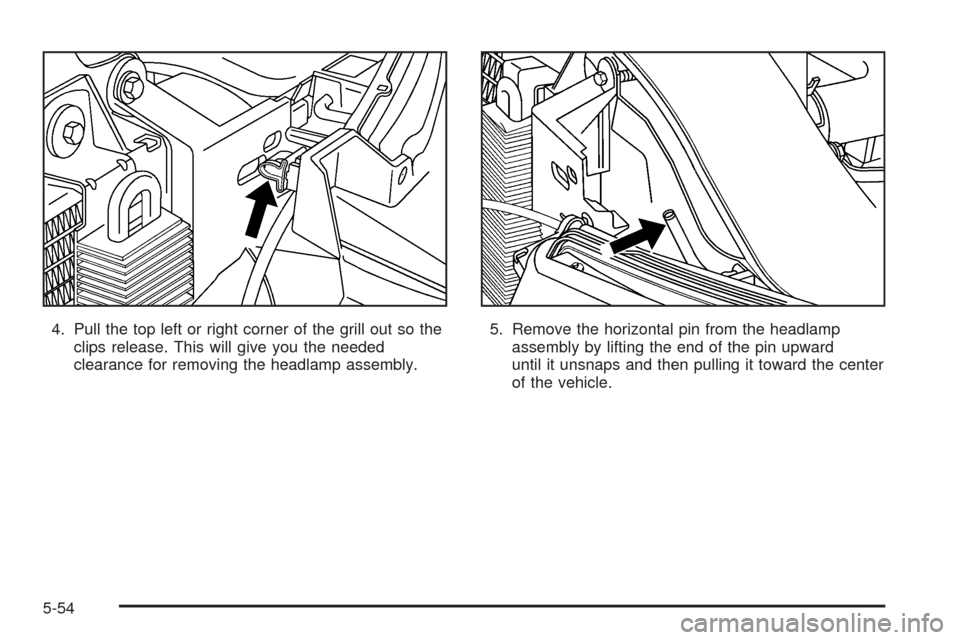
4. Pull the top left or right corner of the grill out so the
clips release. This will give you the needed
clearance for removing the headlamp assembly.5. Remove the horizontal pin from the headlamp
assembly by lifting the end of the pin upward
until it unsnaps and then pulling it toward the center
of the vehicle.
5-54
Page 389 of 484
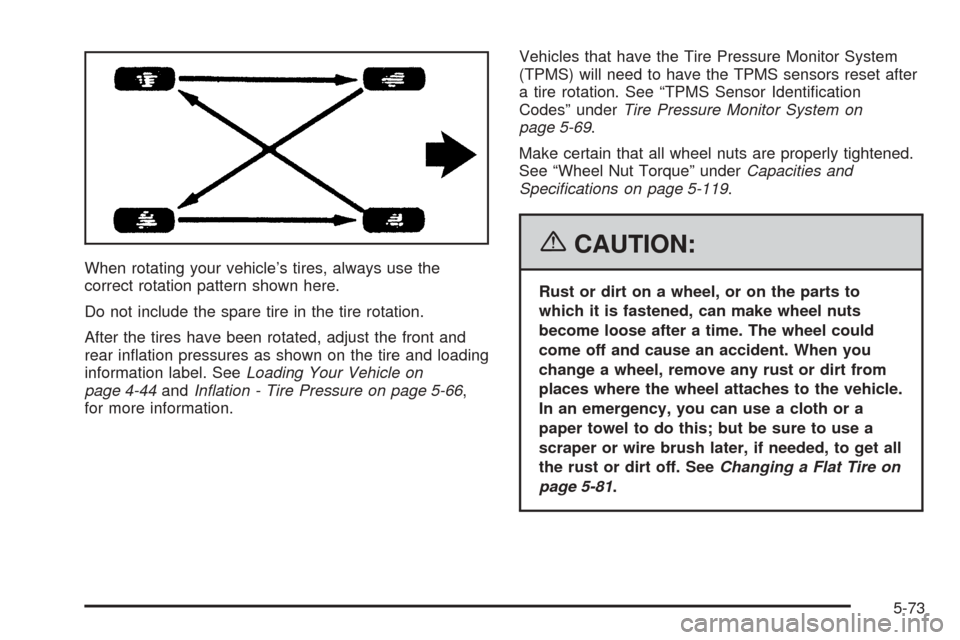
When rotating your vehicle’s tires, always use the
correct rotation pattern shown here.
Do not include the spare tire in the tire rotation.
After the tires have been rotated, adjust the front and
rear in�ation pressures as shown on the tire and loading
information label. SeeLoading Your Vehicle on
page 4-44andIn�ation - Tire Pressure on page 5-66,
for more information.Vehicles that have the Tire Pressure Monitor System
(TPMS) will need to have the TPMS sensors reset after
a tire rotation. See “TPMS Sensor Identi�cation
Codes” underTire Pressure Monitor System on
page 5-69.
Make certain that all wheel nuts are properly tightened.
See “Wheel Nut Torque” underCapacities and
Speci�cations on page 5-119.
{CAUTION:
Rust or dirt on a wheel, or on the parts to
which it is fastened, can make wheel nuts
become loose after a time. The wheel could
come off and cause an accident. When you
change a wheel, remove any rust or dirt from
places where the wheel attaches to the vehicle.
In an emergency, you can use a cloth or a
paper towel to do this; but be sure to use a
scraper or wire brush later, if needed, to get all
the rust or dirt off. SeeChanging a Flat Tire on
page 5-81.
5-73
Page 396 of 484
If a Tire Goes Flat
It is unusual for a tire to blowout while you are driving,
especially if you maintain your vehicle’s tires properly.
If air goes out of a tire, it is much more likely to leak out
slowly. But if you should ever have a blowout, here
are a few tips about what to expect and what to do:
If a front tire fails, the �at tire will create a drag that pulls
the vehicle toward that side. Take your foot off the
accelerator pedal and grip the steering wheel �rmly.
Steer to maintain lane position, and then gently brake to
a stop well out of the traffic lane.
A rear blowout, particularly on a curve, acts much like a
skid and may require the same correction you would
use in a skid. In any rear blowout remove your foot from
the accelerator pedal. Get the vehicle under control
by steering the way you want the vehicle to go. It may
be very bumpy and noisy, but you can still steer.
Gently brake to a stop, well off the road if possible.{CAUTION:
Lifting a vehicle and getting under it to do
maintenance or repairs is dangerous without
the appropriate safety equipment and training.
The jack provided with your vehicle is
designed only for changing a �at tire. If it is
used for anything else, you or others could be
badly injured or killed if the vehicle slips off
the jack. Use the jack provided with your
vehicle only for changing a �at tire.
If a tire goes �at, the next part shows how to use the
jacking equipment to change a �at tire safely.
5-80
Page 401 of 484

3. Insert the hoist end
(open end) (F) of the
extension through
the hole (G) in the
rear bumper.
Be sure the hoist end of the extension connects to
the hoist shaft (E). The ribbed square end of the
extension is used to lower the spare tire.
4. Turn the wheel wrench (H) counterclockwise to
lower the spare tire to the ground. Continue to
turn the wheel wrench until the spare tire can be
pulled out from under the vehicle.
If the spare tire does not lower to the ground,
the secondary latch is engaged causing the tire
not to lower. SeeSecondary Latch System
on page 5-93.5. Pull the spare tire
towards you. The
wheel wrench has a
hook that allows you to
pull the hoist cable
towards you to assist
in reaching the
spare tire.
6. Tilt the retainer at the
end of the cable when
the tire has been
lowered, so it can be
pulled up through
the wheel opening.
7. Put the spare tire near the �at tire.
5-85
Page 406 of 484
{CAUTION:
Rust or dirt on the wheel, or on the parts to
which it is fastened, can make the wheel nuts
become loose after a time. The wheel could
come off and cause an accident. When you
change a wheel, remove any rust or dirt from
the places where the wheel attaches to the
vehicle. In an emergency, you can use a cloth
or a paper towel to do this; but be sure to use
a scraper or wire brush later, if needed, to get
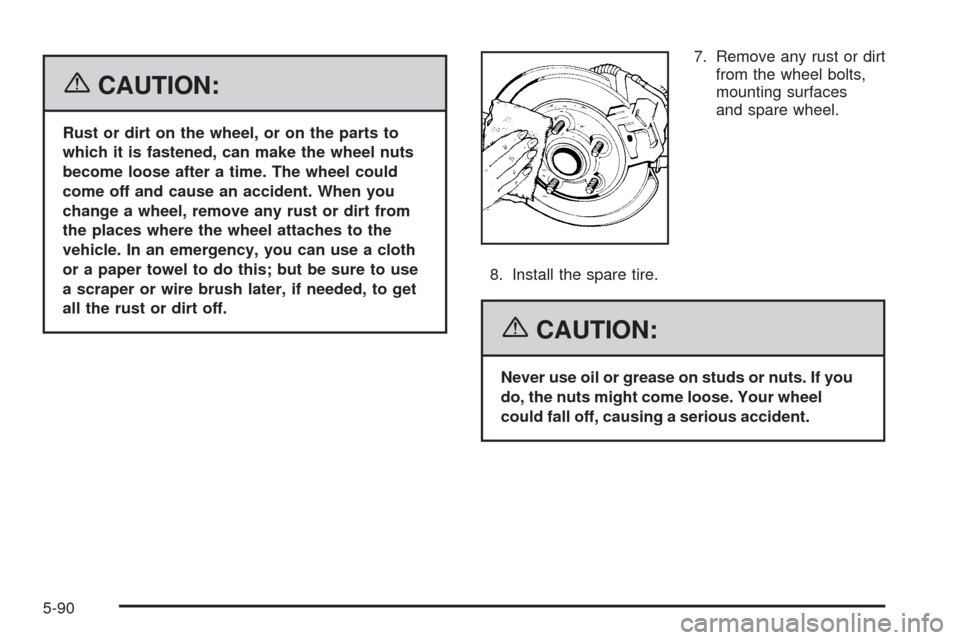
all the rust or dirt off.7. Remove any rust or dirt
from the wheel bolts,
mounting surfaces
and spare wheel.
8. Install the spare tire.
{CAUTION:
Never use oil or grease on studs or nuts. If you
do, the nuts might come loose. Your wheel
could fall off, causing a serious accident.
5-90
Page 407 of 484

9. Put the wheel nuts back on with the rounded end of
the nuts toward the wheel after mounting the spare.
10. Tighten each wheel nut by hand. Then use the
wheel wrench to tighten the wheel nuts until the
wheel is held against the hub.11. Turn the wheel wrench
counterclockwise to
lower the vehicle.
Lower the jack
completely.
Front Position
Rear Position
1500 Series
5-91
Page 410 of 484

5. If the spare does not lower, turn the wrench
counterclockwise until approximately 6 inches
(15 cm) of cable is exposed.
6. Stand the wheel blocks on their shortest ends,
with the backs facing each other.
7. Place the bottom edge
of the jack (A) on the
wheel blocks (B),
separating them so that
the jack is balanced
securely.
8. Attach the jack handle, extension, and wheel
wrench to the jack and place it (with the wheel
blocks) under the vehicle toward the front of the
rear bumper.
5-94
Page 412 of 484

14. Tilt the retainer at the
end of the cable and
pull it through the
wheel opening. Pull the
tire out from under
the vehicle.
15. Turn the wheel wrench in the hoist shaft hole in the
bumper clockwise to raise the cable back up if the
cable is hanging under the vehicle.
Have the hoist assembly inspected as soon as you can.
You will not be able to store a spare or �at tire using
the hoist assembly until it has been replaced.
To continue changing the �at tire, seeRemoving the
Flat Tire and Installing the Spare Tire on page 5-86.Storing a Flat or Spare Tire
and Tools
{CAUTION:
Storing a jack, a tire, or other equipment in the
passenger compartment of the vehicle could
cause injury. In a sudden stop or collision,
loose equipment could strike someone.
Store all these in the proper place.
Notice:Storing an aluminum wheel with a �at tire
under your vehicle for an extended period of time or
with the valve stem pointing up may damage the
wheel. Always stow the wheel with the valve
stem pointing down and have the wheel/tire repaired
as soon as possible.
5-96
Page 413 of 484
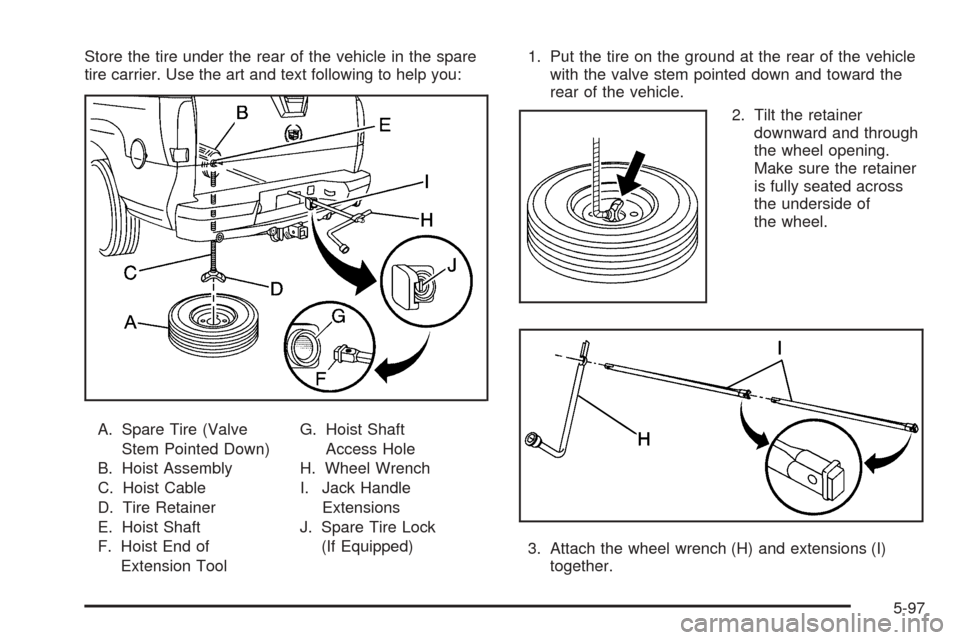
Store the tire under the rear of the vehicle in the spare
tire carrier. Use the art and text following to help you:
A. Spare Tire (Valve
Stem Pointed Down)
B. Hoist Assembly
C. Hoist Cable
D. Tire Retainer
E. Hoist Shaft
F. Hoist End of
Extension ToolG. Hoist Shaft
Access Hole
H. Wheel Wrench
I. Jack Handle
Extensions
J. Spare Tire Lock
(If Equipped)1. Put the tire on the ground at the rear of the vehicle
with the valve stem pointed down and toward the
rear of the vehicle.
2. Tilt the retainer
downward and through
the wheel opening.
Make sure the retainer
is fully seated across
the underside of
the wheel.
3. Attach the wheel wrench (H) and extensions (I)
together.
5-97
Page 417 of 484
Do not clean your vehicle using the following cleaners
or techniques:
Never use a knife or any other sharp object to
remove a soil from any interior surface.
Never use a stiff brush. It can cause damage to
your vehicle’s interior surfaces.
Never apply heavy pressure or rub aggressively
with a cleaning cloth. Use of heavy pressure
can damage your interior and does not improve the
effectiveness of soil removal.
Use only mild, neutral-pH soaps. Avoid laundry
detergents or dishwashing soaps with degreasers.
Using too much soap will leave a residue that
leaves streaks and attracts dirt. For liquid cleaners,
about 20 drops per gallon (3.78 L) of water is a
good guide.
Do not heavily saturate your upholstery while
cleaning.
Damage to your vehicle’s interior may result from
the use of many organic solvents such as naptha,
alcohol, etc.
Fabric/Carpet
Use a vacuum cleaner with a soft brush attachment
frequently to remove dust and loose dirt. A canister
vacuum with a beater bar in the nozzle may only be used
on �oor carpet and carpeted �oor mats. For soils, always
try to remove them �rst with plain water or club soda.
Before cleaning, gently remove as much of the soil as
possible using one of the following techniques:
For liquids: gently blot the remaining soil with a
paper towel. Allow the soil to absorb into the paper
towel until no more can be removed.
For solid dry soils: remove as much as possible and
then vacuum.
To clean, use the following instructions:
1. Saturate a lint-free, clean white cloth with water or
club soda.
2. Wring the cloth to remove excess moisture.
3. Start on the outside edge of the soil and gently rub
toward the center. Continue cleaning, using a clean
area of the cloth each time it becomes soiled.
4. Continue to gently rub the soiled area until the
cleaning cloth remains clean.
5. If the soil is not completely removed, use a mild
soap solution and repeat the cleaning process
that was used with plain water.
5-101