clock CADILLAC ESCALADE EXT 2009 3.G User Guide
[x] Cancel search | Manufacturer: CADILLAC, Model Year: 2009, Model line: ESCALADE EXT, Model: CADILLAC ESCALADE EXT 2009 3.GPages: 546, PDF Size: 4.43 MB
Page 303 of 546
:Touch the + (plus) or−(minus)
screen buttons to increase or decrease the CADILLAC ESCALADE EXT 2009 3.G User Guide Brightness/Contrast/Mode
Touch this screen button to change the brightness,
contrast, and mode of the display.
](Brightness):Touch the + (plus) or−(minus)
screen buttons to increase or decrease the](/img/23/7931/w960_7931-302.png)
Brightness/Contrast/Mode
Touch this screen button to change the brightness,
contrast, and mode of the display.
](Brightness):Touch the + (plus) or−(minus)
screen buttons to increase or decrease the brightness
of the screen.
_(Contrast):Touch the + (plus) or−(minus) screen
buttons to increase or decrease the contrast of the
screen.Auto (Automatic):Touch this screen button for the
system to automatically adjust the screen background
depending on exterior lighting conditions.
Night:Touch this screen button and the system makes
the map background darker.
Day:Touch this screen button and the system makes
the map background brighter.
Setting the Clock
The navigation system time and the analog clock
operate independently. Changing the time through the
navigation system does not change the time on the
analog clock. SeeAnalog Clock on page 3-22to change
the analog clock time.
Press the CONFIG key to enter the con�gure menu
options, then press the CONFIG key repeatedly until the
time is selected or touch the time screen button.
Hours:Press the−(minus) or + (plus) signs to
decrease or increase the hours.
Minutes:Press the−(minus) or + (plus) signs to
decrease or increase the minutes.
12/24 Format:Select the 12 screen button for standard
time; select the 24 screen button for military time.
4-53
Page 316 of 546

Playing an Audio CD
j/r(Pause/Play):Touch this button to pause the
CD. This button will then change to the play button.
Touch the play button to play the CD.
Random:Touch this button to hear the tracks in
random, rather than sequential, order. Touch Random
again to turn off random play.
DISC:Touch this screen button to view the list of
loaded disc(s). Select the disc to play.
r(Rewind):Touch and hold this button to rewind
quickly through a track selection. You will hear sound at a
reduced volume. Release this button to stop rewinding.
The display will show the elapsed time of the track.
[(Forward):Touch and hold this button to fast
forward quickly through a track selection. You will hear
sound at a reduced volume. Release this button to
stop fast forwarding. The display will show the elapsed
time of the track.
y©¨z(Seek):To seek tracks, press the up
arrow to go to the next track. Press the down arrow to
go to the start of the current track, if more than
eight seconds have played. If either arrow is pressed
more than once, the player continues moving backward
or forward through the CD. The sound mutes while
seeking.
w(Tuning Knob):Turn this knob counterclockwise
one notch to go to the start of the current track, turn it
again to go to the previous track. Turn this knob
clockwise to go to the next track.
When playing an audio CD the rear seat operator can
power on the RSE video screen and use the remote
control to navigate through the tracks on the CD.
4-66
Page 320 of 546

[(Forward):Touch and hold this button to fast
forward quickly through a track selection. You will hear
sound at a reduced volume. Release this button to
stop fast forwarding. The display will show the elapsed
time of the track.
qr(Folder/Artist/Album):Select the left or right
arrow to go to the previous or next folder, artist,
or album on the disc.
Press the middle screen button, with the folder, artist, or
album name, to sort the MP3 by folder, artist, or
album. It may take a few minutes for the system to sort
the MP3.
y©¨z(Seek):To seek tracks, press the up
arrow to go to the next track. Press the down arrow to
go to the start of the current track, if more than
eight seconds have played. If either arrow is pressed
more than once, the player will continue moving
backward or forward through the CD. The sound will
mute while seeking.
w(Tuning Knob):Turn this knob counterclockwise
one notch to go to the start of the current track, turn it
again to go to the previous track. Turn this knob
clockwise to go to the next track.
When playing an MP3 the rear seat operator can power
on the RSE video screen and use the remote control
to navigate through the MP3.
CD Messages
If Disc Read Error appears on the display and/or the CD
comes out, it could be for one of the following reasons:
If a disc was inserted with an invalid or unknown
format.
If the map DVD disc was installed into the CD slot.
See “Installing the Map DVD” underMaps on
page 4-14for more information.
It is very hot. When the temperature returns to
normal, the CD should play.
You are driving on a very rough road. When the
road becomes smoother, the CD should play.
The CD is dirty, scratched, wet, or upside down.
The air is very humid. If so, wait about an hour and
try again.
There may have been a problem while burning
the CD.
The label may be caught in the CD player.
If the CD is not playing correctly, for any other reason,
try a known good CD.
If any error occurs repeatedly or if an error cannot be
corrected, contact your dealer/retailer.
4-70
Page 326 of 546

Menu Language:Touch English, Francais, Espanol,
Italiano, or Deutsch to change the default language
of the DVD video menus. The menu language must be
available on the disc. The menu language may vary
for each DVD.
Parental Level:Touch this button to change the rating
level to only allow the play of DVDs with a certain
rating. The rating selection is 1 through 8, with 1 Kids
Safe being a G rating. If the 1 is selected, any DVD with
a rating above G will not be able to be viewed without
entering a password.
When the parental level is �rst entered a keyboard will
appear on the display and a four-digit password will
need to be created. Type in a password that you will be
able to remember. Once the password is created,
you can then select a rating level.
If you would like to change the rating level, press the
Parental Level button, then press the Password button.
Type in the password and then change the rating level.
If the password has been forgotten, contact your
dealer/retailer.
This may not be available on all DVDs.
Aspect:Touch this button to change the aspect ratio of
the DVD. This may not be available on all DVDs.y(Next Track/Chapter):Press this hard key to go to
the next track or chapter. This button may not work
when the DVD is playing the copyright information or
the previews.
z(Previous Track/Chapter):Press this hard key to
return to the start of the current track or chapter.
Press this button again to go to the previous track or
chapter. This button may not work when the DVD
is playing the copyright information or the previews.
w(Tuning Knob):Turn this knob counterclockwise
one notch to go to the start of the current chapter/track,
turn it again to go to the previous chapter/track. Turn
this knob clockwise to go to the next chapter/track.
DVD Messages
If Disc Read Error appears on the display and/or the
DVD comes out, it could be for one of the following
reasons:
If a disc was inserted with an invalid or unknown
format.
If the disc is not from a correct region.
If the map DVD disc was installed into the DVD
audio/video slot. See “Installing the Map DVD”
underMaps on page 4-14for more information.
4-76
Page 339 of 546

If the system fails to turn on or activate, the StabiliTrak
light along with one of the following messages will
be displayed on the Driver Information Center (DIC):
TRACTION CONTROL OFF, SERVICE TRACTION
CONTROL, STABILITRAK OFF, SERVICE
STABILITRAK. If these DIC messages appear, make
sure the StabiliTrak system has not been turned
off using the StabiliTrak on/off button. Then turn the
steering wheel clockwise from the nine o’clock position
to the three o’clock position. If this clears the
message(s), the vehicle does not need servicing. If this
does not clear the message(s), then turn the vehicle
off, wait 15 seconds, and then turn it back on again to
reset the system. If any of these messages still
appear on the Driver Information Center (DIC), the
vehicle should be taken in for service. For more
information on the DIC messages, seeDriver
Information Center (DIC) on page 3-41.
The StabiliTrak light will
�ash on the instrument
panel cluster when
the system is both on
and activated.
The system may be heard or felt while it is working; this
is normal.The traction control disable
button is located on the
instrument panel below the
climate controls.
The traction control part of StabiliTrak can be turned off
by pressing and releasing the StabiliTrak button if
both systems (traction control and StabiliTrak) were
previously on. To disable both traction control and
StabiliTrak, press and hold the button for �ve seconds.
Traction control and StabiliTrak can be turned on by
pressing and releasing the StabiliTrak button if not
automatically shut off for any other reason.
When the TCS or StabiliTrak system is turned off, the
StabiliTrak light and the appropriate TCS off or
StabiliTrak off message will be displayed on the DIC to
warn the driver. The vehicle will still have brake-traction
control when traction control is off, but will not be
able to use the engine speed management system. See
“Traction Control Operation” next for more information.
When the traction control system has been turned
off, system noises may still be heard as a result of the
brake-traction control coming on.
5-7
Page 342 of 546

Steering Tips
It is important to take curves at a reasonable speed.
Traction in a curve depends on the condition of the tires
and the road surface, the angle at which the curve is
banked, and vehicle speed. While in a curve, speed is
the one factor that can be controlled.
If there is a need to reduce speed, do it before entering
the curve, while the front wheels are straight.
Try to adjust the speed so you can drive through the
curve. Maintain a reasonable, steady speed. Wait
to accelerate until out of the curve, and then accelerate
gently into the straightaway.
Steering in Emergencies
There are times when steering can be more effective
than braking. For example, you come over a hill and �nd
a truck stopped in your lane, or a car suddenly pulls
out from nowhere, or a child darts out from between
parked cars and stops right in front of you. These
problems can be avoided by braking — if you can stop
in time. But sometimes you cannot stop in time
because there is no room. That is the time for evasive
action — steering around the problem.
The vehicle can perform very well in emergencies like
these. First apply the brakes. SeeBraking on page 5-4.
It is better to remove as much speed as possiblefrom a collision. Then steer around the problem, to the
left or right depending on the space available.
An emergency like this requires close attention and a
quick decision. If holding the steering wheel at the
recommended 9 and 3 o’clock positions, it can be turned
a full 180 degrees very quickly without removing
either hand. But you have to act fast, steer quickly, and
just as quickly straighten the wheel once you have
avoided the object.
The fact that such emergency situations are always
possible is a good reason to practice defensive driving
at all times and wear safety belts properly.
5-10
Page 351 of 546

If the engine has stopped running, you need to
restart it. With the brake pedal pressed and the
parking brake still applied, shift the transmission to
P (Park) and restart the engine. Then, shift to
R (Reverse), release the parking brake, and slowly
back down the hill as straight as possible in
R (Reverse).
While backing down the hill, put your left hand on the
steering wheel at the 12 o’clock position so you can
tell if the wheels are straight and can maneuver as
you back down. It is best to back down the hill with
the wheels straight rather than in the left or right
direction. Turning the wheel too far to the left or right
will increase the possibility of a rollover.Things not to do if the vehicle stalls, or is about to stall,
when going up a hill:
Never attempt to prevent a stall by shifting into
N (Neutral) to rev-up the engine and regain forward
momentum. This will not work. The vehicle can
roll backward very quickly and could go out
of control.
Never try to turn around if about to stall when going
up a hill. If the hill is steep enough to stall the
vehicle, it is steep enough to cause it to roll over. If
you cannot make it up the hill, back straight
down the hill.
If, after stalling, you try to back down the hill and decide
you just cannot do it, set the parking brake, put your
transmission in P (Park), and turn off the engine. Leave
the vehicle and go get some help. Exit on the uphill
side and stay clear of the path the vehicle would take if
it rolled downhill.
5-19
Page 394 of 546

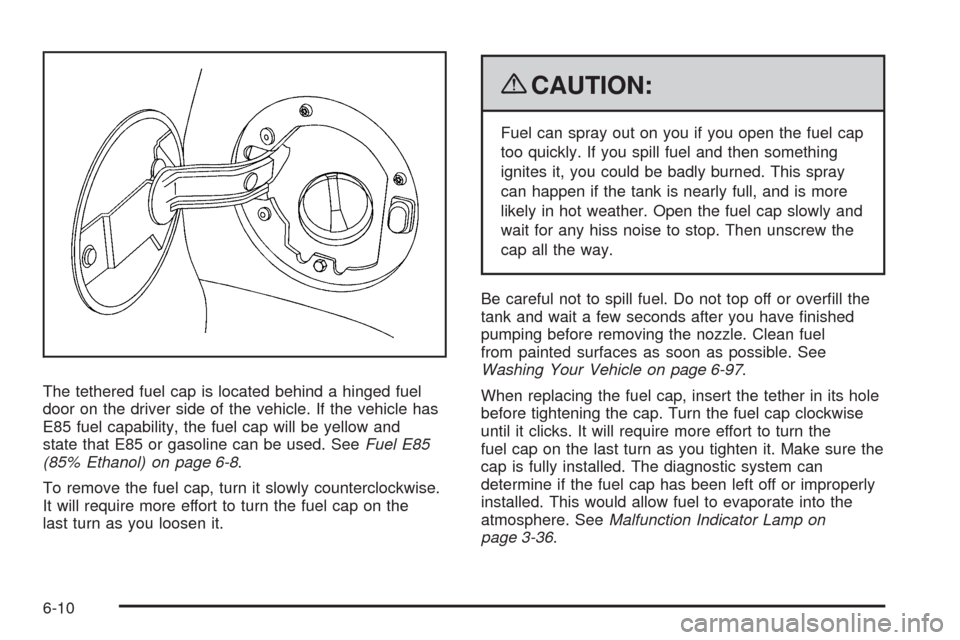
The tethered fuel cap is located behind a hinged fuel
door on the driver side of the vehicle. If the vehicle has
E85 fuel capability, the fuel cap will be yellow and
state that E85 or gasoline can be used. SeeFuel E85
(85% Ethanol) on page 6-8.
To remove the fuel cap, turn it slowly counterclockwise.
It will require more effort to turn the fuel cap on the
last turn as you loosen it.
{CAUTION:
Fuel can spray out on you if you open the fuel cap
too quickly. If you spill fuel and then something
ignites it, you could be badly burned. This spray
can happen if the tank is nearly full, and is more
likely in hot weather. Open the fuel cap slowly and
wait for any hiss noise to stop. Then unscrew the
cap all the way.
Be careful not to spill fuel. Do not top off or over�ll the
tank and wait a few seconds after you have �nished
pumping before removing the nozzle. Clean fuel
from painted surfaces as soon as possible. See
Washing Your Vehicle on page 6-97.
When replacing the fuel cap, insert the tether in its hole
before tightening the cap. Turn the fuel cap clockwise
until it clicks. It will require more effort to turn the
fuel cap on the last turn as you tighten it. Make sure the
cap is fully installed. The diagnostic system can
determine if the fuel cap has been left off or improperly
installed. This would allow fuel to evaporate into the
atmosphere. SeeMalfunction Indicator Lamp on
page 3-36.
6-10
Page 413 of 546

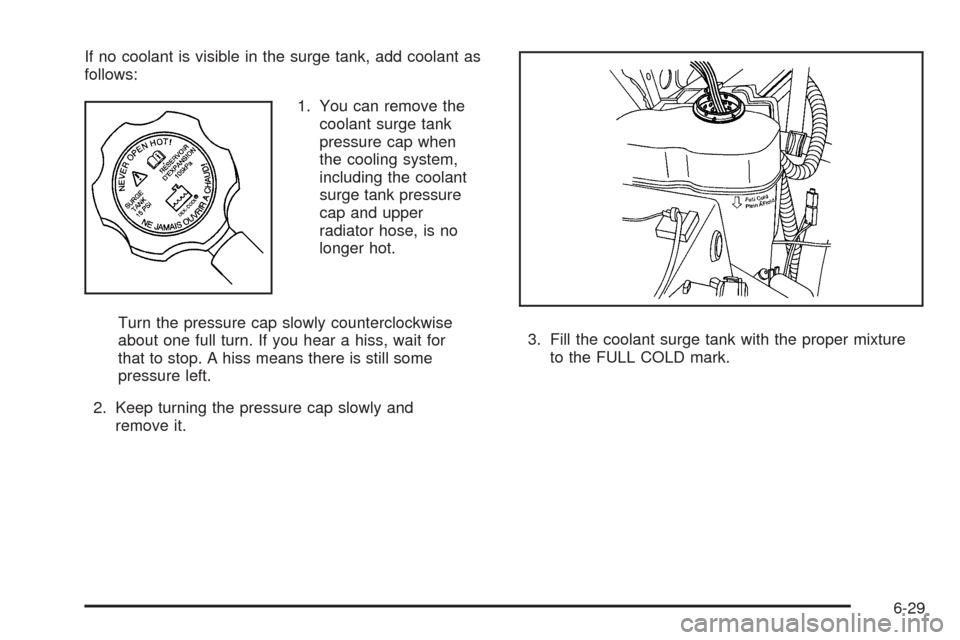
If no coolant is visible in the surge tank, add coolant as
follows:
1. You can remove the
coolant surge tank
pressure cap when
the cooling system,
including the coolant
surge tank pressure
cap and upper
radiator hose, is no
longer hot.
Turn the pressure cap slowly counterclockwise
about one full turn. If you hear a hiss, wait for
that to stop. A hiss means there is still some
pressure left.
2. Keep turning the pressure cap slowly and
remove it.3. Fill the coolant surge tank with the proper mixture
to the FULL COLD mark.
6-29
Page 434 of 546

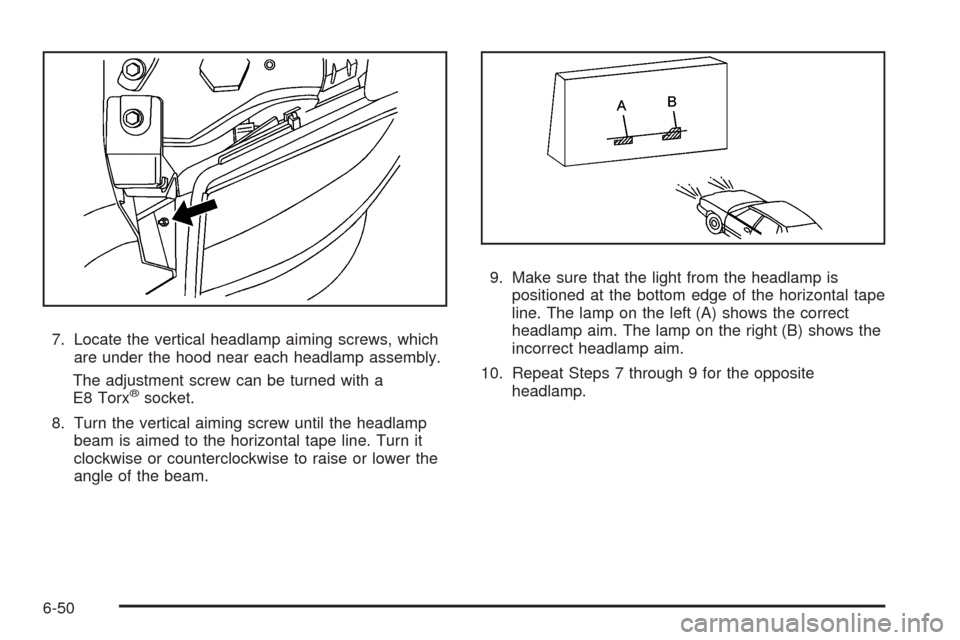
7. Locate the vertical headlamp aiming screws, which
are under the hood near each headlamp assembly.
The adjustment screw can be turned with a
E8 Torx
®socket.
8. Turn the vertical aiming screw until the headlamp
beam is aimed to the horizontal tape line. Turn it
clockwise or counterclockwise to raise or lower the
angle of the beam.9. Make sure that the light from the headlamp is
positioned at the bottom edge of the horizontal tape
line. The lamp on the left (A) shows the correct
headlamp aim. The lamp on the right (B) shows the
incorrect headlamp aim.
10. Repeat Steps 7 through 9 for the opposite
headlamp.
6-50