driver seat adjustment CADILLAC ESCALADE EXT 2009 3.G Owners Manual
[x] Cancel search | Manufacturer: CADILLAC, Model Year: 2009, Model line: ESCALADE EXT, Model: CADILLAC ESCALADE EXT 2009 3.GPages: 546, PDF Size: 4.43 MB
Page 165 of 546

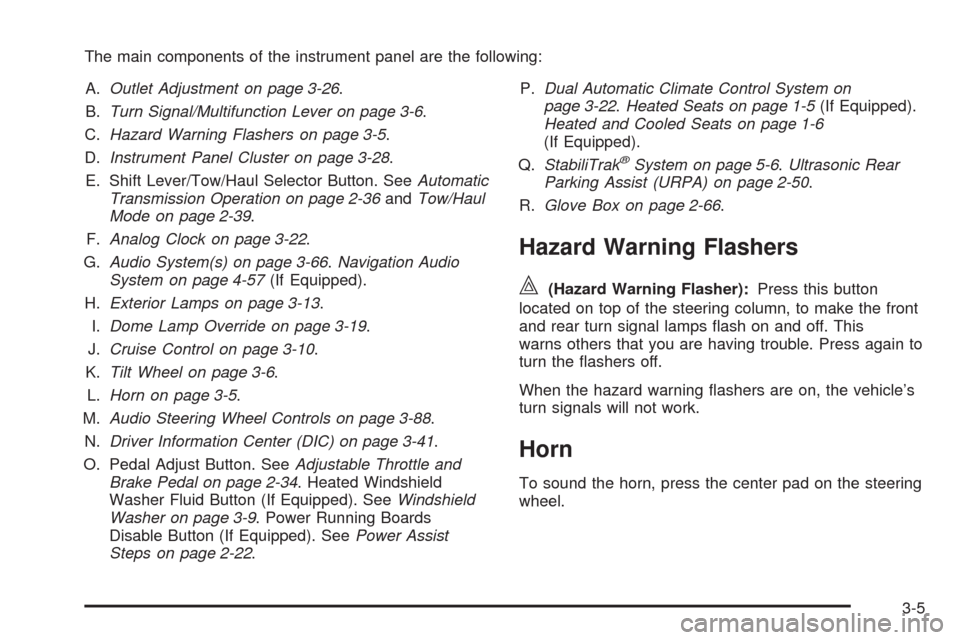
The main components of the instrument panel are the following:
A.Outlet Adjustment on page 3-26.
B.Turn Signal/Multifunction Lever on page 3-6.
C.Hazard Warning Flashers on page 3-5.
D.Instrument Panel Cluster on page 3-28.
E. Shift Lever/Tow/Haul Selector Button. SeeAutomatic
Transmission Operation on page 2-36andTow/Haul
Mode on page 2-39.
F.Analog Clock on page 3-22.
G.Audio System(s) on page 3-66.Navigation Audio
System on page 4-57(If Equipped).
H.Exterior Lamps on page 3-13.
I.Dome Lamp Override on page 3-19.
J.Cruise Control on page 3-10.
K.Tilt Wheel on page 3-6.
L.Horn on page 3-5.
M.Audio Steering Wheel Controls on page 3-88.
N.Driver Information Center (DIC) on page 3-41.
O. Pedal Adjust Button. SeeAdjustable Throttle and
Brake Pedal on page 2-34. Heated Windshield
Washer Fluid Button (If Equipped). SeeWindshield
Washer on page 3-9. Power Running Boards
Disable Button (If Equipped). SeePower Assist
Steps on page 2-22.P.Dual Automatic Climate Control System on
page 3-22.Heated Seats on page 1-5(If Equipped).
Heated and Cooled Seats on page 1-6
(If Equipped).
Q.StabiliTrak
®System on page 5-6.Ultrasonic Rear
Parking Assist (URPA) on page 2-50.
R.Glove Box on page 2-66.
Hazard Warning Flashers
|(Hazard Warning Flasher):Press this button
located on top of the steering column, to make the front
and rear turn signal lamps �ash on and off. This
warns others that you are having trouble. Press again to
turn the �ashers off.
When the hazard warning �ashers are on, the vehicle’s
turn signals will not work.
Horn
To sound the horn, press the center pad on the steering
wheel.
3-5
Page 182 of 546

Analog Clock
The analog clock is located on the instrument panel
above the radio. The clock is not connected with
any other vehicle system and runs by itself. To adjust
the clock:
1. The adjustment button is located in the lower left
corner of the clock.
2. Push and hold the adjustment button to advance
the clock hands. Holding the button down will
cause the clock to advance faster. Release the
button before reaching the desired time.
3. Push and release the button to increase the time
by one minute increments until the desired time is
reached.
Climate Controls
Dual Automatic Climate Control
System
The heating, cooling, and ventilation in the vehicle can
be controlled with this system. The vehicle also has
a �ow-through ventilation system described later in this
section.A. Driver and Passenger
Temperature Controls
B. AUTO
C. Recirculation
D. Air Conditioning
E. Heated and
Cooled SeatsF. Fan Control
G. Defrost
H. Rear Window
Defogger
I. Air Delivery
Mode Control
O(Off):Press the driver side temperature knob to turn
the climate control system off. Outside air still enters the
vehicle, and is directed to the �oor. This direction can be
changed by pressing the mode button. The temperature
can also be adjusted using either temperature knob.Climate Control with Heated and Cooled Seats
shown
3-22
Page 432 of 546

What to Use
Refer to the Maintenance Schedule to determine what
kind of lubricant to use. SeeRecommended Fluids
and Lubricants on page 7-13.
Headlamp Aiming
The vehicle has a visual optical headlamp aiming
system. The aim of the headlamps have been preset at
the factory and should need no further adjustment.
However, if the vehicle is damaged in a crash, the aim
of the headlamps may be affected and adjustment
may be necessary.
If oncoming vehicles �ash their high beams at you, this
may mean the vertical aim of your headlamps needs
to be adjusted.
It is recommended that the vehicle is taken to your
dealer/retailer for service if the headlamps need to be
adjusted. It is possible however, to re-aim the
headlamps as described.The vehicle should:
Be placed so the headlamps are 25 ft. (7.6 m) from
a light colored wall or other �at surface.
Have all four tires on a level surface which is level
all the way to the wall or other �at surface.
Be placed so it is perpendicular to the wall or other
�at surface.
Not have any snow, ice, or mud on it.
Be fully assembled and all other work stopped while
headlamp aiming is being performed.
Be normally loaded with a full tank of fuel and one
person or 160 lbs (75 kg) sitting on the driver seat.
Have the tires properly in�ated.
Have the spare tire is in its proper location in the
vehicle.
6-48