navigation system CADILLAC ESCALADE EXT 2010 3.G User Guide
[x] Cancel search | Manufacturer: CADILLAC, Model Year: 2010, Model line: ESCALADE EXT, Model: CADILLAC ESCALADE EXT 2010 3.GPages: 580, PDF Size: 6.23 MB
Page 260 of 580
How to Change the RSE Video Screen
Settings
The screen display mode (normal, full, and zoom),
screen brightness, and setup menu language can be
changed from the on screen setup menu. To change
any feature, perform the following:1. Press the
zbutton on the remote control.
2. Use the remote control
Q,R,q,rnavigation
arrows and the
rbutton to use the setup menu.
3. Press the
zbutton again to remove the setup
menu from the screen.
Audio Output
Audio from the DVD player or auxiliary inputs can be
heard through the following possible sources:
.Wireless Headphones
.Vehicle Speakers
.Vehicle wired headphone jacks on the rear seat
audio system, if your vehicle has this feature.
The RSE system always transmits the audio signal to
the wireless headphones, if there is audio available.
See “Headphones” earlier in this section for more
information. The DVD player is capable of outputting audio to the
wired headphone jacks on the RSA system, if your
vehicle has this feature. The DVD player can be
selected as an audio source on the RSA system. See
Rear Seat Audio (RSA)
on page 4‑85for more
information.
When a device is connected to the A/V jacks, the rear
seat passengers are be able to hear audio from the
auxiliary device through the wireless or wired
headphones. The front seat passengers are able to
listen to playback from this device through the vehicle
speakers by selecting AUX as the source on the radio.
Video Screen
The video screen is located in the overhead console.
To use the video screen:
1. Push the release button located on the overhead console.
2. Move the screen to the desired position.
When the video screen is not in use, push it up into its
locked position.
If a DVD is playing and the screen is raised to its locked
position, the screen remains on, this is normal, and the
DVD continues to play through the previous audio
source. Use the remote control power button or eject
the disc to turn off the screen.
4-80
Page 261 of 580
The overhead console contains the IR transmitters for
the wireless headphones and the IR receivers for the
remote control. They are located at the rear of the
console.
Notice:Avoid directly touching the video screen, as
damage may occur. See “Cleaning the Video
Screen” later in this section for more information.
Remote Control
To use the remote control, aim it at the transmitter
window at the rear of the overhead console and press
the desired button. Direct sunlight or very bright light
can affect the ability of the RSE transmitter to receive
signals from the remote control. If the remote control
does not seem to be working, the batteries may need to
be replaced. See “Battery Replacement” later in this
section. Objects blocking the line of sight can also affect
the function of the remote control.
If a CD or DVD is in the Radio DVD slot, the remote
control power button can be used to turn on the video
screen display and start the disc. The radio can also
turn on the video screen display. See Navigation Audio
System
on page 5‑59for more information. Notice:
Storing the remote control in a hot area or
in direct sunlight can damage it, and the repairs will
not be covered by the warranty. Storage in extreme
cold can weaken the batteries. Keep the remote
control stored in a cool, dry place.
If the remote control becomes lost or damaged, a new
universal remote control can be purchased. If this
happens, make sure the universal remote control uses
a code set of Toshiba
®.
Remote Control Buttons
O(Power): Press to turn the video screen on and off.
P(Illumination): Press to turn the remote control
backlight on. The backlight automatically times out after
7 to 10 seconds if no other button is pressed while the
backlight is on.
v(Title): Press to return the DVD to the main menu of
the DVD. This function can vary for each disc.
y(Main Menu): Press to access the DVD menu. The
DVD menu is different on every DVD. Use the
navigation arrows to move the cursor around the DVD
menu. After making a selection press the enter button.
This button only operates when using a DVD.
4-81
Page 271 of 580
Section 5 Navigation System
Overview. . . . . . . . . . . . . . . . . . . . . . . . . . . . . . . . . . . . . . . . . . . 5-2
Navigation System Overview . . . . . . . . . . . . . . . . . . . . 5-2
Getting Started . . . . . . . . . . . . . . . . . . . . . . . . . . . . . . . . . . 5-4
Cleaning the Display . . . . . . . . . . . . . . . . . . . . . . . . . . . 5-11
Features and Controls . . . . . . . . . . . . . . . . . . . . . . . . . . . 5-12
Using the Navigation System . . . . . . . . . . . . . . . . . . 5-12
Maps . . . . . . . . . . . . . . . . . . . . . . . . . . . . . . . . . . . . . . . . . . 5-14
Symbols . . . . . . . . . . . . . . . . . . . . . . . . . . . . . . . . . . . . . . . 5-17
Destination . . . . . . . . . . . . . . . . . . . . . . . . . . . . . . . . . . . . 5-24
Configure Menu . . . . . . . . . . . . . . . . . . . . . . . . . . . . . . . 5-42
Global Positioning System (GPS) . . . . . . . . . . . . . . 5-56 Vehicle Positioning . . . . . . . . . . . . . . . . . . . . . . . . . . . . 5-57
Problems with Route Guidance . . . . . . . . . . . . . . . . 5-58
If the System Needs Service . . . . . . . . . . . . . . . . . . . 5-58
Ordering Map DVDs . . . . . . . . . . . . . . . . . . . . . . . . . . . 5-58
Database Coverage Explanations . . . . . . . . . . . . . 5-59
Navigation Audio System . . . . . . . . . . . . . . . . . . . . . . . .5-59
CD Player . . . . . . . . . . . . . . . . . . . . . . . . . . . . . . . . . . . . . 5-68
DVD Player . . . . . . . . . . . . . . . . . . . . . . . . . . . . . . . . . . . . 5-75
Care of Your CDs and DVDs . . . . . . . . . . . . . . . . . . . 5-85
Auxiliary Devices . . . . . . . . . . . . . . . . . . . . . . . . . . . . . . 5-86
Voice Recognition . . . . . . . . . . . . . . . . . . . . . . . . . . . . . . . . 5-87
5-1
Page 272 of 580
Overview
Navigation System Overview
Screen shown with Map Disc Inserted
5-2
Page 273 of 580

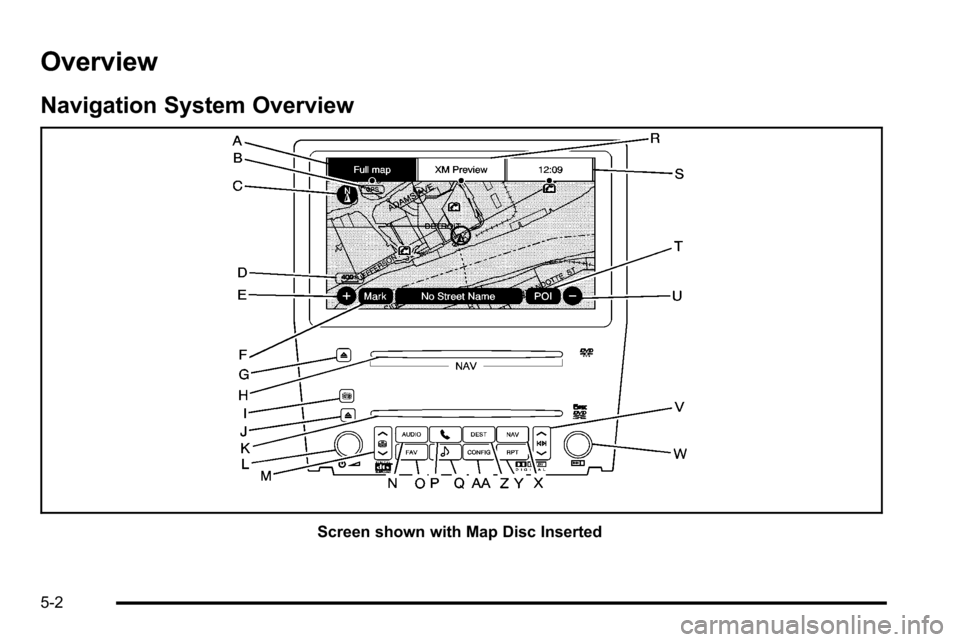
A. FULL MAP Touch Screen Button. See“NAV”under
“Hard Keys” underUsing the Navigation System
on page 5‑12for more information.
B. No GPS Symbol. See Symbols
on page 5‑17for
more information.
C. North Up/Heading Up Symbol. See Symbols
on
page 5‑17for more information.
D. Map Scale. See “Map Scales”underMaps
on
page 5‑14for more information.
E.
0(Zoom In) Touch Screen Button. See “Map
Scales” underMaps
on page 5‑14for more
information.
F. Mark Touch Screen Button. See “Adding
Destinations to the Address Book” under
Destination
on page 5‑24for more information.
G.
Z(DVD Map Disc Eject) Key. See Mapson
page 5‑14
for more information.
H. Map DVD Slot. See “Installing the Map DVD” under
Maps
on page 5‑14for information on how to
install and eject a map DVD.
I.
M(Load) Key. See CD Playeron page 5‑68or
DVD Player
on page 5‑75for more information.
J.
Z(CD/DVD Video/Audio Eject) Key. See CD
Player
on page 5‑68or DVD Playeron page 5‑75for more information. K. CD/DVD Video/Audio Slot. See
CD Player
on
page 5‑68or DVD Playeron page 5‑75for more
information.
L.
O/n(Power/Volume) Knob. See Navigation
Audio System
on page 5‑59for more information.
M.
M(Disc Up/Down) Key. See “Hard Keys”under
Using the Navigation System
on page 5‑12for
more information.
N. AUDIO Key. See Navigation Audio System
on
page 5‑59for more information.
O. FAV (Favorite) Key. See “Storing Radio Station
Presets” underNavigation Audio System
on
page 5‑59for more information.
P.
5(Phone) Key. See the OnStar®owner guide and
Bluetooth®on page 4‑66for more information.
Q.
e(Sound) Key. See “Sound Menu”under
Navigation Audio System
on page 5‑59for more
information.
R. Source (AM, FM, XM, CD, etc.) Touch Screen Button. See Navigation Audio System
on
page 5‑59for more information.
S. Clock Touch Screen Button. See “Setting the
Clock” underConfigure Menu
on page 5‑42for
more information.
5-3
Page 274 of 580
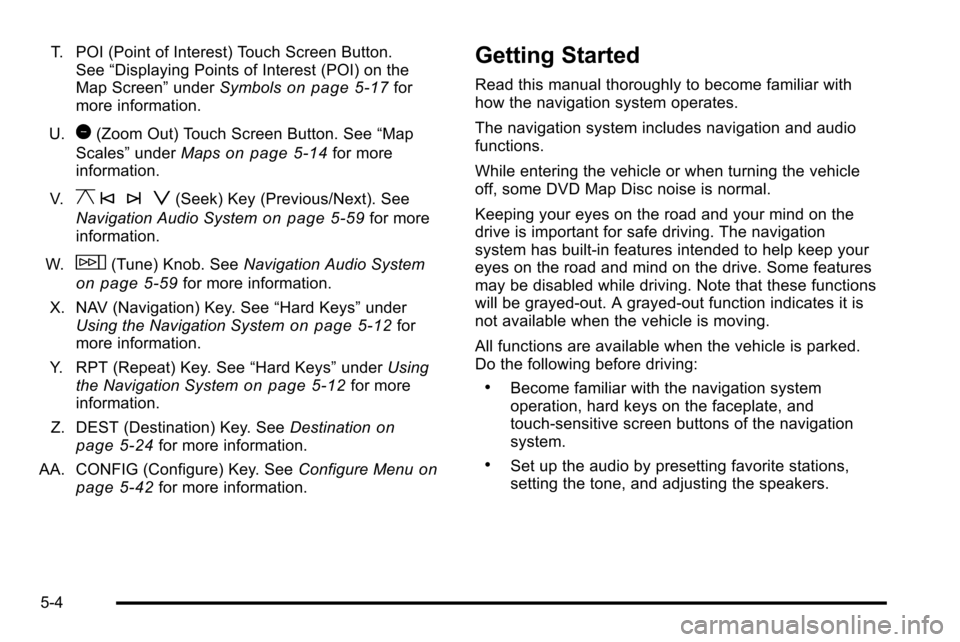
T. POI (Point of Interest) Touch Screen Button.See “Displaying Points of Interest (POI) on the
Map Screen” underSymbols
on page 5‑17for
more information.
U.
1(Zoom Out) Touch Screen Button. See “Map
Scales” underMaps
on page 5‑14for more
information.
V.
y © ¨ z(Seek) Key (Previous/Next). See
Navigation Audio System
on page 5‑59for more
information.
W.
w(Tune) Knob. See Navigation Audio System
on page 5‑59for more information.
X. NAV (Navigation) Key. See “Hard Keys”under
Using the Navigation System
on page 5‑12for
more information.
Y. RPT (Repeat) Key. See “Hard Keys”underUsing
the Navigation System
on page 5‑12for more
information.
Z. DEST (Destination) Key. See Destination
on
page 5‑24for more information.
AA. CONFIG (Configure) Key. See Configure Menu
on
page 5‑42for more information.
Getting Started
Read this manual thoroughly to become familiar with
how the navigation system operates.
The navigation system includes navigation and audio
functions.
While entering the vehicle or when turning the vehicle
off, some DVD Map Disc noise is normal.
Keeping your eyes on the road and your mind on the
drive is important for safe driving. The navigation
system has built-in features intended to help keep your
eyes on the road and mind on the drive. Some features
may be disabled while driving. Note that these functions
will be grayed-out. A grayed-out function indicates it is
not available when the vehicle is moving.
All functions are available when the vehicle is parked.
Do the following before driving:
.Become familiar with the navigation system
operation, hard keys on the faceplate, and
touch-sensitive screen buttons of the navigation
system.
.Set up the audio by presetting favorite stations,
setting the tone, and adjusting the speakers.
5-4
Page 275 of 580
.Set up the navigation features before beginning
driving, such as entering an address or a preset
destination.
.Set up your phone numbers in advance so they
can be called easily with the press of a single
button or a single voice command (for navigation
systems equipped with phone capability).
{WARNING:
Taking your eyes off the road too long or too often
while using the navigation system could cause a
crash resulting in injury or death to you or others.
Focus your attention on driving.
{WARNING:
Avoid looking too long or too often at the moving
map on the navigation screen. This could cause a
crash and you or others can be injured or killed.
Use the turn-by-turn voice guidance directions
whenever possible.Use the navigation system to:
.Plan a route.
.Select a destination using various methods
and choices.
.Follow turn-by-turn route and map guidance with
voice prompts, only if permitted by traffic laws,
controls, and conditions.
You should always be alert and obey traffic and
roadway laws and instructions, regardless of the
guidance from the navigation system. Because the
navigation system uses street map information that
does not include all traffic restrictions or the latest road
changes, it may suggest using a road that is now closed
for construction or a turn that is prohibited by signs at
the intersection. Because the system uses limited
information, you must always evaluate whether
following the system's directions is safe and legal for
the current conditions.
5-5
Page 276 of 580
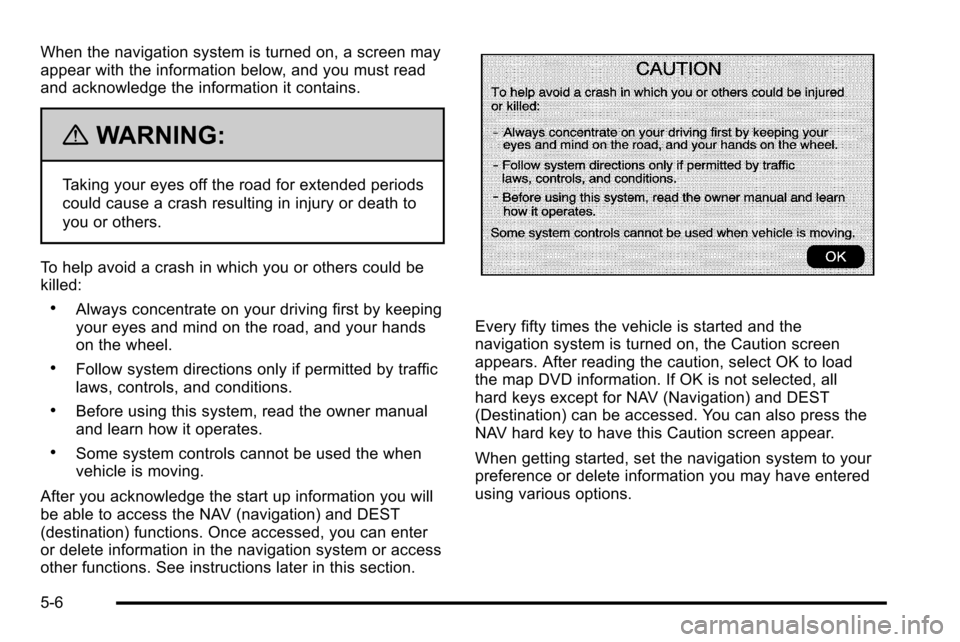
When the navigation system is turned on, a screen may
appear with the information below, and you must read
and acknowledge the information it contains.
{WARNING:
Taking your eyes off the road for extended periods
could cause a crash resulting in injury or death to
you or others.
To help avoid a crash in which you or others could be
killed:
.Always concentrate on your driving first by keeping
your eyes and mind on the road, and your hands
on the wheel.
.Follow system directions only if permitted by traffic
laws, controls, and conditions.
.Before using this system, read the owner manual
and learn how it operates.
.Some system controls cannot be used the when
vehicle is moving.
After you acknowledge the start up information you will
be able to access the NAV (navigation) and DEST
(destination) functions. Once accessed, you can enter
or delete information in the navigation system or access
other functions. See instructions later in this section.
Every fifty times the vehicle is started and the
navigation system is turned on, the Caution screen
appears. After reading the caution, select OK to load
the map DVD information. If OK is not selected, all
hard keys except for NAV (Navigation) and DEST
(Destination) can be accessed. You can also press the
NAV hard key to have this Caution screen appear.
When getting started, set the navigation system to your
preference or delete information you may have entered
using various options.
5-6
Page 277 of 580
Language—English/Metric
To change the language of the navigation screens, see
Driver Information Center (DIC)on page 4‑39for more
information.
To change the navigation screens from English or
metric, see DIC Operation and Displays
on page 4‑40for more information.
Deleting Personal Information
This navigation system can record and store personal
information such as names and addresses. Delete this
information when selling your vehicle or returning a
leased vehicle. See “Edit Address Book—Edit/View”
under Configure Menu
on page 5‑42for deleting
information from the address book.
Limit Features While Driving
The navigation system may have this feature.
Touch the Limit Features While Driving screen button to
turn the ability to limit functions on and off while driving.
When this screen button is highlighted, the following
functions are limited while driving:
.Music Navigator Scrolling
.Radio Category Scrolling
.Navigation Menu Scrolling and some functions See
“Category” underNavigation Audio System
on
page 5‑59for more information. See “From Map”under
Destinationon page 5‑24for more information.
Some functions will remain limited regardless of the
setting.
Storing Radio Station Presets
To set preset radio stations, do the following:
1. Press
Oto turn the system on.
2. Press the AUDIO hard key and select the desired band (AM, FM, or XM (if equipped)).
3. Use the
w(tuning) knob or the SEEK arrows to
tune to the desired station.
4. Press and hold one of the five preset screen buttons, at the bottom of the screen, until a beep is
heard or if the station displays on the selected
preset button.
5. Repeat the steps for each preset.
See “Storing Radio Station Presets” underNavigation
Audio System
on page 5‑59for more information.
5-7
Page 278 of 580
Setting the Clock
The navigation system time and the analog clock
operate independently. Changing the time through the
navigation system does not change the time on the
analog clock. SeeAnalog Clock
on page 4‑20to
change the analog clock time.
To set the time for the navigation system:
1. Press the CONFIG key to enter the configure menu options, then press the CONFIG key
repeatedly until the time is selected or touch the
time screen button.
2. Press the Hours and Minutes −(minus) and
+ (plus) signs to decrease or to increase the time.
See “Setting the Clock” underConfigure Menu
on
page 5‑42for more information.
Entering an Address and Point of
Interest, and Storing Preset
Destinations
Entering an Address
Enter a destination by inputting the city name first:
1. If the radio is already on with a map disc inserted, skip to Step 5.
2. Press
Oto turn the system on. 3. Insert the DVD map disc. See
“Installing the Map
DVD” under Maps
on page 5‑14for more
information.
4. A caution may appear. Touch the OK screen button to proceed.
5. Press the DEST hard key.
6. Press the
2Address Entry screen button.
7. Select the state/province screen button, if needed, to change the current state or province. A list of all
of the available states and provinces appear.
Select the state or province.
8. Once a state or province has been selected the City name category is automatically selected for
entry.
If five or less names are available, a list displays.
If more than five are available, the List screen
button displays a number. This number represents
the number of available cities. Select this button to
view the list and select a city.
5-8