window CADILLAC ESCALADE EXT 2010 3.G User Guide
[x] Cancel search | Manufacturer: CADILLAC, Model Year: 2010, Model line: ESCALADE EXT, Model: CADILLAC ESCALADE EXT 2010 3.GPages: 580, PDF Size: 6.23 MB
Page 105 of 580
Keys
{WARNING:
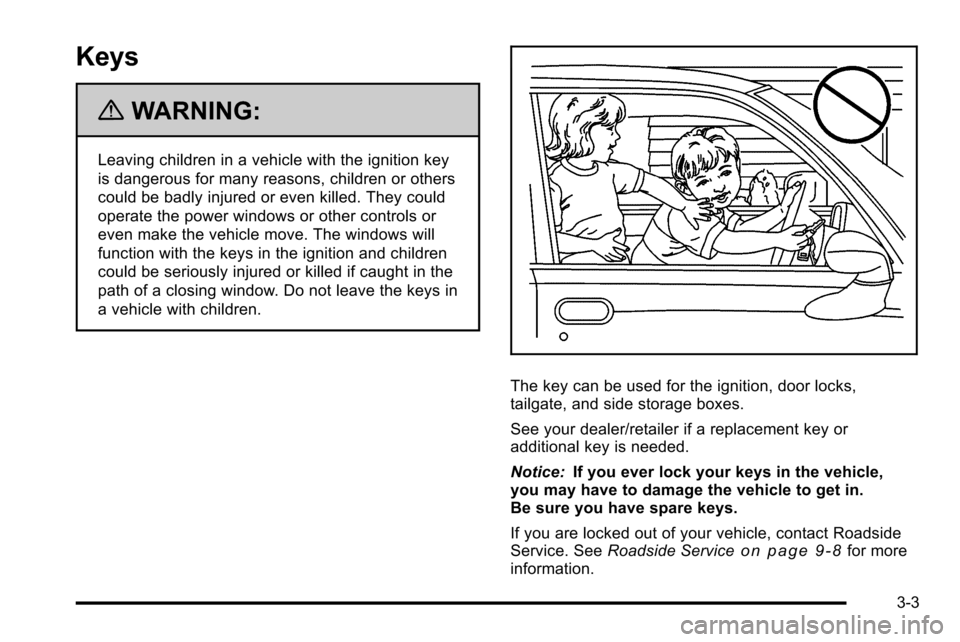
Leaving children in a vehicle with the ignition key
is dangerous for many reasons, children or others
could be badly injured or even killed. They could
operate the power windows or other controls or
even make the vehicle move. The windows will
function with the keys in the ignition and children
could be seriously injured or killed if caught in the
path of a closing window. Do not leave the keys in
a vehicle with children.
The key can be used for the ignition, door locks,
tailgate, and side storage boxes.
See your dealer/retailer if a replacement key or
additional key is needed.
Notice:If you ever lock your keys in the vehicle,
you may have to damage the vehicle to get in.
Be sure you have spare keys.
If you are locked out of your vehicle, contact Roadside
Service. See Roadside Service
on page 9‑8for more
information.
3-3
Page 109 of 580
Remote Vehicle Start
This feature allows you to start the engine from outside
of the vehicle. It may also start up the vehicle's heating
or air conditioning systems and rear window defogger.
Normal operation of the system will return after the key
is turned to the ON/RUN position.
During a remote start, the climate control system will
default to a heating or cooling mode depending on the
outside temperatures.
During a remote start, if your vehicle has an automatic
climate control system and heated seats, the heated
seats will turn on during colder outside temperatures
and will shut off when the key is turned to ON/RUN.
If your vehicle does not have an automatic climate
control system, during remote start, you will need to
manually turn the heated seats on and off. SeeHeated
and Cooled Seats
on page 2‑5for additional
information.
Laws in some communities may restrict the use of
remote starters. For example, some laws may require
a person using the remote start to have the vehicle in
view when doing so. Check local regulations for any
requirements on remote starting of vehicles.
Do not use the remote start feature if your vehicle is low
on fuel. Your vehicle may run out of fuel. If your vehicle has the remote start feature, the RKE
transmitter functions will have an increased range of
operation. However, the range may be less while the
vehicle is running.
There are other conditions which can affect the
performance of the transmitter, see
Remote Keyless
Entry (RKE) System
on page 3‑4for additional
information.
/ (Remote Start) : This button will be on the RKE
transmitter if you have remote start.
To start the vehicle using the remote start feature:
1. Aim the transmitter at the vehicle.
2. Press and release the transmitter's lock button. The vehicle's doors will lock. Immediately press
and hold the transmitter's remote start button until
the turn signal lights flash. If you cannot see the
vehicle's lights, press and hold the remote start
button for two to four seconds. Pressing the remote
start button again after the vehicle has started will
turn the engine off.
When the vehicle starts, the parking lamps will turn
on and remain on while the vehicle is running.
If the vehicle is left running it will automatically shut
off after 10 minutes unless a time extension has
been done.
3-7
Page 114 of 580
Midgate®
{WARNING:
It can be dangerous to drive with the cargo area
covered and the tailgate and the Midgate®open
because carbon monoxide (CO) gas can come
into your vehicle. You can not see or smell CO.
It can cause unconsciousness and even death.
If you must drive with the cargo covers on and the
tailgate and Midgate
®open or if electrical wiring or
other cable connections must pass through the
seal between the body and the Midgate
®:
.Make sure all windows are shut.
.Turn the fan on your heating or cooling
system to its highest speed on the setting that
brings in outside air. This will force outside air
into your vehicle. See Dual Automatic Climate
Control System
on page 4‑20.
(Continued)
WARNING: (Continued)
.If you have air outlets on or under the
instrument panel, open them all the way.
See Engine Exhaust
on page 3‑44.
Midgate®Operation
Your vehicle is equipped with a Midgate®and a
removable rear glass panel. The Midgate®allows you
to extend the length of your vehicle's cargo area.
3-12
Page 115 of 580
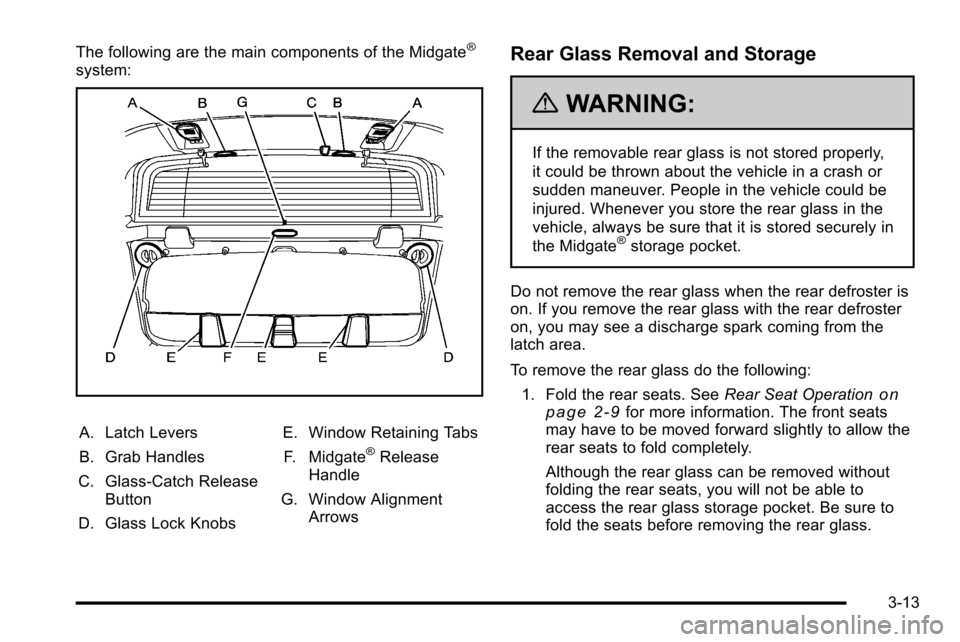
The following are the main components of the Midgate®
system:
A. Latch Levers
B. Grab Handles
C. Glass-Catch Release Button
D. Glass Lock Knobs E. Window Retaining Tabs
F. Midgate®Release
Handle
G. Window Alignment Arrows
Rear Glass Removal and Storage
{WARNING:
If the removable rear glass is not stored properly,
it could be thrown about the vehicle in a crash or
sudden maneuver. People in the vehicle could be
injured. Whenever you store the rear glass in the
vehicle, always be sure that it is stored securely in
the Midgate
®storage pocket.
Do not remove the rear glass when the rear defroster is
on. If you remove the rear glass with the rear defroster
on, you may see a discharge spark coming from the
latch area.
To remove the rear glass do the following: 1. Fold the rear seats. See Rear Seat Operation
on
page 2‑9for more information. The front seats
may have to be moved forward slightly to allow the
rear seats to fold completely.
Although the rear glass can be removed without
folding the rear seats, you will not be able to
access the rear glass storage pocket. Be sure to
fold the seats before removing the rear glass.
3-13
Page 117 of 580

4. With the rear glass tilted toward you, lift it out fromthe lower window frame channel. Use the grab
handles to assist you in removing the rear glass.
5. Load the rear glass into the storage pocket in the
Midgate®, guiding the lower edge of the rear glass
behind the three rear glass retaining tabs (E).
Hold the rear glass flat against the storage pocket,
with grab handles facing you, until the next step.
3-15
Page 119 of 580
Reinstalling the Rear Glass
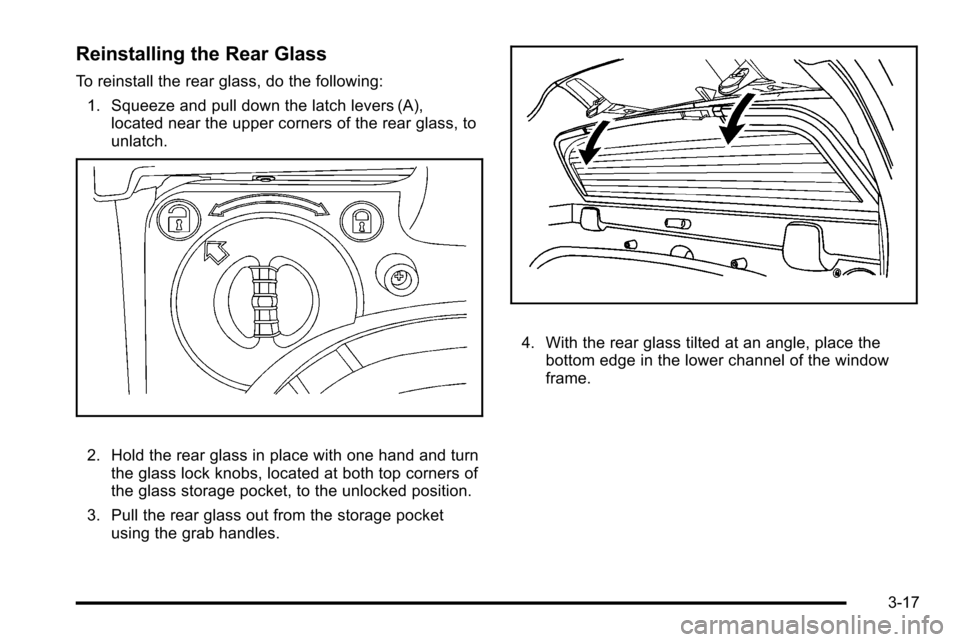
To reinstall the rear glass, do the following:1. Squeeze and pull down the latch levers (A), located near the upper corners of the rear glass, to
unlatch.
2. Hold the rear glass in place with one hand and turn
the glass lock knobs, located at both top corners of
the glass storage pocket, to the unlocked position.
3. Pull the rear glass out from the storage pocket using the grab handles.
4. With the rear glass tilted at an angle, place thebottom edge in the lower channel of the window
frame.
3-17
Page 120 of 580
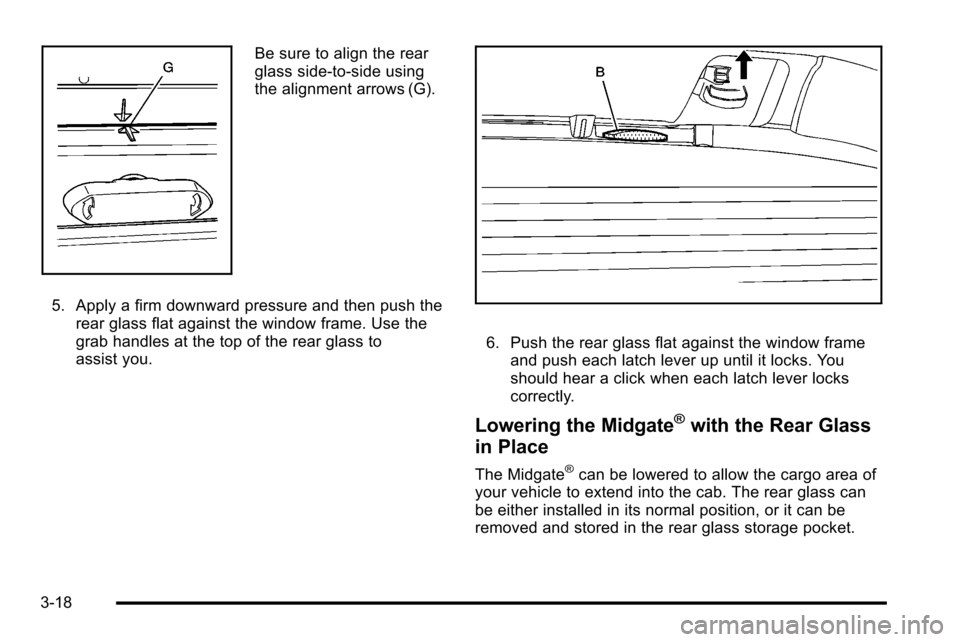
Be sure to align the rear
glass side-to-side using
the alignment arrows (G).
5. Apply a firm downward pressure and then push the rear glass flat against the window frame. Use the
grab handles at the top of the rear glass to
assist you.
6. Push the rear glass flat against the window frameand push each latch lever up until it locks. You
should hear a click when each latch lever locks
correctly.
Lowering the Midgate®with the Rear Glass
in Place
The Midgate®can be lowered to allow the cargo area of
your vehicle to extend into the cab. The rear glass can
be either installed in its normal position, or it can be
removed and stored in the rear glass storage pocket.
3-18
Page 124 of 580

The switch used to
disable the power assist
steps is located on the
center console below the
climate control system.
The assist steps cannot be disabled in the extended
position.
Windows
{WARNING:
Leaving children, helpless adults, or pets in a
vehicle with the windows closed is dangerous.
They can be overcome by the extreme heat and
suffer permanent injuries or even death from heat
stroke. Never leave a child, a helpless adult, or a
pet alone in a vehicle, especially with the windows
closed in warm or hot weather.
3-22
Page 125 of 580

Power Windows
{WARNING:
Leaving children in a vehicle with the keys is
dangerous for many reasons, children or others
could be badly injured or even killed. They could
operate the power windows or other controls or
even make the vehicle move. The windows will
function and they could be seriously injured or
killed if caught in the path of a closing window.
Do not leave keys in a vehicle with children.
When there are children in the rear seat use the
window lockout button to prevent unintentional
operation of the windows.
The power window
switches are located on
the driver door.
In addition, each door has a switch for its own
window. The front power window switch operates with
two positions for both up and down movement and the
rear power window switch operates with one position for
up and two positions for down movement. Press the
switch to the first position to lower the window to the
desired level. Pull the switch up to raise the window.
The vehicle has Retained Accessory Power (RAP) that
allows you to use the power windows once the ignition
has been turned off. For more information, see Retained
Accessory Power (RAP) on page 3‑32.
3-23
Page 126 of 580

Express-Down/Up Windows
Windows with the express feature allow the windows to
be raised and lowered all the way without holding the
switch.
Press or pull the switch fully and release it to activate
the express feature.
The express mode can be canceled at any time by
briefly pressing or pulling the switch.
Express Window Anti-Pinch Feature
If any object is in the path of the window when the
express‐up is active, the window will stop at the
obstruction and auto‐reverse to a preset factory
position. Weather conditions such as severe icing may
also cause the window to auto‐reverse. The window
will return to normal operation once the obstruction or
condition is removed.
Express Window Anti‐Pinch Override
{WARNING:
If express override is activated, the window will
not reverse automatically. You or others could be
injured and the window could be damaged. Before
you use express override, make sure that all
people and obstructions are clear of the
window path.
In an emergency, the anti‐pinch feature can be
overridden in a supervised mode. Hold the window
switch all the way up to the second position. The
window will rise for as long as the switch is held.
Once the switch is released, the express mode is
re‐activated.
In this mode, the window can still close on an object in
its path. Use care when using the override mode.
3-24