light CADILLAC ESCALADE EXT 2010 3.G Owner's Manual
[x] Cancel search | Manufacturer: CADILLAC, Model Year: 2010, Model line: ESCALADE EXT, Model: CADILLAC ESCALADE EXT 2010 3.GPages: 580, PDF Size: 6.23 MB
Page 107 of 580
If enabled through the Driver Information Center (DIC),
the turn signal lamps flash once to indicate locking has
occurred. If enabled through the DIC, the horn chirps
when
Qis pressed again within three seconds. SeeDIC
Vehicle Customization
on page 4‑56for additional
information.
Pressing
Qarms the content theft‐deterrent system.
See Content Theft-Deterrent on page 3‑26.
K(Unlock): Press once to unlock only the driver
door. If
Kis pressed again within three seconds, all
remaining doors, including the tailgate unlock.
The interior lamps come on and stay on for 20 seconds
or until the ignition is turned on. If enabled through
the DIC, the turn signal lamps flash twice to indicate
unlocking has occurred. See DIC Vehicle Customization
on page 4‑56. If enabled through the DIC, the exterior
lights turn on briefly if it is dark enough outside.
See “APPROACH LIGHTING” underDIC Vehicle
Customization
on page 4‑56. Pressing
Kon the RKE transmitter disarms the content
theft‐deterrent system. See Content Theft-Deterrent
on
page 3‑26.
L(Vehicle Locator/Panic Alarm): Press and release
to locate the vehicle. The turn signal lamps flash and
the horn sounds three times.
Press and hold
Lfor more than two seconds to
activate the panic alarm. The turn signal lamps flash
and the horn sounds repeatedly for 30 seconds.
The alarm turns off when the ignition is moved to
ON/RUN or
Lis pressed again. The ignition must
be in LOCK/OFF for the panic alarm to work.
The vehicle comes with two transmitters. Each
transmitter will have a number on top of it, “1”or“2”.
These numbers correspond to the driver of the vehicle.
For example, the memory seat position for driver 1 will
be recalled when using the transmitter labeled “1”,
if enabled through the DIC. See Memory Features
on
page 2‑6and DIC Vehicle Customizationon
page 4‑56for more information.
3-5
Page 109 of 580
Remote Vehicle Start
This feature allows you to start the engine from outside
of the vehicle. It may also start up the vehicle's heating
or air conditioning systems and rear window defogger.
Normal operation of the system will return after the key
is turned to the ON/RUN position.
During a remote start, the climate control system will
default to a heating or cooling mode depending on the
outside temperatures.
During a remote start, if your vehicle has an automatic
climate control system and heated seats, the heated
seats will turn on during colder outside temperatures
and will shut off when the key is turned to ON/RUN.
If your vehicle does not have an automatic climate
control system, during remote start, you will need to
manually turn the heated seats on and off. SeeHeated
and Cooled Seats
on page 2‑5for additional
information.
Laws in some communities may restrict the use of
remote starters. For example, some laws may require
a person using the remote start to have the vehicle in
view when doing so. Check local regulations for any
requirements on remote starting of vehicles.
Do not use the remote start feature if your vehicle is low
on fuel. Your vehicle may run out of fuel. If your vehicle has the remote start feature, the RKE
transmitter functions will have an increased range of
operation. However, the range may be less while the
vehicle is running.
There are other conditions which can affect the
performance of the transmitter, see
Remote Keyless
Entry (RKE) System
on page 3‑4for additional
information.
/ (Remote Start) : This button will be on the RKE
transmitter if you have remote start.
To start the vehicle using the remote start feature:
1. Aim the transmitter at the vehicle.
2. Press and release the transmitter's lock button. The vehicle's doors will lock. Immediately press
and hold the transmitter's remote start button until
the turn signal lights flash. If you cannot see the
vehicle's lights, press and hold the remote start
button for two to four seconds. Pressing the remote
start button again after the vehicle has started will
turn the engine off.
When the vehicle starts, the parking lamps will turn
on and remain on while the vehicle is running.
If the vehicle is left running it will automatically shut
off after 10 minutes unless a time extension has
been done.
3-7
Page 110 of 580
3. If it is the first remote start since the vehicle hasbeen driven, repeat these steps, while the engine
is still running, to extend the engine running time
by 10 minutes. Remote start can be extended
one time.
After entering the vehicle during a remote start, insert
and turn the key to ON/RUN to drive the vehicle.
To manually shut off a remote start, do any of the
following:
.Aim the RKE transmitter at the vehicle and press
the remote start button until the parking lamps
turn off.
.Turn on the hazard warning flashers.
.Turn the ignition switch on and then off.
The vehicle can be remote started two separate times
between driving sequences. The engine will run for
10 minutes after each remote start.
Or, you can extend the engine run time by another
10 minutes within the first 10 minute remote start time
frame, and before the engine stops.
For example, if the lock button and then the remote start
buttons are pressed again after the vehicle has been
running for five minutes, 10 minutes are added, allowing
the engine to run for 15 minutes. The additional ten minutes are considered a second
remote vehicle start.
After your vehicles engine has been started two times
using the remote vehicle start button, or a single remote
start with one time extension, the vehicle must be
started with the key.
After the key is removed from the ignition, the vehicle
can be remote started again.
The vehicle cannot be remote started if the key is in
the ignition, the hood is not closed, or if there is an
emission control system malfunction and the check
engine light comes on.
Also, the engine will turn off during a remote vehicle
start if the coolant temperature gets too high or if the oil
pressure gets low.
Vehicles that have the remote vehicle start feature are
shipped from the factory with the remote vehicle start
system enabled. The system may be enabled or
disabled through the DIC. See
“REMOTE START”
under DIC Vehicle Customization
on page 4‑56for
additional information.
3-8
Page 115 of 580
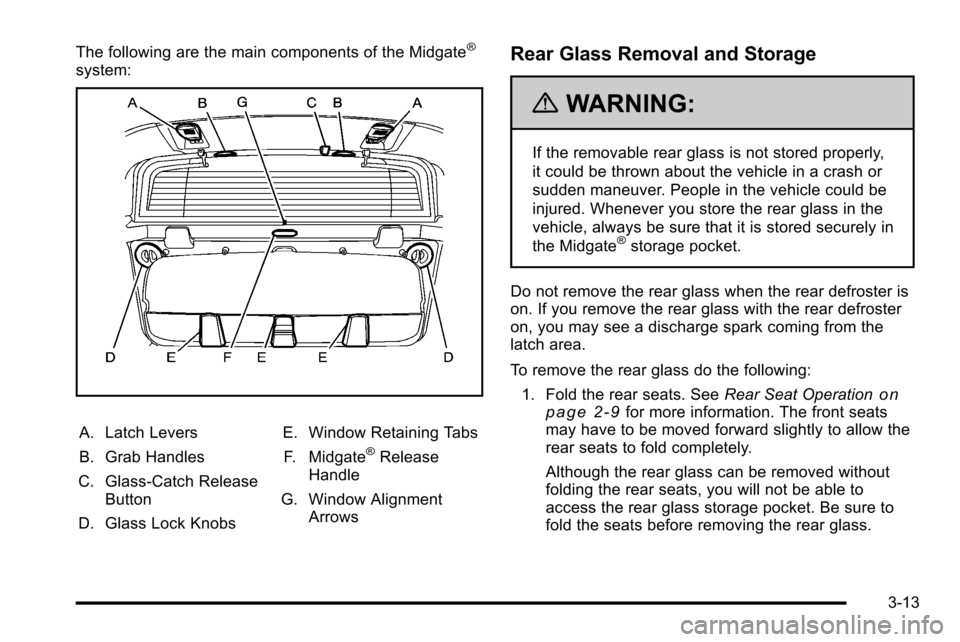
The following are the main components of the Midgate®
system:
A. Latch Levers
B. Grab Handles
C. Glass-Catch Release Button
D. Glass Lock Knobs E. Window Retaining Tabs
F. Midgate®Release
Handle
G. Window Alignment Arrows
Rear Glass Removal and Storage
{WARNING:
If the removable rear glass is not stored properly,
it could be thrown about the vehicle in a crash or
sudden maneuver. People in the vehicle could be
injured. Whenever you store the rear glass in the
vehicle, always be sure that it is stored securely in
the Midgate
®storage pocket.
Do not remove the rear glass when the rear defroster is
on. If you remove the rear glass with the rear defroster
on, you may see a discharge spark coming from the
latch area.
To remove the rear glass do the following: 1. Fold the rear seats. See Rear Seat Operation
on
page 2‑9for more information. The front seats
may have to be moved forward slightly to allow the
rear seats to fold completely.
Although the rear glass can be removed without
folding the rear seats, you will not be able to
access the rear glass storage pocket. Be sure to
fold the seats before removing the rear glass.
3-13
Page 121 of 580

To lower the Midgate®, do the following:
1. Fold the rear seats. The front seats might have to be moved forward slightly to allow the rear seats to
fold. See Rear Seat Operation
on page 2‑9for
more information.
Rear Glass in Normal Position
2. Standing outside of the vehicle, hold the Midgate®
securely so it does not fall forward. Turn the
Midgate®handle clockwise and pull the Midgate®
toward you.
3. Lower the Midgate®until it is flat.
3-19
Page 127 of 580

Programming the Power Windows
If the battery on the vehicle has been recharged,
disconnected, or is not working, you will need to
reprogram each front power window for the express-up
feature to work. Before reprogramming, replace or
recharge the vehicle's battery.
To program each front window, follow these steps:1. With the ignition in ACC/ACCESSORY, ON/RUN, or when Retained Accessory Power (RAP) is
active, close all doors.
2. Press and hold the power window switch until the window is fully open.
3. Pull the power window switch up until the window is fully closed.
4. Continue holding the switch up for approximately two seconds after the window is completely closed.
The window is now reprogrammed. Repeat the process
for the other windows.
Window Lockout
o (Window Lockout) : The rear window lockout button
is located on the driver door near the window switches.
Press the right side of the button to disable the rear
window controls. The light on the button will illuminate,
indicating the feature is in use. The rear windows still
can be raised or lowered using the driver window
switches when the lockout feature is active.
To restore power to the rear windows, press the button
again. The light on the button will go out.
Sun Visors
Sun Visors with Slide Rod
Your vehicle may have this feature. Pull the sun visor
down to block glare. Detach the sun visor from the
center mount and slide it along the rod from side-to-side
to cover the driver or passenger side of the front
window. Swing the sun visor to the side to cover the
side window. It can also be moved along the rod from
side-to-side in this position.
3-25
Page 128 of 580
Sun Visors with Fixed Rod and Pull‐out
Extension
Your vehicle may have this feature. Pull the sun visor
down to block glare. Pull the sun visor extender out for
additional coverage. Detach the sun visor from the
center mount and swing it to the side to cover the side
window.
Lighted Visor Vanity Mirror
Your vehicle has lighted visor vanity mirrors on both the
driver's and passenger's sun visors. Pull the sun visor
down and lift the mirror cover to turn the lamps on.
Theft-Deterrent Systems
Vehicle theft is big business, especially in some cities.
This vehicle has theft-deterrent features, however, they
do not make it impossible to steal.
Content Theft-Deterrent
Your vehicle has a content theft-deterrent alarm system.
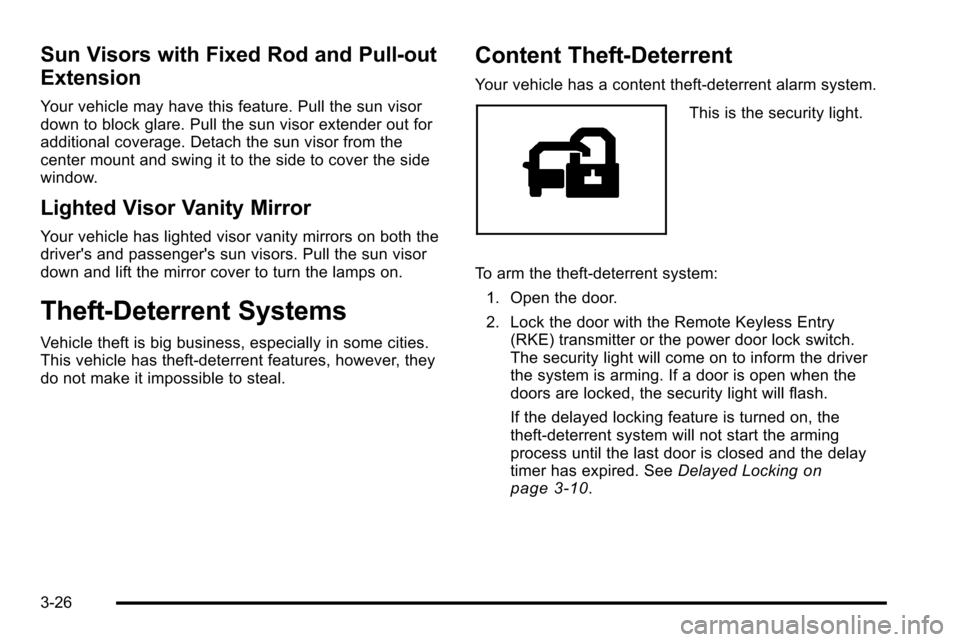
This is the security light.
To arm the theft-deterrent system: 1. Open the door.
2. Lock the door with the Remote Keyless Entry (RKE) transmitter or the power door lock switch.
The security light will come on to inform the driver
the system is arming. If a door is open when the
doors are locked, the security light will flash.
If the delayed locking feature is turned on, the
theft‐deterrent system will not start the arming
process until the last door is closed and the delay
timer has expired. See Delayed Locking
on
page 3‑10.
3-26
Page 129 of 580

3. Close all doors. The security light should go offafter about 30 seconds. The alarm is not armed
until the security light goes off.
The content theft deterrent system does not
sense if the midgate or tailgate are open or ajar,
therefore, vehicle contents may not be protected if
the midgate is left open or ajar.
If a locked driver door is opened without using the RKE
transmitter, a ten second pre-alarm will occur. The horn
will chirp and the lights will flash. If the key is not placed
in the ignition and turned to START or the door is not
unlocked by pressing the unlock button on the RKE
transmitter during the ten second pre-alarm, the alarm
will go off. Your vehicle's headlamps will flash and the
horn will sound for about 30 seconds, then will turn off
to save the battery power.
The theft-deterrent system will not activate if the doors
are locked with the vehicle's key or the manual door
lock. It activates only if you use the power door lock
switch with the door open or the RKE transmitter. You
should also remember that you can start your vehicle
with the correct ignition key if the alarm has been
set off. To avoid setting off the alarm by accident:
.If you do not want to activate the theft-deterrent
system, the vehicle should be locked with the door
key after the doors are closed.
.Always unlock the doors with the RKE transmitter.
Unlocking a door any other way will set off the
alarm if it is armed.
If you set off the alarm by accident, press unlock on the
RKE transmitter or place the key in the ignition and turn
it to START to turn off the alarm. The alarm will not stop
if you try to unlock a door any other way.
Testing the Alarm
To test the alarm: 1. From inside the vehicle, lower the driver's window and open the driver's door.
2. Activate the system by locking the doors with the power door lock switch while the door is open,
or with the RKE transmitter.
3. Get out of the vehicle, close the door and wait for the security light to go out.
4. Then reach in through the window, unlock the door with the manual door lock and open the door. This
should set off the alarm.
While the alarm is set, the power door unlock switch will
not work.
3-27
Page 130 of 580
If the alarm does not sound when it should but the
headlamps flash, check to see if the horn works.
The horn fuse may be blown. To replace the fuse,
seeFuses and Circuit Breakers on page 7‑105.
If the alarm does not sound or the headlamps do
not flash, the vehicle should be serviced by your
dealer/retailer.
PASS-Key®III+ Electronic
Immobilizer
See Radio Frequency Statementon page 9‑20for information regarding Part 15 of the Federal
Communications Commission (FCC) Rules and
RSS-210/211 of Industry and Science Canada.
PASS-Key®III+ Electronic
Immobilizer Operation
Your vehicle has PASS-Key®III+ (Personalized
Automotive Security System) theft-deterrent system.
PASS-Key
®III+ is a passive theft-deterrent system.
The system is automatically armed when the key is
removed from the ignition. The system is automatically disarmed when the key is
turned to ON/RUN, ACC/ACCESSORY or START from
the LOCK/OFF position.
You do not have to manually arm or disarm the system.
The security light will come on if there is a problem with
arming or disarming the theft-deterrent system.
When the PASS-Key
®III+ system senses that someone
is using the wrong key, it prevents the vehicle from
starting. Anyone using a trial-and-error method to start
the vehicle will be discouraged because of the high
number of electrical key codes.
If the engine does not start and the security light on
the instrument panel cluster comes on when trying to
start the vehicle, there may be a problem with your
theft-deterrent system. Turn the ignition off and try
again.
If the engine still does not start, and the key appears
to be undamaged, try another ignition key. At this time,
you may also want to check the fuse, see Fuses and
Circuit Breakers
on page 7‑105. If the engine still
does not start with the other key, your vehicle needs
service. If your vehicle does start, the first key may be
faulty. See your dealer/retailer who can service the
PASS-Key
®III+ to have a new key made. In an
emergency, contact Roadside Assistance.
3-28
Page 131 of 580

It is possible for the PASS-Key®III+ decoder to learn
the transponder value of a new or replacement key.
Up to 10 keys may be programmed for the vehicle.
The following procedure is for programming additional
keys only. If all the currently programmed keys are lost
or do not operate, you must see your dealer/retailer or a
locksmith who can service PASS-Key
®III+ to have keys
made and programmed to the system.
See your dealer/retailer or a locksmith who can service
PASS-Key
®III+ to get a new key blank that is cut
exactly as the ignition key that operates the system.
To program the new additional key:
1. Verify that the new key has a
1stamped on it.
2. Insert the original, already programmed, key in the ignition and start the engine. If the engine will not
start, see your dealer/retailer for service. 3. After the engine has started, turn the key to
LOCK/OFF, and remove the key.
4. Insert the new key to be programmed and turn it to the ON/RUN position within five seconds of turning
the ignition to the LOCK/OFF position in Step 3.
The security light will turn off once the key has
been programmed.
5. Repeat Steps 1 through 4 if additional keys are to be programmed.
If you lose or damage your PASS-Key
®III+ key, see
your dealer/retailer or a locksmith who can service
PASS-Key
®III+ to have a new key made.
Do not leave the key or device that disarms or
deactivates the theft deterrent system in the vehicle.
3-29