stop start CADILLAC ESCALADE EXT 2010 3.G Owner's Manual
[x] Cancel search | Manufacturer: CADILLAC, Model Year: 2010, Model line: ESCALADE EXT, Model: CADILLAC ESCALADE EXT 2010 3.GPages: 580, PDF Size: 6.23 MB
Page 264 of 580
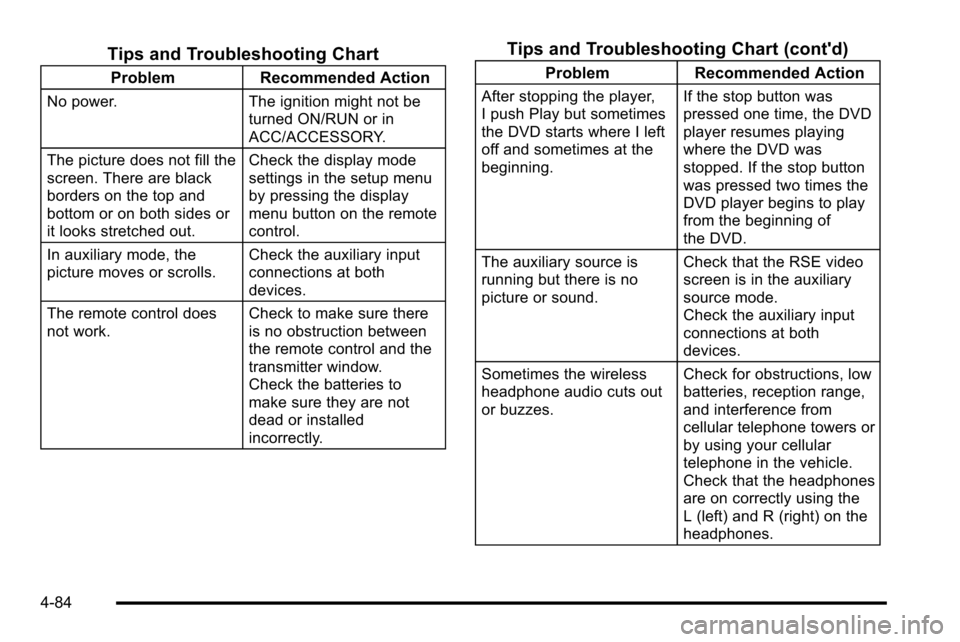
Tips and Troubleshooting Chart
ProblemRecommended Action
No power. The ignition might not be
turned ON/RUN or in
ACC/ACCESSORY.
The picture does not fill the
screen. There are black
borders on the top and
bottom or on both sides or
it looks stretched out. Check the display mode
settings in the setup menu
by pressing the display
menu button on the remote
control.
In auxiliary mode, the
picture moves or scrolls. Check the auxiliary input
connections at both
devices.
The remote control does
not work. Check to make sure there
is no obstruction between
the remote control and the
transmitter window.
Check the batteries to
make sure they are not
dead or installed
incorrectly.
Tips and Troubleshooting Chart (cont'd)
Problem
Recommended Action
After stopping the player,
I push Play but sometimes
the DVD starts where I left
off and sometimes at the
beginning. If the stop button was
pressed one time, the DVD
player resumes playing
where the DVD was
stopped. If the stop button
was pressed two times the
DVD player begins to play
from the beginning of
the DVD.
The auxiliary source is
running but there is no
picture or sound. Check that the RSE video
screen is in the auxiliary
source mode.
Check the auxiliary input
connections at both
devices.
Sometimes the wireless
headphone audio cuts out
or buzzes. Check for obstructions, low
batteries, reception range,
and interference from
cellular telephone towers or
by using your cellular
telephone in the vehicle.
Check that the headphones
are on correctly using the
L (left) and R (right) on the
headphones.
4-84
Page 267 of 580
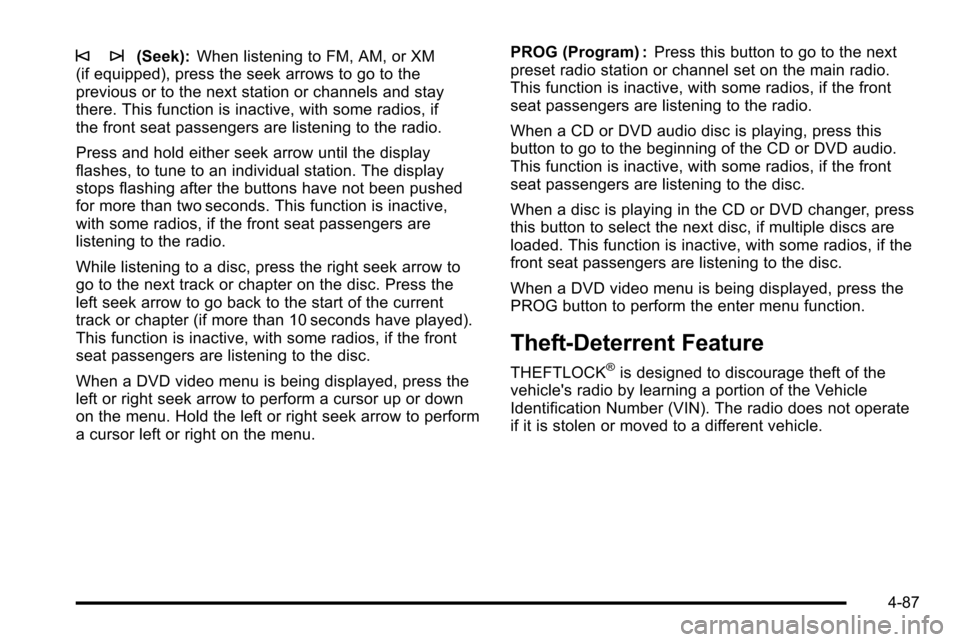
© ¨(Seek):When listening to FM, AM, or XM
(if equipped), press the seek arrows to go to the
previous or to the next station or channels and stay
there. This function is inactive, with some radios, if
the front seat passengers are listening to the radio.
Press and hold either seek arrow until the display
flashes, to tune to an individual station. The display
stops flashing after the buttons have not been pushed
for more than two seconds. This function is inactive,
with some radios, if the front seat passengers are
listening to the radio.
While listening to a disc, press the right seek arrow to
go to the next track or chapter on the disc. Press the
left seek arrow to go back to the start of the current
track or chapter (if more than 10 seconds have played).
This function is inactive, with some radios, if the front
seat passengers are listening to the disc.
When a DVD video menu is being displayed, press the
left or right seek arrow to perform a cursor up or down
on the menu. Hold the left or right seek arrow to perform
a cursor left or right on the menu. PROG (Program) :
Press this button to go to the next
preset radio station or channel set on the main radio.
This function is inactive, with some radios, if the front
seat passengers are listening to the radio.
When a CD or DVD audio disc is playing, press this
button to go to the beginning of the CD or DVD audio.
This function is inactive, with some radios, if the front
seat passengers are listening to the disc.
When a disc is playing in the CD or DVD changer, press
this button to select the next disc, if multiple discs are
loaded. This function is inactive, with some radios, if the
front seat passengers are listening to the disc.
When a DVD video menu is being displayed, press the
PROG button to perform the enter menu function.
Theft-Deterrent Feature
THEFTLOCK®is designed to discourage theft of the
vehicle's radio by learning a portion of the Vehicle
Identification Number (VIN). The radio does not operate
if it is stolen or moved to a different vehicle.
4-87
Page 280 of 580
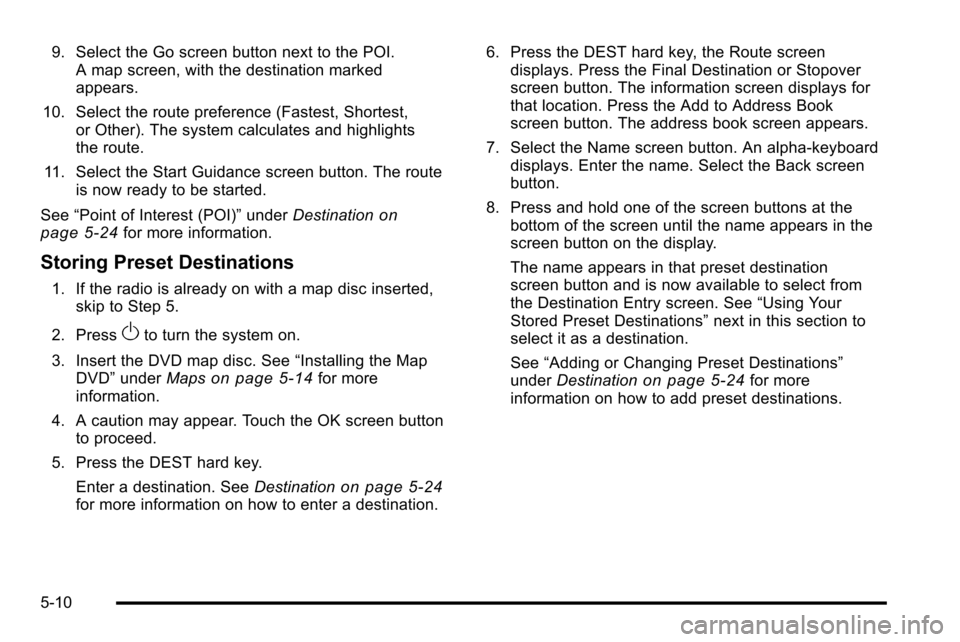
9. Select the Go screen button next to the POI.A map screen, with the destination marked
appears.
10. Select the route preference (Fastest, Shortest, or Other). The system calculates and highlights
the route.
11. Select the Start Guidance screen button. The route is now ready to be started.
See “Point of Interest (POI)” underDestination
on
page 5‑24for more information.
Storing Preset Destinations
1. If the radio is already on with a map disc inserted, skip to Step 5.
2. Press
Oto turn the system on.
3. Insert the DVD map disc. See “Installing the Map
DVD” under Maps
on page 5‑14for more
information.
4. A caution may appear. Touch the OK screen button to proceed.
5. Press the DEST hard key. Enter a destination. See Destination
on page 5‑24for more information on how to enter a destination. 6. Press the DEST hard key, the Route screen
displays. Press the Final Destination or Stopover
screen button. The information screen displays for
that location. Press the Add to Address Book
screen button. The address book screen appears.
7. Select the Name screen button. An alpha-keyboard displays. Enter the name. Select the Back screen
button.
8. Press and hold one of the screen buttons at the bottom of the screen until the name appears in the
screen button on the display.
The name appears in that preset destination
screen button and is now available to select from
the Destination Entry screen. See “Using Your
Stored Preset Destinations” next in this section to
select it as a destination.
See “Adding or Changing Preset Destinations”
under Destination
on page 5‑24for more
information on how to add preset destinations.
5-10
Page 288 of 580
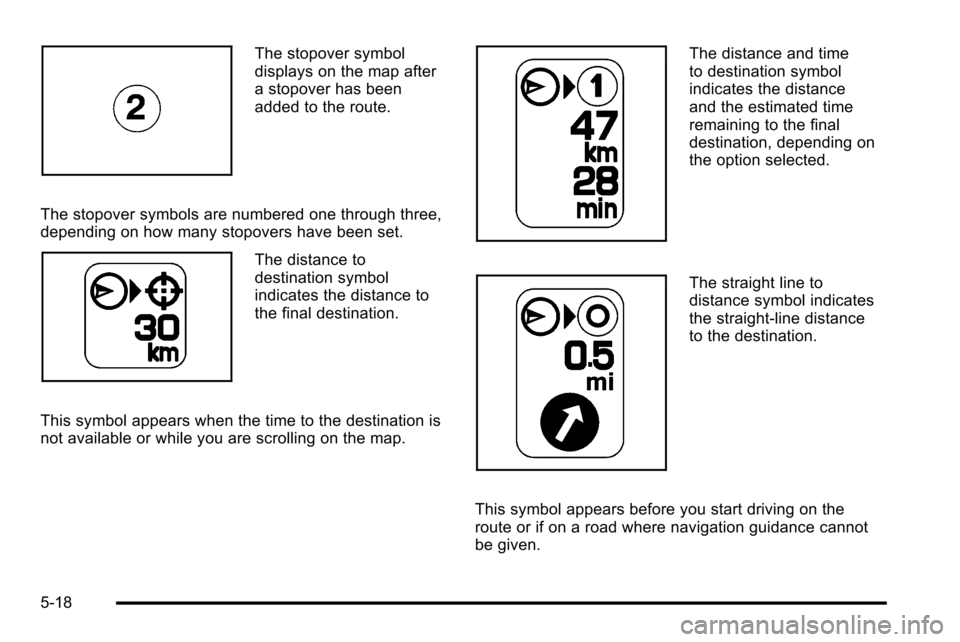
The stopover symbol
displays on the map after
a stopover has been
added to the route.
The stopover symbols are numbered one through three,
depending on how many stopovers have been set.
The distance to
destination symbol
indicates the distance to
the final destination.
This symbol appears when the time to the destination is
not available or while you are scrolling on the map.
The distance and time
to destination symbol
indicates the distance
and the estimated time
remaining to the final
destination, depending on
the option selected.
The straight line to
distance symbol indicates
the straight-line distance
to the destination.
This symbol appears before you start driving on the
route or if on a road where navigation guidance cannot
be given.
5-18
Page 308 of 580
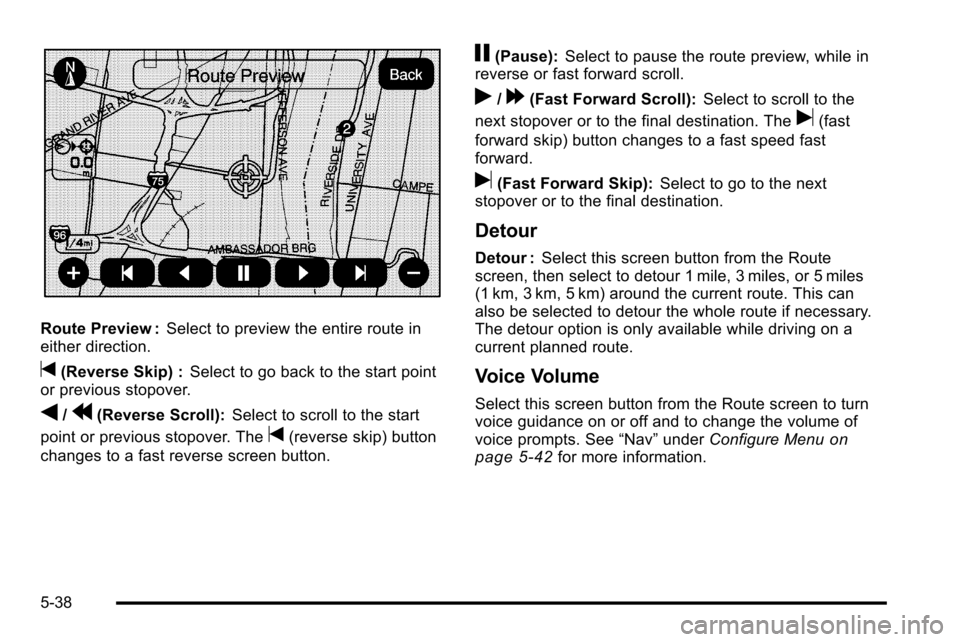
Route Preview :Select to preview the entire route in
either direction.
t(Reverse Skip) : Select to go back to the start point
or previous stopover.
q/r(Reverse Scroll): Select to scroll to the start
point or previous stopover. The
t(reverse skip) button
changes to a fast reverse screen button.
j(Pause): Select to pause the route preview, while in
reverse or fast forward scroll.
r/[(Fast Forward Scroll): Select to scroll to the
next stopover or to the final destination. The
u(fast
forward skip) button changes to a fast speed fast
forward.
u(Fast Forward Skip): Select to go to the next
stopover or to the final destination.
Detour
Detour : Select this screen button from the Route
screen, then select to detour 1 mile, 3 miles, or 5 miles
(1 km, 3 km, 5 km) around the current route. This can
also be selected to detour the whole route if necessary.
The detour option is only available while driving on a
current planned route.
Voice Volume
Select this screen button from the Route screen to turn
voice guidance on or off and to change the volume of
voice prompts. See “Nav”under Configure Menu
on
page 5‑42for more information.
5-38
Page 309 of 580
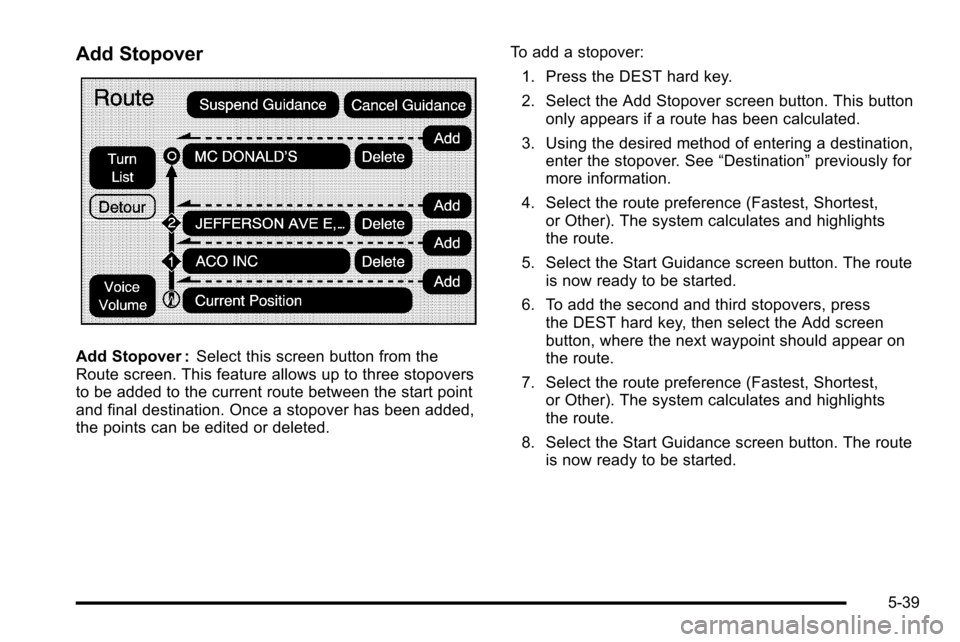
Add Stopover
Add Stopover :Select this screen button from the
Route screen. This feature allows up to three stopovers
to be added to the current route between the start point
and final destination. Once a stopover has been added,
the points can be edited or deleted. To add a stopover:
1. Press the DEST hard key.
2. Select the Add Stopover screen button. This button only appears if a route has been calculated.
3. Using the desired method of entering a destination, enter the stopover. See “Destination”previously for
more information.
4. Select the route preference (Fastest, Shortest, or Other). The system calculates and highlights
the route.
5. Select the Start Guidance screen button. The route is now ready to be started.
6. To add the second and third stopovers, press the DEST hard key, then select the Add screen
button, where the next waypoint should appear on
the route.
7. Select the route preference (Fastest, Shortest, or Other). The system calculates and highlights
the route.
8. Select the Start Guidance screen button. The route is now ready to be started.
5-39
Page 310 of 580
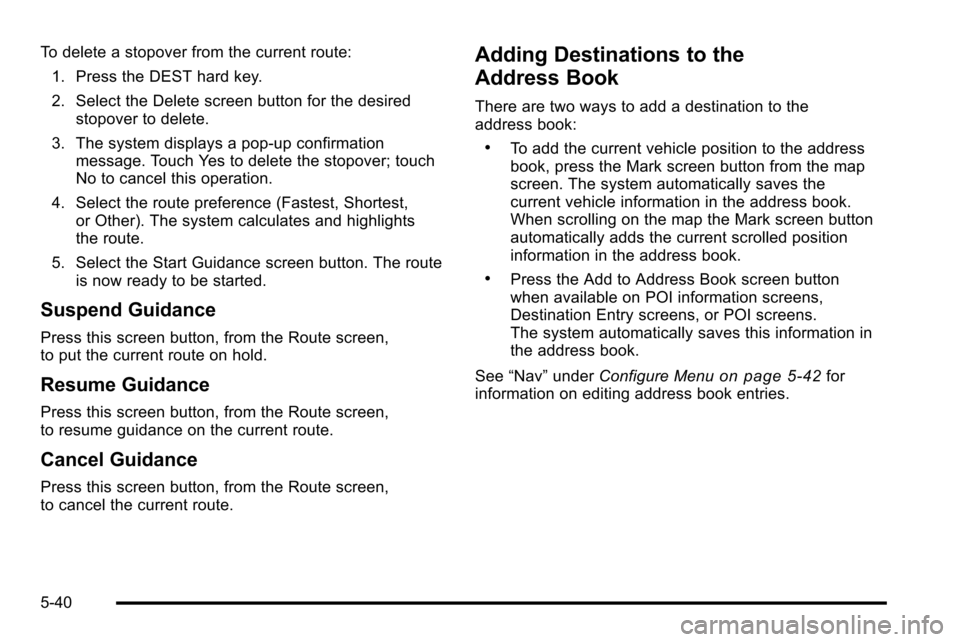
To delete a stopover from the current route:1. Press the DEST hard key.
2. Select the Delete screen button for the desired stopover to delete.
3. The system displays a pop-up confirmation message. Touch Yes to delete the stopover; touch
No to cancel this operation.
4. Select the route preference (Fastest, Shortest, or Other). The system calculates and highlights
the route.
5. Select the Start Guidance screen button. The route is now ready to be started.
Suspend Guidance
Press this screen button, from the Route screen,
to put the current route on hold.
Resume Guidance
Press this screen button, from the Route screen,
to resume guidance on the current route.
Cancel Guidance
Press this screen button, from the Route screen,
to cancel the current route.
Adding Destinations to the
Address Book
There are two ways to add a destination to the
address book:
.To add the current vehicle position to the address
book, press the Mark screen button from the map
screen. The system automatically saves the
current vehicle information in the address book.
When scrolling on the map the Mark screen button
automatically adds the current scrolled position
information in the address book.
.Press the Add to Address Book screen button
when available on POI information screens,
Destination Entry screens, or POI screens.
The system automatically saves this information in
the address book.
See “Nav” under Configure Menu
on page 5‑42for
information on editing address book entries.
5-40
Page 327 of 580

Notice:Do not apply after-market glass tinting to
the vehicle's windows. Glass tinting interferes with
the system's ability to receive GPS signals and
causes the system to malfunction. The window
might have to be replaced to correct the problem.
This would not be covered by the warranty.
For more information if the GPS is not functioning
properly, see If the System Needs Service
on
page 5‑58and Problems with Route Guidanceon
page 5‑58.
Vehicle Positioning
At times, the position of the vehicle on the map may be
inaccurate due to one or more of the following reasons:
.Road system has changed.
.Vehicle is driving on slippery road surfaces such as
in sand, gravel, and/or snow.
.Vehicle is traveling on winding roads.
.Vehicle is on a long straight road.
.Vehicle is approaching a tall building or a large
vehicle.
.Surface streets run parallel to a freeway.
.Vehicle has just been transferred by a vehicle
carrier or a ferry.
.Current position calibration is set incorrectly.
.Vehicle is traveling at high speed.
.Vehicle changes directions more than once,
or when the vehicle is turning on a turn table
in a parking lot.
.Vehicle is entering and/or exiting a parking lot
or a garage.
.GPS signal is not received.
.Roof carrier is installed on the vehicle.
.Vehicle is being driven with tire chains.
.Tires are replaced.
.Tire pressure for the tires is incorrect.
.Tires are worn.
.First time the map DVD is inserted.
.Battery is disconnected for several days.
.Vehicle is driving in heavy traffic where driving is at
low speeds, and the vehicle is stopped and started
repeatedly.
See your dealer/retailer if other problems occur.
5-57
Page 338 of 580
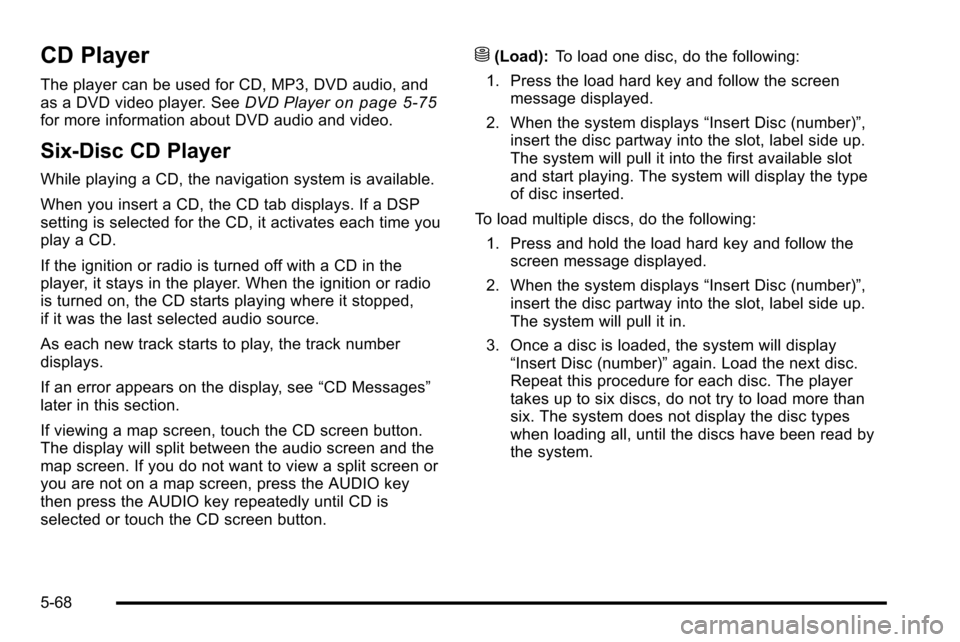
CD Player
The player can be used for CD, MP3, DVD audio, and
as a DVD video player. SeeDVD Playeron page 5‑75for more information about DVD audio and video.
Six-Disc CD Player
While playing a CD, the navigation system is available.
When you insert a CD, the CD tab displays. If a DSP
setting is selected for the CD, it activates each time you
play a CD.
If the ignition or radio is turned off with a CD in the
player, it stays in the player. When the ignition or radio
is turned on, the CD starts playing where it stopped,
if it was the last selected audio source.
As each new track starts to play, the track number
displays.
If an error appears on the display, see “CD Messages”
later in this section.
If viewing a map screen, touch the CD screen button.
The display will split between the audio screen and the
map screen. If you do not want to view a split screen or
you are not on a map screen, press the AUDIO key
then press the AUDIO key repeatedly until CD is
selected or touch the CD screen button.
M(Load): To load one disc, do the following:
1. Press the load hard key and follow the screen message displayed.
2. When the system displays “Insert Disc (number)”,
insert the disc partway into the slot, label side up.
The system will pull it into the first available slot
and start playing. The system will display the type
of disc inserted.
To load multiple discs, do the following: 1. Press and hold the load hard key and follow the screen message displayed.
2. When the system displays “Insert Disc (number)”,
insert the disc partway into the slot, label side up.
The system will pull it in.
3. Once a disc is loaded, the system will display “Insert Disc (number)” again. Load the next disc.
Repeat this procedure for each disc. The player
takes up to six discs, do not try to load more than
six. The system does not display the disc types
when loading all, until the discs have been read by
the system.
5-68
Page 340 of 580
r(Rewind):Touch and hold this button to rewind
quickly through a track selection. You will hear sound
at a reduced volume. Release this button to stop
rewinding. The display will show the elapsed time
of the track.
[(Forward): Touch and hold this button to fast
forward quickly through a track selection. You will hear
sound at a reduced volume. Release this button to stop
fast forwarding. The display will show the elapsed time
of the track.
y © ¨ z(Seek): To seek tracks, press the up
arrow to go to the next track. Press the down arrow
to go to the start of the current track, if more than
eight seconds have played. If either arrow is pressed
more than once, the player continues moving backward
or forward through the CD. The sound mutes while
seeking.
w(Tuning Knob): Turn this knob counterclockwise
one notch to go to the start of the current track, turn it
again to go to the previous track. Turn this knob
clockwise to go to the next track.
When playing an audio CD the rear seat operator can
power on the RSE video screen and use the remote
control to navigate through the tracks on the CD.
Using an MP3 CD
MP3 Format
There are guidelines that must be met, when creating
an MP3 disc. If the guidelines are not met when
recording a CD-R(W), the CD may not play.
The guidelines are:
.Sampling rate: 16 kHz, 22.05 kHz, 24 kHz, 32 kHz,
and 44.1 kHz.
.Bit rates supported: 32, 40, 48, 56, 64, 80, 96, 112,
128, 160, 192, 224, 256, and 320 kbps.
.ID3 tag information is displayed by the radio if it is
available. The radio supports ID3 tag information
v1.0, v1.1, or v2.0. The radio will display a
filename, song name, artist name, album name,
and directory name.
.Maximum 32 characters, including spaces, in a file
or folder name.
.Maximum number of folders is 100 with a
maximum hierarchy of eight folders.
.Create a folder structure that makes it easy to find
songs while driving. Organize songs by albums
using one folder for each album. Each folder or
album should contain 18 songs or less.
5-70