fog light CADILLAC ESCALADE EXT 2010 3.G Owners Manual
[x] Cancel search | Manufacturer: CADILLAC, Model Year: 2010, Model line: ESCALADE EXT, Model: CADILLAC ESCALADE EXT 2010 3.GPages: 580, PDF Size: 6.23 MB
Page 5 of 580
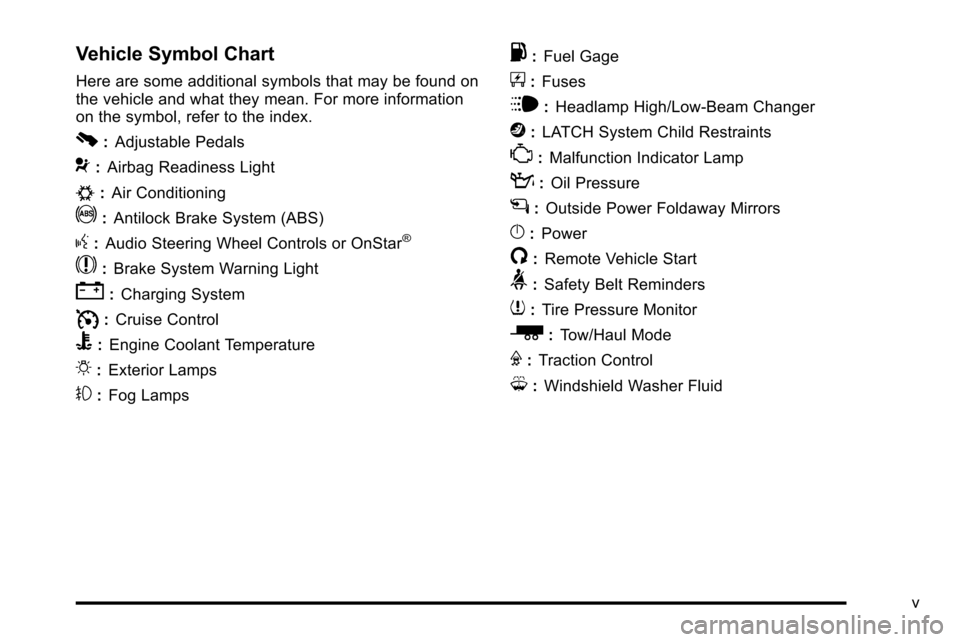
Vehicle Symbol Chart
Here are some additional symbols that may be found on
the vehicle and what they mean. For more information
on the symbol, refer to the index.
0:Adjustable Pedals
9:Airbag Readiness Light
#:Air Conditioning
!:Antilock Brake System (ABS)
g:Audio Steering Wheel Controls or OnStar®
$: Brake System Warning Light
":Charging System
I:Cruise Control
B: Engine Coolant Temperature
O:Exterior Lamps
#:Fog Lamps
.: Fuel Gage
+:Fuses
i: Headlamp High/Low-Beam Changer
j:LATCH System Child Restraints
*: Malfunction Indicator Lamp
::Oil Pressure
g:Outside Power Foldaway Mirrors
}:Power
/:Remote Vehicle Start
>:Safety Belt Reminders
7:Tire Pressure Monitor
_: Tow/Haul Mode
F:Traction Control
M:Windshield Washer Fluid
v
Page 20 of 580
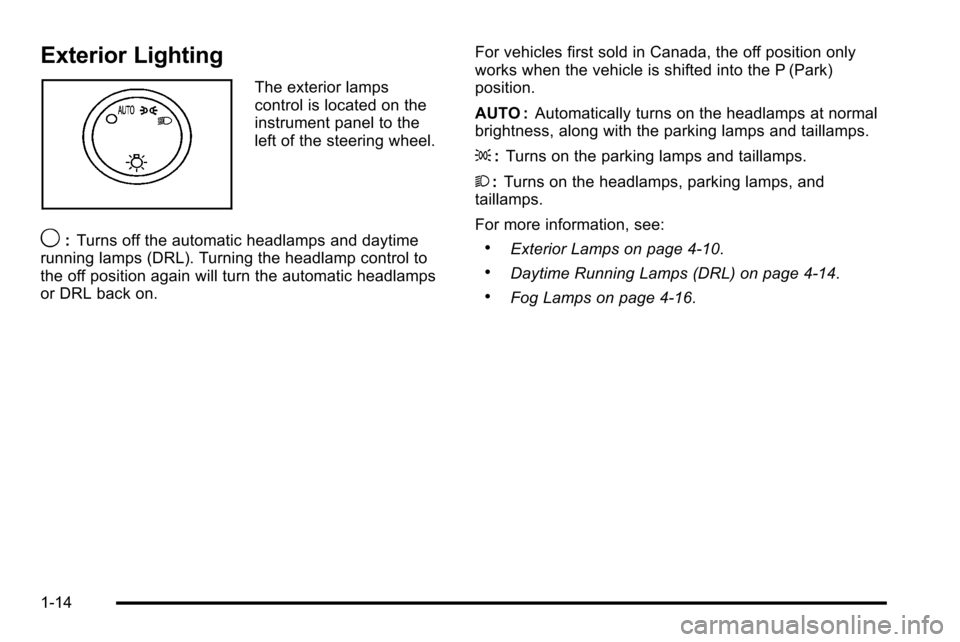
Exterior Lighting
The exterior lamps
control is located on the
instrument panel to the
left of the steering wheel.
9:Turns off the automatic headlamps and daytime
running lamps (DRL). Turning the headlamp control to
the off position again will turn the automatic headlamps
or DRL back on. For vehicles first sold in Canada, the off position only
works when the vehicle is shifted into the P (Park)
position.
AUTO :
Automatically turns on the headlamps at normal
brightness, along with the parking lamps and taillamps.
; :Turns on the parking lamps and taillamps.
2 :Turns on the headlamps, parking lamps, and
taillamps.
For more information, see:.Exterior Lamps on page 4‑10.
.Daytime Running Lamps (DRL) on page 4‑14.
.Fog Lamps on page 4‑16.
1-14
Page 109 of 580
Remote Vehicle Start
This feature allows you to start the engine from outside
of the vehicle. It may also start up the vehicle's heating
or air conditioning systems and rear window defogger.
Normal operation of the system will return after the key
is turned to the ON/RUN position.
During a remote start, the climate control system will
default to a heating or cooling mode depending on the
outside temperatures.
During a remote start, if your vehicle has an automatic
climate control system and heated seats, the heated
seats will turn on during colder outside temperatures
and will shut off when the key is turned to ON/RUN.
If your vehicle does not have an automatic climate
control system, during remote start, you will need to
manually turn the heated seats on and off. SeeHeated
and Cooled Seats
on page 2‑5for additional
information.
Laws in some communities may restrict the use of
remote starters. For example, some laws may require
a person using the remote start to have the vehicle in
view when doing so. Check local regulations for any
requirements on remote starting of vehicles.
Do not use the remote start feature if your vehicle is low
on fuel. Your vehicle may run out of fuel. If your vehicle has the remote start feature, the RKE
transmitter functions will have an increased range of
operation. However, the range may be less while the
vehicle is running.
There are other conditions which can affect the
performance of the transmitter, see
Remote Keyless
Entry (RKE) System
on page 3‑4for additional
information.
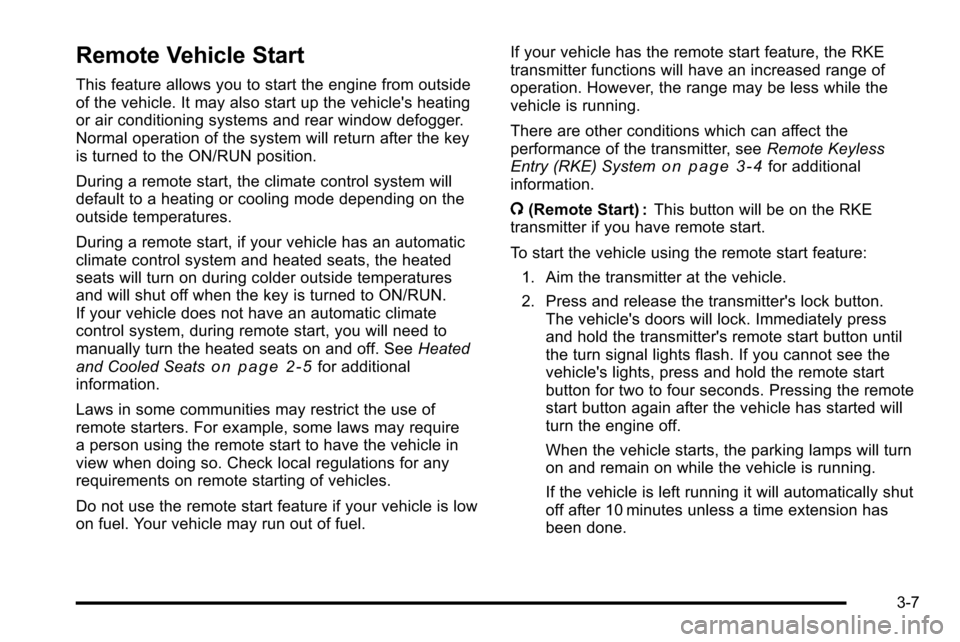
/ (Remote Start) : This button will be on the RKE
transmitter if you have remote start.
To start the vehicle using the remote start feature:
1. Aim the transmitter at the vehicle.
2. Press and release the transmitter's lock button. The vehicle's doors will lock. Immediately press
and hold the transmitter's remote start button until
the turn signal lights flash. If you cannot see the
vehicle's lights, press and hold the remote start
button for two to four seconds. Pressing the remote
start button again after the vehicle has started will
turn the engine off.
When the vehicle starts, the parking lamps will turn
on and remain on while the vehicle is running.
If the vehicle is left running it will automatically shut
off after 10 minutes unless a time extension has
been done.
3-7
Page 181 of 580

Section 4 Instrument Panel
Instrument Panel Overview. . . . . . . . . . . . . . . . . . . . . . . .4-3
Hazard Warning Flashers . . . . . . . . . . . . . . . . . . . . . . . 4-3
Horn . . . . . . . . . . . . . . . . . . . . . . . . . . . . . . . . . . . . . . . . . . . . 4-3
Tilt Wheel . . . . . . . . . . . . . . . . . . . . . . . . . . . . . . . . . . . . . . . 4-3
Heated Steering Wheel . . . . . . . . . . . . . . . . . . . . . . . . . 4-3
Turn Signal/Multifunction Lever . . . . . . . . . . . . . . . . . . 4-4
Turn and Lane-Change Signals . . . . . . . . . . . . . . . . . 4-4
Headlamp High/Low-Beam Changer . . . . . . . . . . . . 4-5
Flash-to-Pass . . . . . . . . . . . . . . . . . . . . . . . . . . . . . . . . . . . 4-5
Windshield Wipers . . . . . . . . . . . . . . . . . . . . . . . . . . . . . . 4-6
Windshield Washer . . . . . . . . . . . . . . . . . . . . . . . . . . . . . 4-6
Cruise Control . . . . . . . . . . . . . . . . . . . . . . . . . . . . . . . . . . 4-7
Exterior Lamps . . . . . . . . . . . . . . . . . . . . . . . . . . . . . . . . 4-10
Headlamps on Reminder . . . . . . . . . . . . . . . . . . . . . . 4-14
Daytime Running Lamps (DRL) . . . . . . . . . . . . . . . . 4-14
Automatic Headlamp System . . . . . . . . . . . . . . . . . . 4-15
Fog Lamps . . . . . . . . . . . . . . . . . . . . . . . . . . . . . . . . . . . . 4-16
Exterior Cargo Lamps . . . . . . . . . . . . . . . . . . . . . . . . . 4-16
Instrument Panel Brightness . . . . . . . . . . . . . . . . . . . 4-16
Dome Lamps . . . . . . . . . . . . . . . . . . . . . . . . . . . . . . . . . . 4-17
Dome Lamp Override . . . . . . . . . . . . . . . . . . . . . . . . . . 4-17 Entry/Exit Lighting . . . . . . . . . . . . . . . . . . . . . . . . . . . . . 4-17
Reading Lamps . . . . . . . . . . . . . . . . . . . . . . . . . . . . . . . . 4-17
Electric Power Management . . . . . . . . . . . . . . . . . . . 4-17
Battery Run-Down Protection . . . . . . . . . . . . . . . . . . 4-18
Accessory Power Outlet(s) . . . . . . . . . . . . . . . . . . . . . 4-18
Ashtray(s) and Cigarette Lighter . . . . . . . . . . . . . . . 4-19
Analog Clock . . . . . . . . . . . . . . . . . . . . . . . . . . . . . . . . . . 4-20
Climate Controls . . . . . . . . . . . . . . . . . . . . . . . . . . . . . . . . . . 4-20
Dual Automatic Climate Control System . . . . . . . 4-20
Outlet Adjustment . . . . . . . . . . . . . . . . . . . . . . . . . . . . . . 4-24
Warning Lights, Gages, and Indicators . . . . . . . . . .4-25
Instrument Panel Cluster . . . . . . . . . . . . . . . . . . . . . . . 4-26
Speedometer and Odometer . . . . . . . . . . . . . . . . . . . 4-27
Trip Odometer . . . . . . . . . . . . . . . . . . . . . . . . . . . . . . . . . 4-27
Tachometer . . . . . . . . . . . . . . . . . . . . . . . . . . . . . . . . . . . . 4-27
Safety Belt Reminders . . . . . . . . . . . . . . . . . . . . . . . . . 4-27
Airbag Readiness Light . . . . . . . . . . . . . . . . . . . . . . . . 4-28
Passenger Airbag Status Indicator . . . . . . . . . . . . . 4-29
Charging System Light . . . . . . . . . . . . . . . . . . . . . . . . 4-30
Brake System Warning Light . . . . . . . . . . . . . . . . . . . 4-31
4-1
Page 182 of 580
Section 4 Instrument Panel
Antilock Brake System (ABS) Warning Light . . . 4-32
StabiliTrak®Indicator Light . . . . . . . . . . . . . . . . . . . . . 4-32
Engine Coolant Temperature Gage . . . . . . . . . . . . 4-33
Tire Pressure Light . . . . . . . . . . . . . . . . . . . . . . . . . . . . 4-33
Malfunction Indicator Lamp . . . . . . . . . . . . . . . . . . . . 4-34
Oil Pressure Light . . . . . . . . . . . . . . . . . . . . . . . . . . . . . 4-37
Security Light . . . . . . . . . . . . . . . . . . . . . . . . . . . . . . . . . . 4-37
Fog Lamp Light . . . . . . . . . . . . . . . . . . . . . . . . . . . . . . . . 4-38
Lights On Reminder . . . . . . . . . . . . . . . . . . . . . . . . . . . 4-38
Cruise Control Light . . . . . . . . . . . . . . . . . . . . . . . . . . . 4-38
Highbeam On Light . . . . . . . . . . . . . . . . . . . . . . . . . . . . 4-38
Tow/Haul Mode Light . . . . . . . . . . . . . . . . . . . . . . . . . . 4-39
Fuel Gage . . . . . . . . . . . . . . . . . . . . . . . . . . . . . . . . . . . . . 4-39 Driver Information Center (DIC)
. . . . . . . . . . . . . . . . . .4-39
DIC Operation and Displays . . . . . . . . . . . . . . . . . . . 4-40
DIC Compass . . . . . . . . . . . . . . . . . . . . . . . . . . . . . . . . . . 4-46
DIC Warnings and Messages . . . . . . . . . . . . . . . . . . 4-48
DIC Vehicle Customization . . . . . . . . . . . . . . . . . . . . 4-56
Audio System(s) . . . . . . . . . . . . . . . . . . . . . . . . . . . . . . . . . . 4-66
Bluetooth
®. . . . . . . . . . . . . . . . . . . . . . . . . . . . . . . . . . . . . 4-66
Rear Seat Entertainment (RSE) System . . . . . . . 4-77
Rear Seat Audio (RSA) . . . . . . . . . . . . . . . . . . . . . . . . 4-85
Theft-Deterrent Feature . . . . . . . . . . . . . . . . . . . . . . . . 4-87
Audio Steering Wheel Controls . . . . . . . . . . . . . . . . 4-88
Radio Reception . . . . . . . . . . . . . . . . . . . . . . . . . . . . . . . 4-89
Fixed Mast Antenna . . . . . . . . . . . . . . . . . . . . . . . . . . . 4-90
XM™ Satellite Radio Antenna System . . . . . . . . . 4-90
4-2
Page 193 of 580

IntelliBeam®may not turn off the high-beams if the
system cannot detect other vehicle's lamps because of
any of the following:
.The others vehicle's lamp(s) are missing,
damaged, obstructed from view or otherwise
undetected.
.The other vehicle's lamp(s) are covered with dirt,
snow and/or road spray.
.The other vehicle's lamp(s) cannot be detected
due to dense exhaust, smoke, fog, snow, road
spray, mist or other airborne obstructions.
.Your vehicle's windshield is dirty, cracked or
obstructed by something that blocks the view of
the IntelliBeam light sensor.
.Your vehicle's windshield is covered with ice, dirt,
haze or other obstructions.
.Your vehicle is loaded such that the front end of
the vehicle points upward, causing the IntelliBeam
sensor to aim high and not detect headlamps and
taillamps.
.You are driving on winding or hilly roads.
You may need to manually disable or cancel the
high-beam headlamps by turning the low-beam
headlamps on, if any of the above conditions exist.
Disabling and Resetting IntelliBeam®
at the Rearview Mirror
IntelliBeam®can be disabled by using the controls on
the inside rearview mirror.
AUTO
3(On/Off): To disable the system, press this
button on the inside rearview mirror. The IntelliBeam®
indicator will turn off and will not come back on until the
IntelliBeam®button is pressed again.
(Stalk Disable) : When IntelliBeam
®has turned on the
high-beams, pull or push the high-beam stalk. This will
disable IntelliBeam
®. The IntelliBeam®indicator on the
mirror will turn off. To re-enable IntelliBeam®, press the
IntelliBeam®button on the mirror.
A different sensitivity setting is available for dealer
diagnostics. This is done by pushing and holding this
button for 20 seconds until the IntelliBeam
®indicator
light flashes three times. If you accidentally activate
this, the vehicle's setting will automatically be reset
each time the ignition is turned off and then on again.
4-13
Page 196 of 580

Fog Lamps
For vehicles with fog lamps, they can be used for better
vision in foggy or misty conditions. The parking lamps
and/or low-beam headlamps must be on for the fog
lamps to work.
The fog lamp button is located on the left side of the
instrument panel.
#(Fog Lamps):Press to turn the fog lamps on or off.
An indicator light comes on in the instrument panel
cluster to show that the fog lamps are on.
Remember, fog lamps alone will not give off as much
light as the headlamps. Never use the fog lamps in the
dark without turning on the headlamps.
The fog lamps will go off whenever the high-beam
headlamps come on. When the high beams go off, the
fog lamps will come on again.
The fog lamps will be cancelled after the ignition is
turned off. To use the fog lamps after restarting the
vehicle, press the fog lamp button again.
Some localities have laws that require the headlamps to
be on along with the fog lamps.
Exterior Cargo Lamps
The cargo lamp can be used if more light is needed in
the cargo area of the vehicle or in the top-box storage
units. Some vehicles will only have a cargo lamp in the
driver side top box.
The cargo lamps come on by turning on the interior
dome lamps.
Instrument Panel Brightness
The knob for this feature is located next to the exterior
lamps control.
D (Instrument Panel Lights) : Push the knob to extend
and then turn clockwise or counterclockwise to brighten
or dim the instrument panel lights and the radio display.
This only works if the headlamps or parking lamps
are on.
To turn on the dome lamps, with the vehicle doors
closed, turn the knob all the way clockwise.
4-16
Page 198 of 580
A high electrical load occurs when several of the
following are on, such as: headlamps, high beams, fog
lamps, rear window defogger, climate control fan at high
speed, heated seats, engine cooling fans, trailer loads,
and loads plugged into accessory power outlets.
EPM works to prevent excessive discharge of the
battery. It does this by balancing the generator's output
and the vehicle's electrical needs. It can increase
engine idle speed to generate more power, whenever
needed. It can temporarily reduce the power demands
of some accessories.
Normally, these actions occur in steps or levels, without
being noticeable. In rare cases at the highest levels of
corrective action, this action may be noticeable to the
driver. If so, a Driver Information Center (DIC) message
might be displayed, such as BATTERY SAVER
ACTIVE, BATTERY VOLTAGE LOW, or LOW
BATTERY. If this message is displayed, it is
recommended that the driver reduce the electrical
loads as much as possible. SeeDIC Warnings and
Messages on page 4‑48.
Battery Run-Down Protection
This feature shuts off the dome lamps if they are left
on for more than 10 minutes when the ignition is in
LOCK/OFF. This helps to prevent the battery from
running down.
Accessory Power Outlet(s)
Accessory power outlets can be used to connect
auxiliary electrical equipment, such as a cellular
telephone.
One accessory power outlet is located inside the center
floor console. Lift up on the lower latch located at the
front of the console lid to access the accessory power
outlet.
There may also be an accessory power outlet located
on the rear of the center floor console above the
cupholder.
Remove the protective cap to use the accessory power
outlet. When not in use, always cover the accessory
power outlet with the protective cap.
Do not try to put the cigarette lighter in any of the
accessory power outlets.
Notice: If electrical devices are left plugged into a
power outlet, the battery may drain causing the
vehicle not to start or damage to the battery. This
would not be covered by the vehicle warranty.
Always unplug all electrical devices when turning
off the vehicle.
4-18
Page 203 of 580

6(Floor):Air is directed to the floor outlets, with some
to the windshield, side window outlets, and second row
floor outlets. In this mode, the system automatically
selects outside air.
-(Defog): This mode clears the windows of fog or
moisture. Air is directed to the windshield, floor outlets,
and side window vents. In this mode, the system
turns off recirculation and runs the air conditioning
compressor unless the outside temperature is close to
freezing. The recirculation mode cannot be selected
while in the defog mode.
0(Defrost): This mode removes fog or frost from
the windshield more quickly. Air is directed to the
windshield and side window vents, with some
directed to the floor vents. In this mode, the system
automatically forces outside air into the vehicle and
runs the air conditioning compressor unless the outside
temperature is close to freezing. The recirculation mode
cannot be selected while in the defrost mode.
The passenger temperature control cannot be activated
while in defrost mode. If the passenger control knob is
pressed, the passenger temperature flashes three times
and will not work. If the passenger control knob is
adjusted, the driver temperature indicator changes.
The passenger temperature will not be displayed. If vent, bi-level, or floor mode is selected again,
the climate control system displays the previous
temperature settings.
Do not drive the vehicle until all the windows are clear.
#(Air Conditioning):
Press to turn the air
conditioning (A/C) compressor on and off. An indicator
light comes on to show that the air conditioning is on.
Pressing this button when the outside temperature
is too cool for air conditioning will make the air
conditioning indicator flash three times and then turn off
indicating the air conditioning mode is not available.
If the air conditioning is on and the outside temperature
drops below a temperature which is too cool for air
conditioning to be effective, the air conditioning light
turns off to show that the air conditioning mode has
been canceled.
On hot days, open the windows long enough to let hot
inside air escape. This helps to reduce the time it takes
for the vehicle to cool down. It also helps the system to
operate more efficiently.
The air conditioning system removes moisture from the
air, so a small amount of water might drip under the
vehicle while idling or after turning off the engine. This
is normal.
4-23
Page 204 of 580
@(Recirculation):Press to turn the recirculation
mode on or off. An indicator light comes on to show that
the recirculation is on.
This mode recirculates and helps to quickly cool the air
inside the vehicle. It can be used to help prevent
outside air and odors from entering the vehicle.
The recirculation mode cannot be used with floor, defog,
or defrost modes. If recirculation is selected with one of
those modes, the indicator light flashes three times and
then turns off. The air conditioning compressor also
comes on when this mode is activated. While in
recirculation mode the windows may fog when the
weather is cold and damp. To clear the fog, select either
the defog or defrost mode and increase the fan speed.
The recirculation mode can also be turned off by turning
off the ignition.
Rear Window Defogger
The rear window defogger uses a warming grid to
remove fog from the rear window.
<(Rear Window Defogger): Press to turn the rear
window defogger on or off. It automatically turns off
after it has been activated. The defogger can also be
turned off by turning off the engine. Do not drive the
vehicle until all the windows are clear. Notice:
Do not use a razor blade or sharp object to
clear the inside rear window. Do not adhere
anything to the defogger grid lines in the rear glass.
These actions may damage the rear defogger.
Repairs would not be covered by your warranty.
Heated Mirrors : For vehicles with heated outside
rearview mirrors, the mirrors heat to help clear fog or
frost from the surface of the mirror when the rear
window defog button is pressed. See Outside Heated
Mirrors on page 3‑47.
Heated or Cooled Seats : For vehicles with heated and
cooled seats, see Heated and Cooled Seats
on
page 2‑5.
Outlet Adjustment
Your vehicle has air outlets located in the center and on
the side of the instrument panel that allow you to adjust
the direction and amount of airflow inside the vehicle.
There are also air outlets on the rear of the center
console for rear seat passenger use. Move the louvers
up or down. Use the rotary knob next to or underneath
the outlet to close the louvers. For the most efficient
airflow and temperature control, keep the outlet in the
fully opened position.
4-24