headlamp CADILLAC ESCALADE EXT 2010 3.G Owners Manual
[x] Cancel search | Manufacturer: CADILLAC, Model Year: 2010, Model line: ESCALADE EXT, Model: CADILLAC ESCALADE EXT 2010 3.GPages: 580, PDF Size: 6.23 MB
Page 2 of 580

2010 Cadillac Escalade EXT Owner ManualM
Service and Appearance Care. . . . . . . . . . . . . . . . . . . 7-1
Service . . . . . . . . . . . . . . . . . . . . . . . . . . . . . . . . . . . . . . . . . . . 7-4
Fuel . . . . . . . . . . . . . . . . . . . . . . . . . . . . . . . . . . . . . . . . . . . . . . 7-6
Checking Things Under the Hood . . . . . . . . . . . . . . . 7-12
All-Wheel Drive . . . . . . . . . . . . . . . . . . . . . . . . . . . . . . . . . 7-47
Rear Axle . . . . . . . . . . . . . . . . . . . . . . . . . . . . . . . . . . . . . . . 7-48
Front Axle . . . . . . . . . . . . . . . . . . . . . . . . . . . . . . . . . . . . . . . 7-49
Headlamp Aiming . . . . . . . . . . . . . . . . . . . . . . . . . . . . . . . 7-50
Bulb Replacement . . . . . . . . . . . . . . . . . . . . . . . . . . . . . . 7-53
Windshield Wiper Blade Replacement . . . . . . . . . . . 7-56
Tires . . . . . . . . . . . . . . . . . . . . . . . . . . . . . . . . . . . . . . . . . . . . 7-57
Appearance Care . . . . . . . . . . . . . . . . . . . . . . . . . . . . . . . 7-96 Vehicle Identification . . . . . . . . . . . . . . . . . . . . . . . . . . . 7-104
Electrical System . . . . . . . . . . . . . . . . . . . . . . . . . . . . . . 7-104
Capacities and Specifications . . . . . . . . . . . . . . . . . . 7-112
Maintenance Schedule . . . . . . . . . . . . . . . . . . . . . . . . . . . 8-1
Maintenance Schedule . . . . . . . . . . . . . . . . . . . . . . . . . . . 8-2
Customer Assistance Information . . . . . . . . . . . . . . . 9-1
Customer Assistance and Information . . . . . . . . . . . . 9-2
Reporting Safety Defects . . . . . . . . . . . . . . . . . . . . . . . . 9-16
Vehicle Data Recording and Privacy . . . . . . . . . . . . . 9-18
Index . . . . . . . . . . . . . . . . . . . . . . . . . . . . . . . . . . . . i-1
Page 5 of 580
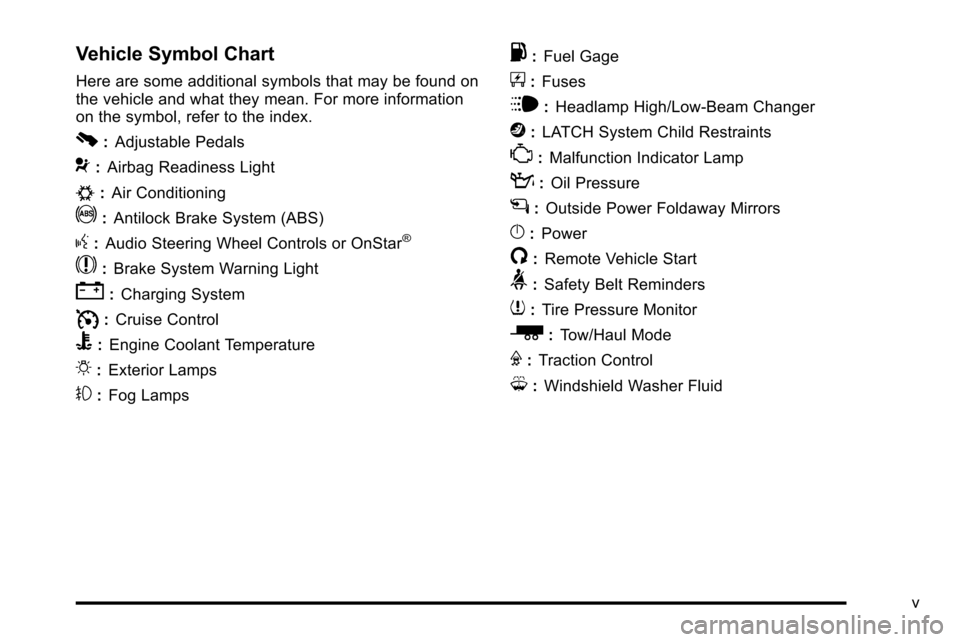
Vehicle Symbol Chart
Here are some additional symbols that may be found on
the vehicle and what they mean. For more information
on the symbol, refer to the index.
0:Adjustable Pedals
9:Airbag Readiness Light
#:Air Conditioning
!:Antilock Brake System (ABS)
g:Audio Steering Wheel Controls or OnStar®
$: Brake System Warning Light
":Charging System
I:Cruise Control
B: Engine Coolant Temperature
O:Exterior Lamps
#:Fog Lamps
.: Fuel Gage
+:Fuses
i: Headlamp High/Low-Beam Changer
j:LATCH System Child Restraints
*: Malfunction Indicator Lamp
::Oil Pressure
g:Outside Power Foldaway Mirrors
}:Power
/:Remote Vehicle Start
>:Safety Belt Reminders
7:Tire Pressure Monitor
_: Tow/Haul Mode
F:Traction Control
M:Windshield Washer Fluid
v
Page 17 of 580
Mirror Adjustment
Exterior Mirrors
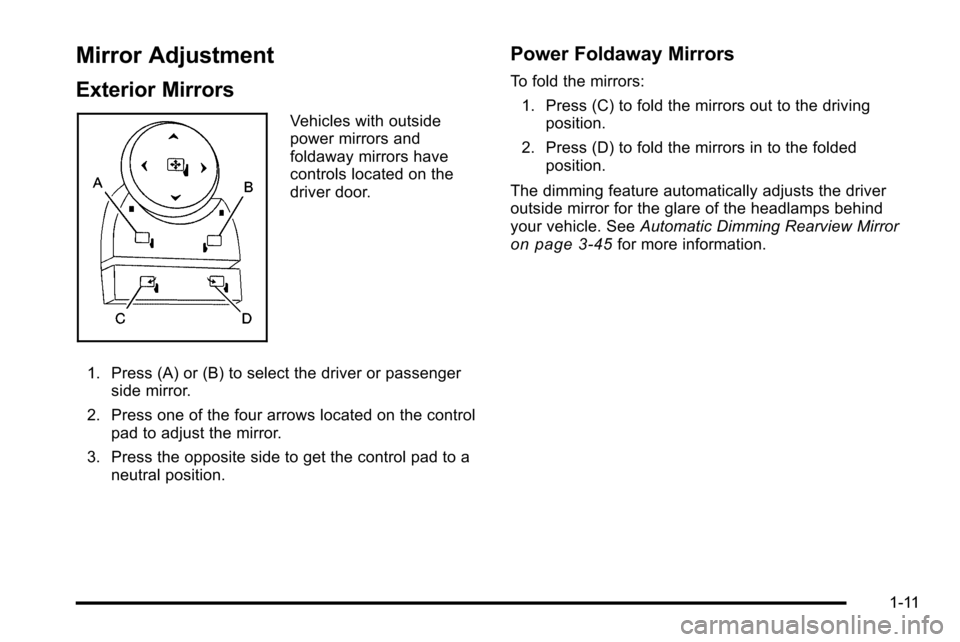
Vehicles with outside
power mirrors and
foldaway mirrors have
controls located on the
driver door.
1. Press (A) or (B) to select the driver or passenger side mirror.
2. Press one of the four arrows located on the control pad to adjust the mirror.
3. Press the opposite side to get the control pad to a neutral position.
Power Foldaway Mirrors
To fold the mirrors:
1. Press (C) to fold the mirrors out to the driving position.
2. Press (D) to fold the mirrors in to the folded position.
The dimming feature automatically adjusts the driver
outside mirror for the glare of the headlamps behind
your vehicle. See Automatic Dimming Rearview Mirror
on page 3‑45for more information.
1-11
Page 18 of 580
Interior Mirror
Vehicles with a manual rearview mirror can be adjusted
to see clearly behind the vehicle. Hold the mirror
in the center to move it up or down and side to side.
To reduce headlamp glare during nighttime use, move
the lever at the bottom of the mirror to the right. Move it
to the left for daytime use.
Vehicles with an automatic dimming rearview mirror.
The dimming feature reduces the glare of lights from
behind the vehicle. The dimming feature comes on and
the indicator light illuminates each time the vehicle is
started.
SeeAutomatic Dimming Rearview Mirror
on page 3‑45for more information.
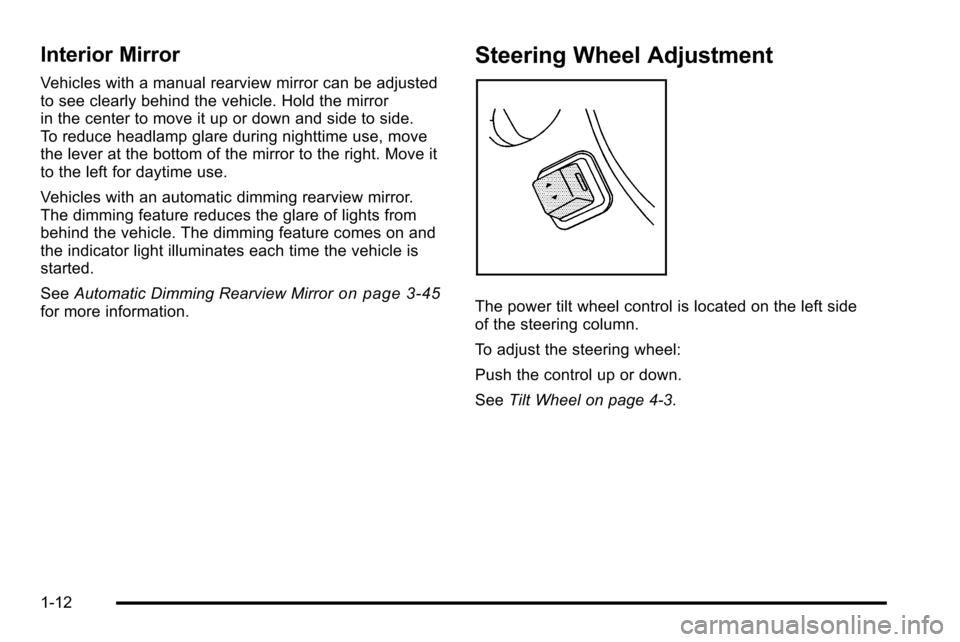
Steering Wheel Adjustment
The power tilt wheel control is located on the left side
of the steering column.
To adjust the steering wheel:
Push the control up or down.
SeeTilt Wheel on page 4‑3.
1-12
Page 20 of 580
Exterior Lighting
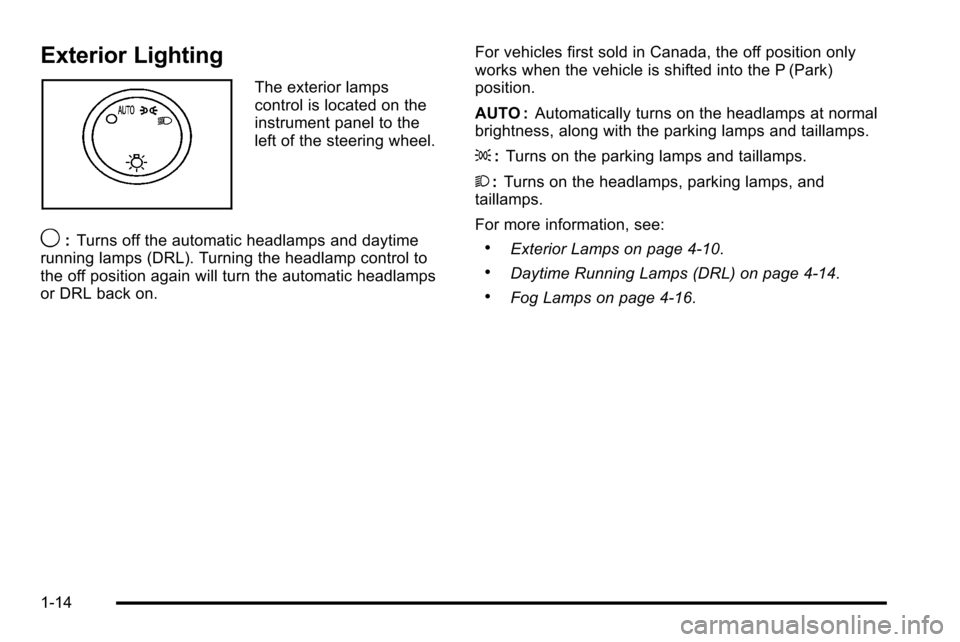
The exterior lamps
control is located on the
instrument panel to the
left of the steering wheel.
9:Turns off the automatic headlamps and daytime
running lamps (DRL). Turning the headlamp control to
the off position again will turn the automatic headlamps
or DRL back on. For vehicles first sold in Canada, the off position only
works when the vehicle is shifted into the P (Park)
position.
AUTO :
Automatically turns on the headlamps at normal
brightness, along with the parking lamps and taillamps.
; :Turns on the parking lamps and taillamps.
2 :Turns on the headlamps, parking lamps, and
taillamps.
For more information, see:.Exterior Lamps on page 4‑10.
.Daytime Running Lamps (DRL) on page 4‑14.
.Fog Lamps on page 4‑16.
1-14
Page 129 of 580

3. Close all doors. The security light should go offafter about 30 seconds. The alarm is not armed
until the security light goes off.
The content theft deterrent system does not
sense if the midgate or tailgate are open or ajar,
therefore, vehicle contents may not be protected if
the midgate is left open or ajar.
If a locked driver door is opened without using the RKE
transmitter, a ten second pre-alarm will occur. The horn
will chirp and the lights will flash. If the key is not placed
in the ignition and turned to START or the door is not
unlocked by pressing the unlock button on the RKE
transmitter during the ten second pre-alarm, the alarm
will go off. Your vehicle's headlamps will flash and the
horn will sound for about 30 seconds, then will turn off
to save the battery power.
The theft-deterrent system will not activate if the doors
are locked with the vehicle's key or the manual door
lock. It activates only if you use the power door lock
switch with the door open or the RKE transmitter. You
should also remember that you can start your vehicle
with the correct ignition key if the alarm has been
set off. To avoid setting off the alarm by accident:
.If you do not want to activate the theft-deterrent
system, the vehicle should be locked with the door
key after the doors are closed.
.Always unlock the doors with the RKE transmitter.
Unlocking a door any other way will set off the
alarm if it is armed.
If you set off the alarm by accident, press unlock on the
RKE transmitter or place the key in the ignition and turn
it to START to turn off the alarm. The alarm will not stop
if you try to unlock a door any other way.
Testing the Alarm
To test the alarm: 1. From inside the vehicle, lower the driver's window and open the driver's door.
2. Activate the system by locking the doors with the power door lock switch while the door is open,
or with the RKE transmitter.
3. Get out of the vehicle, close the door and wait for the security light to go out.
4. Then reach in through the window, unlock the door with the manual door lock and open the door. This
should set off the alarm.
While the alarm is set, the power door unlock switch will
not work.
3-27
Page 130 of 580
If the alarm does not sound when it should but the
headlamps flash, check to see if the horn works.
The horn fuse may be blown. To replace the fuse,
seeFuses and Circuit Breakers on page 7‑105.
If the alarm does not sound or the headlamps do
not flash, the vehicle should be serviced by your
dealer/retailer.
PASS-Key®III+ Electronic
Immobilizer
See Radio Frequency Statementon page 9‑20for information regarding Part 15 of the Federal
Communications Commission (FCC) Rules and
RSS-210/211 of Industry and Science Canada.
PASS-Key®III+ Electronic
Immobilizer Operation
Your vehicle has PASS-Key®III+ (Personalized
Automotive Security System) theft-deterrent system.
PASS-Key
®III+ is a passive theft-deterrent system.
The system is automatically armed when the key is
removed from the ignition. The system is automatically disarmed when the key is
turned to ON/RUN, ACC/ACCESSORY or START from
the LOCK/OFF position.
You do not have to manually arm or disarm the system.
The security light will come on if there is a problem with
arming or disarming the theft-deterrent system.
When the PASS-Key
®III+ system senses that someone
is using the wrong key, it prevents the vehicle from
starting. Anyone using a trial-and-error method to start
the vehicle will be discouraged because of the high
number of electrical key codes.
If the engine does not start and the security light on
the instrument panel cluster comes on when trying to
start the vehicle, there may be a problem with your
theft-deterrent system. Turn the ignition off and try
again.
If the engine still does not start, and the key appears
to be undamaged, try another ignition key. At this time,
you may also want to check the fuse, see Fuses and
Circuit Breakers
on page 7‑105. If the engine still
does not start with the other key, your vehicle needs
service. If your vehicle does start, the first key may be
faulty. See your dealer/retailer who can service the
PASS-Key
®III+ to have a new key made. In an
emergency, contact Roadside Assistance.
3-28
Page 147 of 580

WARNING: (Continued)
even death. Never run the engine in an enclosed
area that has no fresh air ventilation. For more
information, seeEngine Exhaust on page 3‑44.
{WARNING:
It can be dangerous to get out of the vehicle if the
automatic transmission shift lever is not fully in
P (Park) with the parking brake firmly set. The
vehicle can roll. Do not leave the vehicle when the
engine is running unless you have to. If you have
left the engine running, the vehicle can move
suddenly. You or others could be injured. To be
sure the vehicle will not move, even when you are
on fairly level ground, always set the parking
brake and move the shift lever to P (Park).
Follow the proper steps to be sure the vehicle will not
move. See Shifting Into Park on page 3‑41.
If parking on a hill and pulling a trailer, see Towing a
Trailer on page 6‑42.
Mirrors
Manual Rearview Mirror
Hold the inside rearview mirror in the center to move it
for a clearer view behind your vehicle. Adjust the mirror
to avoid glare from the headlamps behind you. Push the
tab forward for daytime use and pull it for nighttime use.
Automatic Dimming Rearview Mirror
This vehicle may have an automatic dimming inside
rearview mirror with OnStar®. It may also have
Intellibeam®. For more information on Intellibeam™, see
“Intellibeam™ Intelligent High‐Beam Headlamp Control
System” underExterior Lamps
on page 4‑10. For more
information on OnStar®, see the OnStar®owner's guide.
Automatic Dimming Mirror Operation
Automatic dimming reduces the glare of lights from
behind the vehicle. The dimming feature comes on and
the indicator light illuminates each time the vehicle is
started.
O(On/Off): Press to turn the dimming feature on or off.
Cleaning the Mirror
Do not spray glass cleaner directly on the mirror. Use a
soft towel dampened with water.
3-45
Page 148 of 580

Outside Power Foldaway Mirrors
Controls for the outside
power foldaway mirrors
are located on the driver
door armrest.
Mirror Adjustment
1. Press (A) or (B) to select the driver or passengerside mirror.
2. Press one of the four arrows located on the control pad to adjust the mirror.
3. Press the opposite side to get the control pad to a neutral position.
4. Press (C) to fold the mirrors out to the driving position.
5. Press (D) to fold the mirrors in to the folded position.
Resetting the Power Foldaway Mirrors
Reset the power foldaway mirrors if:
.The mirrors are accidentally obstructed while
folding.
.They are accidentally manually folded/unfolded.
.The mirrors will not stay in the unfolded position.
.The mirrors vibrate at normal driving speeds.
Fold and unfold the mirrors one time using the
mirror controls to reset them to their normal position.
A popping noise may be heard during the resetting of
the power foldaway mirrors. This sound is normal after
a manual folding operation.
Automatic Dimming
Adjust the driver outside mirror for the glare of the
headlamps behind your vehicle. See Automatic
Dimming Rearview Mirror
on page 3‑45for more
information.
3-46
Page 181 of 580

Section 4 Instrument Panel
Instrument Panel Overview. . . . . . . . . . . . . . . . . . . . . . . .4-3
Hazard Warning Flashers . . . . . . . . . . . . . . . . . . . . . . . 4-3
Horn . . . . . . . . . . . . . . . . . . . . . . . . . . . . . . . . . . . . . . . . . . . . 4-3
Tilt Wheel . . . . . . . . . . . . . . . . . . . . . . . . . . . . . . . . . . . . . . . 4-3
Heated Steering Wheel . . . . . . . . . . . . . . . . . . . . . . . . . 4-3
Turn Signal/Multifunction Lever . . . . . . . . . . . . . . . . . . 4-4
Turn and Lane-Change Signals . . . . . . . . . . . . . . . . . 4-4
Headlamp High/Low-Beam Changer . . . . . . . . . . . . 4-5
Flash-to-Pass . . . . . . . . . . . . . . . . . . . . . . . . . . . . . . . . . . . 4-5
Windshield Wipers . . . . . . . . . . . . . . . . . . . . . . . . . . . . . . 4-6
Windshield Washer . . . . . . . . . . . . . . . . . . . . . . . . . . . . . 4-6
Cruise Control . . . . . . . . . . . . . . . . . . . . . . . . . . . . . . . . . . 4-7
Exterior Lamps . . . . . . . . . . . . . . . . . . . . . . . . . . . . . . . . 4-10
Headlamps on Reminder . . . . . . . . . . . . . . . . . . . . . . 4-14
Daytime Running Lamps (DRL) . . . . . . . . . . . . . . . . 4-14
Automatic Headlamp System . . . . . . . . . . . . . . . . . . 4-15
Fog Lamps . . . . . . . . . . . . . . . . . . . . . . . . . . . . . . . . . . . . 4-16
Exterior Cargo Lamps . . . . . . . . . . . . . . . . . . . . . . . . . 4-16
Instrument Panel Brightness . . . . . . . . . . . . . . . . . . . 4-16
Dome Lamps . . . . . . . . . . . . . . . . . . . . . . . . . . . . . . . . . . 4-17
Dome Lamp Override . . . . . . . . . . . . . . . . . . . . . . . . . . 4-17 Entry/Exit Lighting . . . . . . . . . . . . . . . . . . . . . . . . . . . . . 4-17
Reading Lamps . . . . . . . . . . . . . . . . . . . . . . . . . . . . . . . . 4-17
Electric Power Management . . . . . . . . . . . . . . . . . . . 4-17
Battery Run-Down Protection . . . . . . . . . . . . . . . . . . 4-18
Accessory Power Outlet(s) . . . . . . . . . . . . . . . . . . . . . 4-18
Ashtray(s) and Cigarette Lighter . . . . . . . . . . . . . . . 4-19
Analog Clock . . . . . . . . . . . . . . . . . . . . . . . . . . . . . . . . . . 4-20
Climate Controls . . . . . . . . . . . . . . . . . . . . . . . . . . . . . . . . . . 4-20
Dual Automatic Climate Control System . . . . . . . 4-20
Outlet Adjustment . . . . . . . . . . . . . . . . . . . . . . . . . . . . . . 4-24
Warning Lights, Gages, and Indicators . . . . . . . . . .4-25
Instrument Panel Cluster . . . . . . . . . . . . . . . . . . . . . . . 4-26
Speedometer and Odometer . . . . . . . . . . . . . . . . . . . 4-27
Trip Odometer . . . . . . . . . . . . . . . . . . . . . . . . . . . . . . . . . 4-27
Tachometer . . . . . . . . . . . . . . . . . . . . . . . . . . . . . . . . . . . . 4-27
Safety Belt Reminders . . . . . . . . . . . . . . . . . . . . . . . . . 4-27
Airbag Readiness Light . . . . . . . . . . . . . . . . . . . . . . . . 4-28
Passenger Airbag Status Indicator . . . . . . . . . . . . . 4-29
Charging System Light . . . . . . . . . . . . . . . . . . . . . . . . 4-30
Brake System Warning Light . . . . . . . . . . . . . . . . . . . 4-31
4-1