trailer CADILLAC SEVILLE 2003 5.G Owners Manual
[x] Cancel search | Manufacturer: CADILLAC, Model Year: 2003, Model line: SEVILLE, Model: CADILLAC SEVILLE 2003 5.GPages: 408, PDF Size: 2.72 MB
Page 73 of 408
Trunk Lid Tie Down
{CAUTION:
Driving with the trunk lid open can allow
dangerous CO (carbon monoxide) gas to come
into your vehicle. You can't see or smell CO. It
can cause unconsciousness and even death. If
you ever need to drive with your trunk lid
open, then:
·Make sure all windows, the rear seat
pass-through and sunroof are closed.
·Turn the fan on your heating and cooling
system to its highest speed, with the
setting on AUTO and temperature between
65ÉF (18ÉC) and 85ÉF (29ÉC). This forces
fresh outside air into your vehicle.
·Open all air ducts on the instrument panel.
Don't use the trunk lid tie down if you are
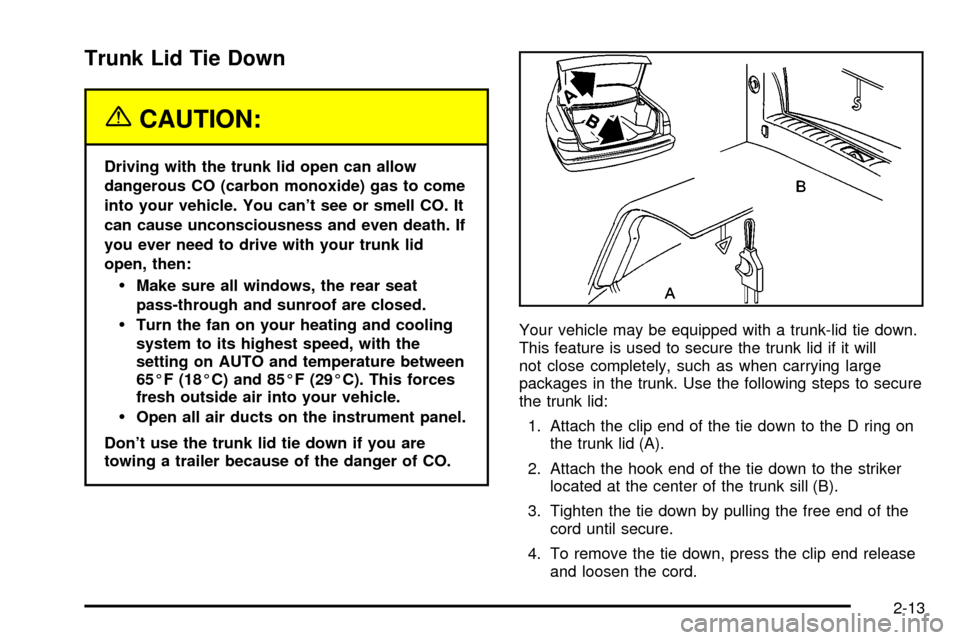
towing a trailer because of the danger of CO.Your vehicle may be equipped with a trunk-lid tie down.
This feature is used to secure the trunk lid if it will
not close completely, such as when carrying large
packages in the trunk. Use the following steps to secure
the trunk lid:
1. Attach the clip end of the tie down to the D ring on
the trunk lid (A).
2. Attach the hook end of the tie down to the striker
located at the center of the trunk sill (B).
3. Tighten the tie down by pulling the free end of the
cord until secure.
4. To remove the tie down, press the clip end release
and loosen the cord.
2-13
Page 83 of 408

5. The SECURITY light will turn off once the key has
been programmed. It may not be apparent that the
SECURITY light went on due to how quickly the
key is programmed.
6. Repeat the Steps 1 through 4 if additional keys are
to be programmed.
If you are ever driving and the SECURITY light comes
on and stays on, you will be able to restart your
engine if you turn it off. Your PASS- Key
žIII system,
however, is not working properly and must be serviced
by your dealer. Your vehicle is not protected by the
PASS-Key
žIII system at this time.
If you lose or damage a PASS-Key
žIII key, contact
your dealer to have a new key made.
In an emergency, contact Cadillac Roadside Assistance.
See
Roadside Service on page 7-6.
Starting and Operating Your
Vehicle
New Vehicle Break-In
Notice:Your vehicle doesn't need an elaborate
ªbreak-in.º But it will perform better in the long run
if you follow these guidelines:
·Don't drive at any one speed Ð fast or
slow Ð for the ®rst 500 miles (805 km). Don't
make full-throttle starts.
·Avoid making hard stops for the ®rst 200 miles
(322 km) or so. During this time your new
brake linings aren't yet broken in. Hard stops
with new linings can mean premature wear and
earlier replacement. Follow this breaking-in
guideline every time you get new brake linings.
·Don't tow a trailer during break-in. See ªTowing
a Trailerº in the Index for more information.
2-23
Page 88 of 408
Automatic Transaxle Operation
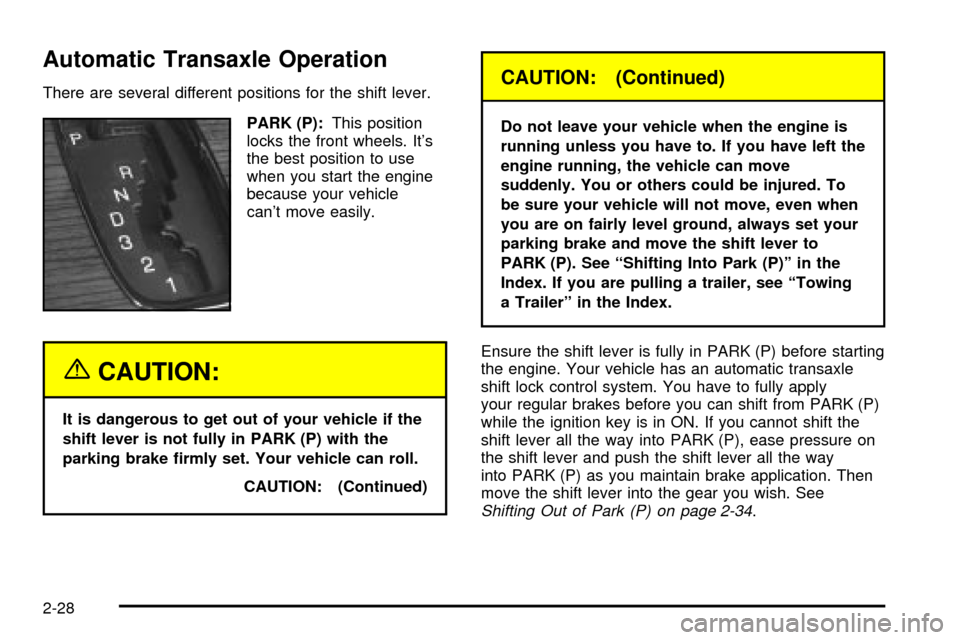
There are several different positions for the shift lever.
PARK (P):This position
locks the front wheels. It's
the best position to use
when you start the engine
because your vehicle
can't move easily.
{CAUTION:
It is dangerous to get out of your vehicle if the
shift lever is not fully in PARK (P) with the
parking brake ®rmly set. Your vehicle can roll.
CAUTION: (Continued)
CAUTION: (Continued)
Do not leave your vehicle when the engine is
running unless you have to. If you have left the
engine running, the vehicle can move
suddenly. You or others could be injured. To
be sure your vehicle will not move, even when
you are on fairly level ground, always set your
parking brake and move the shift lever to
PARK (P). See ªShifting Into Park (P)º in the
Index. If you are pulling a trailer, see ªTowing
a Trailerº in the Index.
Ensure the shift lever is fully in PARK (P) before starting
the engine. Your vehicle has an automatic transaxle
shift lock control system. You have to fully apply
your regular brakes before you can shift from PARK (P)
while the ignition key is in ON. If you cannot shift the
shift lever all the way into PARK (P), ease pressure on
the shift lever and push the shift lever all the way
into PARK (P) as you maintain brake application. Then
move the shift lever into the gear you wish. See
Shifting Out of Park (P) on page 2-34.
2-28
Page 92 of 408
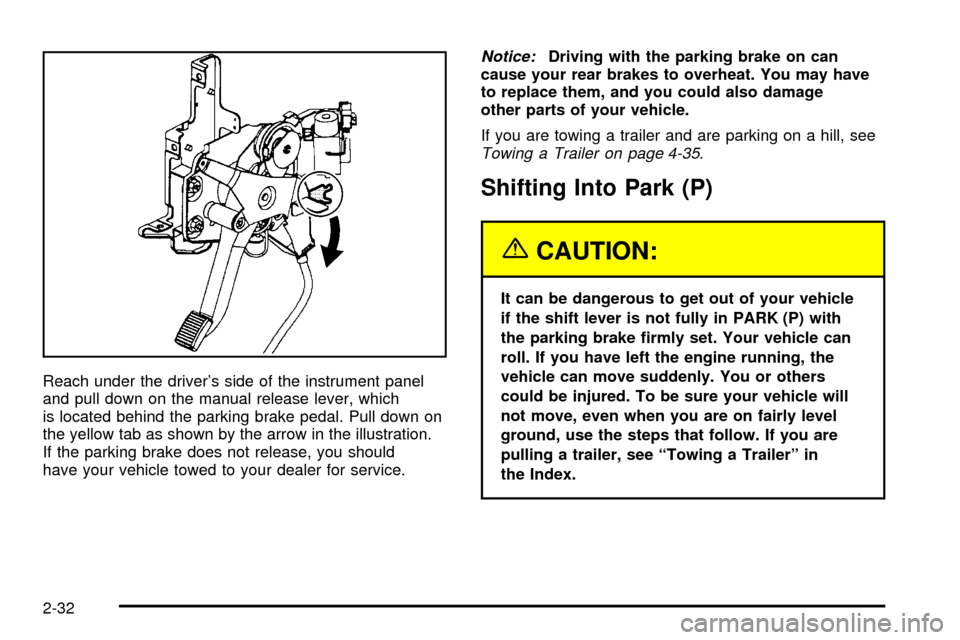
Reach under the driver's side of the instrument panel
and pull down on the manual release lever, which
is located behind the parking brake pedal. Pull down on
the yellow tab as shown by the arrow in the illustration.
If the parking brake does not release, you should
have your vehicle towed to your dealer for service.
Notice:Driving with the parking brake on can
cause your rear brakes to overheat. You may have
to replace them, and you could also damage
other parts of your vehicle.
If you are towing a trailer and are parking on a hill, see
Towing a Trailer on page 4-35.
Shifting Into Park (P)
{CAUTION:
It can be dangerous to get out of your vehicle
if the shift lever is not fully in PARK (P) with
the parking brake ®rmly set. Your vehicle can
roll. If you have left the engine running, the
vehicle can move suddenly. You or others
could be injured. To be sure your vehicle will
not move, even when you are on fairly level
ground, use the steps that follow. If you are
pulling a trailer, see ªTowing a Trailerº in
the Index.
2-32
Page 96 of 408
Running Your Engine While You
Are Parked
It's better not to park with the engine running. But if you
ever have to, here are some things to know.
{CAUTION:
Idling the engine with the climate control
system off could allow dangerous exhaust into
your vehicle. See the earlier Caution under
ªEngine Exhaust.º
Also, idling in a closed-in place can let deadly
carbon monoxide (CO) into your vehicle even if
the climate control fan is at the highest setting.
One place this can happen is a garage.
Exhaust Ð with CO Ð can come in easily.
NEVER park in a garage with the engine
running.
Another closed-in place can be a blizzard. See
ªWinter Drivingº in the Index.
{CAUTION:
It can be dangerous to get out of your vehicle
if the shift lever is not fully in PARK (P) with
the parking brake ®rmly set. Your vehicle can
roll. Don't leave your vehicle when the engine
is running unless you have to. If you've left the
engine running, the vehicle can move
suddenly. You or others could be injured. To
be sure your vehicle won't move, even when
you're on fairly level ground, always set your
parking brake after you move the shift lever to
PARK (P).
Follow the proper steps to be sure your vehicle won't
move. See
Shifting Into Park (P) on page 2-32.
If you are parking on a hill and if you're pulling a trailer,
also see
Towing a Trailer on page 4-35.
2-36
Page 137 of 408

How the System Works
URPA comes on automatically when the shift lever is
moved into REVERSE (R) and the vehicle speed is less
than 3 mph (5 km/h). When the system comes on,
the three lights on the display will illuminate to let you
know that the system is working. URPA senses
how close your vehicle is to an object. The distance is
determined by the four ultrasonic sensors located on the
rear bumper. When you shift into REVERSE (R) and
an object is detected, the following will occur in
sequence depending on the distance from the object:
·At 5 feet (1.5 m) a chime will sound and one
amber light will be lit;
·at 40 inches (1.0 m) both amber lights will be lit;
·at 20 inches (0.5 m) a continuous chime will
sound and all three lights (amber/amber/red) will
be lit; and
·at 1 foot (0.3 m) a continuous chime will sound and
all three lights (amber/amber/red) will ¯ash.
URPA can detect objects 3 inches (7.6 cm) and wider,
and at least 10 inches (25.4 cm) tall, but it cannot detect
objects that are above trunk level. In order for the
rear sensors to recognize an object, it must be within
operating range.If the URPA system is not functioning properly, the
display will ¯ash red, indicating that there is a problem.
The light will also ¯ash red while driving if a trailer is
attached to your vehicle, or a bicycle or object is on the
back of, or hanging out of your trunk. The light will
continue to ¯ash until the trailer or the object is
removed and your vehicle is driven forward at least
15 mph (25 km/h).
It may also ¯ash red if the ultrasonic sensors are not
kept clean. So be sure to keep your rear bumper free of
mud, dirt, snow, ice and slush or materials such as
paint or the system may not work properly. If after
cleaning the rear bumper and driving forward at least
15 mph (25 km/h), the display continues to ¯ash red, see
your dealer. For cleaning instructions, see
Cleaning
the Outside of Your Vehicle on page 5-86.
It may also ¯ash red if your vehicle is moving in
REVERSE (R) at a speed greater than 3 mph (5 km/h).
Other conditions that may affect system performance
include things like the vibrations from a jackhammer or
the compression of air brakes on a very large truck.
As always, drivers should use care when backing up a
vehicle. Always look behind you, being sure to check
for other vehicles, obstructions and blind spots.
3-25
Page 160 of 408

This light should come on, as a check to show you it is
working, when the ignition is on and the engine is
not running. If the light does not come on, have it
repaired. This light will also come on during a
malfunction in one of two ways:
·Light FlashingÐ A mis®re condition has been
detected. A mis®re increases vehicle emissions
and may damage the emission control system on
your vehicle. Diagnosis and service may be
required.
·Light On SteadyÐ An emission control system
malfunction has been detected on your vehicle.
Diagnosis and service may be required.
If the Light Is Flashing
The following may prevent more serious damage to
your vehicle:
·Reducing vehicle speed.
·Avoiding hard accelerations.
·Avoiding steep uphill grades.
·If you are towing a trailer, reduce the amount of
cargo being hauled as soon as it is possible.
If the light stops ¯ashing and remains on steady, see ªIf
the Light Is On Steadyº following.If the light continues to ¯ash, when it is safe to do so,
stop the vehicle.Find a safe place to park your vehicle.
Turn the key off, wait at least 10 seconds and restart
the engine. If the light remains on steady, see ªIf
the Light Is On Steadyº following. If the light is still
¯ashing, follow the previous steps, and see your dealer
for service as soon as possible.
If the Light Is On Steady
You may be able to correct the emission system
malfunction by considering the following:
Did you recently put fuel into your vehicle?
If so, reinstall the fuel cap, making sure to fully install
the cap. See
Filling Your Tank on page 5-6. The
diagnostic system can determine if the fuel cap has
been left off or improperly installed. A loose or missing
fuel cap will allow fuel to evaporate into the atmosphere.
A few driving trips with the cap properly installed
should turn the light off.
Did you just drive through a deep puddle of water?
If so, your electrical system may be wet. The condition
will usually be corrected when the electrical system
dries out. A few driving trips should turn the light off.
3-48
Page 219 of 408

Your Driving, the Road, and Your Vehicle..........4-2
Defensive Driving...........................................4-2
Drunken Driving.............................................4-3
Control of a Vehicle........................................4-6
Braking.........................................................4-6
Traction Control System (TCS).........................4-9
Magnetic Ride Control...................................4-11
Steering......................................................4-11
Off-Road Recovery.......................................4-14
Passing.......................................................4-14
Loss of Control.............................................4-16
Driving at Night............................................4-17
Driving in Rain and on Wet Roads..................4-18City Driving..................................................4-21
Freeway Driving...........................................4-22
Before Leaving on a Long Trip.......................4-23
Highway Hypnosis........................................4-24
Hill and Mountain Roads................................4-24
Winter Driving..............................................4-26
If You Are Stuck: In Sand, Mud,
Ice or Snow..............................................4-30
Towing..........................................................4-31
Towing Your Vehicle.....................................4-31
Recreational Vehicle Towing...........................4-31
Loading Your Vehicle....................................4-33
Towing a Trailer...........................................4-35
Section 4 Driving Your Vehicle
4-1
Page 249 of 408

Towing
Towing Your Vehicle
Consult your dealer or a professional towing service if
you need to have your disabled vehicle towed. See
Roadside Service on page 7-6.
If you want to tow your vehicle behind another vehicle
for recreational purposes (such as behind a motorhome),
see Recreational Vehicle Towing following.
Recreational Vehicle Towing
Recreational vehicle towing means towing your vehicle
behind another vehicle ± such as behind a motorhome.
The two most common types of recreational vehicle
towing are known as ªdinghy towingº (towing your
vehicle with all four wheels on the ground) and ªdolly
towingº (towing your vehicle with two wheels on
the ground and two wheels up on a device known as
a ªdollyº).With the proper preparation and equipment, many
vehicles can be towed in these ways. See ªDinghy
Towingº and ªDolly Towing,º following.
Here are some important things to consider before you
do recreational vehicle towing:
·What's the towing capacity of the towing vehicle?
Be sure you read the tow vehicle manufacturer's
recommendations.
·How far will you tow? Some vehicles have
restrictions on how far and how long they can tow.
·Do you have the proper towing equipment?
See your dealer or trailering professional for
additional advice and equipment recommendations.
·Is your vehicle ready to be towed? Just as you
would prepare your vehicle for a long trip, you'll
want to make sure your vehicle is prepared to be
towed. See
Before Leaving on a Long Trip on
page 4-23.
4-31
Page 253 of 408
Towing a Trailer
{CAUTION:
If you do not use the correct equipment and
drive properly, you can lose control when you
pull a trailer. For example, if the trailer is too
heavy, the brakes may not work well Ð or even
at all. You and your passengers could be
seriously injured. You may also damage your
vehicle; the resulting repairs would not be
covered by your warranty. Pull a trailer only if
you have followed all the steps in this section.
Ask your dealer for advice and information
about towing a trailer with your vehicle.Your vehicle can tow a trailer if it is equipped with the
proper trailer towing equipment. To identify what
the vehicle trailering capacity is for your vehicle, you
should read the information in
Weight of the Trailerthat
appears later in this section. But trailering is different
than just driving your vehicle by itself. Trailering means
changes in handling, durability and fuel economy.
Successful, safe trailering takes correct equipment, and
it has to be used properly.
That's the reason for this part. In it are many time-tested,
important trailering tips and safety rules. Many of
these are important for your safety and that of your
passengers. So please read this section carefully before
you pull a trailer.
Load-pulling components such as the engine, transaxle,
wheel assemblies and tires are forced to work harder
against the drag of the added weight. The engine
is required to operate at relatively higher speeds and
under greater loads, generating extra heat. What's more,
the trailer adds considerably to wind resistance,
increasing the pulling requirements.
4-35