wipers CADILLAC SEVILLE 2003 5.G Owners Manual
[x] Cancel search | Manufacturer: CADILLAC, Model Year: 2003, Model line: SEVILLE, Model: CADILLAC SEVILLE 2003 5.GPages: 408, PDF Size: 2.72 MB
Page 84 of 408

Ignition Positions
With the key in the ignition
switch, located on the
instrument panel, you can
turn the key to four
different positions:
Notice:If your key seems stuck in OFF and you
can't turn it, be sure you are using the correct key;
if so, is it all the way in? Turn the key only with
your hand. Using a tool to force it could break the
key or the ignition switch. If none of this works, then
your vehicle needs service.OFF:This is the only position in which you can insert
or remove the key. This position also locks the transaxle.
It's a theft-deterrent feature.
ACC (Accessory):This position lets you use things
like the radio, windshield wipers, power windows
and optional sunroof when the engine is off. Use ACC if
you must have your vehicle in motion while the engine
is off (for example, if your vehicle is being pushed
or towed).
ON:This is the position for driving.
START:This position starts the engine.
2-24
Page 117 of 408

The main components of the instrument panel are the following:
A. Air Outlets. See
Outlet Adjustment on page 3-33.
B. Driver Information Center (DIC) Buttons. See
DIC Controls and Displays on page 3-53.
C. Turn Signal/Multifunction Lever. See
Turn
Signal/Multifunction Lever on page 3-9.
D. Climate Controls and OnStaržSteering Wheel
Controls (or Cellular Telephone Controls, If
Equipped).
See
Steering Wheel Climate Controls on page 3-35andOnStaržSystem on page 2-42.
E. Instrument Panel Cluster. See
Instrument Panel
Cluster on page 3-38.
F. Windshield Wiper/Washer Lever. See ªWindshield
Wipersº under
Turn Signal/Multifunction Lever
on page 3-9.
G. Audio Steering Wheel Controls. See
Audio Steering
Wheel Controls on page 3-103.
H. Ignition Switch. See
Ignition Positions on page 2-24.
I. Air Outlet Thumbwheel. See
Outlet Adjustment
on page 3-33.
J. Hazard Warning Flasher Button. See
Hazard
Warning Flashers on page 3-6.K. Audio System. See
Audio System(s) on page 3-78.
L. Exterior Lamp Controls. See
Exterior Lamps on
page 3-16.
M. Hood Release. See
Hood Release on page 5-11.
N. Fuel Door Release. See
Filling Your Tank on
page 5-6.
O. Trunk Release Button. See
Trunk on page 2-12.
P. Cruise Control. See ªCruise Controlº under
Turn Signal/Multifunction Lever on page 3-9.
Q. Horn. See
Horn on page 3-7.
R. Heated Seat Controls. See
Heated Seats on
page 1-3.
S. Traction Control System (TCS) Button. See
Traction
Control System (TCS) on page 4-9.
T. Console Shift Lever. See
Automatic Transaxle
Operation on page 2-28.
U. Optional Ashtray. See
Ashtrays and Cigarette
Lighter on page 3-27.
V. Climate Controls. See
Dual Climate Control System
on page 3-28.
W. Glove Box. See
Glove Box on page 2-48.
3-5
Page 122 of 408

Headlamp High/Low-Beam Changer
When the low-beam headlamps are on, push the turn
signal lever away from you to change the headlamps to
high beam.
This light on the instrument
panel cluster will be on,
indicating high-beam
usage.
Pull the turn signal lever toward you to return to
low-beam headlamps.
Flash-To-Pass
This feature lets you use the high-beam headlamps to
signal the driver in front of you that you want to pass.
Pull the turn signal lever toward you brie¯y to
¯ash-to-pass. When you do, the following will occur:
·If the headlamps are either off or in the Daytime
Running Lamps (DRL) mode, the high-beam
headlamps will turn on. They'll stay on as long as
you hold the lever there. Release the lever to
turn them off.
·If the headlamps are on low beam, they will remain
active and the high beam will also illuminate until
you release the lever.
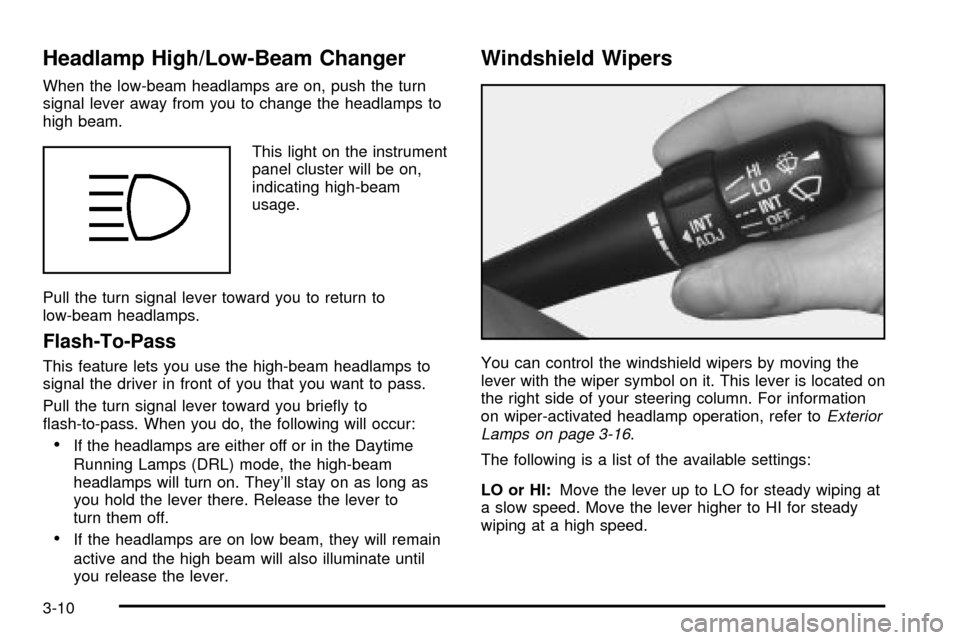
Windshield Wipers
You can control the windshield wipers by moving the
lever with the wiper symbol on it. This lever is located on
the right side of your steering column. For information
on wiper-activated headlamp operation, refer to
Exterior
Lamps on page 3-16.
The following is a list of the available settings:
LO or HI:Move the lever up to LO for steady wiping at
a slow speed. Move the lever higher to HI for steady
wiping at a high speed.
3-10
Page 123 of 408

INT (Delay):Move the lever up to the INT position,
then turn the INT ADJ band, which is located on
the lever, to adjust the delay time. The higher you turn
the INT ADJ band, the more frequently the wipers
will operate.
OFF:Lower the lever to its resting position (OFF) to
turn off the wipers.
MIST:Pull the lever down once and release it for a
single wipe cycle. For more cycles, hold the lever down
in the MIST position longer.
To wash the windshield, press the button located at the
tip of the lever.
Be sure to clear ice and snow from the wiper blades
before using them. If they're frozen to the windshield,
carefully loosen or thaw them. If the blades do become
damaged, get new blades or blade inserts.
Heavy snow or ice can overload the wiper motor. A
circuit breaker will stop the motor until it cools. Clear
away snow or ice to prevent an overload.
Your vehicle is equipped with wiper-activated
headlamps. After the windshield wipers have been on
for approximately six seconds, the headlamps will
automatically turn on. See
Wiper Activated HeadlampsunderExterior Lamps on page 3-16for more
information.
RainsenseŸ II Wipers
Your vehicle may be equipped with RainsenseŸ II
wipers. The moisture sensor for this feature is mounted
on the interior side of the windshield below the
rearview mirror and is used to automatically operate the
wipers by monitoring the amount of moisture build-up
on the windshield. Wipes occur as needed to clear
the windshield depending on driving conditions and the
sensitivity setting. In light rain or snow, fewer wipes
will occur. In heavy rain or snow, wipes will occur more
frequently. The RainsenseŸ wipers operate in a
delay mode as well as a continuous low or high speed
as needed. If the system is left on for long periods
of time, occasional wipes may occur without any
moisture on the windshield. This is normal and indicates
that the RainsenseŸ system is activated.
The RainsenseŸ system can be activated by moving
the wiper stalk up to the INT position and turning the INT
ADJ band to one of the ®ve sensitivity levels. The
bottom INT ADJ position is the lowest sensitivity setting,
level one. This allows more rain or snow to collect on
the windshield between wipes. Turning the INT ADJ
band away from you to the higher sensitivity levels
allows less rain or snow to collect on the windshield
between wipes.
3-11
Page 124 of 408

The top position is the highest sensitivity setting, level
®ve. A single wipe will occur each time you turn the INT
ADJ band to a higher sensitivity level to indicate that
the sensitivity level has been increased.
Notice:The wipers must be turned off when going
through a car wash to avoid damage.
The MIST and ªwashº cycles operate as normal and are
not affected by the RainsenseŸ function. The
RainsenseŸ system can be overridden at any time by
manually changing the wiper control to LO or HI speed.
While RainsenseŸ is active, the headlamps will turn on
automatically. The headlamps will turn off again once
the wipers turn off if it is light enough outside. If it
is dark, they will remain on. See ªWiper-Activated
Headlampsº under
Exterior Lamps on page 3-16for
more information.
Notice:Do not place stickers or other items on the
exterior glass surface directly in front of the
moisture sensor. Doing this could cause the
moisture sensor to malfunction.
Windshield Washer
The windshield washer has both a ªdemandº mode and
a ªprogrammedº mode, depending on the amount of
windshield washer ¯uid you need.
{CAUTION:
In freezing weather, do not use your washer
until the windshield is warmed. Otherwise the
washer ¯uid can form ice on the windshield,
blocking your vision.
To spray washer ¯uid on the windshield in the
programmed mode, press and release the button on the
tip of the lever. The washer will provide a measured
amount of ¯uid to the windshield and the wiper will either
stop or return to your original wiping speed. To spray
washer ¯uid on the windshield in the demand mode,
press and hold the button until you have enough ¯uid,
and the wipers will either stop or return to your
original wiping speed.
CHECK WASHER FLUID will be displayed on the Driver
Information Center (DIC) when the washer ¯uid
reaches a low level.
3-12
Page 129 of 408

Wiper-Activated Headlamps
This feature activates the headlamps and parking lamps
after the windshield wipers have been in use for
about six seconds. To operate, the Twilight Sentinel
ž
feature must be turned on.
When the exterior lamp control is in the off or parking
lamp position and the wiper control is on INT, LO or HI,
the HEADLAMPS SUGGESTED message will appear
on the Driver Information Center (DIC).
When the ignition is turned to OFF, the wiper-activated
headlamps will immediately turn off. The wiper-activated
headlamps will also turn off if the Twilight Sentinel
ž
or the windshield wipers are turned off.
Lamps On Reminder
A warning chime will sound if the exterior lamp control
is left on in either the headlamp or parking lamp position
and the driver's door is opened with the ignition off.
Daytime Running Lamps
Daytime Running Lamps (DRL) can make it easier for
others to see the front of your vehicle during the
day. DRL can be helpful in many different driving
conditions, but they can be especially helpful in the short
periods after dawn and before sunset. Fully functional
daytime running lamps are required on all vehicles
®rst sold in Canada.
The DRL system will make the high-beam headlamps
come on at reduced brightness when the following
conditions are met:
·It is still daylight and the ignition is on,
·the exterior lamp control is in the off position and
·the transaxle is not in PARK (P).
When DRL are on, only your high-beam headlamps (at
reduced brightness) will be on. No other exterior
lamps such as the parking lamps, taillamps, etc. will be
on when the DRL are being used. Your instrument
panel won't be lit up either.
When the Twilight Sentinel
žlever is on and it's dark
enough outside, the high-beam headlamps (at reduced
intensity) will turn off and normal low-beam headlamp
operation will occur.
3-17
Page 352 of 408

Service Parts Identi®cation Label
You'll ®nd this label on the under side of the spare tire
cover in the trunk. It's very helpful if you ever need
to order parts. On this label is:
·your VIN,
·the model designation,
·paint information and
·a list of all production option and special equipment.
Be sure that this label is not removed from the
vehicle.
Electrical System
Add-On Electrical Equipment
Notice:Don't add anything electrical to your
vehicle unless you check with your dealer ®rst.
Some electrical equipment can damage your vehicle
and the damage wouldn't be covered by your
warranty. Some add-on electrical equipment can
keep other components from working as they
should.
Your vehicle has an air bag system. Before attempting
to add anything electrical to your vehicle, see
Servicing Your Air Bag-Equipped Vehicle on page 1-52.
Headlamp Wiring
The headlamp wiring has an individual fuse. An
electrical overload will cause the lamps to go on and off,
or in some cases to remain off. If this happens, have
the headlamp wiring checked right away.
Windshield Wiper Fuses
The windshield wiper motor is protected by an internal
circuit breaker. If the wiper motor overheats due to
heavy snow, the wipers will stop until the motor cools
and will then restart.
A fuse powers the wiper motor. If the fuse blows, there
is an electrical problem. Be sure to have it ®xed.
Power Windows and Other Power
Options
Circuit breakers protect the power windows and power
seats. When the current load is too heavy, the circuit
breaker opens and closes, protecting the circuit until the
problem is ®xed or goes away.
5-92
Page 354 of 408

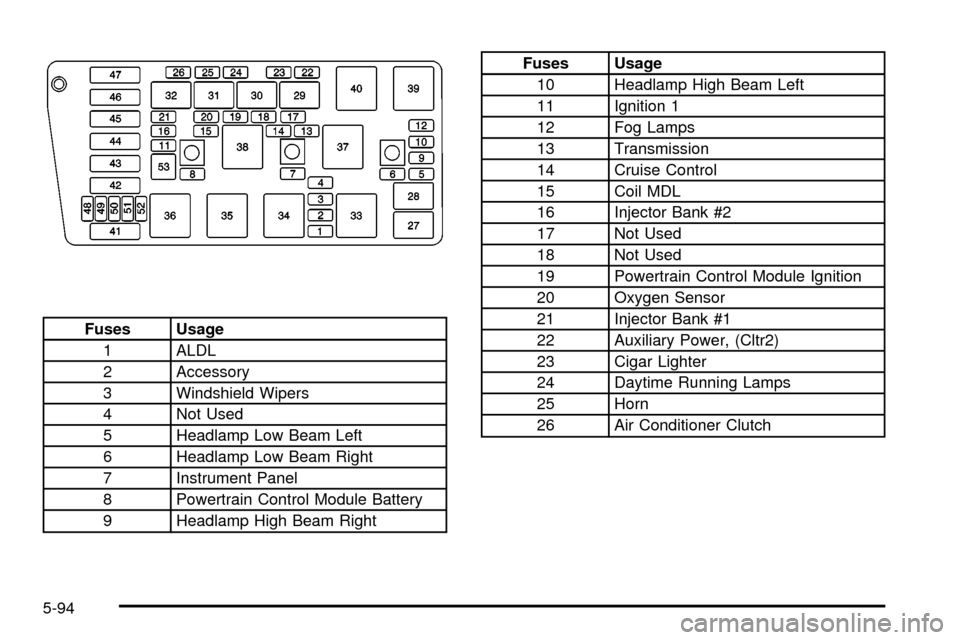
Fuses Usage
1 ALDL
2 Accessory
3 Windshield Wipers
4 Not Used
5 Headlamp Low Beam Left
6 Headlamp Low Beam Right
7 Instrument Panel
8 Powertrain Control Module Battery
9 Headlamp High Beam Right
Fuses Usage
10 Headlamp High Beam Left
11 Ignition 1
12 Fog Lamps
13 Transmission
14 Cruise Control
15 Coil MDL
16 Injector Bank #2
17 Not Used
18 Not Used
19 Powertrain Control Module Ignition
20 Oxygen Sensor
21 Injector Bank #1
22 Auxiliary Power, (Cltr2)
23 Cigar Lighter
24 Daytime Running Lamps
25 Horn
26 Air Conditioner Clutch
5-94
Page 404 of 408

Radios (cont.)
Setting the Time for Radios without
Radio Data Systems (RDS).......................3-78
Theft-Deterrent..........................................3-102
Understanding Reception............................3-103
RainsenseŸ II Wipers.....................................3-11
RDS Messages..............................................3-91
Reaching Roadside Service............................... 7-7
Reading Lamps..............................................3-22
Rear Ashtray..................................................3-27
Rear Climate Control System............................3-34
Rear Door Security Locks................................2-11
Rear Seat Passenger Positions.........................1-19
Rear Seat Passengers, Safety Belts..................1-19
Rear Seat Pass-Through Door..........................2-14
Rear Underseat Fuse Block..............................5-97
Rear Window Defogger....................................3-32
Rearview Mirror, Automatic Dimming
with OnStar
žand Compass..........................2-38
Rearview Mirror, Automatic Dimming
with OnStar
ž..............................................2-37
Reclining Seatbacks.......................................... 1-3
Recreational Vehicle Towing.............................4-31
Remote Keyless Entry System, Operation............ 2-6
Remote Keyless Entry System............................ 2-5
Remote Recall Memory...................................3-65
Removing the Flat Tire and Installing the
Spare Tire..................................................5-76
Removing the Spare Tire and Tools...................5-75
Replacement Bulbs.........................................5-61Replacing Brake System Parts..........................5-43
Replacing Restraint System Parts After a Crash.....1-53
Reporting Safety Defects.................................7-10
Canadian Government..................................7-10
General Motors...........................................7-10
United States Government.............................. 7-9
Reprogramming a Single HomeLink
žButton.......2-48
Resetting Defaults...........................................2-48
Restraint System Check...................................6-10
Checking Your Restraint Systems...................1-52
Replacing Restraint System Parts
After a Crash..........................................1-53
Restraint Systems...........................................1-52
Checking....................................................1-52
Replacing Parts...........................................1-53
Retained Accessory Power (RAP)......................2-25
Right Front Passenger Position, Safety Belts......1-19
Roadside Service Availability.............................. 7-7
Roadside Service for the Hearing or Speech
Impaired...................................................... 7-7
Roadside......................................................... 7-6
Service........................................................ 7-6
Rocking Your Vehicle To Get It Out...................4-30
Running Your Engine While You Are Parked.......2-36
S
Safety Belt.....................................................1-23
Pretensioners..............................................1-23
12
Page 408 of 408

W
Warning Lights, Gages and Indicators................3-37
Warnings.......................................................3-56
DIC Warnings and Messages........................3-56
Hazard Warning Flashers............................... 3-6
Other Warning Devices.................................. 3-7
Safety and Symbols......................................... iii
Vehicle Damage.............................................. iv
Washing Your Vehicle......................................5-86
Weather Band..............................................3-104
Weatherstrip Lubrication...................................6-10
Weight of the Trailer Tongue.............................4-37
Weight of the Trailer........................................4-36
What Kind of Engine Oil to Use........................5-16
What to Do with Used Oil................................5-18
What to Use..................................5-26, 5-38, 5-39
Wheels..........................................................5-71
Alignment and Tire Balance..........................5-71
Replacement...............................................5-71
When to Add Engine Oil..................................5-15
When to Change Engine Oil (GM Oil Life
System).....................................................5-17
When to Check and Change............................5-21
When to Check Power Steering Fluid................5-38
When to Check..............................................5-65
When You Are Ready to Leave After Parking
on a Hill:....................................................4-42Where to Put the Restraint...............................1-33
Why Safety Belts Work..................................... 1-7
Window Lockout.............................................2-18
Windows.......................................................2-15
Power........................................................2-16
Windshield Washer Fluid Level Check................. 6-9
Windshield Washer.........................................3-12
Fluid..........................................................5-39
Windshield Wiper............................................5-62
Blade Replacement......................................5-62
Fuses........................................................5-92
Windshield Wipers..........................................3-10
Winter Driving................................................4-26
Wiper Blade Check.........................................6-10
Wiper-Activated Headlamps..............................3-17
X
XMŸ Radio Satellite Service
(USA Only).........................................3-79, 3-88
XMŸ Satellite Radio Antenna System..............3-106
XMŸ Satellite Radio Service
(USA Only)...............................................3-103
Y
Your Vehicle and the Environment....................... 6-2
16