phone CADILLAC SEVILLE 2003 5.G Owners Manual
[x] Cancel search | Manufacturer: CADILLAC, Model Year: 2003, Model line: SEVILLE, Model: CADILLAC SEVILLE 2003 5.GPages: 408, PDF Size: 2.72 MB
Page 62 of 408

OnStaržSystem.............................................2-42
HomeLinkžTransmitter...................................2-44
Programming the HomeLinkžTransmitter.........2-45
Storage Areas................................................2-48
Glove Box...................................................2-48
Cellular Telephone........................................2-48
Center Console Storage Area.........................2-49
Map Pocket.................................................2-49Assist Handles.............................................2-49
Garment Hooks............................................2-49
Umbrella Holder...........................................2-49
Floor Mats...................................................2-49
Convenience Net..........................................2-49
Sunroof.........................................................2-50
Vehicle Personalization...................................2-51
Memory Seat, Mirrors and Steering Wheel.......2-51
Section 2 Features and Controls
2-2
Page 80 of 408

Testing the Alarm
1. From inside the vehicle, roll down the window, then
get out of the vehicle, keeping the door open.
2. From outside of the vehicle, with the door open,
lock the vehicle using the power door lock or the
remote keyless entry transmitter and close the
door. Wait 30 seconds until the SECURITY lamp
goes off.
3. Reach in and unlock the door using the manual
lock and open the door. The horn will sound and
the hazard lights will ¯ash.
You can turn off the alarm by unlocking the driver's door
with your key, using the unlock button on the remote
keyless entry transmitter or by starting the car with
a valid key.
If the alarm does not sound when it should, check to
see if the horn works. The horn fuse may be blown. To
replace the fuse, see
Fuses and Circuit Breakers on
page 5-93. If the fuse does not need to be replaced, you
may need to have your vehicle serviced.
To reduce the possibility of theft, always arm the
theft-deterrent system when leaving your vehicle.
Valet Lockout Switch
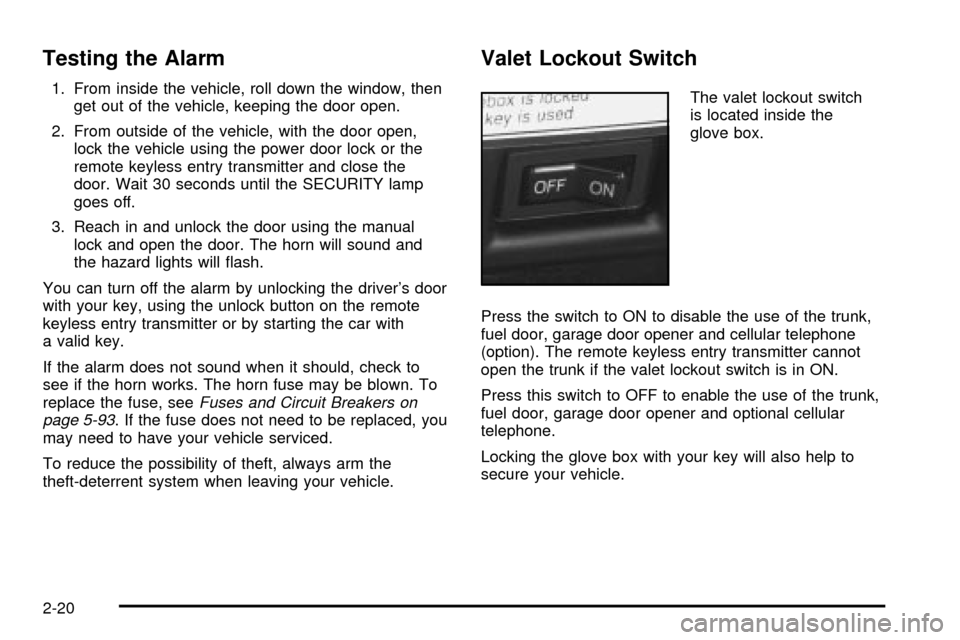
The valet lockout switch
is located inside the
glove box.
Press the switch to ON to disable the use of the trunk,
fuel door, garage door opener and cellular telephone
(option). The remote keyless entry transmitter cannot
open the trunk if the valet lockout switch is in ON.
Press this switch to OFF to enable the use of the trunk,
fuel door, garage door opener and optional cellular
telephone.
Locking the glove box with your key will also help to
secure your vehicle.
2-20
Page 85 of 408

Retained Accessory Power (RAP)
The following accessories on your vehicle may be used
for up to 10 minutes after the ignition key is turned
from ON to OFF:
·Cellular Phone (If Equipped)
·Radio
·Power Windows
·Audio Steering Wheel Controls
·Sunroof (Option)
Power to these accessories stops after 10 minutes or if
a door is opened. If you want power for another
10 minutes, close all the doors and turn the ignition key
to ON and then back to OFF. If the cellular phone is
being used while retained accessory power is active, the
timer is suspended to avoid interruption of the call.
The timer resets to 10 minutes at the end of the call.
Starting Your Engine
Move your shift lever to PARK (P) or NEUTRAL (N).
Your engine won't start in any other position ± that's a
safety feature. To restart when you're already moving,
use NEUTRAL (N) only.
Notice:Do not try to shift to PARK (P) if your
vehicle is moving. If you do, you could damage the
transaxle. Shift to PARK (P) only when your
vehicle is stopped.
1. With your foot off the accelerator pedal, turn your
ignition key to START. When the engine starts, let
go of the key. The idle speed will go down as
your engine gets warm.
Notice:Holding your key in START for longer than
15 seconds at a time will cause your battery to
be drained much sooner. And the excessive heat
can damage your starter motor. Wait about
15 seconds between each try to help avoid draining
your battery or damaging your starter.
2-25
Page 103 of 408

Luxury and Leisure Plan
·
All Directions and Connections Plan services
·Personal Concierge
OnStaržPersonal Calling
With OnStaržPersonal Calling, you have a safer way to
stay connected while driving. It's a hands-free wireless
phone that's integrated into your vehicle. You can place
calls nationwide using voice-activated dialing with no
contracts and no additional roaming charges. To ®nd out
more about OnStar
žPersonal Calling, refer to the
OnStaržuser's guide in your vehicle's glove box, or call
OnStaržat 1-888-4-ONSTAR (1-888-466-7827).
OnStaržVirtual Advisor
With OnStaržVirtual Advisor you can listen to the news,
entertainment and informative topics, such as traffic
and weather reports. You are able to listen and reply to
your e-mail through your vehicle's speakers.
OnStaržSteering Wheel Controls
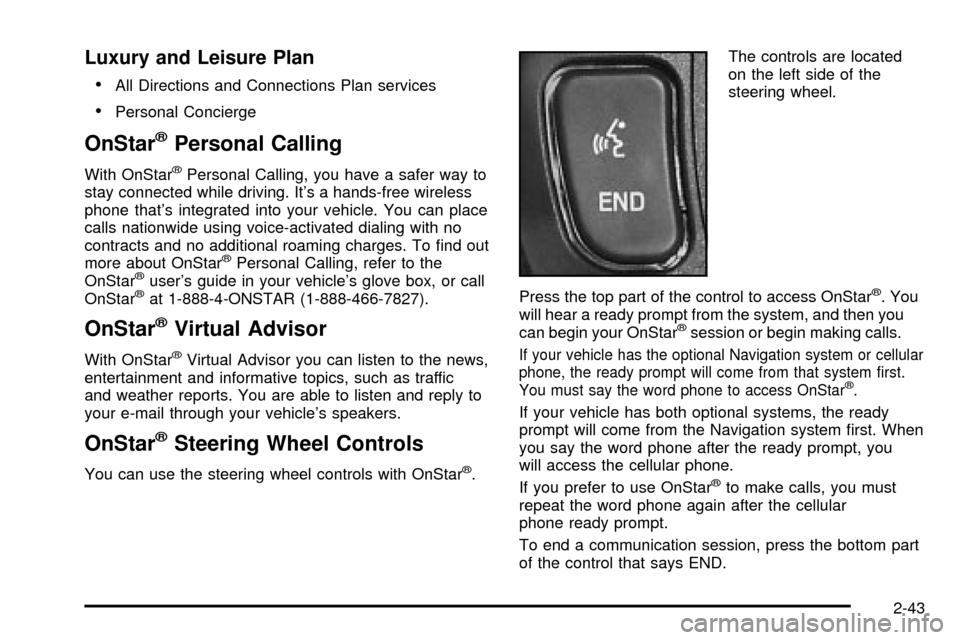
You can use the steering wheel controls with OnStarž.The controls are located
on the left side of the
steering wheel.
Press the top part of the control to access OnStar
ž. You
will hear a ready prompt from the system, and then you
can begin your OnStar
žsession or begin making calls.
If your vehicle has the optional Navigation system or cellular
phone, the ready prompt will come from that system ®rst.
You must say the word phone to access OnStar
ž.
If your vehicle has both optional systems, the ready
prompt will come from the Navigation system ®rst. When
you say the word phone after the ready prompt, you
will access the cellular phone.
If you prefer to use OnStar
žto make calls, you must
repeat the word phone again after the cellular
phone ready prompt.
To end a communication session, press the bottom part
of the control that says END.
2-43
Page 108 of 408

Reprogramming a Single HomeLinkž
Button
To program a device to HomeLinkžusing a HomeLinkž
button previously trained, follow these steps:
1. Press and hold the desired HomeLink
žbutton. Do
not release the button.
2. The indicator light will begin to ¯ash after
20 seconds. While still holding the HomeLink
ž
button, proceed with Step 2 under ªProgramming
HomeLinkž.º
Resetting Defaults
To reset HomeLinkžto default settings do the following:
1. Hold down the two outside buttons for about
20 seconds until the indicator light begins to ¯ash.
2. Continue to hold both buttons until the HomeLink
ž
indicator light turns off.
3. Release both buttons.
For questions or comments, contact HomeLink
žat
1-800-355-3515, or on the internet at
www.homelink.com.
Storage Areas
Glove Box
The glove box is located in front of the passenger's seat
on the instrument panel. To lock the glove box door,
insert the master key into the lock cylinder and
turn it clockwise. Turn the key counterclockwise to
unlock the door.
Cellular Telephone
Your vehicle may have been prewired for dealer
installation of a portable cellular telephone system. The
system has steering wheel telephone controls and
information output through the Driver Information
Center (DIC). Voice activation with remote record and
hands-free operation are standard features. For
more information, contact your dealer. A user's guide is
provided with the telephone.
2-48
Page 109 of 408

Center Console Storage Area
The center console comes with a storage tray, a
storage compartment for CDs or tapes, a dual cupholder
that unfolds, a coinholder, an optional phone and an
armrest. The cupholder can be opened by pressing on
the surface panel located in front of the armrest and
unfolding it. Close the lid to secure it.
Map Pocket
The map/storage pockets are located on each front door
as well as on the passenger's and driver's seatbacks.
Assist Handles
A handle above each door can be used when getting
out of your vehicle.
Garment Hooks
For your convenience, a garment hook is attached to
each rear assist handle.
Umbrella Holder
The driver's and passenger's front seat cushion may be
equipped with an umbrella holder. Gently slide the
umbrella into the slot located under the front portion of
the driver's or passenger's seat cushion.
Floor Mats
Your vehicle is equipped with rubber-backed front and
rear ¯oor mats. Keep them clean by vacuuming and using
a spot cleaner, if necessary. Do not machine wash.
Convenience Net
Your vehicle may be equipped with a convenience net.
The net attaches to the ¯oor of the trunk. Put small
loads, like grocery bags, behind the net. It can help keep
them from falling over during sharp turns or quick
starts and stops.
The net is not for larger, heavier loads. Store them in the
trunk as far forward as you can. When not using the net,
hook the net to the tabs securing it to the sill plate.
2-49
Page 117 of 408

The main components of the instrument panel are the following:
A. Air Outlets. See
Outlet Adjustment on page 3-33.
B. Driver Information Center (DIC) Buttons. See
DIC Controls and Displays on page 3-53.
C. Turn Signal/Multifunction Lever. See
Turn
Signal/Multifunction Lever on page 3-9.
D. Climate Controls and OnStaržSteering Wheel
Controls (or Cellular Telephone Controls, If
Equipped).
See
Steering Wheel Climate Controls on page 3-35andOnStaržSystem on page 2-42.
E. Instrument Panel Cluster. See
Instrument Panel
Cluster on page 3-38.
F. Windshield Wiper/Washer Lever. See ªWindshield
Wipersº under
Turn Signal/Multifunction Lever
on page 3-9.
G. Audio Steering Wheel Controls. See
Audio Steering
Wheel Controls on page 3-103.
H. Ignition Switch. See
Ignition Positions on page 2-24.
I. Air Outlet Thumbwheel. See
Outlet Adjustment
on page 3-33.
J. Hazard Warning Flasher Button. See
Hazard
Warning Flashers on page 3-6.K. Audio System. See
Audio System(s) on page 3-78.
L. Exterior Lamp Controls. See
Exterior Lamps on
page 3-16.
M. Hood Release. See
Hood Release on page 5-11.
N. Fuel Door Release. See
Filling Your Tank on
page 5-6.
O. Trunk Release Button. See
Trunk on page 2-12.
P. Cruise Control. See ªCruise Controlº under
Turn Signal/Multifunction Lever on page 3-9.
Q. Horn. See
Horn on page 3-7.
R. Heated Seat Controls. See
Heated Seats on
page 1-3.
S. Traction Control System (TCS) Button. See
Traction
Control System (TCS) on page 4-9.
T. Console Shift Lever. See
Automatic Transaxle
Operation on page 2-28.
U. Optional Ashtray. See
Ashtrays and Cigarette
Lighter on page 3-27.
V. Climate Controls. See
Dual Climate Control System
on page 3-28.
W. Glove Box. See
Glove Box on page 2-48.
3-5
Page 138 of 408

Accessory Power Outlets
Your vehicle is equipped with accessory power outlets.
The outlets can be used to plug in electrical equipment
such as a cellular telephone, CB radio, etc.
The accessory power outlets are located at the rear of
the center console and on the lower inboard carpeted
panel on the passenger's side of the vehicle.
Your vehicle may have a small cap that must be
removed to access the accessory power outlet. If it
does, when not using the outlet be sure to cover it with
the protective cap.
The accessory power outlet will only operate when the
ignition is in ACC or ON and for 10 minutes after
turning the ignition OFF. If you would like the accessory
power outlet to operate regardless of ignition position,
and for extended periods of time, see your dealer
for more information.
Notice:When using an accessory power outlet,
maximum electrical load must not exceed amperage
rating. Always turn off any electrical equipment
when not in use. Leaving electrical equipment on for
extended periods will drain your battery.Certain accessory power plugs may not be compatible
to the accessory power outlet and could result in
blown vehicle or adapter fuses. If you experience a
problem see your dealer for additional information on the
accessory power plugs.
Notice:Adding some electrical equipment to your
vehicle can damage it or keep other things from
working as they should. This wouldn't be covered by
your warranty. Check with your dealer before
adding electrical equipment, and never use anything
that exceeds the amperage rating.
Follow the proper installation instructions that are
included with any electrical equipment you install.
Notice:Power outlets are designed for accessory
plugs only. Do not hang any type of accessory
or accessory bracket from the plug. Improper use of
the power outlet can cause damage not covered
by your warranty.
3-26
Page 165 of 408

Driver Information Center (DIC)
This display gives you the status of many of your
vehicle's systems. The DIC is also used to display driver
personalization features and warning/status messages.
All messages will appear in the DIC display, located
at the bottom of the instrument panel cluster.
DIC Controls and Displays
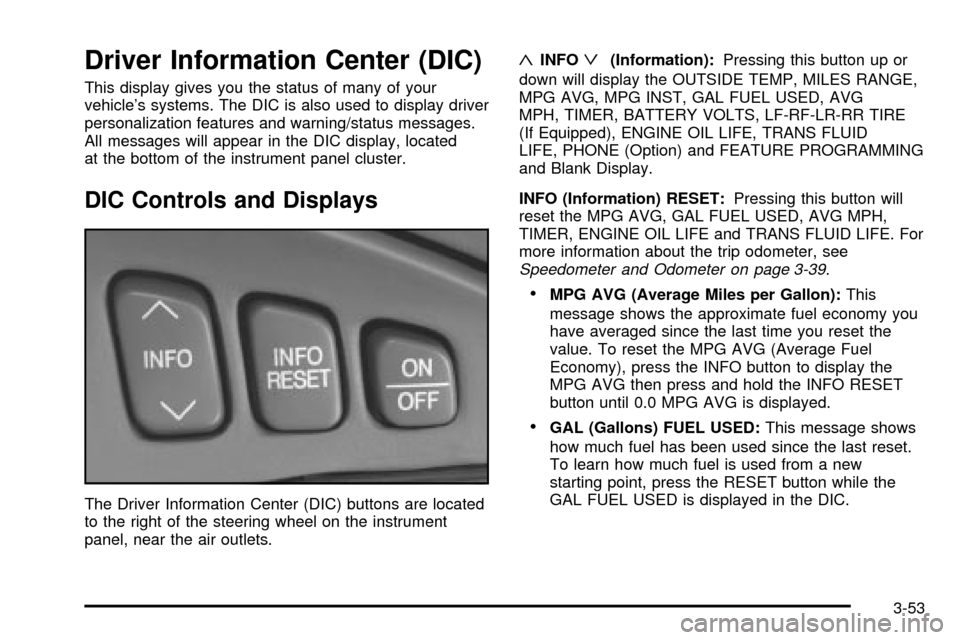
The Driver Information Center (DIC) buttons are located
to the right of the steering wheel on the instrument
panel, near the air outlets.
«INFOª(Information):Pressing this button up or
down will display the OUTSIDE TEMP, MILES RANGE,
MPG AVG, MPG INST, GAL FUEL USED, AVG
MPH, TIMER, BATTERY VOLTS, LF-RF-LR-RR TIRE
(If Equipped), ENGINE OIL LIFE, TRANS FLUID
LIFE, PHONE (Option) and FEATURE PROGRAMMING
and Blank Display.
INFO (Information) RESET:Pressing this button will
reset the MPG AVG, GAL FUEL USED, AVG MPH,
TIMER, ENGINE OIL LIFE and TRANS FLUID LIFE. For
more information about the trip odometer, see
Speedometer and Odometer on page 3-39.
·MPG AVG (Average Miles per Gallon):This
message shows the approximate fuel economy you
have averaged since the last time you reset the
value. To reset the MPG AVG (Average Fuel
Economy), press the INFO button to display the
MPG AVG then press and hold the INFO RESET
button until 0.0 MPG AVG is displayed.
·GAL (Gallons) FUEL USED:This message shows
how much fuel has been used since the last reset.
To learn how much fuel is used from a new
starting point, press the RESET button while the
GAL FUEL USED is displayed in the DIC.
3-53
Page 190 of 408

Audio System(s)
Notice:Before you add any sound equipment to
your vehicle ± like a tape player, CB radio, mobile
telephone or two-way radio ± be sure you can
add what you want. If you can, it's very important to
do it properly. Added sound equipment may
interfere with the operation of your vehicle's engine,
radio or other systems, and even damage them.
Your vehicle's systems may interfere with the
operation of sound equipment that has been added
improperly.
So, before adding sound equipment, check with
your dealer and be sure to check federal rules
covering mobile radio and telephone units.
Your audio system has been designed to operate easily
and to give years of listening pleasure. You will get
the most enjoyment out of it if you acquaint yourself with
it ®rst. Figure out which radio you have in your vehicle,
®nd out what your audio system can do and how to
operate all of its controls to be sure you're getting the
most out of the advanced engineering that went into it.
Your vehicle has a feature called Retained Accessory
Power (RAP). With RAP, you can play your audio
system even after the ignition is turned off. See
ªRetained Accessory Power (RAP)º under
Ignition
Positions on page 2-24.
Setting the Time for Radios without
Radio Data Systems (RDS)
Press and hold HR until the correct hour appears on the
display. Press and hold MN until the correct minute
appears on the display. Display the time with the ignition
off by pressing one of these buttons.
Setting the Time for Radios with
Radio Data Systems (RDS)
Press and hold HR until the correct hour appears on the
display. Press and hold MN until the correct minute
appears on the display. Display the time when the
ignition is off by pressing one of these buttons.
To synchronize the time with an FM station broadcasting
Radio Data System (RDS) information, press and
hold HR and MN at the same time until TIME UPDATED
appears on the display. If the time is not available
from the station, NO STATION TIME will appear on the
display.
3-78