flat tire CADILLAC SEVILLE 2004 5.G Owners Manual
[x] Cancel search | Manufacturer: CADILLAC, Model Year: 2004, Model line: SEVILLE, Model: CADILLAC SEVILLE 2004 5.GPages: 410, PDF Size: 2.64 MB
Page 169 of 410
CHECK TIRE PRESSURE – 144:This message is
displayed when the Tire Pressure Monitor (TPM) system
detects a low or high tire pressure condition in one or
more of the road tires. By pressing the INFO button
up or down, the DIC display will show which tire or tires
do not have the correct inflation pressure. A “LOW
TIRE” condition exists when the tire’s air pressure is
under 25 psi (172 kPa) and a “HIGH TIRE” condition
exists when the tire’s air pressure is above 38 psi
(262 kPa). The system will display the air pressure, the
tire location (LF, RF, RR or LR) and if the air pressure
is low or high. The tire pressure information is available
in English or metric measurements. For example, a
driver’s side front tire that is low may be shown
as: 22 PSI LF TIRE LOW.
The correct tire inflation pressure should be set to those
shown on the Tire Loading-Information Label, located on
the rear edge of the driver’s door. For more information
regarding proper tire inflation, seeIn�ation - Tire
Pressure on page 5-68. If a tire is low, you should stop as
soon as possible and inspect your tire(s) for damage. If a
tire is flat, seeIf a Tire Goes Flat on page 5-77.
Once the TPM system detects the low or high tire
pressure condition, the message CHECK TIRE
PRESSURE will be displayed whenever you start the
engine. To remove or clear the CHECK TIRE
PRESSURE message, you will need to set the tire(s) to
the proper tire pressure. SeeIn�ation - Tire Pressure on
page 5-68.
{CAUTION:
When the CHECK TIRE PRESSURE message is
displayed on the Driver Information Center and
the tire pressure is low, your vehicle’s
handling capabilities will be reduced during
severe maneuvers. If you drive too fast, you
could lose control of your vehicle. You or
others could be injured. Don’t drive over
55 mph (90 km/h) when the tire pressure is
low. Drive cautiously and correct the tire
pressure as soon as you can.
CHECK WASHER FLUID – 25:This message means
that your vehicle is low on windshield washer fluid.
SeeWindshield Washer Fluid on page 5-37.
DRIVER DOOR AJAR – 140:This message will
display anytime the key is in ON, the transaxle is not in
PARK (P) and the driver’s door is open or ajar. A
chime will sound when the vehicle’s speed is greater
than 3 mph (4.8 km/h).
3-57
Page 262 of 410
Wheel Alignment and Tire Balance..................5-75
Wheel Replacement......................................5-75
Tire Chains..................................................5-77
If a Tire Goes Flat........................................5-77
Changing a Flat Tire.....................................5-78
Compact Spare Tire......................................5-87
Appearance Care............................................5-87
Cleaning the Inside of Your Vehicle.................5-88
Care of Safety Belts......................................5-90
Weatherstrips...............................................5-90
Cleaning the Outside of Your Vehicle..............5-90
Sheet Metal Damage.....................................5-92
Finish Damage.............................................5-92
Underbody Maintenance................................5-93Chemical Paint Spotting.................................5-93
Vehicle Care/Appearance Materials..................5-94
Vehicle Identification......................................5-95
Vehicle Identification Number (VIN).................5-95
Service Parts Identification Label.....................5-95
Electrical System............................................5-96
Add-On Electrical Equipment..........................5-96
Headlamp Wiring..........................................5-96
Windshield Wiper Fuses................................5-96
Power Windows and Other Power Options.......5-96
Fuses and Circuit Breakers............................5-97
Removing the Rear Seat Cushion...................5-99
Capacities and Specifications........................5-104
Section 5 Service and Appearance Care
5-2
Page 324 of 410
(A) Temporary Use Only:The compact spare tire or
temporary use tire has a tread life of approximately
3,000 miles (5 000 km) and should not be driven
at speeds over 65 mph (105 km/h). The compact spare
tire is for emergency use when a regular road tire
has lost air and gone flat. SeeCompact Spare Tire on
page 5-87andIf a Tire Goes Flat on page 5-77.
(B) Tire Ply Material:The type of cord and number of
plies in the sidewall and under the tread.
(C) Tire Identification Number (TIN):The Tire
Identification Number (TIN). The TIN shows the
manufacturer and plant code, tire size, and date the tire
was manufactured. The TIN is molded onto both
sides of the tire, although only one side may have the
date of manufacture.
(D) Maximum Cold Inflation Load Limit:Maximum
load that can be carried and the maximum pressure
needed to support that load. SeeCompact Spare Tire
on page 5-87andLoading Your Vehicle on page 4-31.(E) Tire Inflation:The temporary use tire or compact
spare tire should be inflated to 60 psi (420 kPa).
For more information on tire pressure and inflation see
In�ation - Tire Pressure on page 5-68.
(F) Tire Size:A combination of letters and numbers
define a tire’s width, height, aspect ratio, construction
type and service description. The letter “T” as the
first character in the tire size means the tire is for
temporary use only.
(G) Tire Performance Criteria Specification (TPC
Spec):Original equipment tires designed to GM’s
specific tire performance criteria have a TPC
specification code molded onto the sidewall. GM’s TPC
specifications meet or exceed all federal safety
guidelines.
5-64
Page 330 of 410
This device complies with Part 15 of the FCC Rules.
Operation is subject to the following two conditions:
(1) this device may not cause harmful interference, and
(2) this device must accept any interference received,
including interference that may cause undesired
operation.
This device complies with RSS-210 of Industry and
Science Canada. Operation is subject to the following
two conditions: (1) this device may not cause
interference, and (2) this device must accept any
interference received, including interference that may
cause undesired operation of the device.
Changes or modifications to this system by anyone
other than an authorized service facility could void
authorization to use this equipment.
If the TPM system detects low tire pressure, below
25 psi (172 kPa), or high tire pressure, above 38 psi
(262 kPa), a message, CHECK TIRE PRESSURE, will
appear on the Driver Information Center (DIC)
display. By pressing the INFO button, the DIC screen
will show which tire(s) has the low or high pressure
condition. SeeIn�ation - Tire Pressure on page 5-68for
information regarding correct tire inflation. If a tire is
low, you should stop as soon as possible and check all
your tires for damage. If a tire is flat, seeIf a Tire
Goes Flat on page 5-77.Notice:Do not use a tire sealant if your vehicle is
equipped with Tire Pressure Monitors. The liquid
sealant can damage the tire pressure monitor
sensors.
Once a low or high tire pressure condition is detected,
the TPM system will display the CHECK TIRE
MESSAGE each time the engine is started, until the
tire(s) are set to the correct inflation pressure.
The Tire-Loading Information Label, which is located on
the rear edge of the driver’s door, shows the correct
inflation pressure for the tires on your vehicle.
The TPM system also allows the driver to check the air
pressure status of each road tire using the Driver
Information Center (DIC). Each tire’s air pressure will be
listed individually, in the following order: LF (left front
or driver’s side front tire), RF (right front or passenger’s
side front tire), RR (right rear or passenger’s side
rear tire) and LR (left rear or driver’s side rear tire). See
In�ation - Tire Pressure on page 5-68for information
regarding correct tire inflation. Also, seeDriver
Information Center (DIC) on page 3-52for information
on the DIC controls and displays.
If the DIC display does not show tire pressures or the
SERVICE TPM SYSTEM message appears, see
your dealer for service. The TPM system may not work
properly while the compact spare tire is installed.
5-70
Page 332 of 410
Vehicles equipped with the Tire Pressure Monitor (TPM)
system will need to have the sensors reset after a tire
rotation is performed. A special tool is needed to
reset the sensor identification codes. See your dealer
for service.
Make certain that all wheel nuts are properly tightened.
See “Wheel Nut Torque” underCapacities and
Speci�cations on page 5-104.
{CAUTION:
Rust or dirt on a wheel, or on the parts to
which it is fastened, can make wheel nuts
become loose after a time. The wheel could
come off and cause an accident. When you
change a wheel, remove any rust or dirt from
places where the wheel attaches to the vehicle.
In an emergency, you can use a cloth or a
paper towel to do this; but be sure to use a
scraper or wire brush later, if you need to, to
get all the rust or dirt off. See “Changing a Flat
Tire” in the Index.
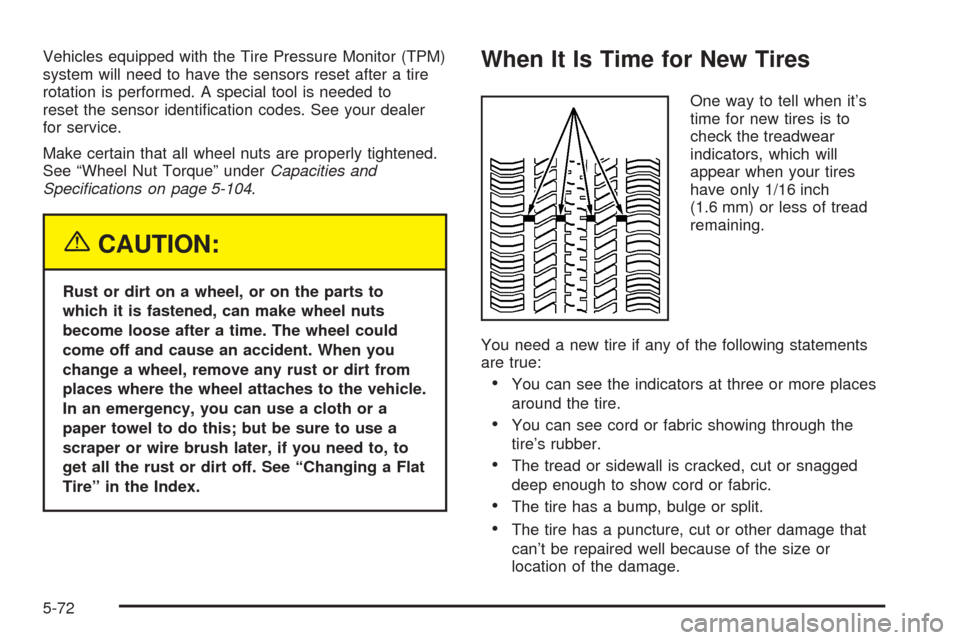
When It Is Time for New Tires
One way to tell when it’s
time for new tires is to
check the treadwear
indicators, which will
appear when your tires
have only 1/16 inch
(1.6 mm) or less of tread
remaining.
You need a new tire if any of the following statements
are true:
•You can see the indicators at three or more places
around the tire.
•You can see cord or fabric showing through the
tire’s rubber.
•The tread or sidewall is cracked, cut or snagged
deep enough to show cord or fabric.
•The tire has a bump, bulge or split.
•The tire has a puncture, cut or other damage that
can’t be repaired well because of the size or
location of the damage.
5-72
Page 336 of 410
If you need to replace any of your wheels, wheel bolts
or wheel nuts, replace them only with new GM
original equipment parts. This way, you will be sure to
have the right wheel, wheel bolts and wheel nuts
for your vehicle.
{CAUTION:
Using the wrong replacement wheels, wheel
bolts or wheel nuts on your vehicle can be
dangerous. It could affect the braking and
handling of your vehicle, make your tires lose
air and make you lose control. You could have
a collision in which you or others could be
injured. Always use the correct wheel, wheel
bolts and wheel nuts for replacement.
Notice:The wrong wheel can also cause problems
with bearing life, brake cooling, speedometer or
odometer calibration, headlamp aim, bumper height,
vehicle ground clearance and tire or tire chain
clearance to the body and chassis.
SeeChanging a Flat Tire on page 5-78for more
information.
Used Replacement Wheels
{CAUTION:
Putting a used wheel on your vehicle is
dangerous. You can’t know how it’s been used
or how far it’s been driven. It could fail
suddenly and cause a crash. If you have to
replace a wheel, use a new GM original
equipment wheel.
5-76
Page 337 of 410
Tire Chains
{CAUTION:
If your vehicle has P235/55R17 size tires, don’t
use tire chains, there’s not enough clearance.
Tire chains used on a vehicle without the
proper amount of clearance can cause damage
to the brakes, suspension or other vehicle
parts. The area damaged by the tire chains
could cause you to lose control of your vehicle
and you or others may be injured in a crash.
Use another type of traction device only if its
manufacturer recommends it for use on your
vehicle and tire size combination and road
conditions. Follow that manufacturer’s
instructions. To help avoid damage to your
vehicle, drive slowly, readjust or remove the
device if it’s contacting your vehicle, and don’t
spin your wheels.
If you do find traction devices that will fit,
install them on the front tires.Notice:If your vehicle has a tire size other than
P235/55R17 size tires, use tire chains only where
legal and only when you must. Use only SAE Class
“S” type chains that are the proper size for your
tires. Install them on the front tires and tighten them
as tightly as possible with the ends securely
fastened. Drive slowly and follow the chain
manufacturer’s instructions. If you can hear the
chains contacting your vehicle, stop and retighten
them. If the contact continues, slow down until
it stops. Driving too fast or spinning the wheels with
chains on will damage your vehicle.
If a Tire Goes Flat
It’s unusual for a tire to “blowout” while you’re driving,
especially if you maintain your tires properly. If air goes
out of a tire, it’s much more likely to leak out slowly.
But if you should ever have a “blowout,” here are a few
tips about what to expect and what to do:
If a front tire fails, the flat tire will create a drag that
pulls the vehicle toward that side. Take your foot off the
accelerator pedal and grip the steering wheel firmly.
Steer to maintain lane position, and then gently brake to
a stop well out of the traffic lane.
5-77
Page 338 of 410
A rear blowout, particularly on a curve, acts much like a
skid and may require the same correction you’d use
in a skid. In any rear blowout, remove your foot from the
accelerator pedal. Get the vehicle under control by
steering the way you want the vehicle to go. It may be
very bumpy and noisy, but you can still steer. Gently
brake to a stop, well off the road if possible.
{CAUTION:
Lifting a vehicle and getting under it to do
maintenance or repairs is dangerous without
the appropriate safety equipment and training.
The jack provided with your vehicle is
designed only for changing a flat tire. If it is
used for anything else, you or others could be
badly injured or killed if the vehicle slips off
the jack. Use the jack provided with your
vehicle only for changing a flat tire.
If a tire goes flat, the next part shows how to use your
jacking equipment to change a flat tire safely.
Changing a Flat Tire
If a tire goes flat, avoid further tire and wheel damage
by driving slowly to a level place. Turn on your
hazard warning flashers.
{CAUTION:
Changing a tire can cause an injury. The
vehicle can slip off the jack and roll over you
or other people. You and they could be badly
injured. Find a level place to change your tire.
To help prevent the vehicle from moving:
1. Put the shift lever in PARK (P).
2. Set the parking brake firmly.
3. Turn off the engine and do not restart
while the vehicle is raised.
4. Do not allow passengers to remain in the
vehicle.
To be even more certain the vehicle won’t
move, you can put blocks at the front and rear
of the tire farthest away from the one being
changed. That would be the tire on the other
side, at the opposite end of the vehicle.
5-78
Page 341 of 410
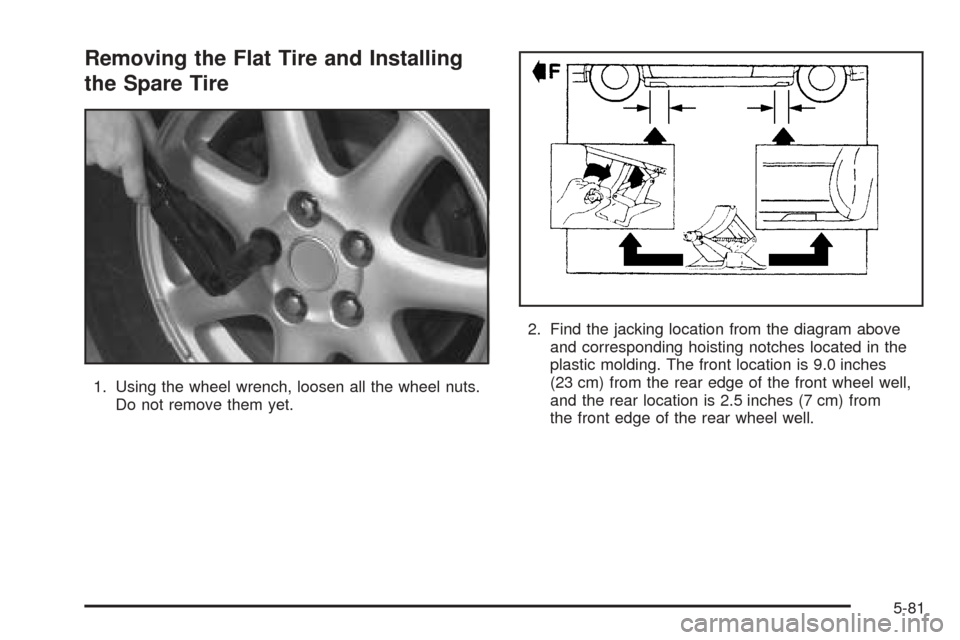
Removing the Flat Tire and Installing
the Spare Tire
1. Using the wheel wrench, loosen all the wheel nuts.
Do not remove them yet.2. Find the jacking location from the diagram above
and corresponding hoisting notches located in the
plastic molding. The front location is 9.0 inches
(23 cm) from the rear edge of the front wheel well,
and the rear location is 2.5 inches (7 cm) from
the front edge of the rear wheel well.
5-81
Page 345 of 410
Screw on the wheel nut covers with your fingers,
then tighten one-quarter turn with the wheel wrench.
{CAUTION:
Incorrect wheel nuts or improperly tightened
wheel nuts can cause the wheel to come loose
and even come off. This could lead to an
accident. Be sure to use the correct wheel
nuts. If you have to replace them, be sure to
get new GM original equipment wheel nuts.
Stop somewhere as soon as you can and have
the nuts tightened with a torque wrench to the
proper torque specification. See “Capacities
and Specifications” in the Index for wheel nut
torque specification.
Notice:Improperly tightened wheel nuts can lead
to brake pulsation and rotor damage. To avoid
expensive brake repairs, evenly tighten the wheel
nuts in the proper sequence and to the proper
torque specification. See “Capacities and
Specifications” in the index for the wheel nut torque
specification.Do not try to put a wheel cover on your compact spare
tire. It will not fit. Store the wheel cover and lug nut
caps in the trunk until you have the flat tire repaired or
replaced.
Notice:Wheel covers will not fit on your compact
spare. If you try to put a wheel cover on the compact
spare, you could damage the cover or the spare.
Storing the Flat Tire and Tools
{CAUTION:
Storing a jack, a tire, or other equipment in the
passenger compartment of the vehicle could
cause injury. In a sudden stop or collision,
loose equipment could strike someone. Store
all these in the proper place.
After you have put the compact spare tire on your
vehicle, you will need to store the flat tire in your trunk.
Store the flat tire as far forward in the trunk as
possible. Store the jack and wheel wrench in their
compartment in the trunk. For storage, the jack must be
raised until the screw end is flush with the edge of
the jack.
5-85