trunk release CADILLAC SEVILLE 2004 5.G Owners Manual
[x] Cancel search | Manufacturer: CADILLAC, Model Year: 2004, Model line: SEVILLE, Model: CADILLAC SEVILLE 2004 5.GPages: 410, PDF Size: 2.64 MB
Page 71 of 410
Trunk
{CAUTION:
It can be dangerous to drive with the trunk lid
open because carbon monoxide (CO) gas can
come into your vehicle. You can not see or
smell CO. It can cause unconsciousness and
even death. If you must drive with the trunk lid
open or if electrical wiring or other cable
connections must pass through the seal
between the body and the trunk lid:
•Make sure all other windows are shut.
•Turn the fan on your heating or cooling
system to its highest speed and select the
control setting that will force outside air
into your vehicle. See Climate Control
System in the Index.
•If you have air outlets on or under the
instrument panel, open them all the way.
SeeEngine Exhaust on page 2-35.
Trunk Lock Release
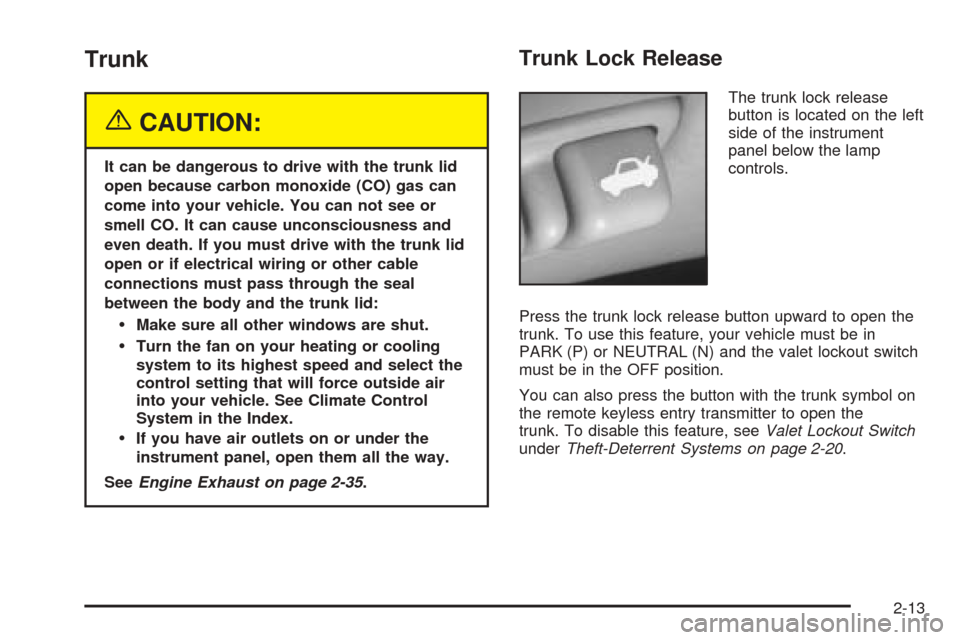
The trunk lock release
button is located on the left
side of the instrument
panel below the lamp
controls.
Press the trunk lock release button upward to open the
trunk. To use this feature, your vehicle must be in
PARK (P) or NEUTRAL (N) and the valet lockout switch
must be in the OFF position.
You can also press the button with the trunk symbol on
the remote keyless entry transmitter to open the
trunk. To disable this feature, seeValet Lockout Switch
underTheft-Deterrent Systems on page 2-20.
2-13
Page 72 of 410
Trunk Lid Tie Down
{CAUTION:
Driving with the trunk lid open can allow
dangerous CO (carbon monoxide) gas to come
into your vehicle. You can not see or smell CO.
It can cause unconsciousness and even death.
If you ever need to drive with your trunk lid
open, then:
•Make sure all windows, the rear seat
pass-through and sunroof are closed.
•Turn the fan on your heating and cooling
system to its highest speed, with the
setting on AUTO and temperature between
65°F (18°C) and 85°F (29°C). This forces
fresh outside air into your vehicle.
•Open all air ducts on the instrument panel.
Do not use the trunk lid tie down if you are
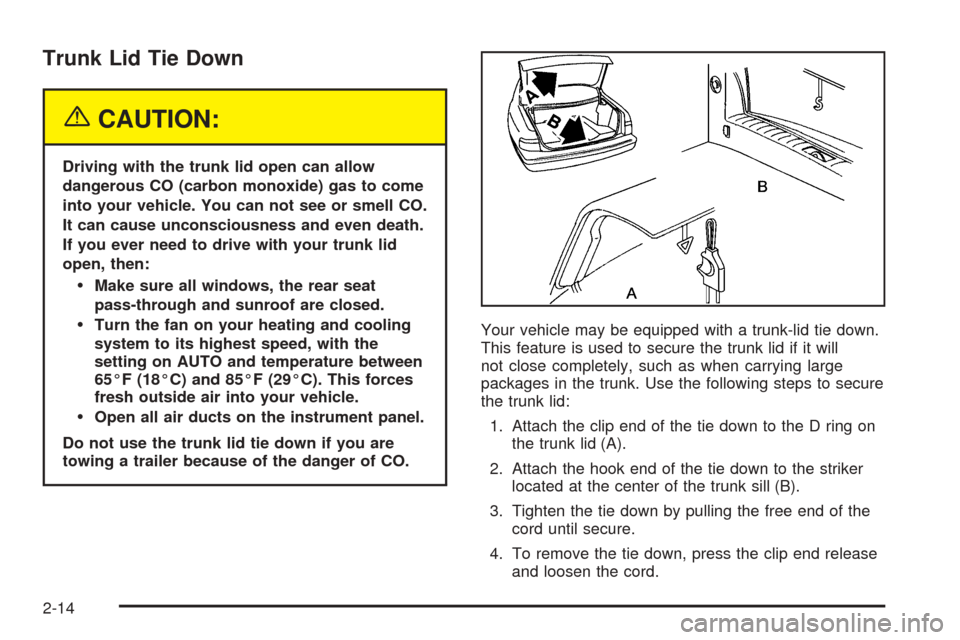
towing a trailer because of the danger of CO.Your vehicle may be equipped with a trunk-lid tie down.
This feature is used to secure the trunk lid if it will
not close completely, such as when carrying large
packages in the trunk. Use the following steps to secure
the trunk lid:
1. Attach the clip end of the tie down to the D ring on
the trunk lid (A).
2. Attach the hook end of the tie down to the striker
located at the center of the trunk sill (B).
3. Tighten the tie down by pulling the free end of the
cord until secure.
4. To remove the tie down, press the clip end release
and loosen the cord.
2-14
Page 73 of 410
Emergency Trunk Release Handle
Notice:Using the emergency trunk release handle
as a tie-down or anchor point when securing
items in the trunk may damage it. Use the
emergency trunk release handle only to help you
open the trunk lid.
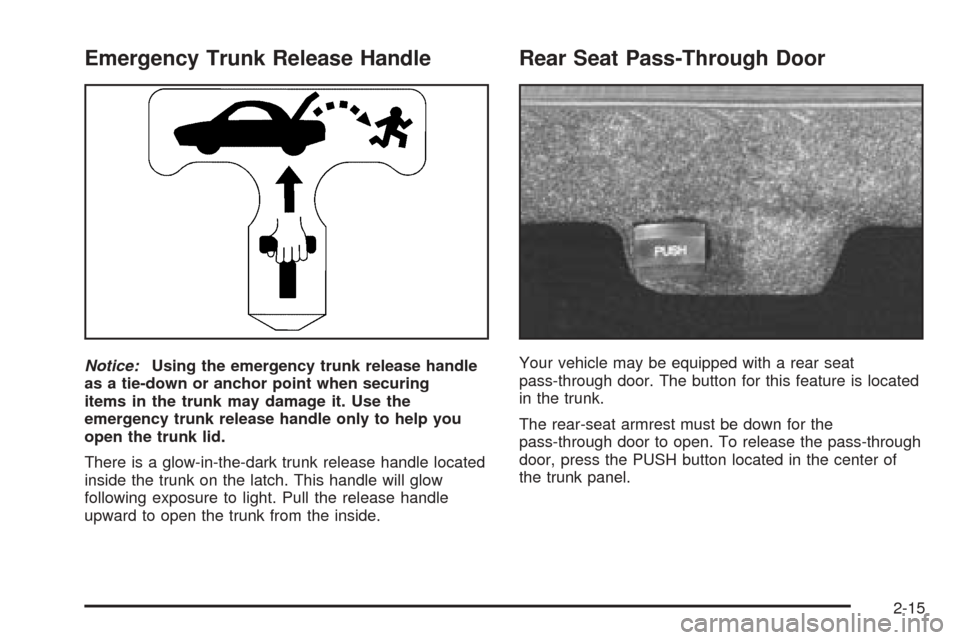
There is a glow-in-the-dark trunk release handle located
inside the trunk on the latch. This handle will glow
following exposure to light. Pull the release handle
upward to open the trunk from the inside.
Rear Seat Pass-Through Door
Your vehicle may be equipped with a rear seat
pass-through door. The button for this feature is located
in the trunk.
The rear-seat armrest must be down for the
pass-through door to open. To release the pass-through
door, press the PUSH button located in the center of
the trunk panel.
2-15
Page 117 of 410
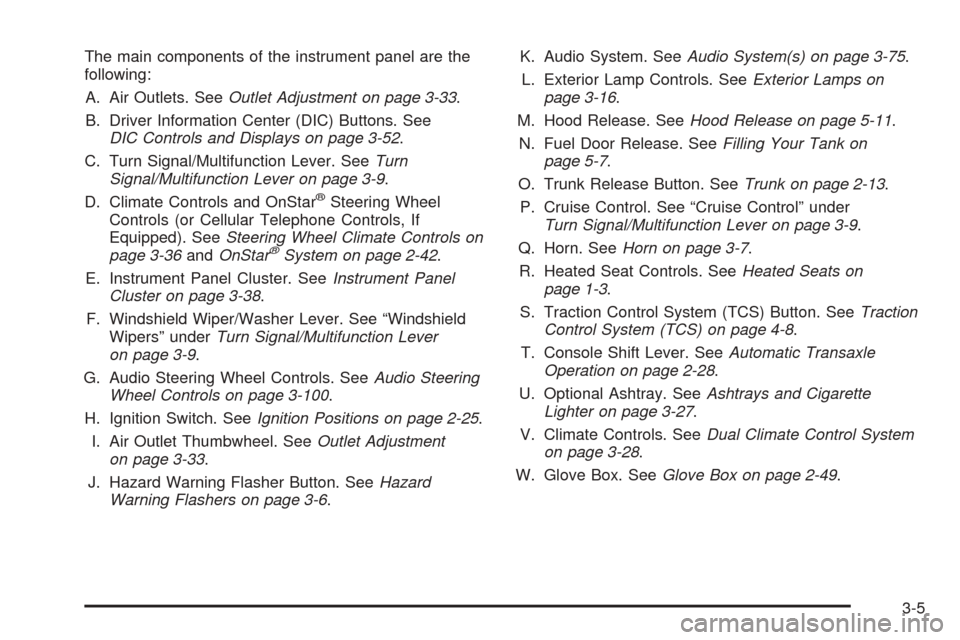
The main components of the instrument panel are the
following:
A. Air Outlets. SeeOutlet Adjustment on page 3-33.
B. Driver Information Center (DIC) Buttons. See
DIC Controls and Displays on page 3-52.
C. Turn Signal/Multifunction Lever. SeeTurn
Signal/Multifunction Lever on page 3-9.
D. Climate Controls and OnStar
®Steering Wheel
Controls (or Cellular Telephone Controls, If
Equipped). SeeSteering Wheel Climate Controls on
page 3-36andOnStar
®System on page 2-42.
E. Instrument Panel Cluster. SeeInstrument Panel
Cluster on page 3-38.
F. Windshield Wiper/Washer Lever. See “Windshield
Wipers” underTurn Signal/Multifunction Lever
on page 3-9.
G. Audio Steering Wheel Controls. SeeAudio Steering
Wheel Controls on page 3-100.
H. Ignition Switch. SeeIgnition Positions on page 2-25.
I. Air Outlet Thumbwheel. SeeOutlet Adjustment
on page 3-33.
J. Hazard Warning Flasher Button. SeeHazard
Warning Flashers on page 3-6.K. Audio System. SeeAudio System(s) on page 3-75.
L. Exterior Lamp Controls. SeeExterior Lamps on
page 3-16.
M. Hood Release. SeeHood Release on page 5-11.
N. Fuel Door Release. SeeFilling Your Tank on
page 5-7.
O. Trunk Release Button. SeeTrunk on page 2-13.
P. Cruise Control. See “Cruise Control” under
Turn Signal/Multifunction Lever on page 3-9.
Q. Horn. SeeHorn on page 3-7.
R. Heated Seat Controls. SeeHeated Seats on
page 1-3.
S. Traction Control System (TCS) Button. SeeTraction
Control System (TCS) on page 4-8.
T. Console Shift Lever. SeeAutomatic Transaxle
Operation on page 2-28.
U. Optional Ashtray. SeeAshtrays and Cigarette
Lighter on page 3-27.
V. Climate Controls. SeeDual Climate Control System
on page 3-28.
W. Glove Box. SeeGlove Box on page 2-49.
3-5
Page 268 of 410
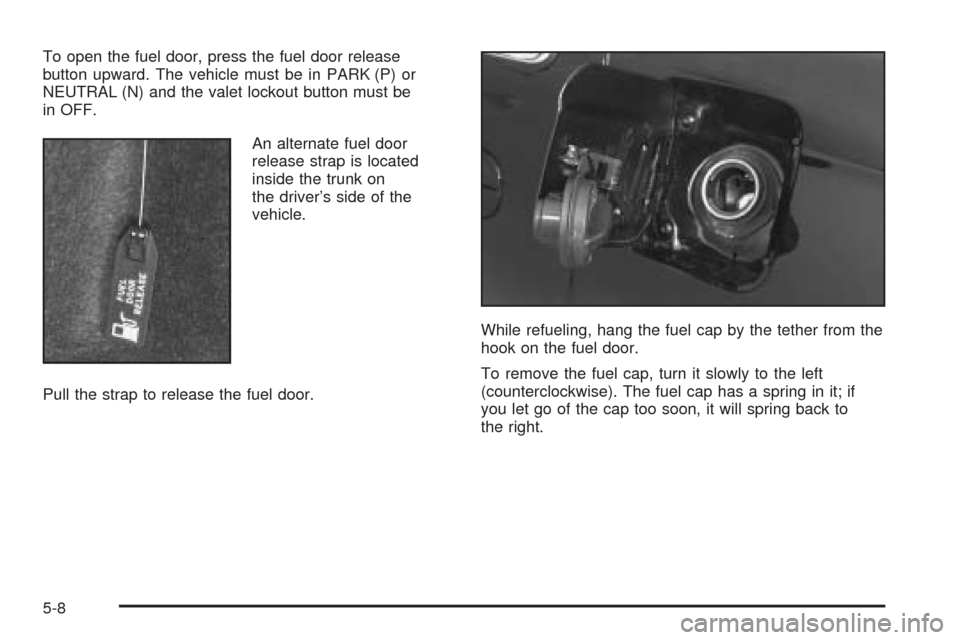
To open the fuel door, press the fuel door release
button upward. The vehicle must be in PARK (P) or
NEUTRAL (N) and the valet lockout button must be
in OFF.
An alternate fuel door
release strap is located
inside the trunk on
the driver’s side of the
vehicle.
Pull the strap to release the fuel door.While refueling, hang the fuel cap by the tether from the
hook on the fuel door.
To remove the fuel cap, turn it slowly to the left
(counterclockwise). The fuel cap has a spring in it; if
you let go of the cap too soon, it will spring back to
the right.
5-8
Page 329 of 410
How to Check
Use a good quality pocket-type gage to check tire
pressure. You can’t tell if your tires are properly inflated
simply by looking at them. Radial tires may look
properly inflated even when they’re underinflated. Check
tire inflation pressure when the tire is cold. Cold
means your vehicle has been sitting for at least three
hours or driven no more than 1 mile (1.6 km).
Remove the valve cap from the tire valve stem. Press
the tire gage firmly onto the valve to get a pressure
measurement. If the cold tire inflation pressure matches
the recommended pressure on the Tire and Loading
Information label, no further adjustment is necessary. If
the inflation pressure is low, add air until you reach
the recommended amount.
If you overfill the tire, release air by pushing on the
metal stem in the center of the tire valve. Recheck the
tire pressure with the tire gage.
Be sure to put the valve caps back on the valve stems.
They help prevent leaks by keeping out dirt and
moisture.Your vehicle has a Tire Pressure Monitor (TPM) that
sends tire pressure information to the Driver Information
Center (DIC). Using the DIC control buttons, the
driver is able to check tire pressure levels in all four
road tires. SeeTire Pressure Monitor Operation
on page 5-69andDIC Controls and Displays on
page 3-52for additional information.
Tire Pressure Monitor Operation
Your vehicle may have a Tire Pressure Monitor
System (TPM). The TPM system uses radio and sensor
technology to check tire pressure levels. Sensors,
mounted on each road wheel, transmit tire pressure
readings to a receiver located in the trunk. Tire pressure
status and tire pressure warnings are shown on the
Driver Information Center (DIC) display. SeeDriver
Information Center (DIC) on page 3-52, for details
regarding DIC controls and displays.
The system operates on a radio frequency subject to
Federal Communications Commission (FCC) Rules and
with Industry and Science Canada.
5-69
Page 362 of 410
Fuses Usage
10 Lamps Park Right
11 Fuel Tank Ventilation Solenoid
12 Ignition 1
13 Lamps, Parking Left
14 Interior Lamp Dimmer Module
15 Navigation
16 Heated Seat Left Front
17 Export Lighting
18 Rear Door Modules
19 Stoplamps
20 Neutral Safety Back-up
21 Audio
22Retained Accessory Power for
Sunroof
23 Not Used
24 Not Used
25 Passenger Door Module
26 Fuel Door/Trunk Release (Body)
27 Interior LampsFuses Usage
28 Rear HVAC Blower
29 Ignition Switch
30 Not Used
31 Heated Seat Right Front
32 Magnetic Ride Control
33 Heating, Ventilation, Air Conditioning
34 Ignition 3 Rear
35 Antilock Braking System
36 Turn Signal/Hazard
37 Heated Seat Right Rear
38 Dash Integration Module
Relays Usage
39 Fuel Pump
40 Parking Lamps
41 Ignition 1
42 Park Brake A
43 Park Brake B
44 Park Shift Interlock
5-102
Page 363 of 410
Relays Usage
45 Reverse Lamps
46Retained Accessory Power for
Sunroof
47 Rear HVAC Blower
48 Not Used
49 Ignition 3
50 Fuel Tank Door Release
51 Interior Lamps
52 Trunk Release
53 Front Courtesy Lamps
54 Rear Courtesy Lamps
55 Automatic Level Control Compressor
Circuit
BreakersUsage
56 Power Seats
57 Power Windows
Relays Usage
58 Cigarette Lighter
59 Rear Defog
Fuses Usage
60 Park Brake
61 Rear Defog
62 Export Brake
63 Audio Amplifier
64 ELC Compressor/Exhaust
65 Cigar Lighter
66 Not Used
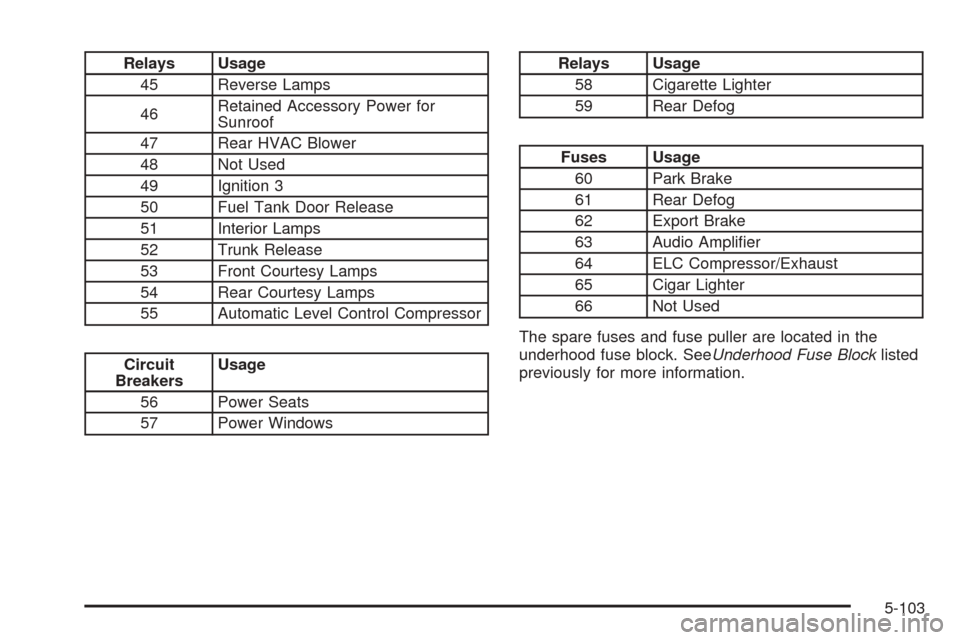
The spare fuses and fuse puller are located in the
underhood fuse block. SeeUnderhood Fuse Blocklisted
previously for more information.
5-103
Page 399 of 410
Driving (cont.)
Hill and Mountain Roads..............................4-22
In Rain and on Wet Roads...........................4-16
Winter........................................................4-24
Driving on Grades...........................................4-43
Driving on Snow or Ice....................................4-25
Driving Through Deep Standing Water...............4-18
Driving Through Flowing Water.........................4-18
Driving with a Trailer.......................................4-41
Dual Climate Control System............................3-28
E
Electrical System
Add-On Equipment......................................5-96
Fuses and Circuit Breakers...........................5-97
Headlamp Wiring.........................................5-96
Power Windows and Other Power Options......5-96
Removing the Rear Seat Cushion..................5-99
Windshield Wiper Fuses...............................5-96
Emergency Trunk Release Handle.....................2-15
Emissions Inspection and Maintenance
Programs...................................................3-48
Engine
Air Cleaner/Filter.........................................5-18
Battery.......................................................5-41
Check and Service Engine Soon Light............3-46Engine (cont.)
Coolant......................................................5-23
Coolant Heater............................................2-27
Coolant Temperature Gage...........................3-45
Coolant Temperature
Warning Light..........................................3-45
Drive Belt Routing.......................................6-13
Engine Compartment Overview......................5-12
Exhaust.....................................................2-35
Oil .............................................................5-13
Overheating................................................5-26
Starting......................................................2-26
Engine Cooling When Trailer Towing..................4-44
Engine Oil Additives........................................5-16
Engine Speed Limiter......................................3-41
English Metric Display.....................................3-40
Entering Feature Programming..........................3-63
Entry Lighting.................................................3-23
Erasing HomeLink
®Buttons..............................2-48
Event Data Records (EDR)..............................7-10
Exiting Feature Programming............................3-74
Express-Down Window....................................2-17
Express-Up Window........................................2-17
Extender, Safety Belt.......................................1-21
Exterior Lamps...............................................3-16
Exterior Lighting Battery Saver..........................3-21
Exterior Lights at Unlock..................................3-68
5
Page 409 of 410
Transaxle (cont.)
Transaxle Operation, Automatic.........................2-28
Transmission, Transaxle, Transfer Case
Unit Repair Manual......................................7-12
Transportation Options...................................... 7-8
Trip Computer
Oil Life Indicator..........................................3-74
Trip Odometers..............................................3-39
Trunk............................................................2-13
Trunk Lid Tie Down.........................................2-14
Trunk Lock Release........................................2-13
Turn and Lane-Change Signals.......................... 3-9
Turn Signal/Multifunction Lever........................... 3-9
Turn Signals When Towing a Trailer..................4-42
Twilight Sentinel
®............................................3-20
U
Ultrasonic Rear Parking
Assist (URPA).............................................3-24
Umbrella Holder..............................................2-50
Underhood Fuse Block....................................5-97
Understanding Radio Reception.......................3-100
Uniform Tire Quality Grading............................5-74
United States – Customer Assistance.................. 7-4Used Replacement Wheels..............................5-76
Using Digital Signal Processing (DSP)...............3-86
Using HomeLink
®...........................................2-48
V
Valet Lockout Switch.......................................2-21
Vehicle
Control........................................................ 4-5
Damage Warnings........................................... iv
Loading......................................................4-31
Symbols......................................................... iv
Vehicle Data Collection and Event
Data Records..............................................7-10
Vehicle Identification
Number (VIN).............................................5-95
Service Parts Identification Label...................5-95
Vehicle Personalization
DIC ...........................................................3-63
Memory Seat, Mirrors and
Steering Wheel........................................2-52
Vehicle Speed Limiter......................................3-40
Vehicle Storage..............................................5-42
Ventilation Adjustment......................................3-33
Visors...........................................................2-19
15