buttons CADILLAC SRX 2006 1.G User Guide
[x] Cancel search | Manufacturer: CADILLAC, Model Year: 2006, Model line: SRX, Model: CADILLAC SRX 2006 1.GPages: 456, PDF Size: 2.55 MB
Page 127 of 456

Two personalized exit positions can also be
programmed. Use the following steps to program exit
positions:
1. Press memory seat button 1 or the button with
the unlock symbol on the remote keyless entry
transmitter with the number 1 on the back to recall
the driving position.
2. Adjust the driver’s seat to the desired exit position.
3. Press and hold the exit button located above
buttons 1 and 2 on the driver’s door armrest
for at least three seconds.
Two beeps will sound to con�rm that the exit
position has been saved.
4. Repeat the procedure for a second driver using
memory seat button 2 or the remote keyless
entry transmitter with the number 2 on the back.To recall the stored exit positions, press and release
the exit button. One beep will sound, and the seat
will move to the previously stored exit position for the
currently identi�ed driver. If an exit position has not been
stored for this driver, the seat will move all the way
back. The position of the outside mirrors is not stored or
recalled for the exit position.
The vehicle must be in PARK (P) to recall the exit
positions.
Three chimes will sound and the exit setting will not be
recalled if you press the exit button when the vehicle
is not in PARK (P).
If you would like your stored exit position to be recalled
when unlocking the vehicle with the remote keyless
entry transmitter or when the ignition is turned off and
the driver’s door is opened, seeDIC Vehicle
Personalization on page 3-67.
2-55
Page 196 of 456
Some vehicles have additional features that can be
programmed including the seat and outside rearview
mirror position.
If your vehicle has the ability to program additional
personalization features, the driver’s preferences are
recalled by pressing the unlock button on the remote
keyless entry transmitter, 1 or 2, or by pressing the
appropriate memory button, 1 or 2, located on the
driver’s door. Certain features can be programmed not
to recall until the key is placed in the ignition. To
change feature preferences, see “Entering the
Personalization Menu” following.
Entering the Personalization Menu
To enter the feature programming mode, use the
following procedure:
1. Turn the ignition to ON, but do not start the engine.
Make sure the vehicle is in PARK (P).
2. If your vehicle has memory settings, press the
appropriate memory button, 1 or 2, located on
the driver’s door armrest. The DIC display will show
either Driver 1 or 2 depending on which button
was selected.
3. Press the TUNE/SEL knob once to access the main
menu of the DIC.4. Turn the TUNE/SEL knob until SETUP is
highlighted.
5. Press the TUNE/SEL knob once to access the
SETUP menu.
6. Turn the TUNE/SEL knob until the feature you want
to change is highlighted, then press the TUNE/SEL
knob to turn the feature on or off. If the feature
is turned on, a check mark will appear next to the
feature name.
If none of the personalization items are turned on,
turn on the personalization menu by pressing
the TUNE/SEL knob. The list of features will then
appear, and you can repeat Step 6.Personalization Features
The following choices are available for programming:
Personalization Name
This feature allows you to type in a name that will
appear on the DIC display whenever the corresponding
remote keyless entry transmitter is used or one of
the buttons on the driver’s door armrest (1 or 2) is
pressed.
If a customized name is not programmed, the system
will show DRIVER 1 or DRIVER 2 to correspond with the
numbers on the back of the remote keyless entry
transmitters.
3-68
Page 231 of 456
The RSE system is capable of outputting audio to the
vehicle speakers by using the radio. The RSE
system may be selected as an audio source on the
radio if the RSE system power is on. Once the
RSE system is selected as an audio source on the
radio, adjust the speaker volume on the radio, if
necessary. If the RSE system power is not on, the RSE
system will not be an available source on the radio.
Refer to the radio information for the radio that
your vehicle has for more information.
Video Screen
The video screen is located in the �oor console. Lift up
the screen by the top or the sides into the full open
position. Adjust the screen’s position as desired. When
the video screen is not in use, close the screen.
The DVD player and display will continue to operate
when the screen is in the up or the down position. The
video screen contains the transmitters for the wireless
headphones and the remote control. If the screen
is in the closed position, the signals will not be available
for the operation of the headphones and the remote
control.
Notice:Avoid directly touching the video screen,
as damage may occur. See “Cleaning the Video
Screen” later in this section for more information.
DVD Player
The DVD player is located in the �oor console under the
display. Flip up the display to access the DVD player.
The DVD player can be controlled by the buttons on the
DVD player and by the buttons on the remote control.
See “Remote Control” later in this section for more
information.
The DVD player power may be turned on when the
ignition is in ON, ACCESSORY, or when Retained
Accessory Power (RAP) is active.
The RSE system DVD player is only compatible with
DVDs of the appropriate region code for the country
that the vehicle was sold in. The DVD region code
is printed on the jacket of most DVDs.
The DVD player will also play audio CDs. Not all home
recorded CDs, CD-R or CD-RW formats, will play in
this DVD player.
If an error message appears on the video screen, see
“DVD Messages” later in this section.
3-103
Page 232 of 456
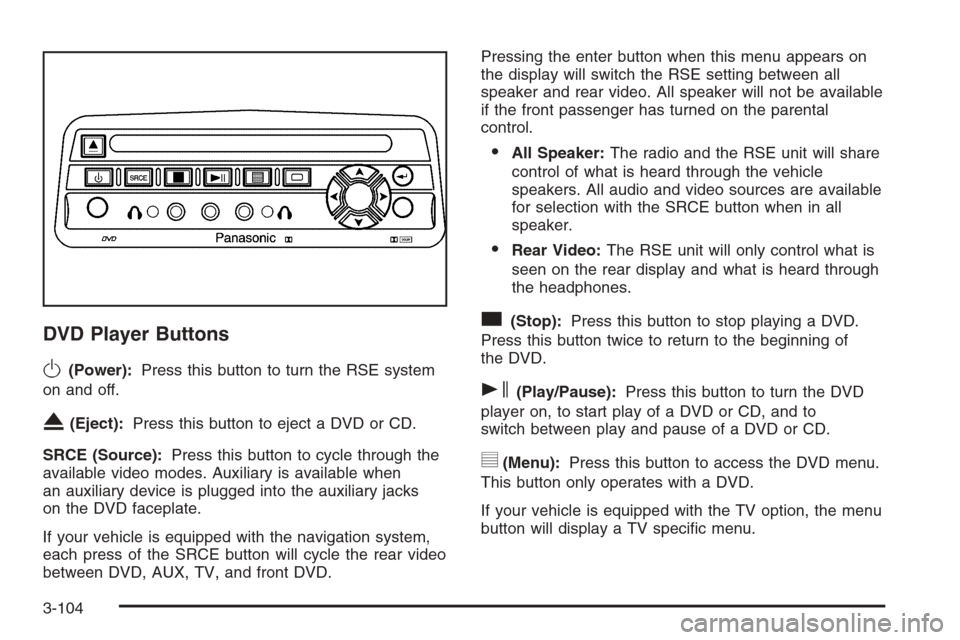
DVD Player Buttons
O(Power):Press this button to turn the RSE system
on and off.
X(Eject):Press this button to eject a DVD or CD.
SRCE (Source):Press this button to cycle through the
available video modes. Auxiliary is available when
an auxiliary device is plugged into the auxiliary jacks
on the DVD faceplate.
If your vehicle is equipped with the navigation system,
each press of the SRCE button will cycle the rear video
between DVD, AUX, TV, and front DVD.Pressing the enter button when this menu appears on
the display will switch the RSE setting between all
speaker and rear video. All speaker will not be available
if the front passenger has turned on the parental
control.
All Speaker:The radio and the RSE unit will share
control of what is heard through the vehicle
speakers. All audio and video sources are available
for selection with the SRCE button when in all
speaker.
Rear Video:The RSE unit will only control what is
seen on the rear display and what is heard through
the headphones.
c(Stop):Press this button to stop playing a DVD.
Press this button twice to return to the beginning of
the DVD.
s(Play/Pause):Press this button to turn the DVD
player on, to start play of a DVD or CD, and to
switch between play and pause of a DVD or CD.
y(Menu):Press this button to access the DVD menu.
This button only operates with a DVD.
If your vehicle is equipped with the TV option, the menu
button will display a TV speci�c menu.
3-104
Page 235 of 456
Remote Control
To use the remote control, aim it at the transmitter
window above the video screen and press the desired
button. Direct sunlight or very bright light may affect
the ability of the RSE system to receive signals from the
remote control. If the remote control does not seem to
be working, the batteries may need to be replaced. See
“Battery Replacement” later in this section.
Objects blocking the line of sight may also affect the
function of the remote control.
Notice:Storing the remote control in a hot area or
in direct sunlight may damage it, and the repairs
will not be covered by your warranty. Keep the
remote control stored in a cool, dry place.
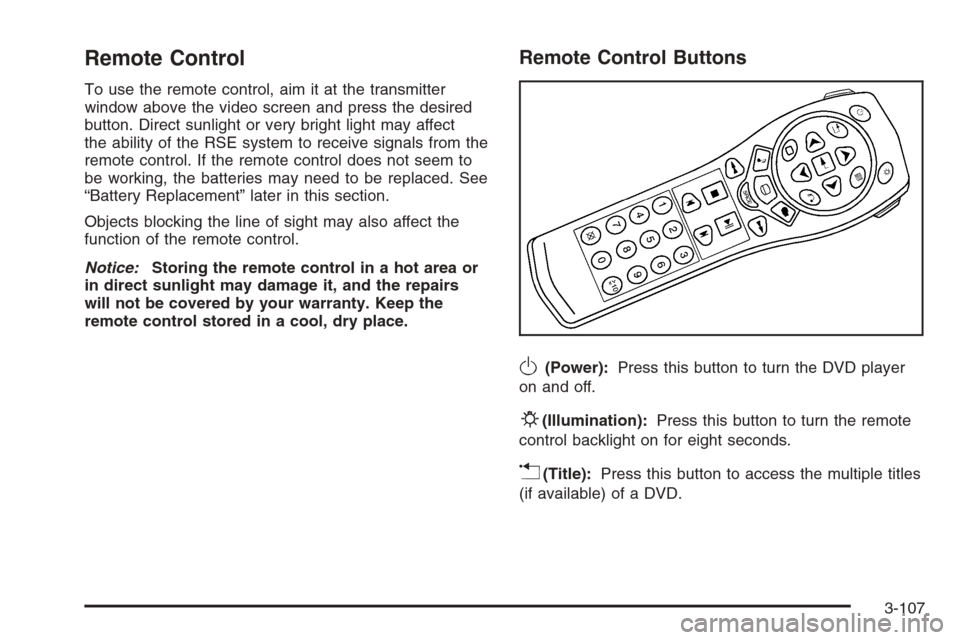
Remote Control Buttons
O(Power):Press this button to turn the DVD player
on and off.
P(Illumination):Press this button to turn the remote
control backlight on for eight seconds.
v(Title):Press this button to access the multiple titles
(if available) of a DVD.
3-107
Page 241 of 456
Cleaning the DVD Player
When cleaning the outside DVD faceplate and buttons,
use only a clean cloth dampened with clean water.
Cleaning the Video Screen
Pour some isopropyl or rubbing alcohol on a clean cloth
and gently wipe the video screen. Do not spray
directly onto the screen and do not press too hard or
too long on the video screen.
Theft-Deterrent Feature
THEFTLOCK®is designed to discourage theft of your
vehicle’s radio. The feature works automatically by
learning a portion of the Vehicle Identi�cation Number
(VIN). If the radio is moved to a different vehicle, it
will not operate. If the radio is removed from your
vehicle, the original VIN in the radio can be used to
trace the radio back to your vehicle.
With THEFTLOCK
®activated, the radio will not
operate if stolen.
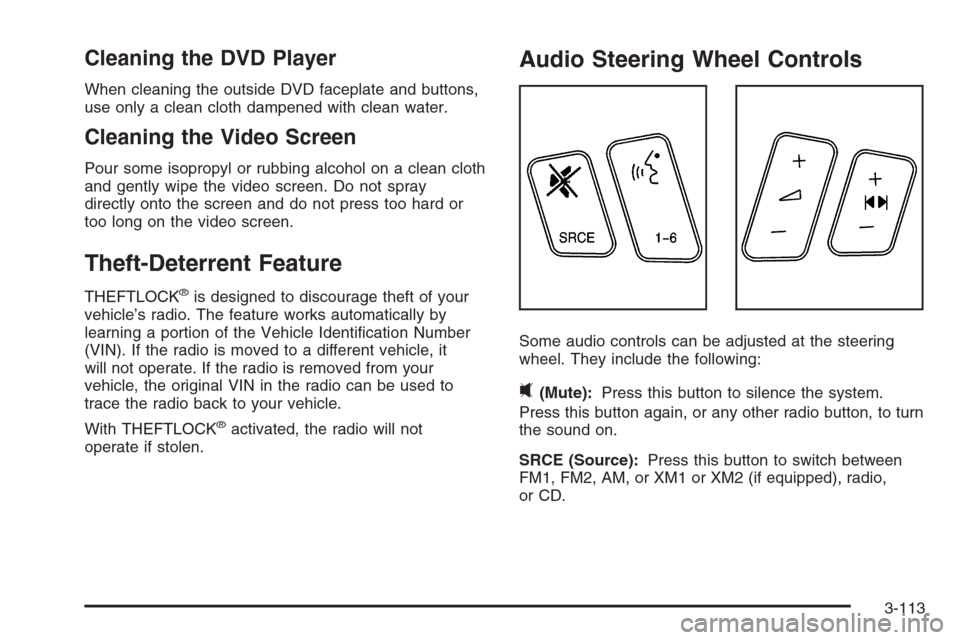
Audio Steering Wheel Controls
Some audio controls can be adjusted at the steering
wheel. They include the following:
0(Mute):Press this button to silence the system.
Press this button again, or any other radio button, to turn
the sound on.
SRCE (Source):Press this button to switch between
FM1, FM2, AM, or XM1 or XM2 (if equipped), radio,
or CD.
3-113
Page 242 of 456
g(Voice Recognition):If your vehicle has the
navigation system, press this button to initiate voice
recognition. See “Voice Recognition” in the Navigation
System manual for more information.
1-6 (Preset Stations):Press this button to play stations
that are programmed on the radio preset pushbuttons.
The radio will only seek preset stations with a strong
signal that are in the selected band.
When a CD is playing, press this button to go to the
next track.
When a CD is playing in the six-disc CD changer, press
this button to go to the next available CD, if multiple
CDs are loaded.
+
u— (Volume):Press this button to increase or to
decrease the volume.
+
tu— (Seek):Press either arrow to go to the
next or the previous radio station and stay there.
The radio will only seek stations with a strong signal
that are in the selected band.
When a CD is playing, press the minus sign to go to the
start of the current track, if more than 10 seconds
have played. Press the plus sign to go to the next track.
If either the minus or the plus button are pressed
more than once, the player will continue moving
backward or forward through the CD.Press and hold the SEEK plus or minus button, until
you hear a beep. The CD will fast forward or fast reverse
through the CD. Press either button again to play the
passage.
If you have the navigation system, some of the audio
steering wheel controls work when a DVD is playing in
the navigation radio. See the Navigation System
manual for more information.
Radio Reception
You may experience frequency interference and static
during normal radio reception if items such as cellphone
chargers, vehicle convenience accessories, and
external electronic devices are plugged into the
accessory power outlet. If there is interference or static,
unplug the item from the accessory power outlet.
AM
The range for most AM stations is greater than for FM,
especially at night. The longer range can cause
station frequencies to interfere with each other. For
better radio reception, most AM radio stations will boost
the power levels during the day, and then reduce
these levels during the night. Static can also occur when
things like storms and power lines interfere with radio
reception. When this happens, try reducing the treble on
your radio.
3-114
Page 366 of 456
Accordingly, when the low tire pressure telltale
illuminates, you should stop and check your tires as
soon as possible, and in�ate them to the proper
pressure. Driving on a signi�cantly under-in�ated tire
causes the tire to overheat and can lead to tire failure.
Under-in�ation also reduces fuel efficiency and tire
tread life, and may affect the vehicle’s handling
and stopping ability.
Please note that the TPMS is not a substitute for proper
tire maintenance, and it is the driver’s responsibility to
maintain correct tire pressure, even if under-in�ation has
not reached the level to trigger illumination of the
TPMS low tire pressure telltale.
The Tire and Loading Information Label shows the size
of your vehicle’s original tires and their recommended
cold in�ation pressures. SeeLoading Your Vehicle
on page 4-44, for the location of the tire and loading
information label. Also seeIn�ation - Tire Pressure
on page 5-59.
Your vehicle’s TPMS can warn you about a low tire
pressure condition but it does not replace normal
tire maintenance. SeeTire Inspection and Rotation on
page 5-64andTires on page 5-52.
Notice:Do not use a tire sealant if your vehicle has
Tire Pressure Monitors. The liquid sealant can
damage the tire pressure monitor sensors.TPM Sensor Identi�cation Codes
Each TPM sensor has a unique identi�cation code. Any
time you replace one or more of the TPM sensors,
the identi�cation codes will need to be matched to the
new tire/wheel position. Each tire/wheel position is
matched to a sensor, by increasing or decreasing the
tire’s air pressure. The sensors are matched to the
tire/wheel positions in the following order: left front (LF),
right front (RF), right rear (RR), and left rear (LR).
You will have one minute to match the �rst tire/wheel
position, and �ve minutes overall, to match all
four tire/wheel positions. If it takes longer than
one minute, to match the �rst tire and wheel, or more
than �ve minutes to match all four tire and wheel
positions the matching process stops and you will need
to start over.
The TPM matching process is outlined below:
1. Set the parking brake.
2. Turn the ignition switch to ON with the engine off.
3. Using the Remote Keyless Entry (RKE) transmitter,
lock and unlock the vehicle’s doors.
4. Press the lock and unlock buttons, at the same
time, on the RKE transmitter. A single horn chirp
will sound, indicating that the TPM system is ready,
and the sensor matching process can begin.
5. Start with the driver’s side front tire.
5-62
Page 389 of 456
Appearance Care
Cleaning the Inside of Your Vehicle
Your vehicle’s interior will continue to look its best if
it is cleaned often. Although not always visible, dust
and dirt can accumulate on your upholstery. Dirt
can damage carpet, fabric, leather, and plastic surfaces.
Regular vacuuming is recommended to remove
particles from your upholstery. It is important to keep
your upholstery from becoming and remaining heavily
soiled. Soils should be removed as quickly as possible.
Your vehicle’s interior may experience extremes of
heat that could cause stains to set rapidly.
Lighter colored interiors may require more frequent
cleaning. Use care because newspapers and garments
that transfer color to your home furnishings may also
transfer color to your vehicle’s interior.
When cleaning your vehicle’s interior, only use cleaners
speci�cally designed for the surfaces being cleaned.
Permanent damage may result from using cleaners on
surfaces for which they were not intended. Use glass
cleaner only on glass. Remove any accidental over-spray
from other surfaces immediately. To prevent over-spray,
apply cleaner directly to the cleaning cloth.Notice:If you use abrasive cleaners when cleaning
glass surfaces on your vehicle, you could scratch
the glass and/or cause damage to the integrated
radio antenna and the rear window defogger. When
cleaning the glass on your vehicle, use only a
soft cloth and glass cleaner.
Many cleaners contain solvents that may become
concentrated in your vehicle’s breathing space. Before
using cleaners, read and adhere to all safety
instructions on the label. While cleaning your vehicle’s
interior, maintain adequate ventilation by opening
your vehicle’s doors and windows.
Dust may be removed from small buttons and knobs
using a small brush with soft bristles.
Your GM dealer has a product for cleaning your
vehicle’s glass. Should it become necessary, you can
also obtain a product from your GM dealer to remove
odors from your vehicle’s upholstery.
5-85