reset CADILLAC SRX 2008 1.G Owner's Manual
[x] Cancel search | Manufacturer: CADILLAC, Model Year: 2008, Model line: SRX, Model: CADILLAC SRX 2008 1.GPages: 448, PDF Size: 5.61 MB
Page 206 of 448
EXIT LIGHTING
This feature allows you to select the amount of time you
want the exterior lamps to remain on when it is dark
enough outside. This happens after the key is turned
from ON/RUN to LOCK/OFF.
Press the customization button until EXIT LIGHTING
appears on the DIC display. Press the set/reset button
to access the settings for this feature. Then press the
menu up/down button to scroll through the following
settings:
OFF:The exterior lamps will not turn on.
30 SECONDS (default):The exterior lamps will stay on
for 30 seconds.
1 MINUTE:The exterior lamps will stay on for
one minute.
2 MINUTES:The exterior lamps will stay on for
two minutes.
NO CHANGE:No change will be made to this feature.
The current setting will remain.
To select a setting, press the set/reset button while the
desired setting is displayed on the DIC.
APPROACH LIGHTING
This feature allows you to select whether or not to have
the exterior lights turn on brie�y during low light periods
after unlocking the vehicle using the Remote Keyless
Entry (RKE) transmitter.
Press the customization button until APPROACH
LIGHTING appears on the DIC display. Press the
set/reset button to access the settings for this feature.
Then press the menu up/down button to scroll through
the following settings:
OFF:The exterior lights will not turn on when you
unlock the vehicle with the RKE transmitter.
ON (default):If it is dark enough outside, the exterior
lights will turn on brie�y when you unlock the vehicle
with the RKE transmitter.
The lights will remain on for 20 seconds or until the lock
button on the RKE transmitter is pressed, or the vehicle is
no longer off. SeeRemote Keyless Entry (RKE) System
Operation on page 2-5for more information.
NO CHANGE:No change will be made to this feature.
The current setting will remain.
To select a setting, press the set/reset button while the
desired setting is displayed on the DIC.
3-66
Page 207 of 448
CHIME VOLUME
This feature allows you to select the volume level of the
chime.
Press the customization button until CHIME VOLUME
appears on the DIC display. Press the set/reset button
to access the settings for this feature. Then press the
menu up/down button to scroll through the following
settings:
NORMAL:The chime volume will be set to a normal
level.
LOUD:The chime volume will be set to a loud level.
NO CHANGE:No change will be made to this feature.
The current setting will remain.
There is no default for chime volume. The volume will
stay at the last known setting.
To select a setting, press the set/reset button while the
desired setting is displayed on the DIC.
PARK TILT MIRRORS
If your vehicle has this feature, it allows you to select
whether or not the outside mirror(s) will automatically tilt
down when the vehicle is shifted into REVERSE (R).
SeePark Tilt Mirrors on page 2-44for more information.
Press the customization button until PARK TILT
MIRRORS appears on the DIC display. Press the
set/reset button to access the settings for this feature.
Then press the menu up/down button to scroll through
the following settings:
OFF (default):Neither outside mirror will be tilted down
when the vehicle is shifted into REVERSE (R).
DRIVER MIRROR:The driver’s outside mirror
will be tilted down when the vehicle is shifted into
REVERSE (R).
PASSENGER MIRROR:The passenger’s outside
mirror will be tilted down when the vehicle is shifted into
REVERSE (R).
BOTH MIRRORS:The driver’s and passenger’s outside
mirrors will be tilted down when the vehicle is shifted
into REVERSE (R).
NO CHANGE:No change will be made to this feature.
The current setting will remain.
To select a setting, press the set/reset button while the
desired setting is displayed on the DIC.
3-67
Page 208 of 448
EASY EXIT SEAT
If the vehicle has this feature, it allows you to select
your preference for the automatic easy exit seat feature.
SeeMemory Seat and Mirrors on page 1-5for more
information.
Press the customization button until EASY EXIT SEAT
appears in the display. Press the set/reset button to
access the settings for this feature. Then press the menu
up/down button to scroll through the following settings:
OFF (default):No automatic seat exit recall will occur.
ON:The driver’s seat will move back when the key
is removed from the ignition.
The automatic easy exit seat movement will only occur
one time after the key is removed from the ignition.
If the automatic movement has already occurred, and
you put the key back in the ignition and remove it again,
the seat will stay in the original exit position, unless a
memory recall took place prior to removing the key
again.
NO CHANGE:No change will be made to this feature.
The current setting will remain.
To select a setting, press the set/reset button while the
desired setting is displayed on the DIC.
MEMORY SEAT RECALL
If the vehicle has this feature, it allows you to select
your preference for the remote memory seat recall
feature. SeeMemory Seat and Mirrors on page 1-5for
more information.
Press the customization button until MEMORY SEAT
RECALL appears in the display. Press the set/reset
button to access the settings for this feature. Then press
the menu up/down button to scroll through the following
settings:
OFF (default):No remote memory seat recall will
occur.
ON:The driver’s seat and outside mirrors will
automatically move to the stored driving position when
the unlock button on the Remote Keyless Entry (RKE)
transmitter is pressed. If your vehicle has the adjustable
throttle and brake pedal feature, the pedals will also
automatically move. See “RELEARN REMOTE KEY”
underDIC Operation and Displays on page 3-48for
more information on matching transmitters to driver ID
numbers.
NO CHANGE:No change will be made to this feature.
The current setting will remain.
To select a setting, press the set/reset button while the
desired setting is displayed on the DIC.
3-68
Page 209 of 448
REMOTE START
If the vehicle has this feature, it allows you to turn
the remote start feature off or on. The remote start
feature allows you to start the engine from outside of
the vehicle using the Remote Keyless Entry (RKE)
transmitter. SeeRemote Vehicle Start on page 2-7for
more information.
Press the customization button until REMOTE START
appears on the DIC display. Press the set/reset button
to access the settings for this feature. Then press
the menu up/down button to scroll through the following
settings:
OFF:The remote start feature will be disabled.
ON (default):The remote start feature will be enabled.
NO CHANGE:No change will be made to this
feature. The current setting will remain.
To select a setting, press the set/reset button while the
desired setting is displayed on the DIC.
FACTORY SETTINGS
This feature allows you to set all of the customization
features back to their factory default settings.
Press the customization button until FACTORY
SETTINGS appears on the DIC display. Press the
set/reset button to access the settings for this feature.
Then press the menu up/down button to scroll through
the following settings:
RESTORE ALL (default):The customization features
will be set to their factory default settings.
DO NOT RESTORE:The customization features will
not be set to their factory default settings.
To select a setting, press the set/reset button while the
desired setting is displayed on the DIC.
3-69
Page 211 of 448
While your vehicle is parked:
Familiarize yourself with all of its controls.
Familiarize yourself with its operation.
Set up your audio system by presetting your
favorite radio stations, setting the tone, and
adjusting the speakers. Then, when driving
conditions permit, you can tune to your favorite
radio stations using the presets and steering
wheel controls if the vehicle has them.
Notice:Before adding any sound equipment to
your vehicle, such as an audio system, CD player,
CB radio, mobile telephone, or two-way radio, make
sure that it can be added by checking with your
dealer/retailer. Also, check federal rules covering
mobile radio and telephone units. If sound equipment
can be added, it is very important to do it properly.
Added sound equipment may interfere with the
operation of your vehicle’s engine, radio, or other
systems, and even damage them. Your vehicle’s
systems may interfere with the operation of sound
equipment that has been added.
Your vehicle has a feature called Retained Accessory
Power (RAP). With RAP, the audio system can be played
even after the ignition is turned off. SeeRetained
Accessory Power (RAP) on page 2-26for more
information.
Setting the Time
Radio with a Single CD or a Six-Disc
CD Player
Your vehicle equipped with a Bose®sound system, has
an analog clock as well as the digital radio clock. At
the time of new vehicle delivery, the digital radio clock
display should be disabled. If you decide to use the
digital radio clock as well as the analog clock, you can
change the setting to enable the radio clock display.
Enabling/Disabling the Digital Radio
Clock
For the Single CD Player
Turn the radio clock display on or off by following these
steps:
1. Turn the radio on.
2. Press the
H(clock) button until the clock and date
setting menus appear.
3. Press the pushbutton located under the forward
arrow label until the menu for default clock and
date settings appear.
3-71
Page 216 of 448
Finding a Station
BAND:Press to switch between AM, FM, or XM™
(if equipped). The display shows the selection.
a(Tune):Turn to select radio stations.
©SEEK¨:Press the arrows to go to the previous
or to the next station and stay there.
To scan stations, press and hold either arrow for
three seconds until a beep sounds. The radio goes
to a station, plays for a few seconds, then goes to the
next station. Press either arrow again to stop scanning.
The radio only seeks and scan stations with a strong
signal that are in the selected band.
4(Information) (XM™ Satellite Radio Service,
MP3/WMA, and RDS Features):Press to display
additional text information related to the current FM-RDS
or XM™ station (if equipped), or MP3/WMA song.
A choice of additional information such as: Channel,
Song, Artist, CAT (category) can appear. Continue
pressing this button to highlight the desired label,
or press the pushbutton positioned under any one of
the labels and the information about that label displays.
When information is not available, No Info displays.
Storing a Radio Station as a Favorite
Drivers are encouraged to set up their radio station
favorites while the vehicle is stopped. Tune to your
favorite stations using the presets, favorites button,
and steering wheel controls, if your vehicle has
this feature. SeeDefensive Driving on page 4-2.
FAV (Favorites):A maximum of 36 stations can be
programmed as favorites using the six pushbuttons
positioned below the radio station frequency labels and
by using the radio favorites page button (FAV button).
Press the FAV button to go through up to six pages of
favorites, each having six favorite stations available
per page. Each page of favorites can contain any
combination of AM, FM, or XM™ (if equipped) stations.
To store a station as a favorite, perform the following
steps:
1. Tune to the desired radio station.
2. Press the FAV button to display the page where
you want the station stored.
3. Press and hold one of the six pushbuttons until a
beep sounds. When that pushbutton is pressed
and released, the station that was set, returns.
4. Repeat the steps for each pushbutton radio station
you want stored as a favorite.
3-76
Page 229 of 448
XM Radio Messages
XL (Explicit Language Channels):These channels,
or any others, can be blocked at a customer’s request,
by calling 1-800-852-XMXM (9696).
XM Updating:The encryption code in the receiver is
being updated, and no action is required. This process
should take no longer than 30 seconds.
No XM Signal:The system is functioning correctly, but
the vehicle is in a location that is blocking the XM™
signal. When you move into an open area, the signal
should return.
Loading XM:The audio system is acquiring and
processing audio and text data. No action is needed.
This message should disappear shortly.
Channel Off Air:This channel is not currently in
service. Tune to another channel.
Channel Unavail:This previously assigned channel
is no longer assigned. Tune to another station. If
this station was one of the presets, choose another
station for that preset button.
No Artist Info:No artist information is available at this
time on this channel. The system is working properly.No Title Info:No song title information is available
at this time on this channel. The system is working
properly.
No CAT Info:No category information is available
at this time on this channel. The system is working
properly.
No Information:No text or informational messages are
available at this time on this channel. The system is
working properly.
CAT Not Found:There are no channels available for
the selected category. The system is working properly.
XM TheftLocked:The XM™ receiver in the vehicle
could have previously been in another vehicle. For
security purposes, XM™ receivers cannot be swapped
between vehicles. If this message appears after having
your vehicle serviced, check with your dealer/retailer.
XM Radio ID:If tuned to channel 0, this message
can alternate with the XM™ Radio eight digit radio ID
label. This label is needed to activate the service.
Unknown:If this message is received when tuned to
channel 0, there could be a receiver fault. Consult
with your dealer/retailer.
3-89
Page 231 of 448
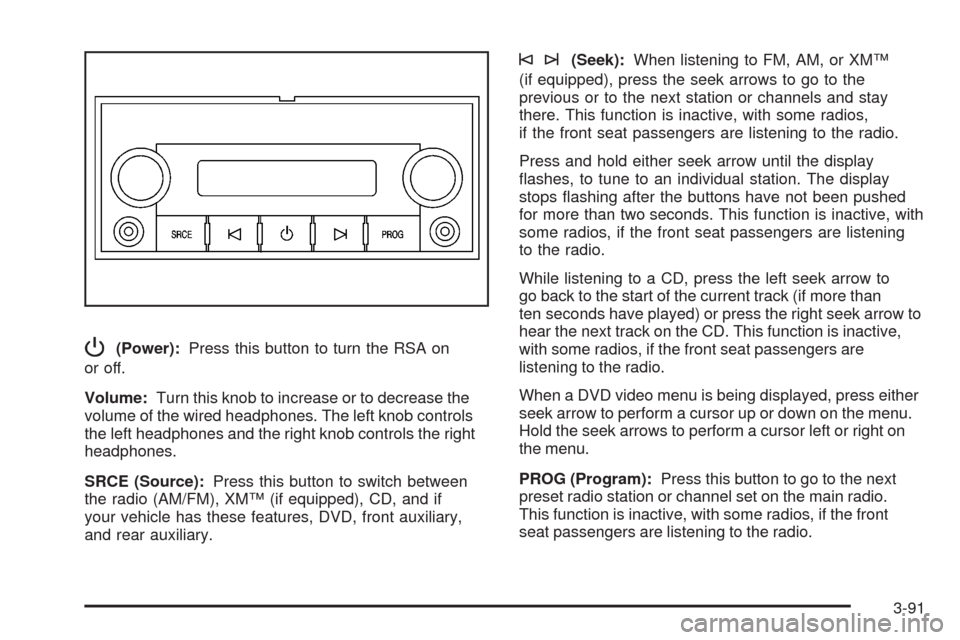
P(Power):Press this button to turn the RSA on
or off.
Volume:Turn this knob to increase or to decrease the
volume of the wired headphones. The left knob controls
the left headphones and the right knob controls the right
headphones.
SRCE (Source):Press this button to switch between
the radio (AM/FM), XM™ (if equipped), CD, and if
your vehicle has these features, DVD, front auxiliary,
and rear auxiliary.
©¨(Seek):When listening to FM, AM, or XM™
(if equipped), press the seek arrows to go to the
previous or to the next station or channels and stay
there. This function is inactive, with some radios,
if the front seat passengers are listening to the radio.
Press and hold either seek arrow until the display
�ashes, to tune to an individual station. The display
stops �ashing after the buttons have not been pushed
for more than two seconds. This function is inactive, with
some radios, if the front seat passengers are listening
to the radio.
While listening to a CD, press the left seek arrow to
go back to the start of the current track (if more than
ten seconds have played) or press the right seek arrow to
hear the next track on the CD. This function is inactive,
with some radios, if the front seat passengers are
listening to the radio.
When a DVD video menu is being displayed, press either
seek arrow to perform a cursor up or down on the menu.
Hold the seek arrows to perform a cursor left or right on
the menu.
PROG (Program):Press this button to go to the next
preset radio station or channel set on the main radio.
This function is inactive, with some radios, if the front
seat passengers are listening to the radio.
3-91
Page 303 of 448
Substitute Engine Oil: When adding oil to maintain
engine oil level, oil meeting GM Standard GM4718M
might not be available. You can add substitute oil
designated SAE 5W-30 with the starburst symbol at all
temperatures. Substitute oil not meeting GM Standard
GM4718M should not be used for an oil change.
Engine Oil Additives
Do not add anything to the oil. The recommended oils
with the starburst symbol that meet GM standards are all
you need for good performance and engine protection.
Engine Oil Life System
When to Change Engine Oil
Your vehicle has a computer system that lets you know
when to change the engine oil and �lter. This is
based on engine revolutions and engine temperature,
and not on mileage. Based on driving conditions,
the mileage at which an oil change will be indicated
can vary considerably. For the oil life system to
work properly, you must reset the system every time
the oil is changed.When the system has calculated that oil life has been
diminished, it will indicate that an oil change is
necessary. A CHANGE ENGINE OIL SOON message
will come on. SeeDIC Warnings and Messages on
page 3-53. Change the oil as soon as possible within the
next 600 miles (1 000 km). It is possible that, if you
are driving under the best conditions, the oil life system
might not indicate that an oil change is necessary for
over a year. However, the engine oil and �lter must be
changed at least once a year and at this time the
system must be reset. Your dealer/retailer has trained
service people who will perform this work using genuine
parts and reset the system. It is also important to
check the oil regularly and keep it at the proper level.
If the system is ever reset accidentally, you must change
the oil at 3,000 miles (5 000 km) since your last oil
change. Remember to reset the oil life system whenever
the oil is changed.
5-19
Page 304 of 448
How to Reset the Engine Oil Life
System
The Engine Oil Life System calculates when to
change the engine oil and �lter based on vehicle use.
Whenever the oil is changed, reset the system so it
can calculate when the next oil change is required.
If a situation occurs where you change the oil prior to
a CHANGE ENGINE OIL SOON message being turned
on, reset the system.
Always reset the engine oil life to 100% after every oil
change. It will not reset itself. To reset the Engine
Oil Life System:
1. Display the OIL LIFE REMAINING on the DIC.
2. Press and hold the SET/RESET button on the
DIC for more than �ve seconds. The oil life will
change to 100%.
If the CHANGE ENGINE OIL SOON message comes
back on when you start your vehicle, the Engine Oil Life
System has not reset. Repeat the procedure.
What to Do with Used Oil
Used engine oil contains certain elements that can be
unhealthy for your skin and could even cause cancer.
Do not let used oil stay on your skin for very long. Clean
your skin and nails with soap and water, or a good
hand cleaner. Wash or properly dispose of clothing or
rags containing used engine oil. See the manufacturer’s
warnings about the use and disposal of oil products.
Used oil can be a threat to the environment. If you
change your own oil, be sure to drain all the oil from
the �lter before disposal. Never dispose of oil by putting
it in the trash, pouring it on the ground, into sewers,
or into streams or bodies of water. Instead, recycle it by
taking it to a place that collects used oil. If you have
a problem properly disposing of used oil, ask your
dealer/retailer, a service station, or a local recycling
center for help.
5-20