tow CADILLAC SRX 2009 1.G Workshop Manual
[x] Cancel search | Manufacturer: CADILLAC, Model Year: 2009, Model line: SRX, Model: CADILLAC SRX 2009 1.GPages: 442, PDF Size: 2.42 MB
Page 319 of 442
4. Open the hoods and locate the positive (+) and
negative (−) terminal locations or the remote
positive (+) and remote negative (−) terminals of the
other vehicle. Then locate the remote positive (+)
location on your vehicle. SeeEngine Compartment
Overview on page 5-12for more information on
locations the terminals.
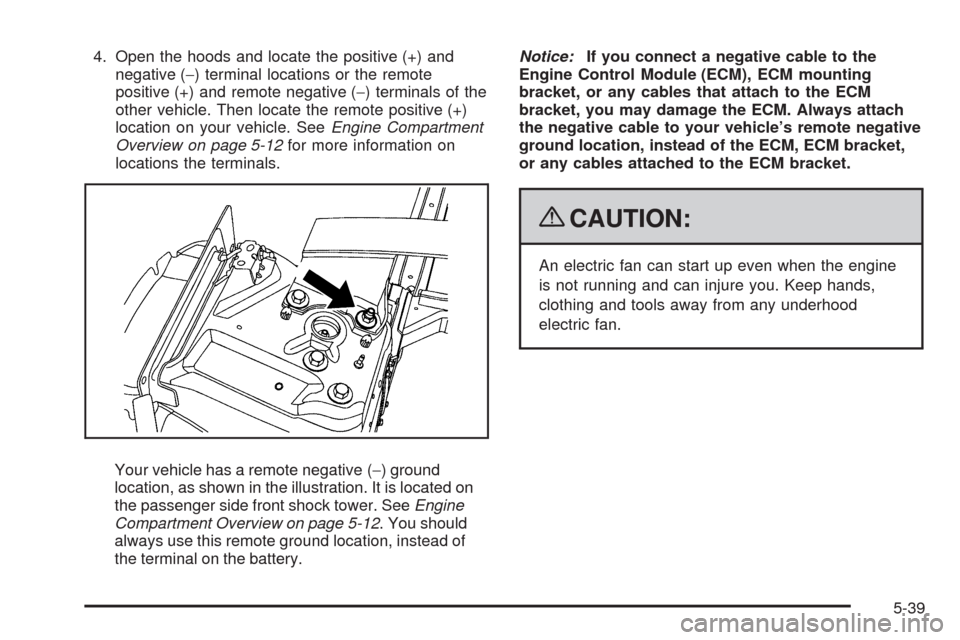
Your vehicle has a remote negative (−) ground
location, as shown in the illustration. It is located on
the passenger side front shock tower. SeeEngine
Compartment Overview on page 5-12. You should
always use this remote ground location, instead of
the terminal on the battery.Notice:If you connect a negative cable to the
Engine Control Module (ECM), ECM mounting
bracket, or any cables that attach to the ECM
bracket, you may damage the ECM. Always attach
the negative cable to your vehicle’s remote negative
ground location, instead of the ECM, ECM bracket,
or any cables attached to the ECM bracket.
{CAUTION:
An electric fan can start up even when the engine
is not running and can injure you. Keep hands,
clothing and tools away from any underhood
electric fan.
5-39
Page 345 of 442
Reset the Tire Pressure Monitor System. SeeTire
Pressure Monitor Operation on page 5-60.
Make certain that all wheel nuts are properly
tightened. See “Wheel Nut Torque” under
Capacities and Specifications on page 5-109.
{CAUTION:
Rust or dirt on a wheel, or on the parts to
which it is fastened, can make wheel nuts
become loose after time. The wheel could
come off and cause an accident. When you
change a wheel, remove any rust or dirt from
places where the wheel attaches to the
vehicle. In an emergency, you can use a
cloth or a paper towel to do this; but be
sure to use a scraper or wire brush later,
if needed, to get all the rust or dirt off.
SeeChanging a Flat Tire on page 5-74.
When It Is Time for New Tires
Various factors, such as maintenance, temperatures,
driving speeds, vehicle loading, and road conditions,
in�uence when you need new tires.
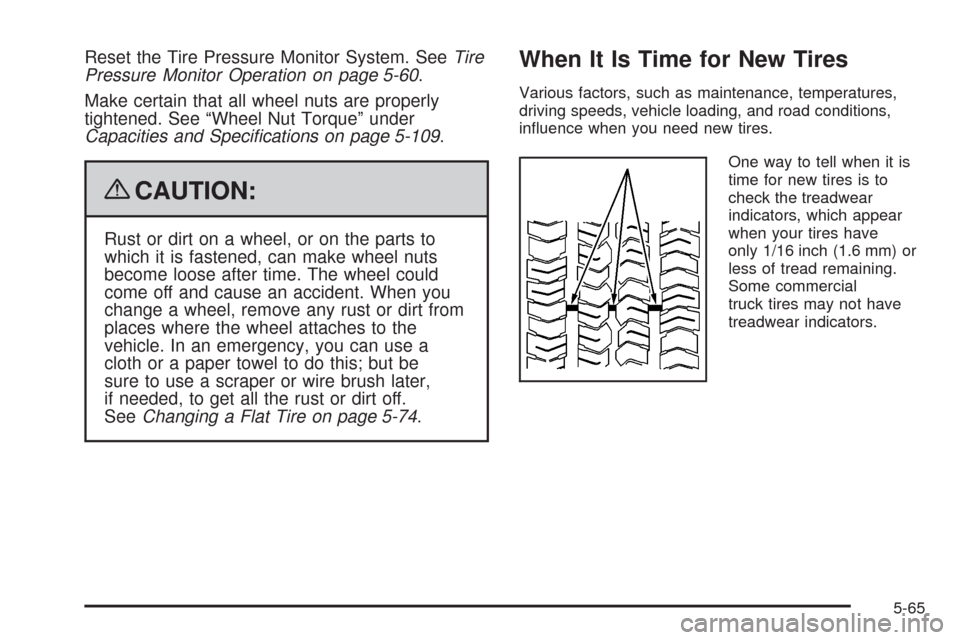
One way to tell when it is
time for new tires is to
check the treadwear
indicators, which appear
when your tires have
only 1/16 inch (1.6 mm) or
less of tread remaining.
Some commercial
truck tires may not have
treadwear indicators.
5-65
Page 353 of 442
If a Tire Goes Flat
It is unusual for a tire to blowout while you are driving,
especially if you maintain your vehicle’s tires properly.
If air goes out of a tire, it is much more likely to leak out
slowly. But if you should ever have a blowout, here
are a few tips about what to expect and what to do:
If a front tire fails, the �at tire creates a drag that pulls
the vehicle toward that side. Take your foot off the
accelerator pedal and grip the steering wheel �rmly.
Steer to maintain lane position, and then gently brake to
a stop well out of the traffic lane.
A rear blowout, particularly on a curve, acts much like a
skid and may require the same correction you would
use in a skid. In any rear blowout remove your foot from
the accelerator pedal. Get the vehicle under control
by steering the way you want the vehicle to go. It may
be very bumpy and noisy, but you can still steer. Gently
brake to a stop, well off the road if possible.{CAUTION:
Lifting a vehicle and getting under it to do
maintenance or repairs is dangerous without the
appropriate safety equipment and training. If a jack
is provided with the vehicle, it is designed only for
changing a �at tire. If it is used for anything else,
you or others could be badly injured or killed if the
vehicle slips off the jack. If a jack is provided with
the vehicle, only use it for changing a �at tire.
If a tire goes �at, the next part shows how to use the
jacking equipment to change a �at tire safely.
5-73
Page 361 of 442
{CAUTION:
Rust or dirt on a wheel, or on the parts to which it
is fastened, can make wheel nuts become loose
after time. The wheel could come off and cause
an accident. When changing a wheel, remove any
rust or dirt from places where the wheel attaches
to the vehicle. In an emergency, use a cloth or
a paper towel to do this; but be sure to use a
scraper or wire brush later, if needed, to get all
the rust or dirt off. SeeChanging a Flat Tire on
page 5-74.
{CAUTION:
Never use oil or grease on bolts or nuts because
the nuts might come loose. The vehicle’s wheel
could fall off, causing a crash.
11. Install the spare tire.
12. Put the wheel nuts back on with the rounded end of
the nuts toward the wheel.
13. Tighten each nut by hand until the wheel is held
against the hub.
14. Lower the vehicle by attaching the wheel wrench to
the jack and turning the wrench counterclockwise.
Lower the jack completely.
5-81
Page 362 of 442
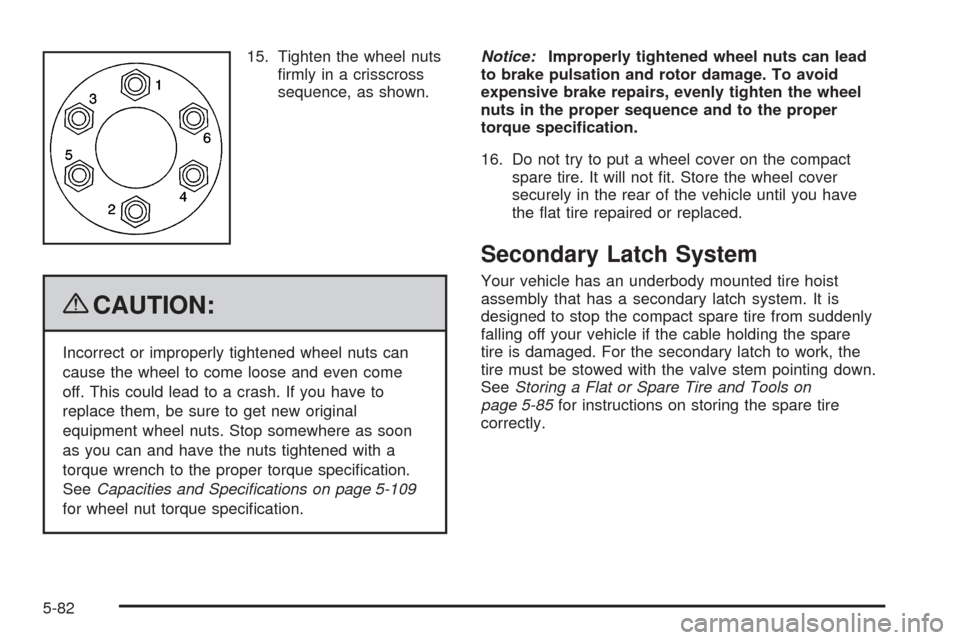
15. Tighten the wheel nuts
�rmly in a crisscross
sequence, as shown.
{CAUTION:
Incorrect or improperly tightened wheel nuts can
cause the wheel to come loose and even come
off. This could lead to a crash. If you have to
replace them, be sure to get new original
equipment wheel nuts. Stop somewhere as soon
as you can and have the nuts tightened with a
torque wrench to the proper torque speci�cation.
SeeCapacities and Specifications on page 5-109
for wheel nut torque speci�cation.Notice:Improperly tightened wheel nuts can lead
to brake pulsation and rotor damage. To avoid
expensive brake repairs, evenly tighten the wheel
nuts in the proper sequence and to the proper
torque speci�cation.
16. Do not try to put a wheel cover on the compact
spare tire. It will not �t. Store the wheel cover
securely in the rear of the vehicle until you have
the �at tire repaired or replaced.
Secondary Latch System
Your vehicle has an underbody mounted tire hoist
assembly that has a secondary latch system. It is
designed to stop the compact spare tire from suddenly
falling off your vehicle if the cable holding the spare
tire is damaged. For the secondary latch to work, the
tire must be stowed with the valve stem pointing down.
SeeStoring a Flat or Spare Tire and Tools on
page 5-85for instructions on storing the spare tire
correctly.
5-82
Page 367 of 442
Storing the Spare Tire and Tools
{CAUTION:
The underbody-mounted spare tire needs to be
stored with the valve stem pointing down. If the
spare tire is stored with the valve stem pointing
upwards, the secondary latch will not work properly
and the spare tire could loosen and suddenly fall
from the vehicle. If this happened when the vehicle
was being driven, the tire might contact a person or
another vehicle, causing injury and damage to itself.
Be sure the underbody-mounted spare tire is stored
with the valve stem pointing down.
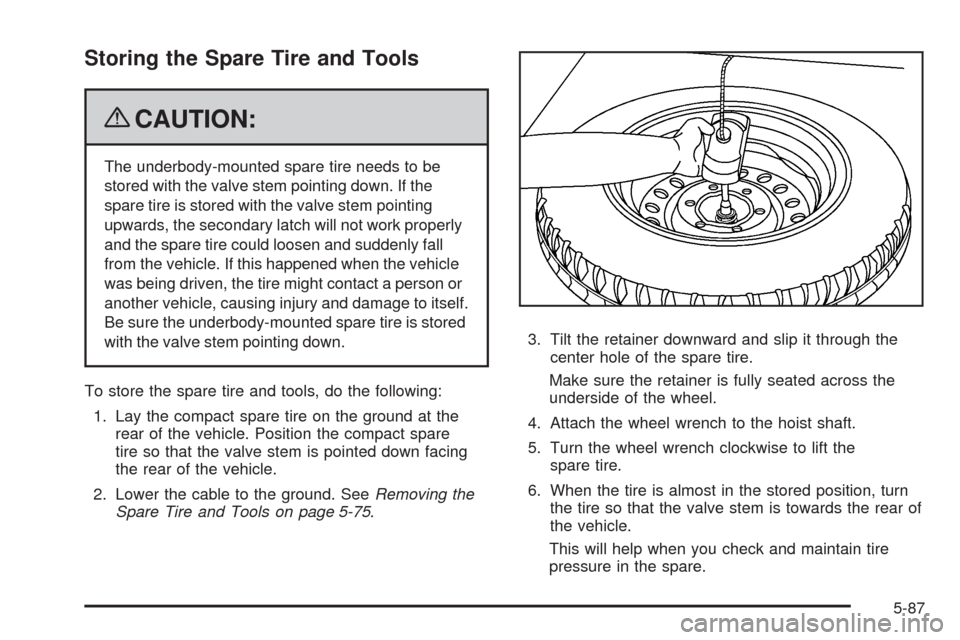
To store the spare tire and tools, do the following:
1. Lay the compact spare tire on the ground at the
rear of the vehicle. Position the compact spare
tire so that the valve stem is pointed down facing
the rear of the vehicle.
2. Lower the cable to the ground. SeeRemoving the
Spare Tire and Tools on page 5-75.3. Tilt the retainer downward and slip it through the
center hole of the spare tire.
Make sure the retainer is fully seated across the
underside of the wheel.
4. Attach the wheel wrench to the hoist shaft.
5. Turn the wheel wrench clockwise to lift the
spare tire.
6. When the tire is almost in the stored position, turn
the tire so that the valve stem is towards the rear of
the vehicle.
This will help when you check and maintain tire
pressure in the spare.
5-87
Page 370 of 442
Do not clean the vehicle using:
A knife or any other sharp object to remove a soil
from any interior surface.
A stiff brush. It can cause damage to the vehicle’s
interior surfaces.
Heavy pressure or aggressive rubbing with a
cleaning cloth. Use of heavy pressure can damage
the interior and does not improve the effectiveness
of soil removal.
Laundry detergents or dishwashing soaps with
degreasers can leave residue that streaks and
attracts dirt. For liquid cleaners, about 20 drops
per gallon (3.78 L) of water is a good guide.
Use only mild, neutral-pH soaps.
Too much cleaner that saturates the upholstery.
Organic solvents such as naptha, alcohol, etc. that
can damage the vehicle’s interior.
Fabric/Carpet
Use a vacuum cleaner with a soft brush attachment
frequently to remove dust and loose dirt. A canister
vacuum with a beater bar in the nozzle may only be used
on �oor carpet and carpeted �oor mats. For any soil,
always try to remove it �rst with plain water or club soda.
Before cleaning, gently remove as much of the soil as
possible using one of the following techniques:
For liquids: gently blot the remaining soil with a paper
towel. Allow the soil to absorb into the paper towel
until no more can be removed.
For solid dry soils: remove as much as possible and
then vacuum.
To clean:
1. Saturate a lint-free, clean white cloth with water or
club soda.
2. Wring the cloth to remove excess moisture.
3. Start on the outside edge of the soil and gently rub
toward the center. Continue cleaning, using a clean
area of the cloth each time it becomes soiled.
5-90
Page 371 of 442
4. Continue to gently rub the soiled area until the
cleaning cloth remains clean.
5. If the soil is not completely removed, use a mild
soap solution and repeat the cleaning process
that was used with plain water.
If any of the soil remains, a commercial fabric cleaner
or spot lifter may be necessary. When a commercial
upholstery cleaner or spot lifter is to be used, test
a small hidden area for colorfastness �rst. If the
locally cleaned area gives any impression that a
ring formation may result, clean the entire surface.
After the cleaning process has been completed, a paper
towel can be used to blot excess moisture from the
fabric or carpet.Leather
A soft cloth dampened with water can be used to
remove dust. If a more thorough cleaning is necessary,
a soft cloth dampened with a mild soap solution can be
used. Allow the leather to dry naturally. Do not use heat
to dry. Never use steam to clean leather. Never use spot
lifters or spot removers on leather. Many commercial
leather cleaners and coatings that are sold to preserve
and protect leather may permanently change the
appearance and feel of the leather and are not
recommended. Do not use silicone or wax-based
products, or those containing organic solvents to
clean the vehicle’s interior because they can alter the
appearance by increasing the gloss in a non-uniform
manner. Never use shoe polish on leather.
5-91
Page 373 of 442
Weatherstrips
Silicone grease on weatherstrips will make them last
longer, seal better, and not stick or squeak. Apply
silicone grease with a clean cloth. During very cold,
damp weather frequent application may be required.
SeeRecommended Fluids and Lubricants on page 6-13.
Washing Your Vehicle
The best way to preserve the vehicle’s �nish is to keep
it clean by washing it often.
Notice:Certain cleaners contain chemicals that can
damage the emblems or nameplates on the vehicle.
Check the cleaning product label. If it states that
it should not be used on plastic parts, do not use it
on the vehicle or damage may occur and it would
not be covered by the warranty.
Do not wash the vehicle in direct sunlight. Use a car
washing soap. Do not use cleaning agents that
are petroleum based or that contain acid or abrasives,
as they can damage the paint, metal or plastic onthe vehicle. Approved cleaning products can be obtained
from your dealer/retailer. Follow all manufacturers’
directions regarding correct product usage, necessary
safety precautions and appropriate disposal of any
vehicle care product.
Rinse the vehicle well, before washing and after to
remove all cleaning agents completely. If they are
allowed to dry on the surface, they could stain.
Dry the �nish with a soft, clean chamois or an all-cotton
towel to avoid surface scratches and water spotting.
High pressure car washes may cause water to enter the
vehicle. Avoid using high pressure washes closer
than 12 inches (30 cm) to the surface of the vehicle.
Use of power washers exceeding 1,200 psi (8 274 kPa)
can result in damage or removal of paint and decals.
Cleaning Exterior Lamps/Lenses
Use only lukewarm or cold water, a soft cloth and a car
washing soap to clean exterior lamps and lenses.
Follow instructions underWashing Your Vehicle on
page 5-93.
5-93
Page 374 of 442
Finish Care
Occasional waxing or mild polishing of the vehicle by
hand may be necessary to remove residue from
the paint �nish. Approved cleaning products can be
obtained from your dealer/retailer.
If the vehicle has a basecoat/clearcoat paint �nish, the
clearcoat gives more depth and gloss to the colored
basecoat. Always use waxes and polishes that are
non-abrasive and made for a basecoat/clearcoat
paint �nish.
Notice:Machine compounding or aggressive
polishing on a basecoat/clearcoat paint �nish may
damage it. Use only non-abrasive waxes and
polishes that are made for a basecoat/clearcoat
paint �nish on the vehicle.
Foreign materials such as calcium chloride and other
salts, ice melting agents, road oil and tar, tree sap, bird
droppings, chemicals from industrial chimneys, etc.,
can damage the vehicle’s �nish if they remain on painted
surfaces. Wash the vehicle as soon as possible. If
necessary, use non-abrasive cleaners that are marked
safe for painted surfaces to remove foreign matter.
Exterior painted surfaces are subject to aging, weather
and chemical fallout that can take their toll over a period
of years. To help keep the paint �nish looking new, keep
the vehicle garaged or covered whenever possible.
Protecting Exterior Bright Metal Parts
Bright metal parts should be cleaned regularly to keep
their luster. Washing with water is all that is usually
needed. However, chrome polish may be used on
chrome or stainless steel trim, if necessary.
Use special care with aluminum trim. To avoid damaging
protective trim, never use auto or chrome polish, steam or
caustic soap to clean aluminum. A coating of wax, rubbed
to high polish, is recommended for all bright metal parts.
Windshield and Wiper Blades
Clean the outside of the windshield with glass cleaner.
Clean the rubber blades using a lint free cloth or paper
towel soaked with windshield washer �uid or a mild
detergent. Wash the windshield thoroughly when
cleaning the blades. Bugs, road grime, sap, and a
buildup of vehicle wash/wax treatments may cause
wiper streaking. Replace the wiper blades if they are
worn or damaged.
Wipers can be damaged by:
Extreme dusty conditions
Sand and salt
Heat and sun
Snow and ice, without proper removal
5-94