Safety lock CADILLAC SRX 2012 2.G Owner's Manual
[x] Cancel search | Manufacturer: CADILLAC, Model Year: 2012, Model line: SRX, Model: CADILLAC SRX 2012 2.GPages: 502, PDF Size: 6.23 MB
Page 335 of 502
Black plate (3,1)Cadillac SRX Owner Manual (Include Mex) - 2012
Vehicle Care 10-3
California Proposition
65 Warning
Most motor vehicles, including this
one, contain and/or emit chemicals
known to the State of California to
cause cancer and birth defects or
other reproductive harm. Engine
exhaust, many parts and systems,
many fluids, and some component
wear by-products contain and/or
emit these chemicals.
California Perchlorate
Materials Requirements
Certain types of automotive
applications, such as airbag
initiators, seat belt pretensioners,
and lithium batteries contained in
Remote Keyless Entry transmitters,
may contain perchlorate materials.
Special handling may be necessary.
For additional information, see
www.dtsc.ca.gov/hazardouswaste/
perchlorate.
Accessories and
Modifications
Adding non‐dealer accessories or
making modifications to the vehicle
can affect vehicle performance and
safety, including such things as
airbags, braking, stability, ride and
handling, emissions systems,
aerodynamics, durability, and
electronic systems like antilock
brakes, traction control, and stability
control. These accessories or
modifications could even cause
malfunction or damage not covered
by the vehicle warranty.Damage to vehicle components
resulting from modifications or the
installation or use of non‐GM
certified parts, including control
module or software modifications,
is not covered under the terms of
the vehicle warranty and may affect
remaining warranty coverage for
affected parts.
GM Accessories are designed to
complement and function with other
systems on the vehicle. See your
dealer to accessorize the vehicle
using genuine GM Accessories
installed by a dealer technician.
Also, see
Adding Equipment to
the Airbag-Equipped Vehicle on
page 3‑34.
Page 399 of 502
Black plate (67,1)Cadillac SRX Owner Manual (Include Mex) - 2012
Vehicle Care 10-67
Different Size Tires
and Wheels
If wheels or tires are installed that
are a different size than the original
equipment wheels and tires, vehicle
performance, including its braking,
ride and handling characteristics,
stability, and resistance to rollover
may be affected. If the vehicle has
electronic systems such as antilock
brakes, rollover airbags, traction
control, and electronic stability
control, the performance of these
systems can also be affected.
{WARNING
If different sized wheels are used,
there may not be an acceptable
level of performance and safety
if tires not recommended for
those wheels are selected.
This increases the chance of
a crash and serious injury.
Only use GM specific wheel and
tire systems developed for the
vehicle, and have them properly
installed by a GM certified
technician.
See Buying New Tires on
page 10‑65 andAccessories and
Modifications on page 10‑3 for
additional information.
Uniform Tire Quality
Grading
Quality grades can be found
where applicable on the tire
sidewall between tread shoulder
and maximum section width.
For example:
Treadwear 200 Traction AA
Temperature A
The following information relates
to the system developed by the
United States National Highway
Traffic Safety Administration
(NHTSA), which grades tires
by treadwear, traction, and
temperature performance.
This applies only to vehicles
sold in the United States.
Page 404 of 502
Black plate (72,1)Cadillac SRX Owner Manual (Include Mex) - 2012
10-72 Vehicle Care
{WARNING
Lifting a vehicle and getting
under it to do maintenance or
repairs is dangerous without the
appropriate safety equipment and
training. If a jack is provided with
the vehicle, it is designed only for
changing a flat tire. If it is used for
anything else, you or others could
be badly injured or killed if the
vehicle slips off the jack. If a jack
is provided with the vehicle, only
use it for changing a flat tire.
If a tire goes flat, avoid further tire
and wheel damage by driving slowly
to a level place, well off the road,
if possible. Turn on the hazard
warning flashers. See Hazard
Warning Flashers on page 6‑5.
{WARNING
Changing a tire can be
dangerous. The vehicle can slip
off the jack and roll over or fall
causing injury or death. Find a
level place to change the tire.
To help prevent the vehicle from
moving:
1. Set the parking brake firmly.
2. Put an automatic transmission in P (Park) or a
manual transmission in
1 (First) or R (Reverse).
3. Turn off the engine and do not restart while the vehicle
is raised.
4. Do not allow passengers to remain in the vehicle.
5. Place wheel blocks on both sides of the tire at the
opposite corner of the tire
being changed. This vehicle may come with a jack
and spare tire or a tire sealant and
compressor kit. To use the jacking
equipment to change a spare tire
safely, follow the instructions below.
Then see
Tire Changing on
page 10‑81. To use the tire sealant
and compressor kit, see Tire
Sealant and Compressor Kit on
page 10‑73.
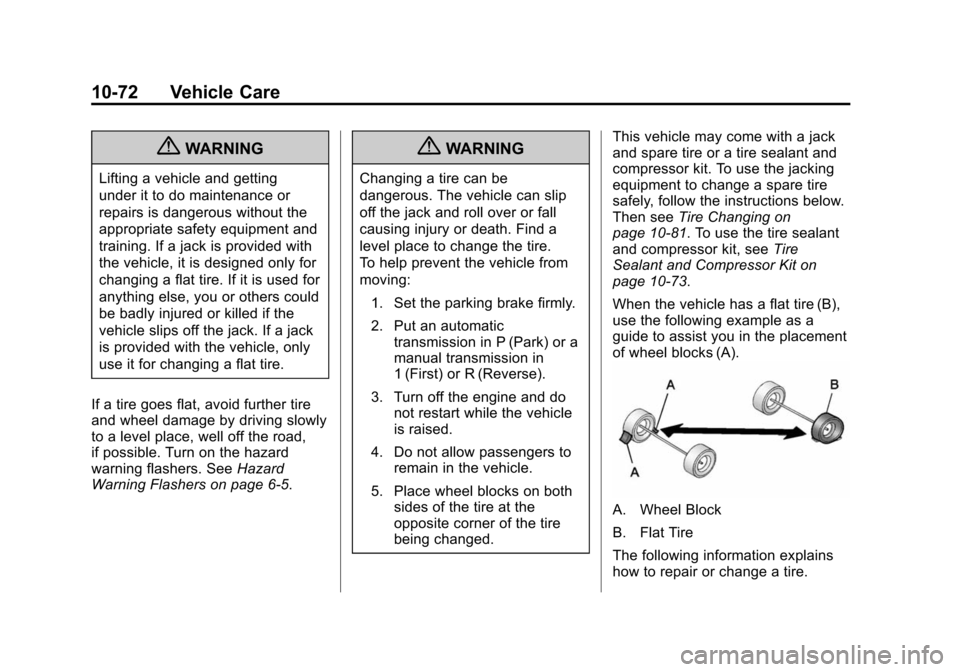
When the vehicle has a flat tire (B),
use the following example as a
guide to assist you in the placement
of wheel blocks (A).
A. Wheel Block
B. Flat Tire
The following information explains
how to repair or change a tire.
Page 407 of 502
Black plate (75,1)Cadillac SRX Owner Manual (Include Mex) - 2012
Vehicle Care 10-75
When using the tire sealant and
compressor kit during cold
temperatures, warm the kit in a
heated environment for five minutes.
This will help to inflate the tire
faster.
If a tire goes flat, avoid further tire
and wheel damage by driving slowly
to a level place. Turn on the hazard
warning flashers. SeeHazard
Warning Flashers on page 6‑5.
See If a Tire Goes Flat on
page 10‑71 for other important
safety warnings.
Do not remove any objects that
have penetrated the tire.
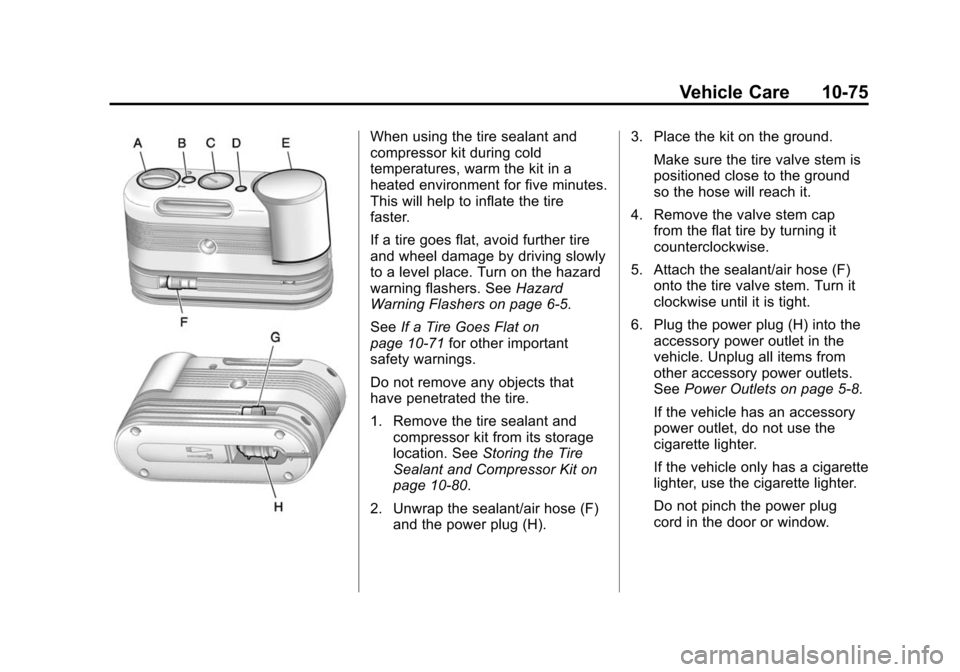
1. Remove the tire sealant and compressor kit from its storage
location. See Storing the Tire
Sealant and Compressor Kit on
page 10‑80.
2. Unwrap the sealant/air hose (F) and the power plug (H). 3. Place the kit on the ground.
Make sure the tire valve stem is
positioned close to the ground
so the hose will reach it.
4. Remove the valve stem cap from the flat tire by turning it
counterclockwise.
5. Attach the sealant/air hose (F) onto the tire valve stem. Turn it
clockwise until it is tight.
6. Plug the power plug (H) into the accessory power outlet in the
vehicle. Unplug all items from
other accessory power outlets.
See Power Outlets on page 5‑8.
If the vehicle has an accessory
power outlet, do not use the
cigarette lighter.
If the vehicle only has a cigarette
lighter, use the cigarette lighter.
Do not pinch the power plug
cord in the door or window.
Page 410 of 502
Black plate (78,1)Cadillac SRX Owner Manual (Include Mex) - 2012
10-78 Vehicle Care
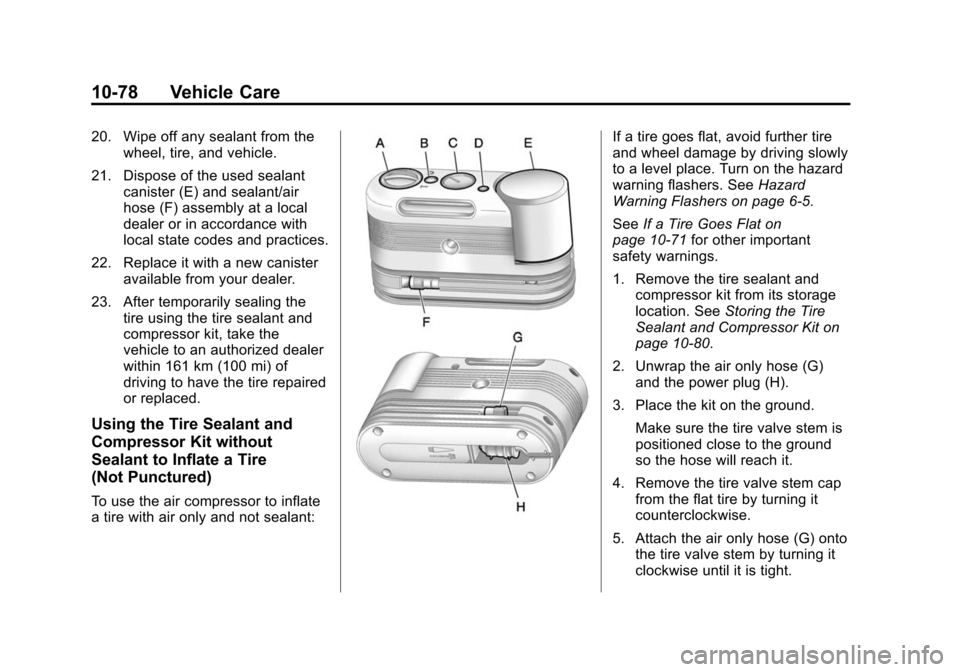
20. Wipe off any sealant from thewheel, tire, and vehicle.
21. Dispose of the used sealant canister (E) and sealant/air
hose (F) assembly at a local
dealer or in accordance with
local state codes and practices.
22. Replace it with a new canister available from your dealer.
23. After temporarily sealing the tire using the tire sealant and
compressor kit, take the
vehicle to an authorized dealer
within 161 km (100 mi) of
driving to have the tire repaired
or replaced.
Using the Tire Sealant and
Compressor Kit without
Sealant to Inflate a Tire
(Not Punctured)
To use the air compressor to inflate
a tire with air only and not sealant:
If a tire goes flat, avoid further tire
and wheel damage by driving slowly
to a level place. Turn on the hazard
warning flashers. See Hazard
Warning Flashers on page 6‑5.
See If a Tire Goes Flat on
page 10‑71 for other important
safety warnings.
1. Remove the tire sealant and compressor kit from its storage
location. See Storing the Tire
Sealant and Compressor Kit on
page 10‑80.
2. Unwrap the air only hose (G) and the power plug (H).
3. Place the kit on the ground. Make sure the tire valve stem is
positioned close to the ground
so the hose will reach it.
4. Remove the tire valve stem cap from the flat tire by turning it
counterclockwise.
5. Attach the air only hose (G) onto the tire valve stem by turning it
clockwise until it is tight.
Page 414 of 502
Black plate (82,1)Cadillac SRX Owner Manual (Include Mex) - 2012
10-82 Vehicle Care
Removing the Flat Tire and
Installing the Spare Tire
Take off the wheel cover or center
cap, if the vehicle has one, to reach
the wheel bolts.
1. Do a safety check beforeproceeding. See If a Tire Goes
Flat on page 10‑71 for more
information.
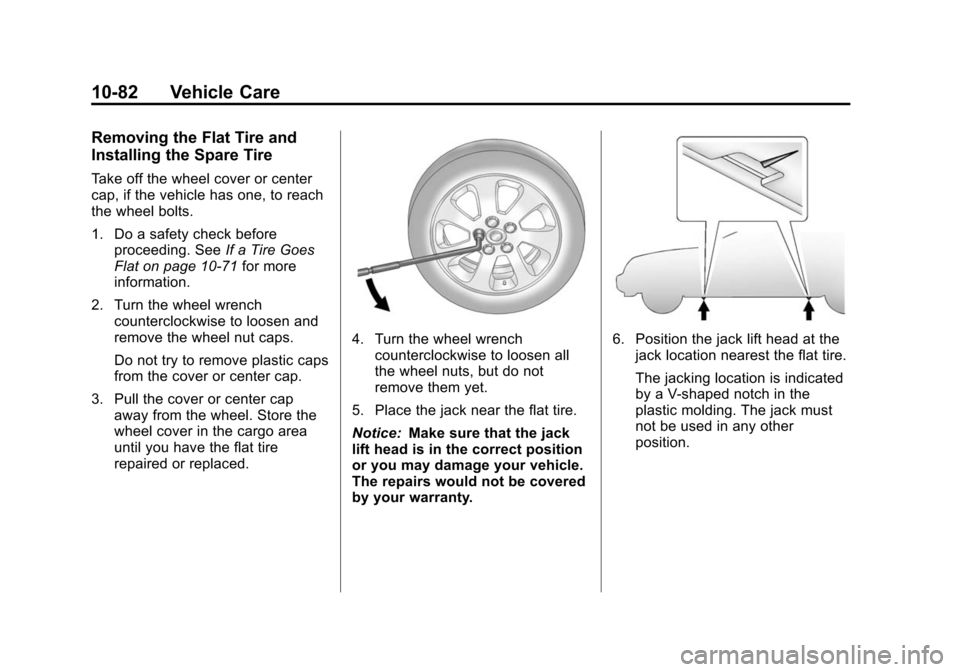
2. Turn the wheel wrench counterclockwise to loosen and
remove the wheel nut caps.
Do not try to remove plastic caps
from the cover or center cap.
3. Pull the cover or center cap away from the wheel. Store the
wheel cover in the cargo area
until you have the flat tire
repaired or replaced.
4. Turn the wheel wrenchcounterclockwise to loosen all
the wheel nuts, but do not
remove them yet.
5. Place the jack near the flat tire.
Notice: Make sure that the jack
lift head is in the correct position
or you may damage your vehicle.
The repairs would not be covered
by your warranty.6. Position the jack lift head at the jack location nearest the flat tire.
The jacking location is indicated
by a V-shaped notch in the
plastic molding. The jack must
not be used in any other
position.
Page 415 of 502
Black plate (83,1)Cadillac SRX Owner Manual (Include Mex) - 2012
Vehicle Care 10-83
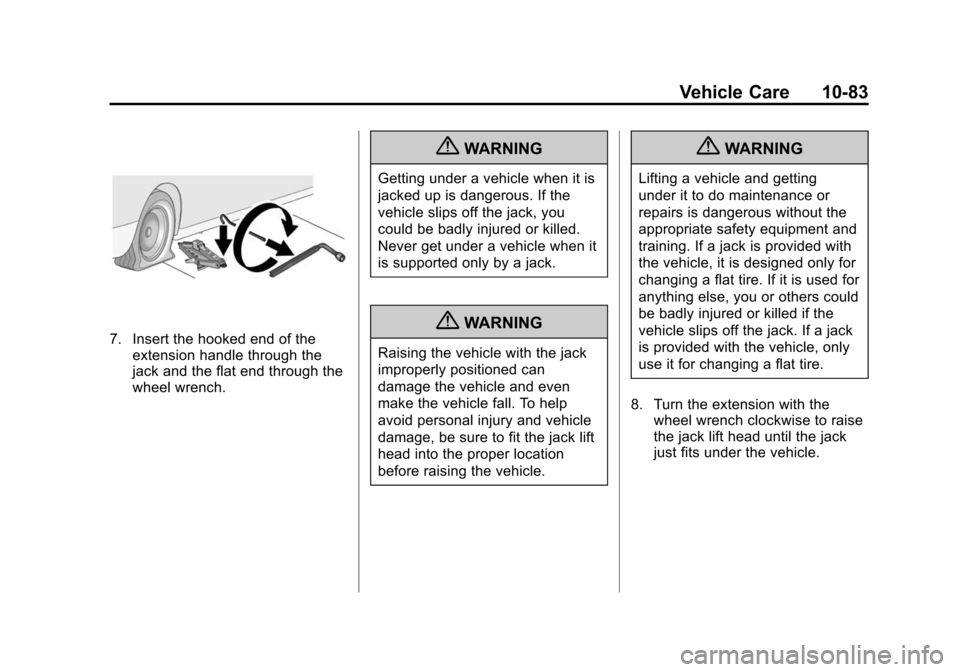
7. Insert the hooked end of theextension handle through the
jack and the flat end through the
wheel wrench.
{WARNING
Getting under a vehicle when it is
jacked up is dangerous. If the
vehicle slips off the jack, you
could be badly injured or killed.
Never get under a vehicle when it
is supported only by a jack.
{WARNING
Raising the vehicle with the jack
improperly positioned can
damage the vehicle and even
make the vehicle fall. To help
avoid personal injury and vehicle
damage, be sure to fit the jack lift
head into the proper location
before raising the vehicle.
{WARNING
Lifting a vehicle and getting
under it to do maintenance or
repairs is dangerous without the
appropriate safety equipment and
training. If a jack is provided with
the vehicle, it is designed only for
changing a flat tire. If it is used for
anything else, you or others could
be badly injured or killed if the
vehicle slips off the jack. If a jack
is provided with the vehicle, only
use it for changing a flat tire.
8. Turn the extension with the wheel wrench clockwise to raise
the jack lift head until the jack
just fits under the vehicle.
Page 441 of 502

Black plate (5,1)Cadillac SRX Owner Manual (Include Mex) - 2012
Service and Maintenance 11-5
.Visually inspect windshield
wiper blades for wear, cracking,
or contamination. SeeExterior
Care on page 10‑96. Replace
worn or damaged wiper blades.
See Wiper Blade Replacement
on page 10‑26.
.Check tire inflation pressures.
See Tire Pressure on
page 10‑56.
.Inspect tire wear. See Tire
Inspection on page 10‑63.
.Visually check for fluid leaks.
.Inspect engine air cleaner filter.
See Engine Air Cleaner/Filter on
page 10‑12.
.Inspect brake system.
.Visually inspect steering,
suspension, and chassis
components for damaged,
loose, or missing parts or signs
of wear. See Exterior Care on
page 10‑96.
.Check restraint system
components. See Safety
System Check on page 3‑21.
.Visually inspect fuel system for
damage or leaks.
.Visually inspect exhaust system
and nearby heat shields for
loose or damaged parts.
.Lubricate body components.
See Exterior Care on
page 10‑96.
.Check starter switch.
See Starter Switch Check on
page 10‑25.
.Check automatic transmission
shift lock control function.
See Automatic Transmission
Shift Lock Control Function
Check on page 10‑25.
.Check parking brake and
automatic transmission park
mechanism. See Park Brake and
P (Park) Mechanism Check on
page 10‑26.
.Check accelerator pedal for
damage, high effort, or binding.
Replace if needed.
.Visually inspect gas strut for
signs of wear, cracks, or other
damage. Check the hold open
ability of the strut. See your
dealer if service is required.
.Check tire sealant expiration
date, if equipped. See Tire
Sealant and Compressor Kit on
page 10‑73.
.Inspect sunroof track and seal,
if equipped. See Sunroof on
page 2‑27.
Page 478 of 502
Black plate (20,1)Cadillac SRX Owner Manual (Include Mex) - 2012
13-20 Customer Information
Vehicle Data
Recording and
Privacy
This GM vehicle has a number of
sophisticated computers that record
information about the vehicle’s
performance and how it is driven.
For example, the vehicle uses
computer modules to monitor and
control engine and transmission
performance, to monitor the
conditions for airbag deployment
and deploy airbags in a crash, and,
if so equipped, to provide antilock
braking to help the driver control the
vehicle. These modules may store
data to help your dealer technician
service the vehicle. Some modules
may also store data about how you
operate the vehicle, such as rate of
fuel consumption or average speed.
These modules may also retain the
owner’s personal preferences, such
as radio presets, seat positions, and
temperature settings.
Event Data Recorders
This vehicle has an Event Data
Recorder (EDR). The main purpose
of an EDR is to record, in certain
crash or near crash-like situations,
such as an airbag deployment or
hitting a road obstacle, data that
will assist in understanding how a
vehicle's systems performed.
The EDR is designed to record data
related to vehicle dynamics and
safety systems for a short period of
time, typically 30 seconds or less.
The EDR in this vehicle is designed
to record such data as:
.How various systems in the
vehicle were operating.
.Whether or not the driver and
passenger safety belts were
buckled/fastened.
.How far, if at all, the driver was
pressing the accelerator and/or
brake pedal.
.How fast the vehicle was
traveling. This data can help provide a better
understanding of the circumstances
in which crashes and injuries occur.
Important:
EDR data is recorded
by the vehicle only if a non-trivial
crash situation occurs; no data is
recorded by the EDR under normal
driving conditions and no personal
data (e.g., name, gender, age, and
crash location) is recorded.
However, other parties, such as law
enforcement, could combine the
EDR data with the type of
personally identifying data routinely
acquired during a crash
investigation.
To read data recorded by an EDR,
special equipment is required, and
access to the vehicle or the EDR is
needed. In addition to the vehicle
manufacturer, other parties, such as
law enforcement, that have the
special equipment, can read the
information if they have access to
the vehicle or the EDR.
GM will not access this data or
share it with others except: with the
consent of the vehicle owner or,
Page 492 of 502

Black plate (4,1)Cadillac SRX Owner Manual (Include Mex) - 2012
i-4 INDEX
DrivingCharacteristics and
Towing Tips . . . . . . . . . . . . . . . . . 9-53
Defensive . . . . . . . . . . . . . . . . . . . . . . 9-3
Drunk . . . . . . . . . . . . . . . . . . . . . . . . . . 9-3
For Better Fuel Economy . . . . . 1-23
Highway Hypnosis . . . . . . . . . . . . . 9-8
Hill and Mountain Roads . . . . . . . 9-8
If the Vehicle is Stuck . . . . . . . . . 9-11
Loss of Control . . . . . . . . . . . . . . . . 9-5
Off-Road Recovery . . . . . . . . . . . . 9-5
Vehicle Load Limits . . . . . . . . . . . 9-12
Wet Roads . . . . . . . . . . . . . . . . . . . . 9-6
Winter . . . . . . . . . . . . . . . . . . . . . . . . . 9-9
Dual Automatic Climate Control System . . . . . . . . . . . . . . . . 8-1
DVD Rear Seat EntertainmentSystem . . . . . . . . . . . . . . . . . . . . . . 7-35
DVD/CD Player . . . . . . . . . . . . . . . . 7-21E
E85 Fuel . . . . . . . . . . . . . . . . . . . . . . . 9-49
ECO Button . . . . . . . . . . . . . . . . . . . 9-29
Economy Mode Fuel . . . . . . . . . . . . . . . . . . . . . . . . . . 9-29
Electric Parking Brake Light . . . 5-21
Electrical Equipment, Add-On . . . . . . . . . . . . . . . . . . . . . . 9-60
Electrical System Engine CompartmentFuse Block . . . . . . . . . . . . . . . . 10-42
Fuses and Circuit Breakers . . . . . . . . . . . . . . . . . . 10-41
Instrument Panel Fuse Block . . . . . . . . . . . . . . . . . . . . . . 10-44
Overload . . . . . . . . . . . . . . . . . . . 10-41
Rear Compartment Fuse
Block . . . . . . . . . . . . . . . . . . . . . . 10-46
Emergency, OnStar
®. . . . . . . . . . 14-2
Engine
Air Cleaner/Filter . . . . . . . . . . . 10-12
Check and Service EngineSoon Light . . . . . . . . . . . . . . . . . . 5-18
Compartment Overview . . . . . . . 10-6
Coolant . . . . . . . . . . . . . . . . . . . . . 10-15 Engine (cont.)
Coolant Temperature
Gauge . . . . . . . . . . . . . . . . . . . . . . 5-14
Cooling System . . . . . . . . . . . . . 10-14
Cooling System Messages . . . 5-34
Cover . . . . . . . . . . . . . . . . . . . . . . . . . 10-8
Drive Belt Routing . . . . . . . . . . . . 12-3
Exhaust . . . . . . . . . . . . . . . . . . . . . . 9-24
Gasoline Starting . . . . . . . . . . . . . 9-20
Heater . . . . . . . . . . . . . . . . . . . . . . . . 9-22
Overheating . . . . . . . . . . . . . . . . 10-18
Power Messages . . . . . . . . . . . . . 5-35
Pressure Light . . . . . . . . . . . . . . . . 5-25
Running While Parked . . . . . . . . 9-25
Engine Oil Life System . . . . . . . . . . . . . . . . . 10-10
Messages . . . . . . . . . . . . . . . . . . . . 5-35
Entry Lighting . . . . . . . . . . . . . . . . . . . 6-8
Equipment, Towing . . . . . . . . . . . . 9-59
Event Data Recorders . . . . . . . . 13-20
Exit Lighting . . . . . . . . . . . . . . . . . . . . 6-8
Extender, Safety Belt . . . . . . . . . . 3-21
Exterior Lamp Controls . . . . . . . . . 6-1