spare wheel CADILLAC SRX 2014 User Guide
[x] Cancel search | Manufacturer: CADILLAC, Model Year: 2014, Model line: SRX, Model: CADILLAC SRX 2014Pages: 416, PDF Size: 4.56 MB
Page 325 of 416
Black plate (65,1)Cadillac SRX Owner Manual (GMNA-Localizing-U.S./Canada/Mexico-
6081464) - 2014 - CRC - 10/4/13
Vehicle Care 10-65
The following information explains
how to repair or change a tire.
Tire Sealant and
Compressor Kit
{Warning
Idling a vehicle in an enclosed
area with poor ventilation is
dangerous. Engine exhaust may
enter the vehicle. Engine exhaust
contains carbon monoxide (CO)
which cannot be seen or smelled.
It can cause unconsciousness
and even death. Never run the
engine in an enclosed area that
has no fresh air ventilation. For
more information, seeEngine
Exhaust on page 9-21.
{Warning
Overinflating a tire could cause
the tire to rupture and you or
others could be injured. Be sure
to read and follow the tire sealant
and compressor kit instructions
and inflate the tire to its
recommended pressure. Do not
exceed the recommended
pressure.
{Warning
Storing the tire sealant and
compressor kit or other
equipment in the passenger
compartment of the vehicle could
cause injury. In a sudden stop or
collision, loose equipment could
strike someone. Store the tire
sealant and compressor kit in its
original location. If this vehicle has a tire sealant and
compressor kit, there may not be a
spare tire or tire changing
equipment, and on some vehicles
there may not be a place to store
a tire.
The tire sealant and compressor
can be used to temporarily seal
punctures up to 6 mm (0.25 in) in
the tread area of the tire. It can also
be used to inflate an
underinflated tire.
If the tire has been separated from
the wheel, has damaged sidewalls,
or has a large puncture, the tire is
too severely damaged for the tire
sealant and compressor kit to be
effective. See
Roadside Service on
page 13-5.
Read and follow all of the tire
sealant and compressor kit
instructions.
Page 333 of 416
Black plate (73,1)Cadillac SRX Owner Manual (GMNA-Localizing-U.S./Canada/Mexico-
6081464) - 2014 - CRC - 10/4/13
Vehicle Care 10-73
Tire Changing
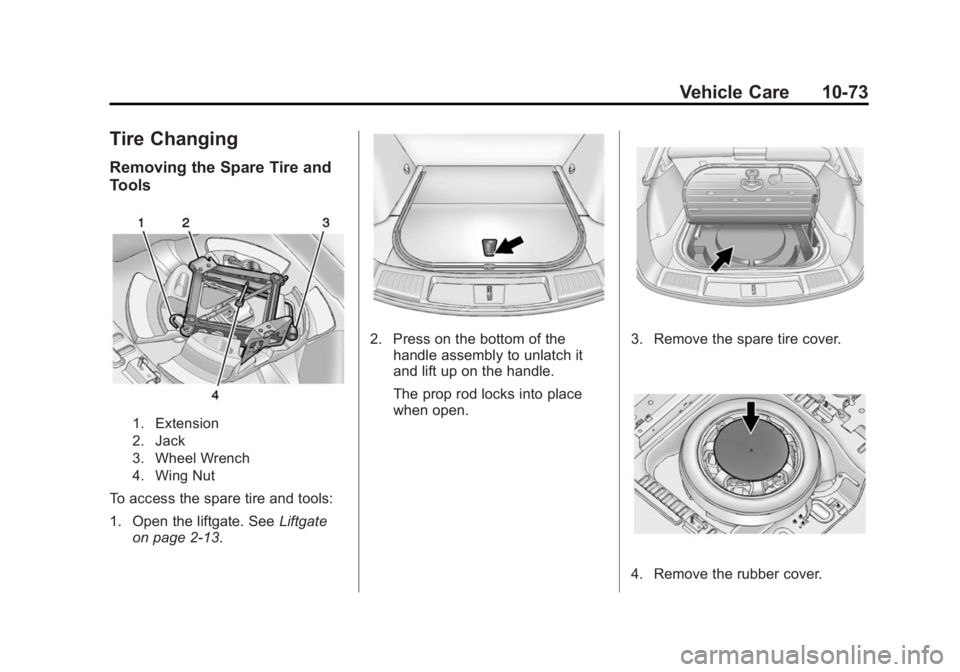
Removing the Spare Tire and
Tools
1. Extension
2. Jack
3. Wheel Wrench
4. Wing Nut
To access the spare tire and tools:
1. Open the liftgate. SeeLiftgate
on page 2-13.
2. Press on the bottom of the handle assembly to unlatch it
and lift up on the handle.
The prop rod locks into place
when open.3. Remove the spare tire cover.
4. Remove the rubber cover.
Page 334 of 416
Black plate (74,1)Cadillac SRX Owner Manual (GMNA-Localizing-U.S./Canada/Mexico-
6081464) - 2014 - CRC - 10/4/13
10-74 Vehicle Care
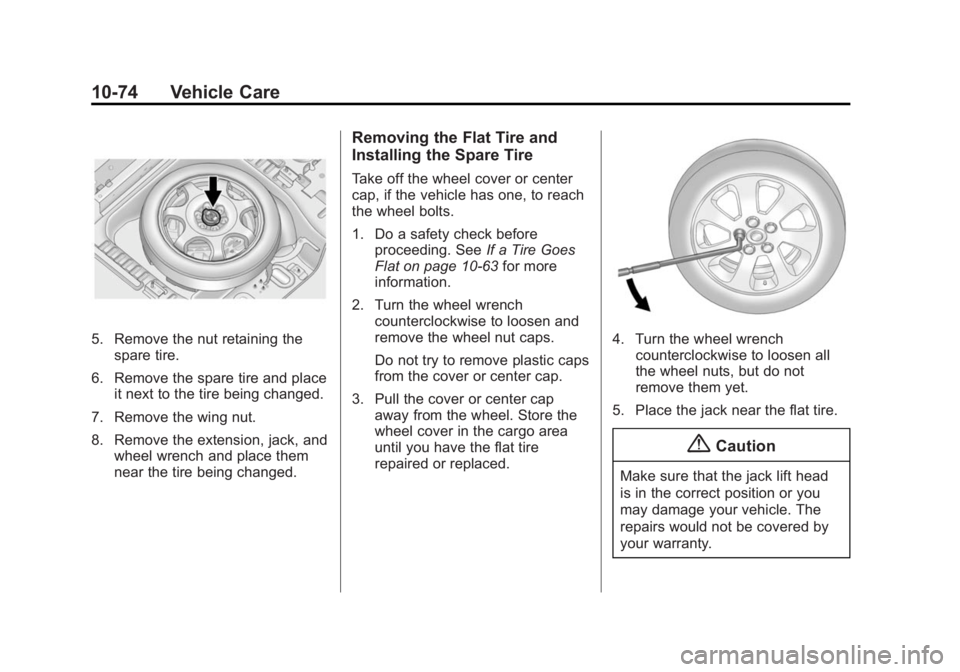
5. Remove the nut retaining thespare tire.
6. Remove the spare tire and place it next to the tire being changed.
7. Remove the wing nut.
8. Remove the extension, jack, and wheel wrench and place them
near the tire being changed.
Removing the Flat Tire and
Installing the Spare Tire
Take off the wheel cover or center
cap, if the vehicle has one, to reach
the wheel bolts.
1. Do a safety check beforeproceeding. See If a Tire Goes
Flat on page 10-63 for more
information.
2. Turn the wheel wrench counterclockwise to loosen and
remove the wheel nut caps.
Do not try to remove plastic caps
from the cover or center cap.
3. Pull the cover or center cap away from the wheel. Store the
wheel cover in the cargo area
until you have the flat tire
repaired or replaced.
4. Turn the wheel wrenchcounterclockwise to loosen all
the wheel nuts, but do not
remove them yet.
5. Place the jack near the flat tire.
{Caution
Make sure that the jack lift head
is in the correct position or you
may damage your vehicle. The
repairs would not be covered by
your warranty.
Page 336 of 416
Black plate (76,1)Cadillac SRX Owner Manual (GMNA-Localizing-U.S./Canada/Mexico-
6081464) - 2014 - CRC - 10/4/13
10-76 Vehicle Care
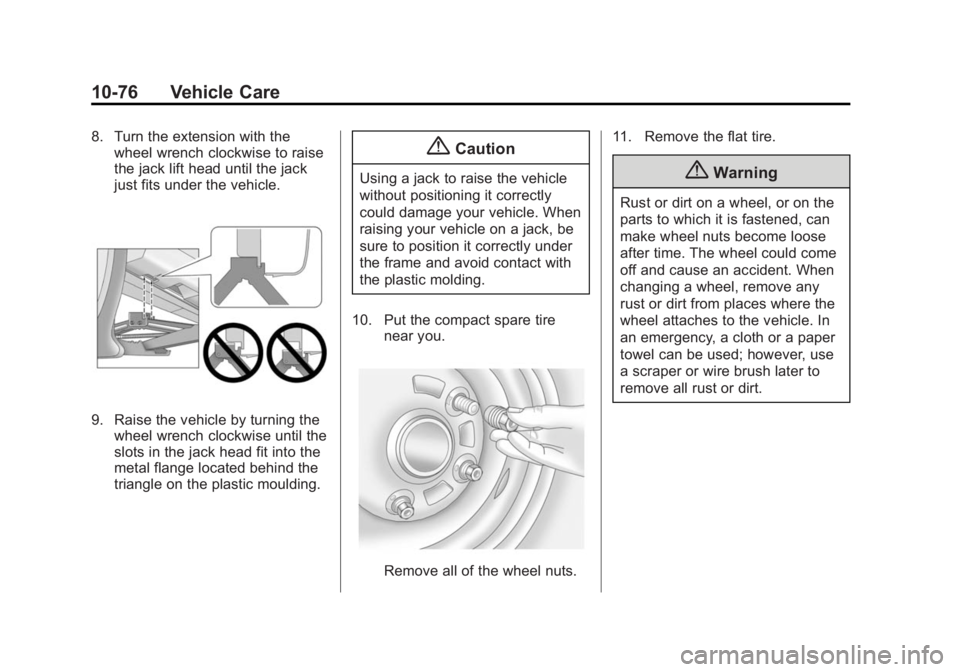
8. Turn the extension with thewheel wrench clockwise to raise
the jack lift head until the jack
just fits under the vehicle.
9. Raise the vehicle by turning the
wheel wrench clockwise until the
slots in the jack head fit into the
metal flange located behind the
triangle on the plastic moulding.
{Caution
Using a jack to raise the vehicle
without positioning it correctly
could damage your vehicle. When
raising your vehicle on a jack, be
sure to position it correctly under
the frame and avoid contact with
the plastic molding.
10. Put the compact spare tire near you.
Remove all of the wheel nuts. 11. Remove the flat tire.
{Warning
Rust or dirt on a wheel, or on the
parts to which it is fastened, can
make wheel nuts become loose
after time. The wheel could come
off and cause an accident. When
changing a wheel, remove any
rust or dirt from places where the
wheel attaches to the vehicle. In
an emergency, a cloth or a paper
towel can be used; however, use
a scraper or wire brush later to
remove all rust or dirt.
Page 337 of 416
Black plate (77,1)Cadillac SRX Owner Manual (GMNA-Localizing-U.S./Canada/Mexico-
6081464) - 2014 - CRC - 10/4/13
Vehicle Care 10-77
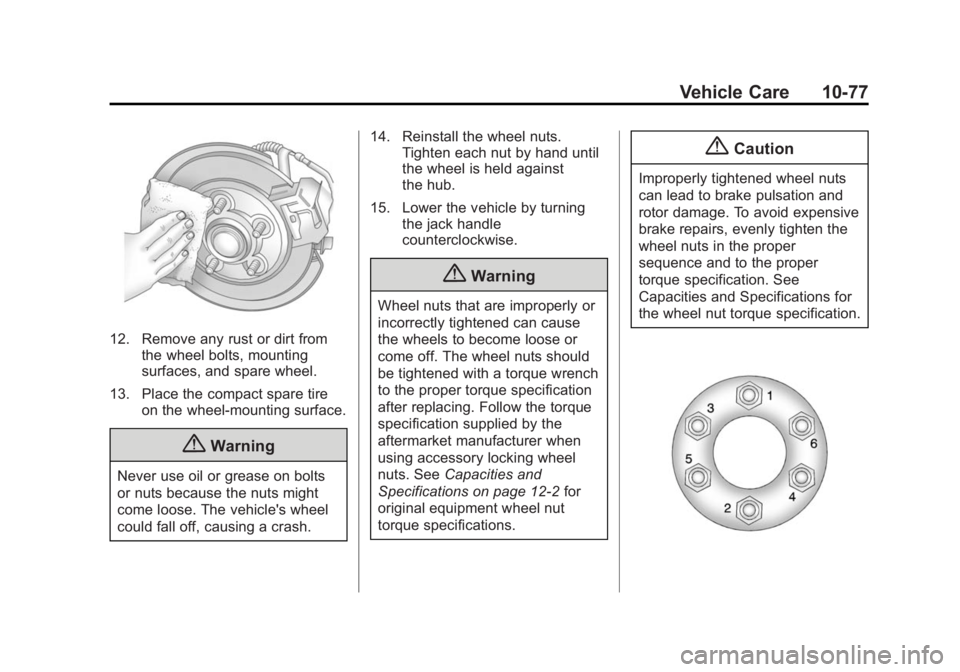
12. Remove any rust or dirt fromthe wheel bolts, mounting
surfaces, and spare wheel.
13. Place the compact spare tire on the wheel-mounting surface.
{Warning
Never use oil or grease on bolts
or nuts because the nuts might
come loose. The vehicle's wheel
could fall off, causing a crash. 14. Reinstall the wheel nuts.
Tighten each nut by hand until
the wheel is held against
the hub.
15. Lower the vehicle by turning the jack handle
counterclockwise.
{Warning
Wheel nuts that are improperly or
incorrectly tightened can cause
the wheels to become loose or
come off. The wheel nuts should
be tightened with a torque wrench
to the proper torque specification
after replacing. Follow the torque
specification supplied by the
aftermarket manufacturer when
using accessory locking wheel
nuts. See Capacities and
Specifications on page 12-2 for
original equipment wheel nut
torque specifications.
{Caution
Improperly tightened wheel nuts
can lead to brake pulsation and
rotor damage. To avoid expensive
brake repairs, evenly tighten the
wheel nuts in the proper
sequence and to the proper
torque specification. See
Capacities and Specifications for
the wheel nut torque specification.
Page 338 of 416
Black plate (78,1)Cadillac SRX Owner Manual (GMNA-Localizing-U.S./Canada/Mexico-
6081464) - 2014 - CRC - 10/4/13
10-78 Vehicle Care
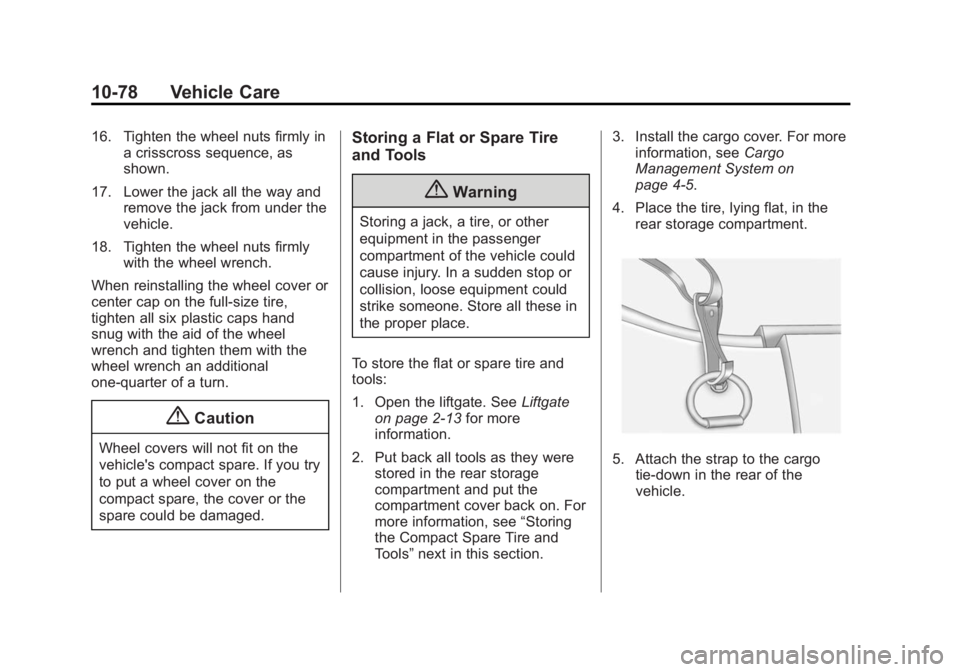
16. Tighten the wheel nuts firmly ina crisscross sequence, as
shown.
17. Lower the jack all the way and remove the jack from under the
vehicle.
18. Tighten the wheel nuts firmly with the wheel wrench.
When reinstalling the wheel cover or
center cap on the full-size tire,
tighten all six plastic caps hand
snug with the aid of the wheel
wrench and tighten them with the
wheel wrench an additional
one-quarter of a turn.
{Caution
Wheel covers will not fit on the
vehicle's compact spare. If you try
to put a wheel cover on the
compact spare, the cover or the
spare could be damaged.
Storing a Flat or Spare Tire
and Tools
{Warning
Storing a jack, a tire, or other
equipment in the passenger
compartment of the vehicle could
cause injury. In a sudden stop or
collision, loose equipment could
strike someone. Store all these in
the proper place.
To store the flat or spare tire and
tools:
1. Open the liftgate. See Liftgate
on page 2-13 for more
information.
2. Put back all tools as they were stored in the rear storage
compartment and put the
compartment cover back on. For
more information, see “Storing
the Compact Spare Tire and
Tools” next in this section. 3. Install the cargo cover. For more
information, see Cargo
Management System on
page 4-5.
4. Place the tire, lying flat, in the rear storage compartment.
5. Attach the strap to the cargotie-down in the rear of the
vehicle.
Page 339 of 416
Black plate (79,1)Cadillac SRX Owner Manual (GMNA-Localizing-U.S./Canada/Mexico-
6081464) - 2014 - CRC - 10/4/13
Vehicle Care 10-79
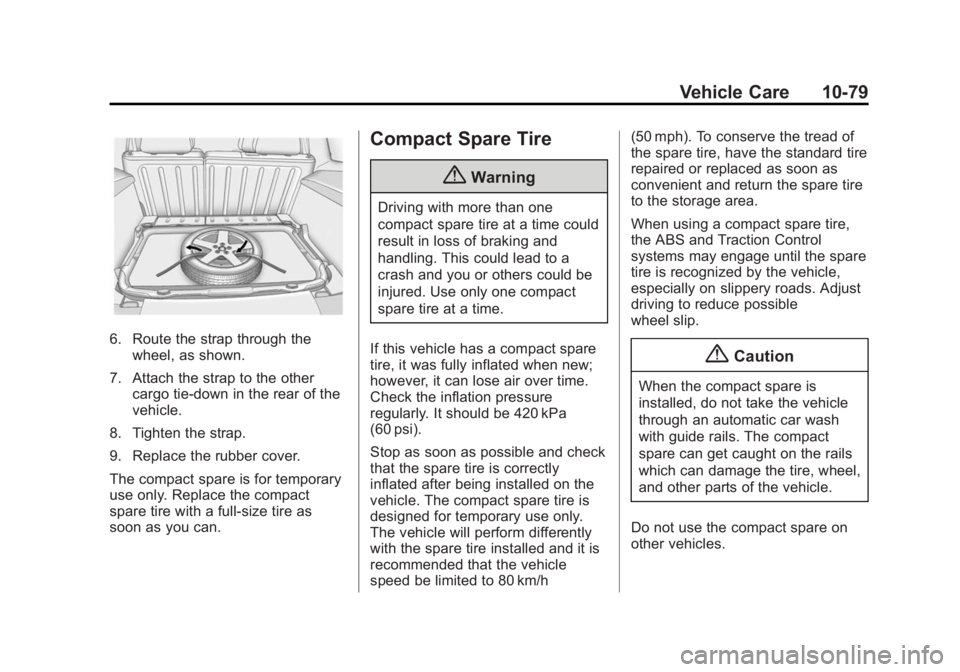
6. Route the strap through thewheel, as shown.
7. Attach the strap to the other cargo tie-down in the rear of the
vehicle.
8. Tighten the strap.
9. Replace the rubber cover.
The compact spare is for temporary
use only. Replace the compact
spare tire with a full-size tire as
soon as you can.
Compact Spare Tire
{Warning
Driving with more than one
compact spare tire at a time could
result in loss of braking and
handling. This could lead to a
crash and you or others could be
injured. Use only one compact
spare tire at a time.
If this vehicle has a compact spare
tire, it was fully inflated when new;
however, it can lose air over time.
Check the inflation pressure
regularly. It should be 420 kPa
(60 psi).
Stop as soon as possible and check
that the spare tire is correctly
inflated after being installed on the
vehicle. The compact spare tire is
designed for temporary use only.
The vehicle will perform differently
with the spare tire installed and it is
recommended that the vehicle
speed be limited to 80 km/h (50 mph). To conserve the tread of
the spare tire, have the standard tire
repaired or replaced as soon as
convenient and return the spare tire
to the storage area.
When using a compact spare tire,
the ABS and Traction Control
systems may engage until the spare
tire is recognized by the vehicle,
especially on slippery roads. Adjust
driving to reduce possible
wheel slip.
{Caution
When the compact spare is
installed, do not take the vehicle
through an automatic car wash
with guide rails. The compact
spare can get caught on the rails
which can damage the tire, wheel,
and other parts of the vehicle.
Do not use the compact spare on
other vehicles.
Page 340 of 416

Black plate (80,1)Cadillac SRX Owner Manual (GMNA-Localizing-U.S./Canada/Mexico-
6081464) - 2014 - CRC - 10/4/13
10-80 Vehicle Care
Do not mix the compact spare tire or
wheel with other wheels or tires.
They will not fit. Keep the spare tire
and its wheel together.
{Caution
Tire chains will not fit the compact
spare. Using them can damage
the vehicle and the chains. Do not
use tire chains on the compact
spare.
Jump Starting
For more information about the
vehicle battery, seeBattery on
page 10-22.
If the vehicle battery has run down,
you may want to use another
vehicle and some jumper cables to
start your vehicle. Be sure to use
the following steps to do it safely.
{Warning
Batteries can hurt you. They can
be dangerous because:
.They contain acid that can
burn you.
.They contain gas that can
explode or ignite.
.They contain enough
electricity to burn you.
If you do not follow these steps
exactly, some or all of these
things can hurt you.
{Caution
Ignoring these steps could result
in costly damage to the vehicle
that would not be covered by the
vehicle warranty. Trying to start
the vehicle by pushing or pulling it
will not work, and it could damage
the vehicle.
1. Remote Positive (+) Terminal
2. Remote Negative (−) Terminal
Page 346 of 416

Black plate (86,1)Cadillac SRX Owner Manual (GMNA-Localizing-U.S./Canada/Mexico-
6081464) - 2014 - CRC - 10/4/13
10-86 Vehicle Care
Once the destination has been
reached:
1. Shift the vehicle to P (Park).
2. Reinstall the shift lever boot byinserting the front edge and
pressing the rear of the trim
plate until it snaps into place.
3. Start the engine and let it idle for more than three minutes before
driving the vehicle.
{Caution
Too much or too little fluid can
damage the transmission. Be
sure that the transmission fluid is
at the proper level before towing
with all four wheels on the
ground.
{Caution
Do not tow a vehicle with the front
drive wheels on the ground if one
of the front tires is a compact
spare tire. Towing with two
different tire sizes on the front of
the vehicle can cause severe
damage to the transmission.
Dolly Towing (All-Wheel-Drive
Vehicles)
All-wheel-drive vehicles should not
be towed with two wheels on the
ground. To properly tow these
vehicles, they should be placed on
a platform trailer with all four wheels
off of the ground or dinghy towed
from the front. See “Dinghy Towing”
earlier in this section.
Dolly Towing
(Front-Wheel-Drive Vehicles)
To tow the vehicle from the front
with the rear wheels on the ground:
1. Put the front wheels on a dolly.
2. Move the shift lever to P (Park).
See Shifting Into Park on
page 9-19.
3. Set the parking brake.
4. Secure the vehicle to the dolly.
Page 405 of 416

Black plate (3,1)Cadillac SRX Owner Manual (GMNA-Localizing-U.S./Canada/Mexico-
6081464) - 2014 - CRC - 10/4/13
INDEX i-3
Climate Control SystemsDual Automatic . . . . . . . . . . . . . . . . 8-1
Rear . . . . . . . . . . . . . . . . . . . . . . . . . . . 8-6
Clock . . . . . . . . . . . . . . . . . . . . . . . . . . . 5-6
Cluster, Instrument . . . . . . . . . . . . 5-10
Collision Damage Repair . . . . . . 13-9
Compact Spare Tire . . . . . . . . . . 10-79
Compartments Storage . . . . . . . . . . . . . . . . . . . . . . . . 4-1
Compass . . . . . . . . . . . . . . . . . . . . . . . 5-6 Messages . . . . . . . . . . . . . . . . . . . . 5-30
Compressor Kit, Tire Sealant . . . . . . . . . . . . . . . . . . . . . . 10-65
Connections OnStar
®. . . . . . . . . . . . . . . . . . . . . . 14-3
Control
Traction and ElectronicStability . . . . . . . . . . . . . . . . . . . . . 9-30
Control of a Vehicle . . . . . . . . . . . . . 9-3
Convenience Net . . . . . . . . . . . . . . 4-11
Convex Mirrors . . . . . . . . . . . . . . . . 2-19 Coolant
Engine . . . . . . . . . . . . . . . . . . . . . . 10-13
Engine Temperature
Gauge . . . . . . . . . . . . . . . . . . . . . . 5-13
Engine Temperature Warning Light . . . . . . . . . . . . . . . 5-22
Cooling System . . . . . . . . . . . . . . . 10-12
Engine Messages . . . . . . . . . . . . 5-31
Courtesy Lamps . . . . . . . . . . . . . . . . 6-8
Courtesy Transportation Program . . . . . . . . . . . . . . . . . . . . . . 13-7
Cover Cargo . . . . . . . . . . . . . . . . . . . . . . . . . . 4-3
Engine . . . . . . . . . . . . . . . . . . . . . . . . 10-6
Cruise Control . . . . . . . . . . . . . . . . . 9-33 Light . . . . . . . . . . . . . . . . . . . . . . . . . . 5-26
Messages . . . . . . . . . . . . . . . . . . . . 5-30
Cruise Control, Active . . . . . . . . . 9-36
Cupholders . . . . . . . . . . . . . . . . . . . . . 4-2
Customer Assistance . . . . . . . . . . 13-4 Offices . . . . . . . . . . . . . . . . . . . . . . . . 13-3
Text Telephone (TTY)
Users . . . . . . . . . . . . . . . . . . . . . . . 13-4
Customer Information Service Publications
Ordering Information . . . . . . .13-11 Customer Satisfaction
Procedure . . . . . . . . . . . . . . . . . . . . 13-1
D
Damage Repair, Collision . . . . . . 13-9
Danger, Warnings, and
Cautions . . . . . . . . . . . . . . . . . . . . . . . . iv
Data Recorders, Event . . . . . . . 13-13
Daytime Running Lamps (DRL) . . . . . . . . . . . . . . . . . . 6-4
Defensive Driving . . . . . . . . . . . . . . . 9-3
Delayed Locking . . . . . . . . . . . . . . . 2-11
Distracted Driving . . . . . . . . . . . . . . . 9-2
Dome Lamps . . . . . . . . . . . . . . . . . . . 6-8
Door Ajar Messages . . . . . . . . . . . . . . . 5-31
Delayed Locking . . . . . . . . . . . . . . 2-11
Locks . . . . . . . . . . . . . . . . . . . . . . . . . 2-10
Power Locks . . . . . . . . . . . . . . . . . . 2-11
Rear Seat Pass-Through . . . . . 3-12
Drive Belt Routing, Engine . . . . . 12-4
Drive Systems All-Wheel Drive . . . . . . . 9-26, 10-23
Driver Assistance Systems . . . . 9-44
Driver Information Center (DIC) . . . . . . . . . . . . . . . . . 5-26