ECO mode CADILLAC SRX 2014 Owner's Manual
[x] Cancel search | Manufacturer: CADILLAC, Model Year: 2014, Model line: SRX, Model: CADILLAC SRX 2014Pages: 416, PDF Size: 4.56 MB
Page 9 of 416
Black plate (3,1)Cadillac SRX Owner Manual (GMNA-Localizing-U.S./Canada/Mexico-
6081464) - 2014 - CRC - 10/4/13
In Brief 1-3
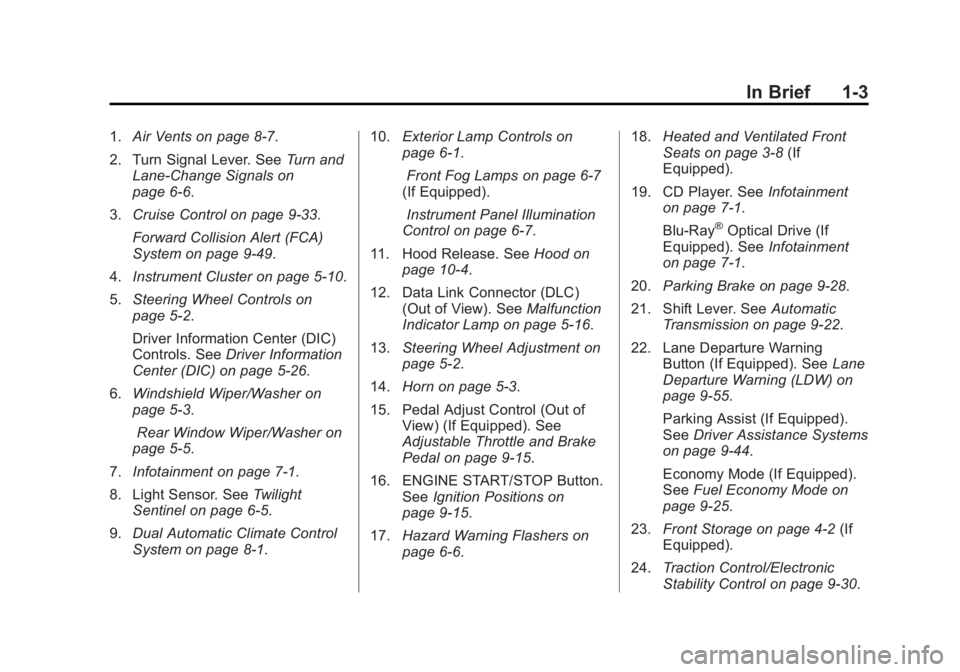
1.Air Vents on page 8-7.
2. Turn Signal Lever. See Turn and
Lane-Change Signals on
page 6-6.
3. Cruise Control on page 9-33.
Forward Collision Alert (FCA)
System on page 9-49.
4. Instrument Cluster on page 5-10.
5. Steering Wheel Controls on
page 5-2.
Driver Information Center (DIC)
Controls. See Driver Information
Center (DIC) on page 5-26.
6. Windshield Wiper/Washer on
page 5-3.
Rear Window Wiper/Washer on
page 5-5.
7. Infotainment on page 7-1.
8. Light Sensor. See Twilight
Sentinel on page 6-5.
9. Dual Automatic Climate Control
System on page 8-1. 10.
Exterior Lamp Controls on
page 6-1.
Front Fog Lamps on page 6-7
(If Equipped).
Instrument Panel Illumination
Control on page 6-7.
11. Hood Release. See Hood on
page 10-4.
12. Data Link Connector (DLC) (Out of View). See Malfunction
Indicator Lamp on page 5-16.
13. Steering Wheel Adjustment on
page 5-2.
14. Horn on page 5-3.
15. Pedal Adjust Control (Out of View) (If Equipped). See
Adjustable Throttle and Brake
Pedal on page 9-15.
16. ENGINE START/STOP Button. SeeIgnition Positions on
page 9-15.
17. Hazard Warning Flashers on
page 6-6. 18.
Heated and Ventilated Front
Seats on page 3-8 (If
Equipped).
19. CD Player. See Infotainment
on page 7-1.
Blu-Ray
®Optical Drive (If
Equipped). See Infotainment
on page 7-1.
20. Parking Brake on page 9-28.
21. Shift Lever. See Automatic
Transmission on page 9-22.
22. Lane Departure Warning Button (If Equipped). See Lane
Departure Warning (LDW) on
page 9-55.
Parking Assist (If Equipped).
See Driver Assistance Systems
on page 9-44.
Economy Mode (If Equipped).
See Fuel Economy Mode on
page 9-25.
23. Front Storage on page 4-2 (If
Equipped).
24. Traction Control/Electronic
Stability Control on page 9-30.
Page 32 of 416
Black plate (4,1)Cadillac SRX Owner Manual (GMNA-Localizing-U.S./Canada/Mexico-
6081464) - 2014 - CRC - 10/4/13
2-4 Keys, Doors, and Windows
On some models, pressing and
holding
Kwill open all of the
windows.
If equipped, pressing
Kwill also
unlock the fuel door.
/(Remote Start): For vehicles
with this feature, press and release
Qand then immediately press and
hold
/for at least four seconds to
start the engine from outside the
vehicle using the RKE transmitter.
See Remote Vehicle Start on
page 2-8.
L(Vehicle Locator/Panic
Alarm): Press and release one
time to initiate vehicle locator. The
exterior lamps flash and the horn
chirps three times. Press and hold
Lfor three seconds to sound the
panic alarm. The horn sounds and
the turn signal lamps flash for
30 seconds, or until
Lis pressed
again or the vehicle is started.
h(Remote Liftgate
Release): Press and hold to open
or close the power liftgate.
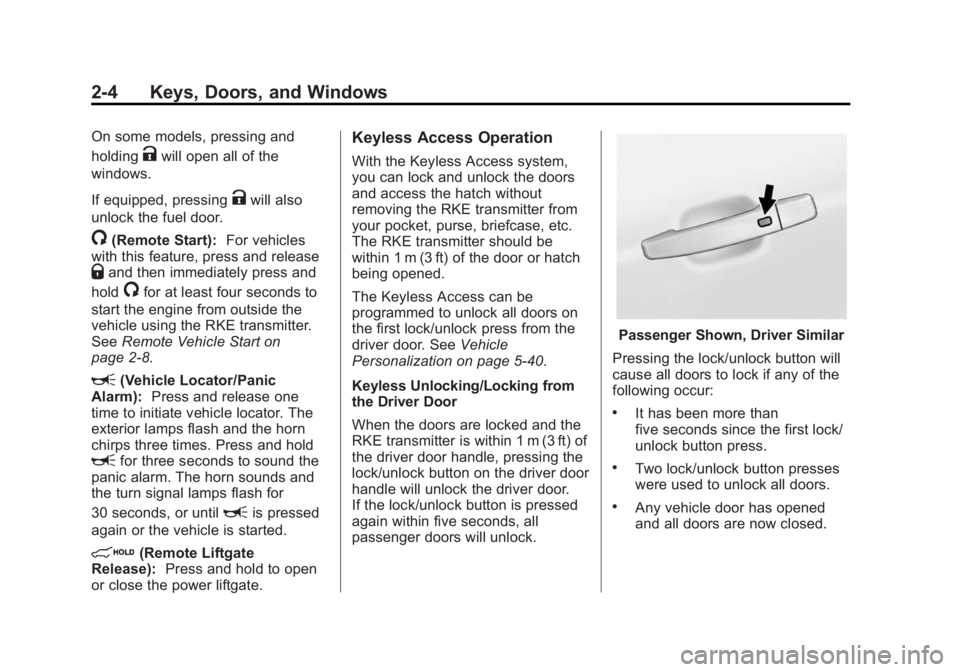
Keyless Access Operation
With the Keyless Access system,
you can lock and unlock the doors
and access the hatch without
removing the RKE transmitter from
your pocket, purse, briefcase, etc.
The RKE transmitter should be
within 1 m (3 ft) of the door or hatch
being opened.
The Keyless Access can be
programmed to unlock all doors on
the first lock/unlock press from the
driver door. See Vehicle
Personalization on page 5-40.
Keyless Unlocking/Locking from
the Driver Door
When the doors are locked and the
RKE transmitter is within 1 m (3 ft) of
the driver door handle, pressing the
lock/unlock button on the driver door
handle will unlock the driver door.
If the lock/unlock button is pressed
again within five seconds, all
passenger doors will unlock.
Passenger Shown, Driver Similar
Pressing the lock/unlock button will
cause all doors to lock if any of the
following occur:
.It has been more than
five seconds since the first lock/
unlock button press.
.Two lock/unlock button presses
were used to unlock all doors.
.Any vehicle door has opened
and all doors are now closed.
Page 34 of 416
Black plate (6,1)Cadillac SRX Owner Manual (GMNA-Localizing-U.S./Canada/Mexico-
6081464) - 2014 - CRC - 10/4/13
2-6 Keys, Doors, and Windows
2. Insert the vehicle key of thetransmitter into the key lock
cylinder on the driver door
handle and turn the key,
counterclockwise, to the unlock
position five times within
10 seconds.
The Driver Information Center
(DIC) displays READY FOR
REMOTE #2, 3, 4, ETC.
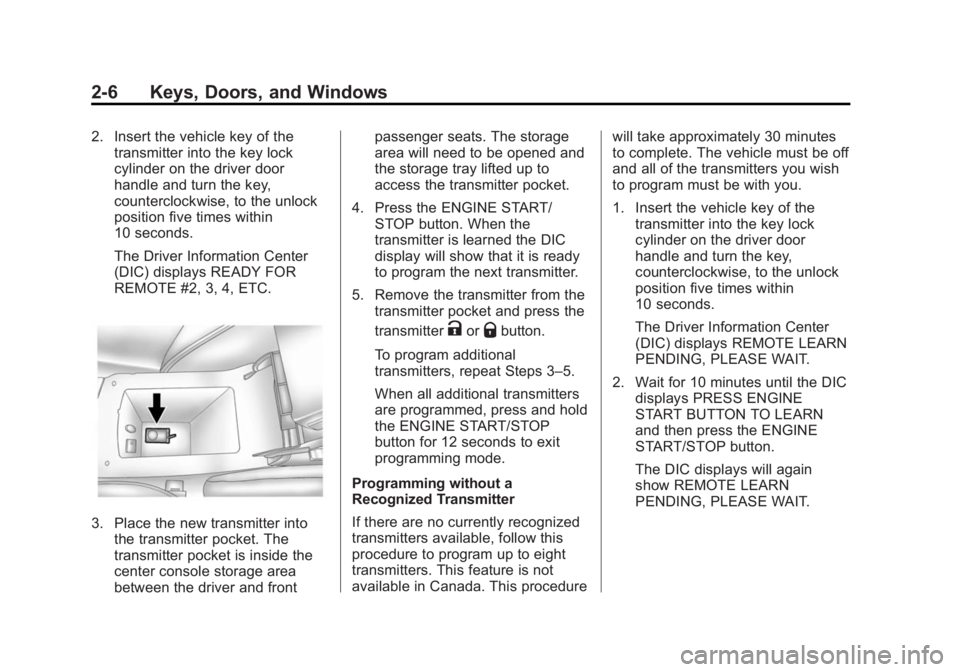
3. Place the new transmitter intothe transmitter pocket. The
transmitter pocket is inside the
center console storage area
between the driver and front passenger seats. The storage
area will need to be opened and
the storage tray lifted up to
access the transmitter pocket.
4. Press the ENGINE START/ STOP button. When the
transmitter is learned the DIC
display will show that it is ready
to program the next transmitter.
5. Remove the transmitter from the transmitter pocket and press the
transmitter
KorQbutton.
To program additional
transmitters, repeat Steps 3–5.
When all additional transmitters
are programmed, press and hold
the ENGINE START/STOP
button for 12 seconds to exit
programming mode.
Programming without a
Recognized Transmitter
If there are no currently recognized
transmitters available, follow this
procedure to program up to eight
transmitters. This feature is not
available in Canada. This procedure will take approximately 30 minutes
to complete. The vehicle must be off
and all of the transmitters you wish
to program must be with you.
1. Insert the vehicle key of the
transmitter into the key lock
cylinder on the driver door
handle and turn the key,
counterclockwise, to the unlock
position five times within
10 seconds.
The Driver Information Center
(DIC) displays REMOTE LEARN
PENDING, PLEASE WAIT.
2. Wait for 10 minutes until the DIC displays PRESS ENGINE
START BUTTON TO LEARN
and then press the ENGINE
START/STOP button.
The DIC displays will again
show REMOTE LEARN
PENDING, PLEASE WAIT.
Page 35 of 416
Black plate (7,1)Cadillac SRX Owner Manual (GMNA-Localizing-U.S./Canada/Mexico-
6081464) - 2014 - CRC - 10/4/13
Keys, Doors, and Windows 2-7
3. Repeat Step 2 two additionaltimes. After the third time all
previously known transmitters
will no longer work with the
vehicle. Remaining transmitters
can be relearned during the next
steps.
The DIC display should
now show READY FOR
REMOTE # 1.
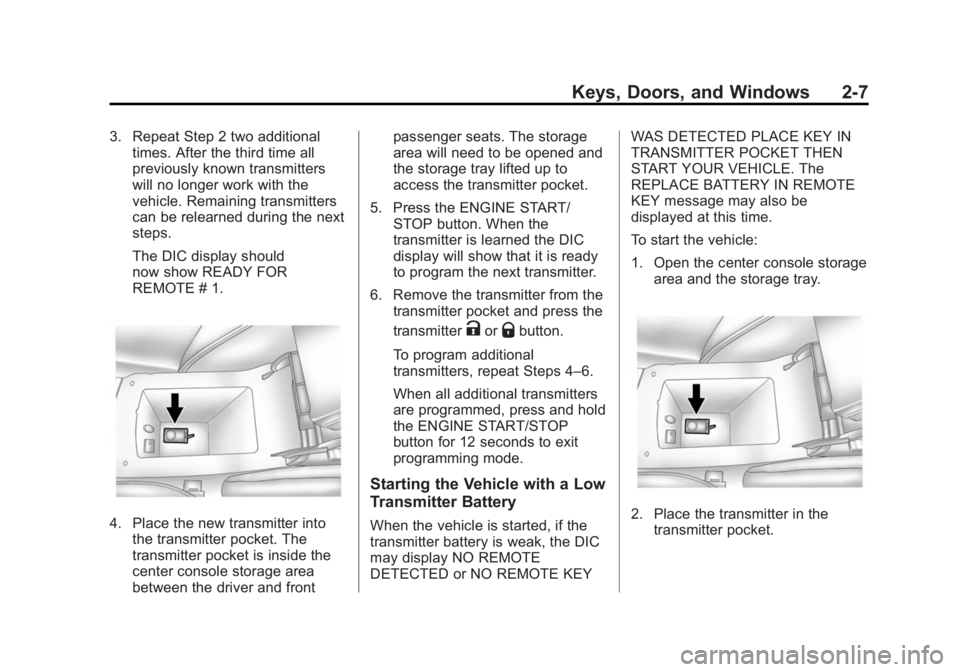
4. Place the new transmitter intothe transmitter pocket. The
transmitter pocket is inside the
center console storage area
between the driver and front passenger seats. The storage
area will need to be opened and
the storage tray lifted up to
access the transmitter pocket.
5. Press the ENGINE START/ STOP button. When the
transmitter is learned the DIC
display will show that it is ready
to program the next transmitter.
6. Remove the transmitter from the transmitter pocket and press the
transmitter
KorQbutton.
To program additional
transmitters, repeat Steps 4–6.
When all additional transmitters
are programmed, press and hold
the ENGINE START/STOP
button for 12 seconds to exit
programming mode.
Starting the Vehicle with a Low
Transmitter Battery
When the vehicle is started, if the
transmitter battery is weak, the DIC
may display NO REMOTE
DETECTED or NO REMOTE KEY WAS DETECTED PLACE KEY IN
TRANSMITTER POCKET THEN
START YOUR VEHICLE. The
REPLACE BATTERY IN REMOTE
KEY message may also be
displayed at this time.
To start the vehicle:
1. Open the center console storage
area and the storage tray.2. Place the transmitter in the
transmitter pocket.
Page 37 of 416
Black plate (9,1)Cadillac SRX Owner Manual (GMNA-Localizing-U.S./Canada/Mexico-
6081464) - 2014 - CRC - 10/4/13
Keys, Doors, and Windows 2-9
Other conditions can affect the
performance of the transmitter. See
Remote Keyless Entry (RKE)
System on page 2-2for additional
information.
Starting the Engine Using Remote
Start
1. Press and release
Qon the
RKE transmitter.
2. Immediately press and hold
/
for at least four seconds or until
the turn signal lamps flash. The
turn signal lamps flashing
confirms the request to remote
start the vehicle has been
received.
During the remote start the
doors will be locked and the
parking lamps will remain on as
long as the engine is running.
The engine will shut off after
10 minutes unless a time
extension is done or the ignition
is put in ON/RUN/START. 3. Press the brake pedal and select
the ON/RUN/START ignition
mode to drive the vehicle.
Extending Engine Run Time
The engine run time can also be
extended by another 10-minutes,
if during the first 10 minutes
Steps 1–2 are repeated while the
engine is still running. This provides
a total of 20 minutes.
The remote start can only be
extended once.
When the remote start is extended,
the second 10-minute period is
added on to the first 10 minutes for
a total of 20 minutes.
A maximum of two remote starts,
or a remote start with an extension,
are allowed between ignition cycles.
The vehicle's ignition must be
changed to ON/RUN/START and
then back to OFF before the remote
start procedure can be used again. Shutting the Engine Off After a
Remote Start
To cancel a remote start, do any of
the following:
.Press and hold/until the
parking lamps turn off.
.Turn on the hazard warning
flashers.
.Turn the vehicle on and then off.
Conditions in Which Remote Start
Will Not Work
The remote start will not operate if
any of the following occur:
.The transmitter is in the vehicle.
.The hood is not closed.
.The hazard warning flashers
are on.
.There is an emission control
system malfunction.
.The engine coolant temperature
is too high.
.The oil pressure is low.
Page 44 of 416
Black plate (16,1)Cadillac SRX Owner Manual (GMNA-Localizing-U.S./Canada/Mexico-
6081464) - 2014 - CRC - 10/4/13
2-16 Keys, Doors, and Windows
Setting the Power Liftgate
3/4 Mode
To change the liftgate stop position:
1. Turn the liftgate switch to theMAX or 3/4 mode position and
power open the liftgate.
2. Stop the liftgate movement at the desired height by pressing
any liftgate switch. Manually
adjust the liftgate position if
required.
3. Press and hold the button on the liftgate next to the latch until the
turn signals flash and a beep
sounds to indicate that the new
setting is recorded.
When power opened with the
3/4 mode selected, the liftgate stops
at the new set position. If you do not receive the audible and
visual feedback when setting the
intermediate stop position, you are
attempting to set the height below
the 3/4 open height minimum
(approximately 1.52 m or 5 ft). The
liftgate cannot be set below that
minimum and the new setting will
not be recorded.
Manual Operation of Power
Liftgate
To change the liftgate to manual
operation, turn the mode switch to
the OFF position.
With the power liftgate disabled and
all of the doors unlocked, the liftgate
can be manually opened and
closed. The effort required to
operate a power liftgate is greater
than the effort required to operate a
non-power liftgate.To open the liftgate, press the touch
pad on the handle on the outside of
the liftgate, and lift the gate open. To
close the liftgate, use the pull cup to
lower the liftgate and close. With the
power liftgate disabled, the liftgate
electric latch will still power latch
once contact is made with the
striker. Always close the liftgate
before driving.
If the RKE button is pressed while
power operation is disabled, the turn
signals flash and the liftgate will
not move.
The liftgate has an electric latch.
If the battery is disconnected or has
low voltage, the liftgate will not
open. The liftgate will resume
operation when the battery is
reconnected and charged.
Page 78 of 416
Black plate (24,1)Cadillac SRX Owner Manual (GMNA-Localizing-U.S./Canada/Mexico-
6081464) - 2014 - CRC - 10/4/13
3-24 Seats and Restraints
A seat-mounted side impact airbag
is designed to inflate on the side of
the vehicle that is struck.
Roof-rail airbags are designed to
inflate in moderate to severe side
crashes depending on the location
of the impact. In addition, these
roof-rail airbags are designed to
inflate during a rollover or in a
severe frontal impact. Roof-rail
airbags are not designed to inflate in
rear impacts. Both roof-rail airbags
will inflate when either side of the
vehicle is struck, if the sensing
system predicts that the vehicle is
about to roll over on its side, or in a
severe frontal impact.
In any particular crash, no one can
say whether an airbag should have
inflated simply because of the
vehicle damage or repair costs.What Makes an Airbag
Inflate?
In a deployment event, the sensing
system sends an electrical signal
triggering a release of gas from the
inflator. Gas from the inflator fills the
airbag causing the bag to break out
of the cover. The inflator, the airbag,
and related hardware are all part of
the airbag module.
For airbag locations, seeWhere Are
the Airbags? on page 3-21.
How Does an Airbag
Restrain?
In moderate to severe frontal or
near frontal collisions, even belted
occupants can contact the steering
wheel or the instrument panel. In
moderate to severe side collisions,
even belted occupants can contact
the inside of the vehicle. Airbags supplement the protection
provided by safety belts by
distributing the force of the impact
more evenly over the
occupant's body.
Rollover capable roof-rail airbags
are designed to help contain the
head and chest of occupants in the
outboard seating positions in the
first and second rows. The rollover
capable roof-rail airbags are
designed to help reduce the risk of
full or partial ejection in rollover
events, although no system can
prevent all such ejections.
But airbags would not help in many
types of collisions, primarily
because the occupant's motion is
not toward those airbags. See
When
Should an Airbag Inflate? on
page 3-23.
Airbags should never be regarded
as anything more than a supplement
to safety belts.
Page 136 of 416
Black plate (16,1)Cadillac SRX Owner Manual (GMNA-Localizing-U.S./Canada/Mexico-
6081464) - 2014 - CRC - 10/4/13
5-16 Instruments and Controls
If the word OFF or the off symbol is
lit on the passenger airbag status
indicator, it means that the
passenger sensing system has
turned off the front outboard
passenger frontal airbag.
If, after several seconds, both status
indicator lights remain on, or if there
are no lights at all, there may be a
problem with the lights or the
passenger sensing system. See
your dealer for service.
{Warning
If the airbag readiness light ever
comes on and stays on, it means
that something may be wrong
with the airbag system. To help
avoid injury to yourself or others,
have the vehicle serviced right
away. SeeAirbag Readiness
Light on page 5-14 for more
information, including important
safety information.
Charging System Light
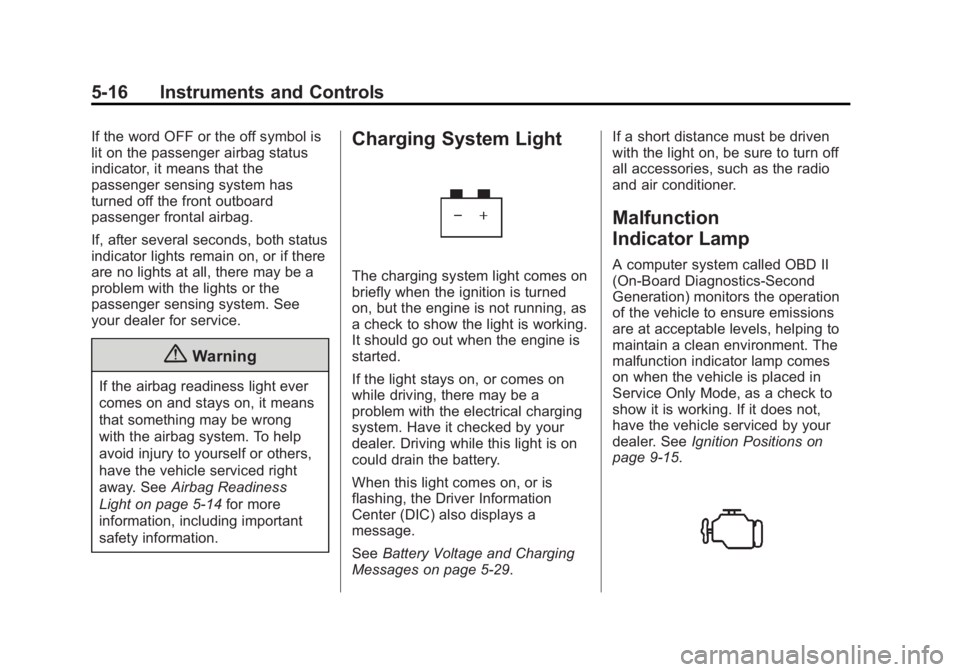
The charging system light comes on
briefly when the ignition is turned
on, but the engine is not running, as
a check to show the light is working.
It should go out when the engine is
started.
If the light stays on, or comes on
while driving, there may be a
problem with the electrical charging
system. Have it checked by your
dealer. Driving while this light is on
could drain the battery.
When this light comes on, or is
flashing, the Driver Information
Center (DIC) also displays a
message.
See Battery Voltage and Charging
Messages on page 5-29. If a short distance must be driven
with the light on, be sure to turn off
all accessories, such as the radio
and air conditioner.
Malfunction
Indicator Lamp
A computer system called OBD II
(On-Board Diagnostics-Second
Generation) monitors the operation
of the vehicle to ensure emissions
are at acceptable levels, helping to
maintain a clean environment. The
malfunction indicator lamp comes
on when the vehicle is placed in
Service Only Mode, as a check to
show it is working. If it does not,
have the vehicle serviced by your
dealer. See
Ignition Positions on
page 9-15.
Page 138 of 416
Black plate (18,1)Cadillac SRX Owner Manual (GMNA-Localizing-U.S./Canada/Mexico-
6081464) - 2014 - CRC - 10/4/13
5-18 Instruments and Controls
The following may correct an
emission control system
malfunction:
.Check that the fuel cap is fully
installed. SeeFilling the Tank on
page 9-59. The diagnostic
system can determine if the fuel
cap has been left off or
improperly installed. A loose or
missing fuel cap allows fuel to
evaporate into the atmosphere.
A few driving trips with the cap
properly installed should turn the
light off.
.Check that good quality fuel is
used. Poor fuel quality causes
the engine not to run as
efficiently as designed and may
cause stalling after start-up,
stalling when the vehicle is
changed into gear, misfiring,
hesitation on acceleration,
or stumbling on acceleration.
These conditions might go away
once the engine is warmed up. If one or more of these conditions
occurs, change the fuel brand used.
It may require at least one full tank
of the proper fuel to turn the light off.
See
Recommended Fuel on
page 9-57.
If none of the above have made the
light turn off, your dealer can check
the vehicle. The dealer has the
proper test equipment and
diagnostic tools to fix any
mechanical or electrical problems
that might have developed.Emissions Inspection and
Maintenance Programs
Depending on where you live, your
vehicle may be required to
participate in an emission control
system inspection and maintenance
program. For the inspection, the
emission system test equipment will
likely connect to the vehicle's Data
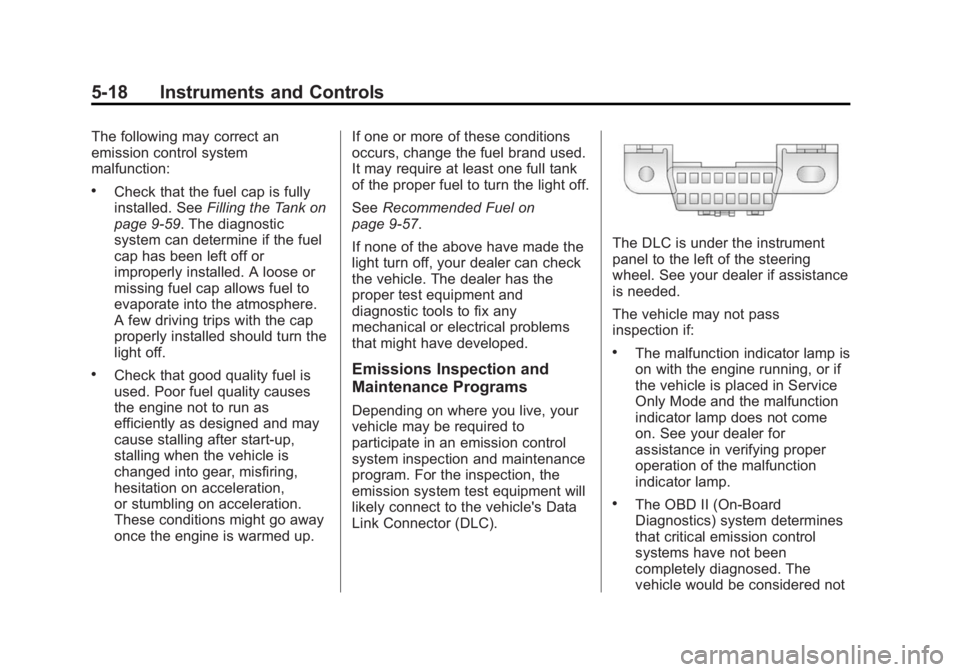
Link Connector (DLC).
The DLC is under the instrument
panel to the left of the steering
wheel. See your dealer if assistance
is needed.
The vehicle may not pass
inspection if:
.The malfunction indicator lamp is
on with the engine running, or if
the vehicle is placed in Service
Only Mode and the malfunction
indicator lamp does not come
on. See your dealer for
assistance in verifying proper
operation of the malfunction
indicator lamp.
.The OBD II (On-Board
Diagnostics) system determines
that critical emission control
systems have not been
completely diagnosed. The
vehicle would be considered not
Page 144 of 416
Black plate (24,1)Cadillac SRX Owner Manual (GMNA-Localizing-U.S./Canada/Mexico-
6081464) - 2014 - CRC - 10/4/13
5-24 Instruments and Controls
This light should come on briefly as
the engine is started. If it does not
come on, have the vehicle serviced
by your dealer.
If the light comes on and stays on, it
means that oil is not flowing through
the engine properly. The vehicle
could be low on oil and might have
some other system problem. See
your dealer.
Fuel Economy Light
This light is in the Driver Information
Center (DIC) display.For vehicles with the fuel economy
mode light, it comes on when the
eco (economy) button, located next
to the shift lever, is pressed. Press
the button again to turn off the light
and exit the fuel economy mode.
See
Driving for Better Fuel
Economy on page 1-21 andFuel
Economy Mode on page 9-25 for
more information.
Low Fuel Warning Light
This light is near the fuel gauge and
comes on briefly when the ignition is
turned on as a check to show it is
working.
It also comes on when the fuel tank
is low on fuel. The light turns off
when fuel is added. If it does not,
have the vehicle serviced.
Security Light
The security light should come on
briefly as the engine is started. If it
does not come on, have the vehicle
serviced by your dealer. If the
system is working normally, the
indicator light turns off.
If the light stays on and the engine
does not start, there could be a
problem with the theft-deterrent
system. See Immobilizer Operation
on page 2-18.