CADILLAC SRX 2015 2.G Owners Manual
Manufacturer: CADILLAC, Model Year: 2015, Model line: SRX, Model: CADILLAC SRX 2015 2.GPages: 417, PDF Size: 4.59 MB
Page 201 of 417
Black plate (10,1)Cadillac SRX Owner Manual (GMNA-Localizing-U.S./Canada/Mexico-
7707476) - 2015 - crc - 4/8/14
9-10 Driving and Operating
Warning (Continued)
vehicle handles. This could
cause loss of control and a
crash. Overloading can also
shorten the life of the vehicle.
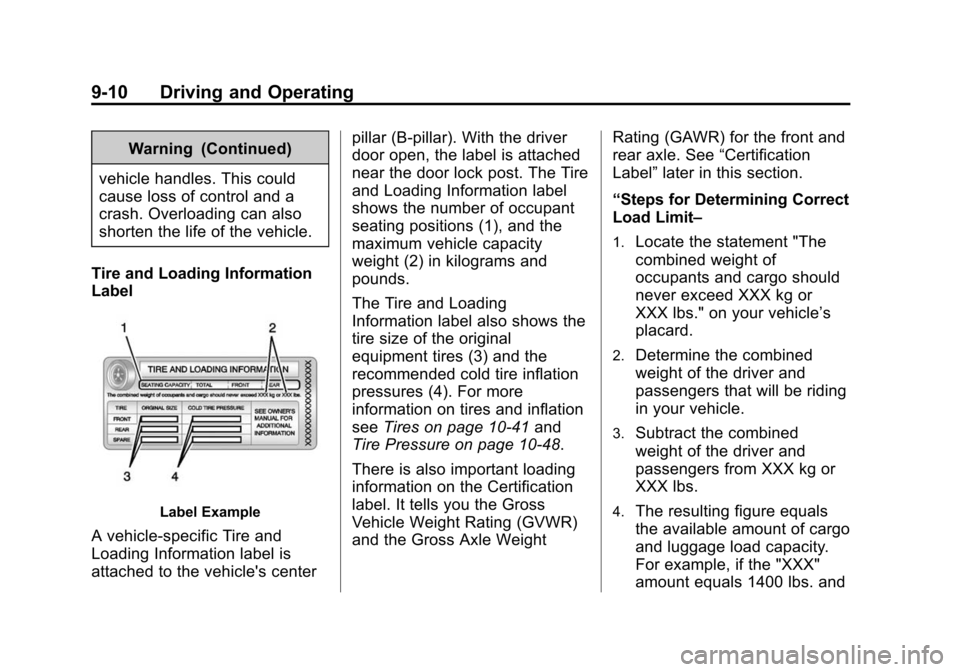
Tire and Loading Information
Label
Label Example
A vehicle-specific Tire and
Loading Information label is
attached to the vehicle's center pillar (B-pillar). With the driver
door open, the label is attached
near the door lock post. The Tire
and Loading Information label
shows the number of occupant
seating positions (1), and the
maximum vehicle capacity
weight (2) in kilograms and
pounds.
The Tire and Loading
Information label also shows the
tire size of the original
equipment tires (3) and the
recommended cold tire inflation
pressures (4). For more
information on tires and inflation
see
Tires on page 10-41 and
Tire Pressure on page 10-48.
There is also important loading
information on the Certification
label. It tells you the Gross
Vehicle Weight Rating (GVWR)
and the Gross Axle Weight Rating (GAWR) for the front and
rear axle. See
“Certification
Label” later in this section.
“Steps for Determining Correct
Load Limit–
1.Locate the statement "The
combined weight of
occupants and cargo should
never exceed XXX kg or
XXX lbs." on your vehicle’s
placard.
2.Determine the combined
weight of the driver and
passengers that will be riding
in your vehicle.
3.Subtract the combined
weight of the driver and
passengers from XXX kg or
XXX lbs.
4.The resulting figure equals
the available amount of cargo
and luggage load capacity.
For example, if the "XXX"
amount equals 1400 lbs. and
Page 202 of 417
Black plate (11,1)Cadillac SRX Owner Manual (GMNA-Localizing-U.S./Canada/Mexico-
7707476) - 2015 - crc - 4/8/14
Driving and Operating 9-11
there will be five 150 lb
passengers in your vehicle,
the amount of available cargo
and luggage load capacity is
650 lbs. (1400-750 (5 x 150)
= 650 lbs.)
5.Determine the combined
weight of luggage and cargo
being loaded on the vehicle.
That weight may not safely
exceed the available cargo
and luggage load capacity
calculated in Step 4.
6.If your vehicle will be towing
a trailer, load from your trailer
will be transferred to your
vehicle. Consult this manual
to determine how this
reduces the available cargo
and luggage load capacity of
your vehicle.”
See Trailer Towing on page 9-63
for important information on
towing a trailer, towing safety
rules and trailering tips.
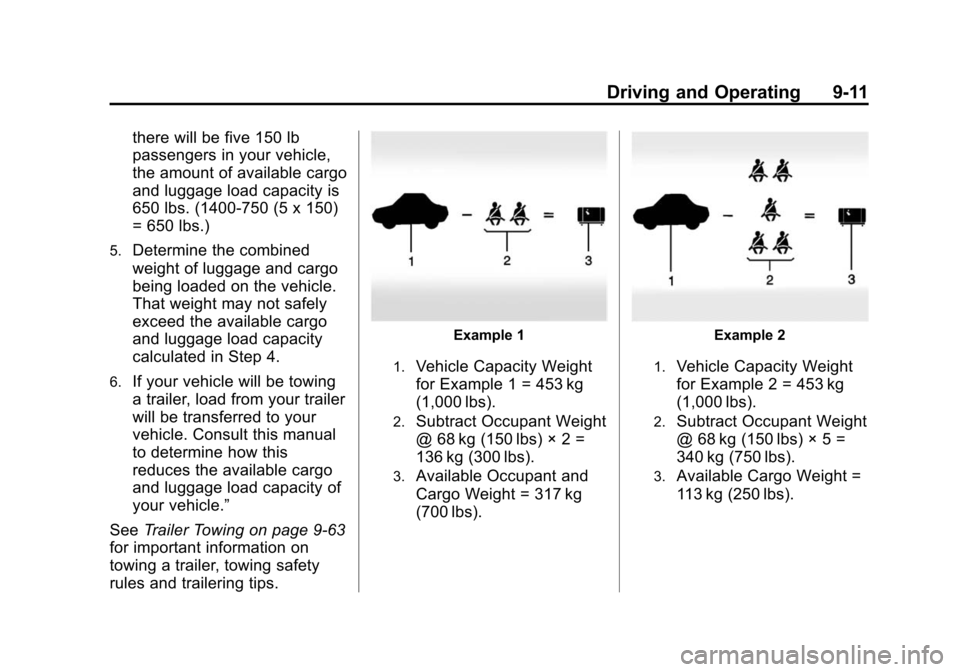
Example 1
1.Vehicle Capacity Weight
for Example 1 = 453 kg
(1,000 lbs).
2.Subtract Occupant Weight
@ 68 kg (150 lbs) × 2 =
136 kg (300 lbs).
3.Available Occupant and
Cargo Weight = 317 kg
(700 lbs).
Example 2
1.Vehicle Capacity Weight
for Example 2 = 453 kg
(1,000 lbs).
2.Subtract Occupant Weight
@ 68 kg (150 lbs) × 5 =
340 kg (750 lbs).
3.Available Cargo Weight =
113 kg (250 lbs).
Page 203 of 417
Black plate (12,1)Cadillac SRX Owner Manual (GMNA-Localizing-U.S./Canada/Mexico-
7707476) - 2015 - crc - 4/8/14
9-12 Driving and Operating
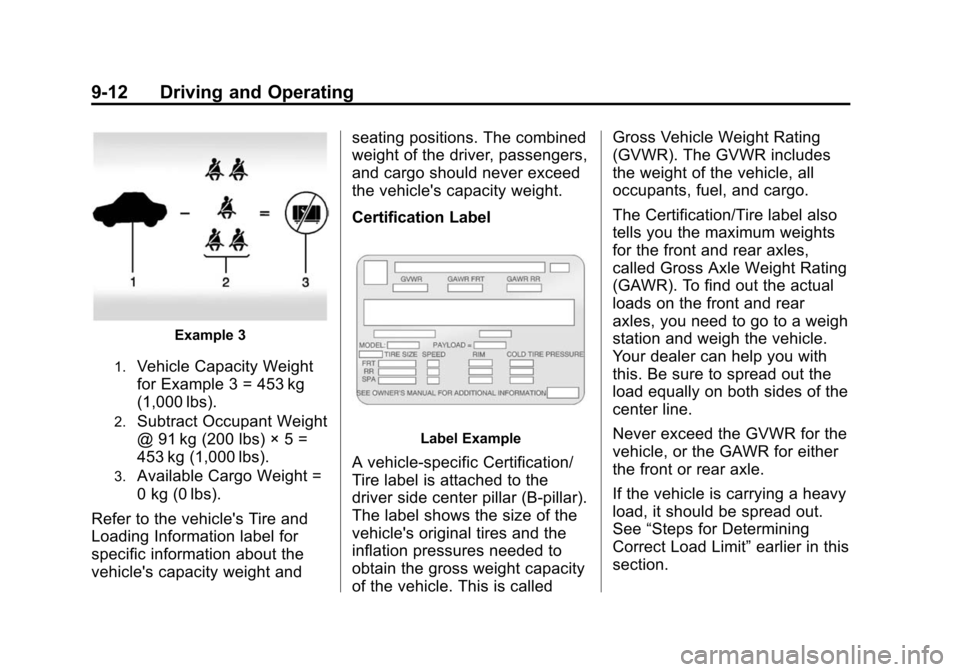
Example 3
1.Vehicle Capacity Weight
for Example 3 = 453 kg
(1,000 lbs).
2.Subtract Occupant Weight
@ 91 kg (200 lbs) × 5 =
453 kg (1,000 lbs).
3.Available Cargo Weight =
0 kg (0 lbs).
Refer to the vehicle's Tire and
Loading Information label for
specific information about the
vehicle's capacity weight and seating positions. The combined
weight of the driver, passengers,
and cargo should never exceed
the vehicle's capacity weight.
Certification Label
Label Example
A vehicle-specific Certification/
Tire label is attached to the
driver side center pillar (B-pillar).
The label shows the size of the
vehicle's original tires and the
inflation pressures needed to
obtain the gross weight capacity
of the vehicle. This is calledGross Vehicle Weight Rating
(GVWR). The GVWR includes
the weight of the vehicle, all
occupants, fuel, and cargo.
The Certification/Tire label also
tells you the maximum weights
for the front and rear axles,
called Gross Axle Weight Rating
(GAWR). To find out the actual
loads on the front and rear
axles, you need to go to a weigh
station and weigh the vehicle.
Your dealer can help you with
this. Be sure to spread out the
load equally on both sides of the
center line.
Never exceed the GVWR for the
vehicle, or the GAWR for either
the front or rear axle.
If the vehicle is carrying a heavy
load, it should be spread out.
See
“Steps for Determining
Correct Load Limit” earlier in this
section.
Page 204 of 417
Black plate (13,1)Cadillac SRX Owner Manual (GMNA-Localizing-U.S./Canada/Mexico-
7707476) - 2015 - crc - 4/8/14
Driving and Operating 9-13
{Warning
Do not load the vehicle any
heavier than the Gross
Vehicle Weight Rating
(GVWR), or either the
maximum front or rear Gross
Axle Weight Rating (GAWR).
This can cause systems to
break and change the way the
vehicle handles. This could
cause loss of control and a
crash. Overloading can also
shorten the life of the vehicle.
Your warranty does not cover
parts or components that fail
because of overloading.
The label will help you decide
how much cargo and installed
equipment your vehicle can
carry. Using heavier suspension
components to get added
durability might not change your
weight ratings. Ask your dealer
to help you load your vehicle the
right way.
If you put things inside your
vehicle
–like suitcases, tools,
packages, or anything else –
they will go as fast as the
vehicle goes. If you have to stop
or turn quickly, or if there is a
crash, they will keep going.
{Warning
Things inside the vehicle can
strike and injure people in a
sudden stop or turn, or in a
crash.
.Put things in the cargo
area of the vehicle. In the
cargo area, put them as
(Continued)
Warning (Continued)
far forward as possible.
Try to spread the weight
evenly.
.Never stack heavier
things, like suitcases,
inside the vehicle so that
some of them are above
the tops of the seats.
.Do not leave an
unsecured child restraint
in the vehicle.
.Secure loose items in the
vehicle.
.Do not leave a seat folded
down unless needed.
Page 205 of 417
Black plate (14,1)Cadillac SRX Owner Manual (GMNA-Localizing-U.S./Canada/Mexico-
7707476) - 2015 - crc - 4/8/14
9-14 Driving and Operating
Starting and
Operating
New Vehicle Break-In
{Caution
The vehicle does not need an
elaborate break-in. But it will
perform better in the long run if
you follow these guidelines:
.Do not drive at any one
constant speed, fast or slow,
for the first 805 km (500 mi).
Do not make full-throttle
starts. Avoid downshifting to
brake or slow the vehicle.
.Avoid making hard stops for
the first 322 km (200 mi) or
so. During this time the new
brake linings are not yet
broken in. Hard stops with
new linings can mean
premature wear and earlier
replacement. Follow this(Continued)
Caution (Continued)
breaking-in guideline every
time you get new brake
linings.
Following break-in, engine speed
and load can be gradually
increased.
Adjustable Throttle and
Brake Pedal
If the vehicle has this feature, the
position of the throttle and brake
pedals can be adjusted.
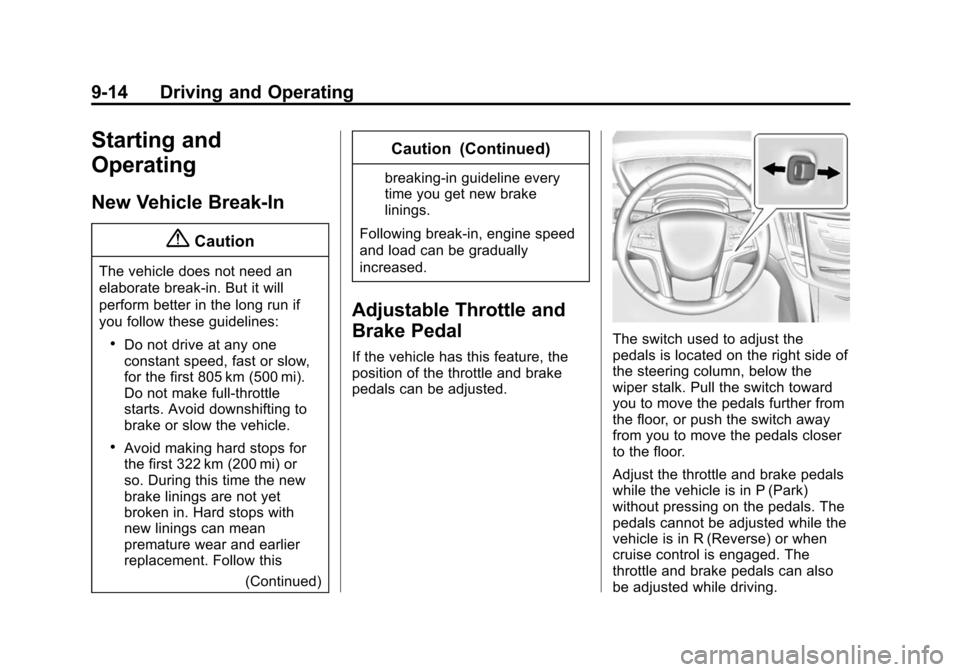
The switch used to adjust the
pedals is located on the right side of
the steering column, below the
wiper stalk. Pull the switch toward
you to move the pedals further from
the floor, or push the switch away
from you to move the pedals closer
to the floor.
Adjust the throttle and brake pedals
while the vehicle is in P (Park)
without pressing on the pedals. The
pedals cannot be adjusted while the
vehicle is in R (Reverse) or when
cruise control is engaged. The
throttle and brake pedals can also
be adjusted while driving.
Page 206 of 417
Black plate (15,1)Cadillac SRX Owner Manual (GMNA-Localizing-U.S./Canada/Mexico-
7707476) - 2015 - crc - 4/8/14
Driving and Operating 9-15
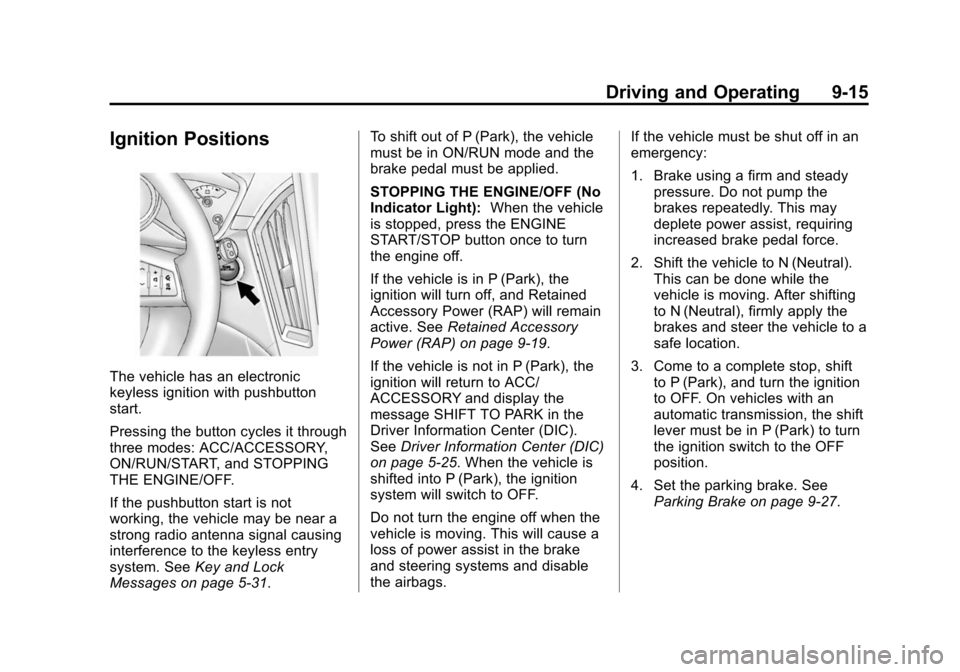
Ignition Positions
The vehicle has an electronic
keyless ignition with pushbutton
start.
Pressing the button cycles it through
three modes: ACC/ACCESSORY,
ON/RUN/START, and STOPPING
THE ENGINE/OFF.
If the pushbutton start is not
working, the vehicle may be near a
strong radio antenna signal causing
interference to the keyless entry
system. SeeKey and Lock
Messages on page 5-31. To shift out of P (Park), the vehicle
must be in ON/RUN mode and the
brake pedal must be applied.
STOPPING THE ENGINE/OFF (No
Indicator Light):
When the vehicle
is stopped, press the ENGINE
START/STOP button once to turn
the engine off.
If the vehicle is in P (Park), the
ignition will turn off, and Retained
Accessory Power (RAP) will remain
active. See Retained Accessory
Power (RAP) on page 9-19.
If the vehicle is not in P (Park), the
ignition will return to ACC/
ACCESSORY and display the
message SHIFT TO PARK in the
Driver Information Center (DIC).
See Driver Information Center (DIC)
on page 5-25. When the vehicle is
shifted into P (Park), the ignition
system will switch to OFF.
Do not turn the engine off when the
vehicle is moving. This will cause a
loss of power assist in the brake
and steering systems and disable
the airbags. If the vehicle must be shut off in an
emergency:
1. Brake using a firm and steady
pressure. Do not pump the
brakes repeatedly. This may
deplete power assist, requiring
increased brake pedal force.
2. Shift the vehicle to N (Neutral). This can be done while the
vehicle is moving. After shifting
to N (Neutral), firmly apply the
brakes and steer the vehicle to a
safe location.
3. Come to a complete stop, shift to P (Park), and turn the ignition
to OFF. On vehicles with an
automatic transmission, the shift
lever must be in P (Park) to turn
the ignition switch to the OFF
position.
4. Set the parking brake. See Parking Brake on page 9-27.
Page 207 of 417
Black plate (16,1)Cadillac SRX Owner Manual (GMNA-Localizing-U.S./Canada/Mexico-
7707476) - 2015 - crc - 4/8/14
9-16 Driving and Operating
{Warning
Turning off the vehicle while
moving may cause loss of power
assist in the brake and steering
systems and disable the airbags.
While driving, only shut the
vehicle off in an emergency.
If the vehicle cannot be pulled over
and must be shut off while driving,
press and hold the ENGINE START/
STOP button for longer than
two seconds, or press twice in
five seconds.
ACC/ACCESSORY (Amber
Indicator Light): This mode allows
you to use some electrical
accessories when the engine is off.
With the ignition off, pressing the
button one time without the brake
pedal applied will place the ignition
system in ACC/ACCESSORY. The ignition will switch from ACC/
ACCESSORY to OFF after
10 minutes to prevent battery
rundown.
ON/RUN/START (Green Indicator
Light):
This mode is for driving and
starting. With the ignition off and the
brake pedal applied, pressing the
button once will place the ignition
system in ON/RUN/START. Once
engine cranking begins, release the
button. Engine cranking will
continue until the engine starts. See
Starting the Gasoline Engine on
page 9-16. The ignition will then
remain in ON/RUN.
Service Only Mode
This power mode is available for
service and diagnostics, and to
verify the proper operation of the
malfunction indicator lamp as may
be required for emission inspection
purposes. With the vehicle off, and
the brake pedal not applied,
pressing and holding the button for
more than five seconds will place
the vehicle in Service Only Mode. The instruments and audio systems
will operate as they do in ON/RUN,
but the vehicle will not be able to be
driven. The engine will not start in
Service Only Mode. Press the
button again to turn the vehicle off.
Starting the Gasoline
Engine
Place the transmission in the proper
gear by moving the shift lever to
P (Park) or N (Neutral). To restart
the engine when the vehicle is
already moving, use N (Neutral).
{Caution
Do not try to shift to P (Park) if the
vehicle is moving. If you do, you
could damage the transmission.
Shift to P (Park) only when the
vehicle is stopped.
Page 208 of 417
Black plate (17,1)Cadillac SRX Owner Manual (GMNA-Localizing-U.S./Canada/Mexico-
7707476) - 2015 - crc - 4/8/14
Driving and Operating 9-17
{Caution
If the steering wheel is turned
until it reaches the end of its
travel, and is held in that position
while starting the vehicle, damage
may occur to the hydraulic power
steering system and there may be
loss of power steering assist.
{Caution
If you add electrical parts or
accessories, you could change
the way the engine operates. Any
resulting damage would not be
covered by the vehicle warranty.
SeeAdd-On Electrical Equipment
on page 9-67. To start the vehicle:
Starting Procedure
1. With the Keyless Access
System, the RKE transmitter
must be in the vehicle. Press the
ENGINE START/STOP button
with the brake pedal applied.
When the engine begins
cranking, let go of the button.
The idle speed will go down as
the engine warms up. Do not
race the engine immediately
after starting it.
If the RKE transmitter is not in
the vehicle, if there is
interference, or the RKE battery
is low, a Driver Information
Center (DIC) will display. See
Driver Information Center (DIC)
on page 5-25 andRemote
Keyless Entry (RKE) System
Operation on page 2-3.
{Caution
Cranking the engine for long
periods of time, by pressing the
ENGINE START/STOP button
immediately after cranking has
ended, can overheat and damage
the cranking motor, and drain the
battery. Wait at least 15 seconds
between each try, to let the
cranking motor cool down.
2. If the engine does not start after five to 10 seconds, especially in
very cold weather (below −18°
C or 0°F), it could be flooded
with too much gasoline. Try
pushing the accelerator pedal all
the way to the floor and holding
it there as you press the
ENGINE START/STOP button,
for up to a maximum of
15 seconds. Wait at least
15 seconds between each try, to
allow the cranking motor to cool
down. When the engine starts,
let go of the button and the
Page 209 of 417
Black plate (18,1)Cadillac SRX Owner Manual (GMNA-Localizing-U.S./Canada/Mexico-
7707476) - 2015 - crc - 4/8/14
9-18 Driving and Operating
accelerator. If the vehicle starts
briefly but then stops again, do
the same thing. This clears the
extra gasoline from the engine.
Do not race the engine
immediately after starting it.
Operate the engine and
transmission gently until the oil
warms up and lubricates all
moving parts.
Engine Heater
The engine coolant heater,
if available, can help in cold weather
conditions at or below−18°C (0°F)
for easier starting and better fuel
economy during engine warm-up.
Plug in the coolant heater at least
four hours before starting the
vehicle. An internal thermostat in
the plug end of the cord will prevent
engine coolant heater operation at
temperatures above −18°C (0°F).
To Use the Engine Coolant
Heater
1. Turn off the engine. 2. Open the hood and unwrap the
electrical cord. The cord is
located near the air cleaner.
Check the heater cord for
damage. If it is damaged, do not
use it. See your dealer for a
replacement. Inspect the cord for
damage yearly.
3. Plug it into a normal, grounded 110-volt AC outlet.
{Warning
Improper use of the heater cord
or an extension cord can damage
the cord and may result in
overheating and fire.
.Plug the cord into a
three-prong electrical utility
receptacle that is protected
by a ground fault detection
(Continued)
Warning (Continued)
function. An ungrounded
outlet could cause an electric
shock.
.Use a weatherproof,
heavy-duty, 15 amp-rated
extension cord if needed.
Failure to use the
recommended extension cord
in good operating condition,
or using a damaged heater or
extension cord, could make it
overheat and cause a fire,
property damage, electric
shock, and injury.
.Do not operate the vehicle
with the heater cord
permanently attached to the
(Continued)
Page 210 of 417
Black plate (19,1)Cadillac SRX Owner Manual (GMNA-Localizing-U.S./Canada/Mexico-
7707476) - 2015 - crc - 4/8/14
Driving and Operating 9-19
Warning (Continued)
vehicle. Possible heater cord
and thermostat damage could
occur.
.While in use, do not let the
heater cord touch vehicle
parts or sharp edges. Never
close the hood on the
heater cord.
.Before starting the vehicle,
unplug the cord, reattach the
cover to the plug, and
securely fasten the cord.
Keep the cord away from any
moving parts.
4. Before starting the engine, be sure to unplug and store the
cord as it was before to keep it
away from moving engine parts.
If you do not it could be
damaged. The length of time the heater should
remain plugged in depends on
several factors. Ask a dealer in the
area where you will be parking the
vehicle for the best advice on this.
Retained Accessory
Power (RAP)
These accessories can be used
after the engine is turned off:
.Infotainment system (up to
10 minutes or until the driver
door is opened).
.Power windows, sunroof (if
equipped), and power outlets (up
to 10 minutes or until any door is
opened).
Shifting Into Park
1. Hold the brake pedal down and
set the parking brake. See
Parking Brake on page 9-27.
2. Move the shift lever into P (Park) by pushing the lever all the way
toward the front of the vehicle. 3. Turn the ignition off.
Leaving the Vehicle with the
Engine Running
{Warning
It can be dangerous to leave the
vehicle with the engine running.
It could overheat and catch fire.
It is dangerous to get out of the
vehicle if the shift lever is not fully
in P (Park) with the parking brake
firmly set. The vehicle can roll.
Do not leave the vehicle when the
engine is running. If you have left
the engine running, the vehicle
can move suddenly. You or others
could be injured. To be sure the
vehicle will not move, even when
you are on fairly level ground,
always set the parking brake and
move the shift lever to P (Park).
(Continued)