horn CADILLAC SRX 2015 2.G Owners Manual
[x] Cancel search | Manufacturer: CADILLAC, Model Year: 2015, Model line: SRX, Model: CADILLAC SRX 2015 2.GPages: 417, PDF Size: 4.59 MB
Page 10 of 417

Black plate (3,1)Cadillac SRX Owner Manual (GMNA-Localizing-U.S./Canada/Mexico-
7707476) - 2015 - crc - 4/8/14
In Brief 1-3
1.Air Vents on page 8-7.
2. Turn Signal Lever. See Turn and
Lane-Change Signals on
page 6-6.
3. Cruise Control on page 9-33.
Forward Collision Alert (FCA)
System on page 9-48.
4. Instrument Cluster on page 5-9.
5. Steering Wheel Controls on
page 5-2.
Driver Information Center (DIC)
Controls. See Driver Information
Center (DIC) on page 5-25.
6. Windshield Wiper/Washer on
page 5-3.
Rear Window Wiper/Washer on
page 5-4.
7. Infotainment on page 7-1.
8. Light Sensor. See Twilight
Sentinel on page 6-4.
9. Dual Automatic Climate Control
System on page 8-1. 10.
Exterior Lamp Controls on
page 6-1.
Front Fog Lamps on page 6-6
(If Equipped).
Instrument Panel Illumination
Control on page 6-7.
11. Hood Release. See Hood on
page 10-4.
12. Data Link Connector (DLC) (Out of View). See Malfunction
Indicator Lamp on page 5-15.
13. Steering Wheel Adjustment on
page 5-2.
14. Horn on page 5-3.
15. Pedal Adjust Switch (Out of View) (If Equipped). See
Adjustable Throttle and Brake
Pedal on page 9-14.
16. ENGINE START/STOP Button. SeeIgnition Positions on
page 9-15.
17. Hazard Warning Flashers on
page 6-5. 18.
Heated and Ventilated Front
Seats on page 3-8 (If
Equipped).
19. CD Player. See Infotainment
on page 7-1.
Blu-Ray
®Optical Drive (If
Equipped). See Infotainment
on page 7-1.
20. Parking Brake on page 9-27.
21. Shift Lever. See Automatic
Transmission on page 9-22.
22. Lane Departure Warning Button (If Equipped). See Lane
Departure Warning (LDW) on
page 9-54.
Parking Assist (If Equipped).
See Driver Assistance Systems
on page 9-43.
eco Button (If Equipped). See
Fuel Economy Mode on
page 9-25.
23. Front Storage on page 4-2.
24. Traction Control/Electronic
Stability Control on page 9-30.
Page 32 of 417
Black plate (3,1)Cadillac SRX Owner Manual (GMNA-Localizing-U.S./Canada/Mexico-
7707476) - 2015 - crc - 4/8/14
Keys, Doors, and Windows 2-3
Remote Keyless Entry
(RKE) System Operation
The Keyless Access system allows
for vehicle entry when the
transmitter is within range. See
“Keyless Access Operation”
following.
The RKE transmitter functions may
work up to 60 m (197 ft) away from
the vehicle.
Keep in mind that other conditions,
such as those previously stated, can
impact the performance of the
transmitter.
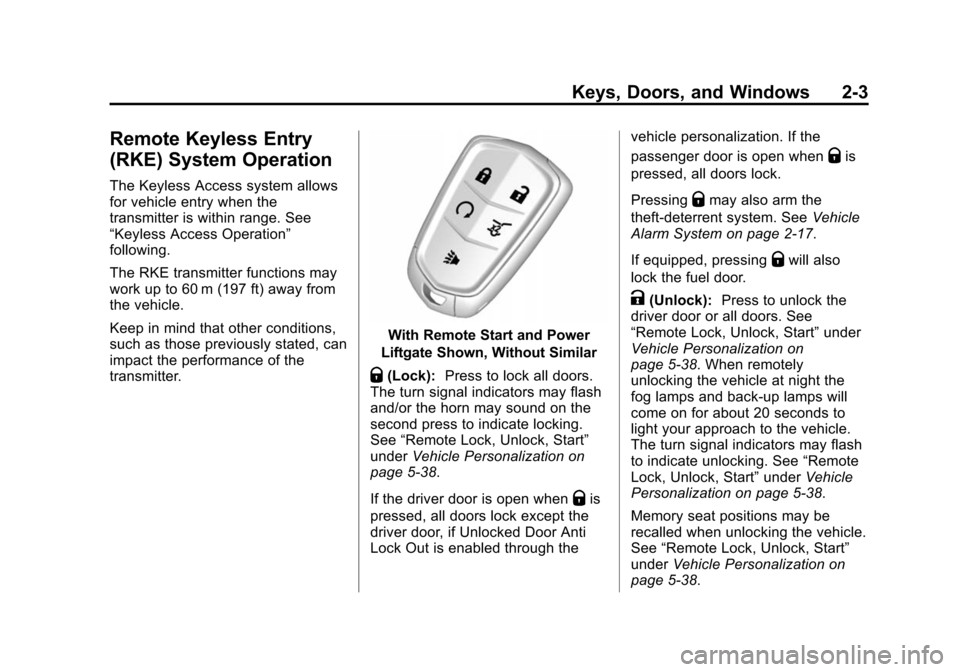
With Remote Start and Power
Liftgate Shown, Without Similar
Q(Lock): Press to lock all doors.
The turn signal indicators may flash
and/or the horn may sound on the
second press to indicate locking.
See “Remote Lock, Unlock, Start”
under Vehicle Personalization on
page 5-38.
If the driver door is open when
Qis
pressed, all doors lock except the
driver door, if Unlocked Door Anti
Lock Out is enabled through the vehicle personalization. If the
passenger door is open when
Qis
pressed, all doors lock.
Pressing
Qmay also arm the
theft-deterrent system. See Vehicle
Alarm System on page 2-17.
If equipped, pressing
Qwill also
lock the fuel door.
K(Unlock): Press to unlock the
driver door or all doors. See
“Remote Lock, Unlock, Start” under
Vehicle Personalization on
page 5-38. When remotely
unlocking the vehicle at night the
fog lamps and back-up lamps will
come on for about 20 seconds to
light your approach to the vehicle.
The turn signal indicators may flash
to indicate unlocking. See “Remote
Lock, Unlock, Start” underVehicle
Personalization on page 5-38.
Memory seat positions may be
recalled when unlocking the vehicle.
See “Remote Lock, Unlock, Start”
under Vehicle Personalization on
page 5-38.
Page 33 of 417
Black plate (4,1)Cadillac SRX Owner Manual (GMNA-Localizing-U.S./Canada/Mexico-
7707476) - 2015 - crc - 4/8/14
2-4 Keys, Doors, and Windows
PressingKwill disarm the
theft-deterrent system. See Vehicle
Alarm System on page 2-17.
On some models, pressing and
holding
Kwill open all of the
windows.
If equipped, pressing
Kwill also
unlock the fuel door.
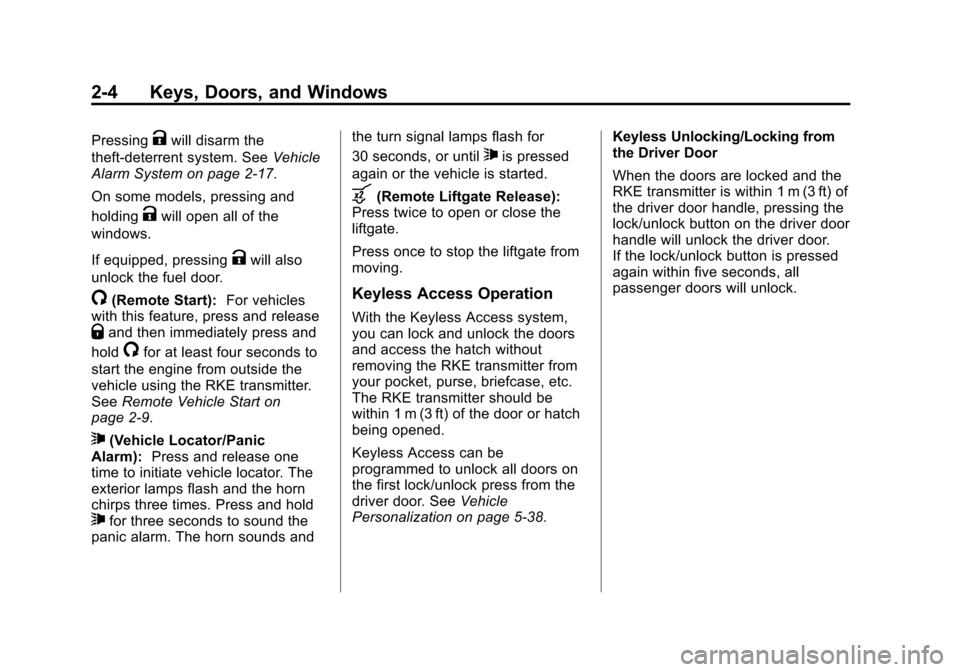
/(Remote Start): For vehicles
with this feature, press and release
Qand then immediately press and
hold
/for at least four seconds to
start the engine from outside the
vehicle using the RKE transmitter.
See Remote Vehicle Start on
page 2-9.
7(Vehicle Locator/Panic
Alarm): Press and release one
time to initiate vehicle locator. The
exterior lamps flash and the horn
chirps three times. Press and hold
7for three seconds to sound the
panic alarm. The horn sounds and the turn signal lamps flash for
30 seconds, or until
7is pressed
again or the vehicle is started.
b(Remote Liftgate Release):
Press twice to open or close the
liftgate.
Press once to stop the liftgate from
moving.
Keyless Access Operation
With the Keyless Access system,
you can lock and unlock the doors
and access the hatch without
removing the RKE transmitter from
your pocket, purse, briefcase, etc.
The RKE transmitter should be
within 1 m (3 ft) of the door or hatch
being opened.
Keyless Access can be
programmed to unlock all doors on
the first lock/unlock press from the
driver door. See Vehicle
Personalization on page 5-38. Keyless Unlocking/Locking from
the Driver Door
When the doors are locked and the
RKE transmitter is within 1 m (3 ft) of
the driver door handle, pressing the
lock/unlock button on the driver door
handle will unlock the driver door.
If the lock/unlock button is pressed
again within five seconds, all
passenger doors will unlock.
Page 47 of 417
Black plate (18,1)Cadillac SRX Owner Manual (GMNA-Localizing-U.S./Canada/Mexico-
7707476) - 2015 - crc - 4/8/14
2-18 Keys, Doors, and Windows
will bypass the 30-second delay
and immediately arm the alarm
system.
The vehicle alarm system will not
arm if the doors are locked with
the key.
If the driver door is opened without
first unlocking with the RKE
transmitter, the horn will chirp and
the lights will flash to indicate
pre-alarm. If the vehicle is not
started, or the door is not unlocked
by pressing
Kon the RKE
transmitter during the 10-second
pre-alarm, the alarm will be
activated.
The alarm will also be activated if a
passenger door, the liftgate, or the
hood is opened without first
disarming the system. When the
alarm is activated, the turn signals
flash and the horn sounds for about
30 seconds. The alarm system will
then re-arm to monitor for the next
unauthorized event.
Disarming the Alarm System
To disarm the alarm system or turn
off the alarm if it has been activated:
.PressKon the RKE transmitter.
.Unlock the vehicle using the
Keyless Access system.
.Start the vehicle.
To avoid setting off the alarm by
accident:
.Lock the vehicle after all
occupants have left the vehicle
and all doors are closed.
.Always unlock a door with the
RKE transmitter or use the
Keyless Access system.
Unlocking the driver door with the
key will not disarm the system or
turn off the alarm.
How to Detect a Tamper
Condition
IfKis pressed and the horn chirps
and the lights flash three times, the
alarm was activated while the alarm
system was armed.
If the alarm system has been
activated, a message will appear on
the DIC. See Security Messages on
page 5-36.
Power Sounder, Inclination
Sensor, and Intrusion Sensor
In addition to the standard
theft-deterrent system features, this
system also has an inclination
sensor and intrusion sensor.
The power sounder provides an
audible alarm which is different from
the vehicle’ s horn. It has its own
power source, and can sound an
alarm when the vehicle’ s battery is
compromised.
Page 124 of 417
Black plate (1,1)Cadillac SRX Owner Manual (GMNA-Localizing-U.S./Canada/Mexico-
7707476) - 2015 - crc - 4/8/14
Instruments and Controls 5-1
Instruments and
Controls
Controls
Steering Wheel Adjustment . . . 5-2
Steering Wheel Controls . . . . . . 5-2
Heated Steering Wheel . . . . . . . 5-2
Horn . . . . . . . . . . . . . . . . . . . . . . . . . . 5-3
Windshield Wiper/Washer . . . . . 5-3
Rear Window Wiper/Washer . . . . . . . . . . . . . . . . . . . . . . 5-4
Compass . . . . . . . . . . . . . . . . . . . . . 5-5
Clock . . . . . . . . . . . . . . . . . . . . . . . . . 5-6
Power Outlets . . . . . . . . . . . . . . . . . 5-6
Cigarette Lighter . . . . . . . . . . . . . . 5-7
Ashtrays . . . . . . . . . . . . . . . . . . . . . . 5-7
Warning Lights, Gauges, and
Indicators
Warning Lights, Gauges, and Indicators . . . . . . . . . . . . . . . . . . . . 5-8
Instrument Cluster . . . . . . . . . . . . 5-9
Speedometer . . . . . . . . . . . . . . . . 5-10
Odometer . . . . . . . . . . . . . . . . . . . . 5-10
Trip Odometer . . . . . . . . . . . . . . . 5-10
Tachometer . . . . . . . . . . . . . . . . . . 5-11
Fuel Gauge . . . . . . . . . . . . . . . . . . 5-11 Engine Coolant Temperature
Gauge . . . . . . . . . . . . . . . . . . . . . . 5-12
Safety Belt Reminders . . . . . . . 5-12
Airbag Readiness Light . . . . . . 5-13
Passenger Airbag Status Indicator . . . . . . . . . . . . . . . . . . . . 5-14
Charging System Light . . . . . . 5-15
Malfunction Indicator Lamp . . . . . . . . . . . . . 5-15
Brake System Warning Light . . . . . . . . . . . . . . . . . . . . . . . 5-18
Electric Parking Brake Light . . . . . . . . . . . . . . . . . . . . . . . 5-18
Service Electric Parking Brake Light . . . . . . . . . . . . . . . . . . . . . . . 5-19
Antilock Brake System (ABS) Warning Light . . . . . . . . . . . . . . 5-19
Lane Departure Warning (LDW) Light . . . . . . . . . . . . . . . . 5-20
Vehicle Ahead Indicator . . . . . . 5-20
Traction Off Light . . . . . . . . . . . . 5-20
StabiliTrak®OFF Light . . . . . . . 5-20
Traction Control System (TCS)/StabiliTrak
®Light . . . . 5-21
Engine Coolant Temperature Warning Light . . . . . . . . . . . . . . 5-21
Tire Pressure Light . . . . . . . . . . 5-22
Engine Oil Pressure Light . . . . 5-22
Fuel Economy Light . . . . . . . . . 5-23 Low Fuel Warning Light . . . . . . 5-23
Security Light . . . . . . . . . . . . . . . . 5-23
High-Beam On Light . . . . . . . . . 5-24
Front Fog Lamp Light . . . . . . . . 5-24
Lamps On Reminder . . . . . . . . . 5-24
Cruise Control Light . . . . . . . . . 5-24
Information Displays
Driver Information
Center (DIC) . . . . . . . . . . . . . . . 5-25
Vehicle Messages
Vehicle Messages . . . . . . . . . . . 5-27
Battery Voltage and ChargingMessages . . . . . . . . . . . . . . . . . . 5-28
Brake System Messages . . . . 5-28
Compass Messages . . . . . . . . . 5-29
Cruise Control Messages . . . . 5-29
Door Ajar Messages . . . . . . . . . 5-30
Engine Cooling System Messages . . . . . . . . . . . . . . . . . . 5-30
Engine Oil Messages . . . . . . . . 5-31
Engine Power Messages . . . . 5-31
Fuel System Messages . . . . . . 5-31
Key and Lock Messages . . . . . 5-31
Lamp Messages . . . . . . . . . . . . . 5-32
Object Detection System Messages . . . . . . . . . . . . . . . . . . 5-32
Page 126 of 417

Black plate (3,1)Cadillac SRX Owner Manual (GMNA-Localizing-U.S./Canada/Mexico-
7707476) - 2015 - crc - 4/8/14
Instruments and Controls 5-3
The steering wheel takes about
three minutes to start heating.
Horn
Pressaon the steering wheel pad
to sound the horn.
Windshield Wiper/Washer
With the ignition in ACC/
ACCESSORY or ON/RUN/START,
move the windshield wiper lever to
select the wiper speed.
HI: Use for fast wipes.
LO: Use for slow wipes.
INT (Intermittent Wipes/Rainsense
Wipe Sensitivity Control): Use for
intermittent wipes. To adjust wipe
frequency, turn the
xINT band
up for more frequent wipes or down
for less frequent wipes. If the
vehicle has Rainsense™, see the
following Rainsense information.
OFF: Use to turn the wipers off.
1X (Mist): For a single wipe, briefly
move the wiper lever down. For
several wipes, hold the wiper
lever down.
Clear snow and ice from the wiper
blades before using them. If frozen
to the windshield, carefully loosen or
thaw them. Damaged blades should
be replaced. See Wiper Blade
Replacement on page 10-23. Heavy snow or ice can overload the
wiper motor.
Wipe Parking
If the ignition is changed to
STOPPING THE ENGINE/OFF
mode while the wipers are on LO,
HI, or INT, they will
immediately stop.
If the windshield wiper lever is then
moved to off before the driver door
is opened or within 10 minutes, the
wipers will restart and move to the
base of the windshield.
If the ignition is changed to
STOPPING THE ENGINE/OFF
while the wipers are performing
wipes due to windshield washing,
the wipers continue to run until they
reach the base of the windshield.
Rainsense™
If equipped, there is a sensor near
the top center of the windshield that
detects the amount of water on the
windshield and automatically
controls the frequency of the
windshield wiper.
Page 165 of 417

Black plate (42,1)Cadillac SRX Owner Manual (GMNA-Localizing-U.S./Canada/Mexico-
7707476) - 2015 - crc - 4/8/14
5-42 Instruments and Controls
Select Off or On.
Auto High Beam
This allows the feature to be turned
on or off. See“IntelliBeam System”
in Exterior Lamp Controls on
page 6-1.
Select On or Off. On some vehicles
select Off, Normal Sensitivity,
or Low Sensitivity.
Exit Lighting
This allows the selection of how
long the exterior lamps stay on
when leaving the vehicle when it is
dark outside.
Select Off, 30 Seconds, 60
Seconds, or 120 Seconds.
Power Door Locks
Select and the following may be
displayed:
.Unlocked Door Anti Lock Out
.Auto Door Unlock
.Delayed Door Lock Unlocked Door Anti Lock Out
When on, this feature will keep the
driver door from locking when the
door is open. If Off is selected, the
Delayed Door Lock menu will be
available.
Select Off or On.
Auto Door Unlock
This allows selection of which of the
doors will automatically unlock when
the vehicle is shifted into P (Park).
Select Off, All Doors, or Driver Door.
Delayed Door Lock
When on, this feature will delay the
locking of the doors. To override the
delay, press the power door lock
switch on the door.
Select Off or On.
Remote Lock, Unlock, Start
Select and the following may be
displayed:.Remote Unlock Light Feedback
.Remote Lock Feedback
.Remote Door Unlock
.Remote Start Auto Cool Seats
.Remote Start Auto Heat Seats
.Passive Door Unlock
.Passive Door Lock
.Remote Left in Vehicle Alert
Remote Unlock Light Feedback
When on, the exterior lamps will
flash when unlocking the vehicle
with the RKE transmitter.
Select Off or On.
Remote Lock Feedback
This allows selection of what type of
feedback is given when locking the
vehicle with the RKE transmitter.
Select Off, Lights and Horn, Lights
Only, or Horn Only.
Remote Door Unlock
This allows selection of which doors
will unlock when pressing
Kon the
RKE transmitter.
Select All Doors or Driver Door.
Page 166 of 417

Black plate (43,1)Cadillac SRX Owner Manual (GMNA-Localizing-U.S./Canada/Mexico-
7707476) - 2015 - crc - 4/8/14
Instruments and Controls 5-43
Remote Start Auto Cool Seats
If equipped and turned on, this
feature will turn the ventilated seats
on when using remote start on
warm days.
Select Off or On.
Remote Start Auto Heat Seats
If equipped and turned on, this
feature will turn the heated seats on
when using remote start on
cold days.
Select Off or On.
Passive Door Unlock
This allows the selection of what
doors will unlock when using the
button on the driver door to unlock
the vehicle.
Select All Doors or Driver Door.
Passive Door Lock
This feature can be turned on or off,
or can be used to select feedback
when using the button on the driverdoor to lock the vehicle. See
Remote Keyless Entry (RKE)
System Operation on page 2-3.
Select Off, On with Horn
Chirp, or On.
Remote Left in Vehicle Alert
This feature sounds an alert when
the RKE transmitter is left in the
vehicle.
Select Off or On.
Bluetooth
Select and the following may be
displayed:
.Pair New Device
.Device Management
.Ringtones
.Voice Mail Numbers
Pair New Device
Select to pair a new device. See
“Pairing” in“Infotainment Controls”
under “Bluetooth” in the infotainment
manual. Device Management
Select to connect to a different
phone source, disconnect a phone,
or delete a phone.
Ringtones
Press to change the ring tone for
the specific phone. The phone does
not need to be connected to change
the ring.
Voice Mail Numbers
This feature displays the voice mail
number for all connected phones.
To change the voice mail number,
select EDIT or press the EDIT
button. Type a new number, then
select SAVE or press the SAVE
button.Voice
Select and the following may be
displayed:
.Confidence Threshold
.Prompt Length
.Audio Feedback Speed
Page 294 of 417
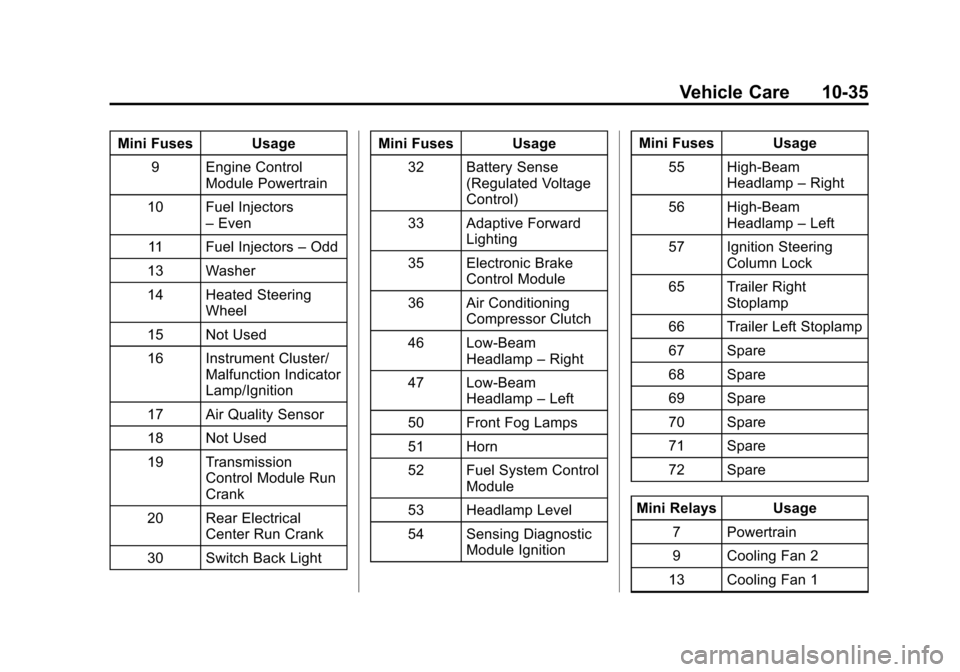
Black plate (35,1)Cadillac SRX Owner Manual (GMNA-Localizing-U.S./Canada/Mexico-
7707476) - 2015 - crc - 4/8/14
Vehicle Care 10-35
Mini Fuses Usage9 Engine Control Module Powertrain
10 Fuel Injectors –Even
11 Fuel Injectors –Odd
13 Washer
14 Heated Steering Wheel
15 Not Used
16 Instrument Cluster/ Malfunction Indicator
Lamp/Ignition
17 Air Quality Sensor
18 Not Used
19 Transmission Control Module Run
Crank
20 Rear Electrical Center Run Crank
30 Switch Back Light Mini Fuses Usage
32 Battery Sense (Regulated Voltage
Control)
33 Adaptive Forward Lighting
35 Electronic Brake Control Module
36 Air Conditioning Compressor Clutch
46 Low-Beam Headlamp –Right
47 Low-Beam Headlamp –Left
50 Front Fog Lamps
51 Horn
52 Fuel System Control Module
53 Headlamp Level
54 Sensing Diagnostic Module Ignition Mini Fuses Usage
55 High-Beam Headlamp –Right
56 High-Beam Headlamp –Left
57 Ignition Steering Column Lock
65 Trailer Right Stoplamp
66 Trailer Left Stoplamp
67 Spare
68 Spare
69 Spare
70 Spare
71 Spare
72 Spare
Mini Relays Usage 7 Powertrain
9 Cooling Fan 2
13 Cooling Fan 1
Page 313 of 417

Black plate (54,1)Cadillac SRX Owner Manual (GMNA-Localizing-U.S./Canada/Mexico-
7707476) - 2015 - crc - 4/8/14
10-54 Vehicle Care
3. Make sure the Tire Pressure infodisplay option is turned on. The
info displays on the DIC can be
turned on and off through the
Settings menu. See Driver
Information Center (DIC) on
page 5-25.
4. Use the five-way DIC control on the right side of the steering
wheel to scroll to the Tire
Pressure screen under the DIC
info page. See Driver
Information Center (DIC) on
page 5-25.
5. Press and hold the SEL button in the center of the five-way DIC
control.
The horn sounds twice to signal
the receiver is in relearn mode
and the TIRE LEARNING
ACTIVE message displays on
the DIC screen.
6. Start with the driver side front tire. 7. Place the relearn tool against
the tire sidewall, near the valve
stem. Then press the button to
activate the TPMS sensor.
A horn chirp confirms that the
sensor identification code has
been matched to this tire and
wheel position.
8. Proceed to the passenger side front tire, and repeat Step 7.
9. Proceed to the passenger side rear tire, and repeat Step 7.
10. Proceed to the driver side rear tire, and repeat Step 7. The
horn sounds two times to
indicate the sensor
identification code has been
matched to the driver side rear
tire, and the TPMS sensor
matching process is no longer
active. The TIRE LEARNING
ACTIVE message on the DIC
display screen goes off.
11. Shut the ignition off. 12. Set all four tires to the
recommended air pressure
level as indicated on the Tire
and Loading Information label.
Tire Inspection
We recommend that the tires,
including the spare tire, if the
vehicle has one, be inspected
for signs of wear or damage at
least once a month.
Replace the tire if:
.The indicators at three or
more places around the tire
can be seen.
.There is cord or fabric
showing through the tire's
rubber.
.The tread or sidewall is
cracked, cut, or snagged
deep enough to show cord or
fabric.
.The tire has a bump, bulge,
or split.