CADILLAC STS 2005 1.G Owners Manual
Manufacturer: CADILLAC, Model Year: 2005, Model line: STS, Model: CADILLAC STS 2005 1.GPages: 446, PDF Size: 2.58 MB
Page 171 of 446

Cleaning the Intellibeam™ Light Sensor
The light sensor is located
on the inside of the vehicle
in front of the inside
rearview mirror.
Clean the light sensor window, periodically, using glass
cleaner on a soft cloth. Gently wipe the sensor
window. Do not spray glass cleaner directly on the
surface of the sensor window.
Wiper Activated Headlamps
This feature activates the headlamps and parking lamps
after the windshield wipers have been in use for
about six seconds. For this feature to work, automatic
lighting must be enabled. SeeHeadlamps on page 3-33
for additional information.
When the ignition is turned off, the wiper-activated
headlamps will immediately turn off. They will also turn
off if the windshield wiper control is turned off.
Headlamps on Reminder
A warning chime will sound if the exterior lamp control
is left on in either the headlamp or parking lamp position
and the driver’s door is opened with the ignition off.
SeeLights On Reminder on page 3-71for additional
information.
3-37
Page 172 of 446

Daytime Running Lamps (DRL)
Daytime Running Lamps (DRL) can make it easier for
others to see the front of your vehicle during the
day. DRL can be helpful in many different driving
conditions, but they can be especially helpful in the short
periods after dawn and before sunset. Fully functional
daytime running lamps are required on all vehicles
�rst sold in Canada.
The DRL system will make the turn signal lamps come
on when the following conditions are met:
It is still daylight and the ignition is on,
the automatic lights are enabled, and
the transmission is not in PARK (P).
When DRL are on, only your front turn signal lamps will
be on. No other exterior lamps will be on when the DRL
are being used. Your instrument panel will not be lit.
When the automatic lights are enabled and it is dark
enough outside, the DRL will turn off and the low-beam
headlamps will turn on. When it is bright enough
outside, the low-beam headlamps will go off, and the
DRL will turn back on. If you start your vehicle in a
dark garage, the automatic headlamp system will
come on immediately. Once you leave the garage, it
will take about one minute for the automatic headlamp
system to change to DRL if it is light outside.During that delay, your instrument panel cluster may
not be as bright as usual. Make sure your instrument
panel brightness lever is in the full bright position.
SeeInstrument Panel Brightness on page 3-41.
To operate your vehicle with the DRL off, turn the
exterior lamp control off and then do one of the
following:
Turn the exterior lamp control to the parking lamp
position.
Turn the exterior lamp control to the headlamp
position.
Turn the exterior lamp control from AUTO to off and
back to AUTO.
An AUTOMATIC LIGHTS OFF message will appear on
the DIC, showing that automatic lighting has been
disabled.
As with any vehicle, you should turn on the regular
headlamp system when you need it.
3-38
Page 173 of 446

Light Sensor
The light sensor for the DRL is located on top of the
instrument panel. If you cover the sensor, it will
read dark, and the exterior lamps may come on when
you do not need them.
Fog Lamps
Use the fog lamps for better vision in foggy or misty
conditions.
The fog lamp controls are located on the turn
signal/multifunction lever.
-:The band with this symbol is used to turn the
front fog lamps on and off.
The parking lamps must be on for the fog lamps
to work.
To turn the fog lamps on, turn the fog lamp band on the
lever up to the dot and release it. The band will return
to its original position.
To turn the fog lamps off, turn the fog lamp band up to
the dot and release it. The band will return to its
original position, and the fog lamps will turn off. If you
turn on the high-beam headlamps, the fog lamps
will also turn off. They’ll turn back on again when you
switch back to low-beam headlamps.
3-39
Page 174 of 446

Twilight Sentinel®
Twilight Sentinel®can turn your lamps on and off for you.
A light sensor on top of the instrument panel makes the
Twilight Sentinel
®work, so be sure it is not covered.
With Twilight Sentinel
®you will see the following
happen:
When it is dark enough outside, the front turn signal
lamps (DRL) will go off, and the headlamps and
parking lamps will come on. The other lamps
that come on with headlamps will also come on.
When it is bright enough outside, the headlamps
will go off, and the front turn signal lamps (DRL)
will come on, as long as the exterior lamp switch is
in the off position.
If you start your vehicle in a dark garage, the automatic
headlamp system will come on immediately. Once
you leave the garage, it will take approximately
one minute for the automatic headlamp system to
change to DRL if it is light outside. During that delay,
your instrument panel cluster may not be as bright
as usual. Make sure your instrument panel brightness
control is in full bright position. SeeInstrument Panel
Brightness on page 3-41for more information.
You can idle the vehicle with the lamps off, even when
it is dark outside. First set the parking brake while
the ignition is in OFF/ACC. Then start the vehicle. The
lamps will stay off until you release the parking
brake.
Twilight Sentinel
®also provides exterior illumination as
you leave the vehicle. If Twilight Sentinel®has turned
on the lamps when you turn off the ignition, your lamps
will remain on until:
The exterior lamp switch is moved from off to the
parking lamp position, or
a delay time that you select has elapsed.
3-40
Page 175 of 446

SeeVehicle Personalization on page 2-47to select the
delay time that you want. You can also select no
delay time.
If you turn off the ignition with the exterior lamp switch
in the parking lamp or headlamp position, the Twilight
Sentinel
®delay will not occur. The lamps will turn off as
soon as the switch is turned off.
As with any vehicle, you should turn on the regular
headlamp system when you need it.
Exterior Lighting Battery Saver
If the parking lamps or headlamps have been left on,
the exterior lamps will turn off about 10 minutes after the
ignition is turned off. This protects against draining
the battery in case you have accidentally left the
headlamps or parking lamps on. The battery saver does
not work if the headlamps are turned on after the
ignition is turned off.
If you need to leave the lamps on for more than
10 minutes, use the exterior lamp control to turn the
lamps back on.
Instrument Panel Brightness
This feature controls
the brightness of the
instrument panel lights.
Press in the center knob on the DIC control panel until
the knob pops out. Then turn the knob clockwise to
brighten the lights or counterclockwise to dim them.
If you turn the knob completely clockwise, the interior
lamps will turn on.Base Level Shown,
Uplevel Similar
3-41
Page 176 of 446

Entry Lighting
The entry lighting system turns on the reading and
dome lamps and the backlighting to the exterior lamp
control when a door is opened or if you press the remote
keyless entry transmitter unlock button. If activated by
the transmitter, the lighting will remain active for
about 25 seconds. The entry lighting system uses the
light sensor; it must be dark outside in order for the
lamps to turn on. The lamps turn off about 25 seconds
after the last door is closed. They will dim to off if
the ignition is on, or immediately deactivate if the power
locks are activated.
Parade Dimming
This feature prohibits dimming of the instrument panel
displays and backlighting during daylight hours when the
key is in the ignition and the headlamps are on. This
feature operates with the light sensor and is fully
automatic. When the light sensor reads darkness outside
and the parking lamps are active, the instrument
panel displays can be adjusted by turning the instrument
panel brightness knob. SeeInstrument Panel Brightness
on page 3-41for additional information.
Reading Lamps
The reading lamps are located on the overhead console.
These lamps come on automatically when any door is
opened.
For manual operation, press the button next to each
lamp to turn it on. Press it again to turn the lamp off.
If the reading lamps are left on, they automatically shut
off 10 minutes after the ignition has been turned off.
Battery Load Management
The battery load management feature is designed to
monitor the vehicle’s electrical load and determine when
the battery is in a heavy discharge condition. During
times of high electrical loading, the engine may idle at
a higher revolutions per minute (rpm) setting than normal
to make sure the battery charges. High electrical
loads may occur when several of the following are on:
headlamps, high beams, fog lamps, rear window
defogger, the climate control fan at high speeds, heated
seats and engine cooling fans.
3-42
Page 177 of 446

If the battery continues to discharge, even with the
engine idling at a higher rpm setting, some electrical
loads will automatically be reduced. When this occurs,
the rear window defogger may take slightly longer
to clear the glass and the fan may cut back to a lower
speed. For more battery saving information, see “Battery
Saver Active Message” underDIC Warnings and
Messages on page 3-78.
Inadvertent Power Battery Saver
This feature is designed to protect your vehicle’s battery
against drainage from the interior lamps, trunk lamp,
glove box lamp, or the garage door opener. When the
ignition is turned off, the power to these features will
automatically turn off after 10 minutes (three minutes if
a new car has 15 miles (24 km) or less). Power will
be restored for an additional 10 minutes if any door is
opened, the trunk is opened or the courtesy lamp switch
is turned on.
Head-Up Display (HUD)
{CAUTION:
If the HUD image is too bright, or too high in
your �eld of view, it may take you more time to
see things you need to see when it is dark
outside. Be sure to keep the HUD image dim
and placed low in your �eld of view.
The Head-Up Display (HUD) allows you to see some of
the driver information that appears on your instrument
panel cluster on the windshield.
The information may be displayed in English or metric
units and appears as an image focused out toward
the front of your vehicle. To change from English
to metric units, seeDIC Controls and Displays on
page 3-74.
3-43
Page 178 of 446

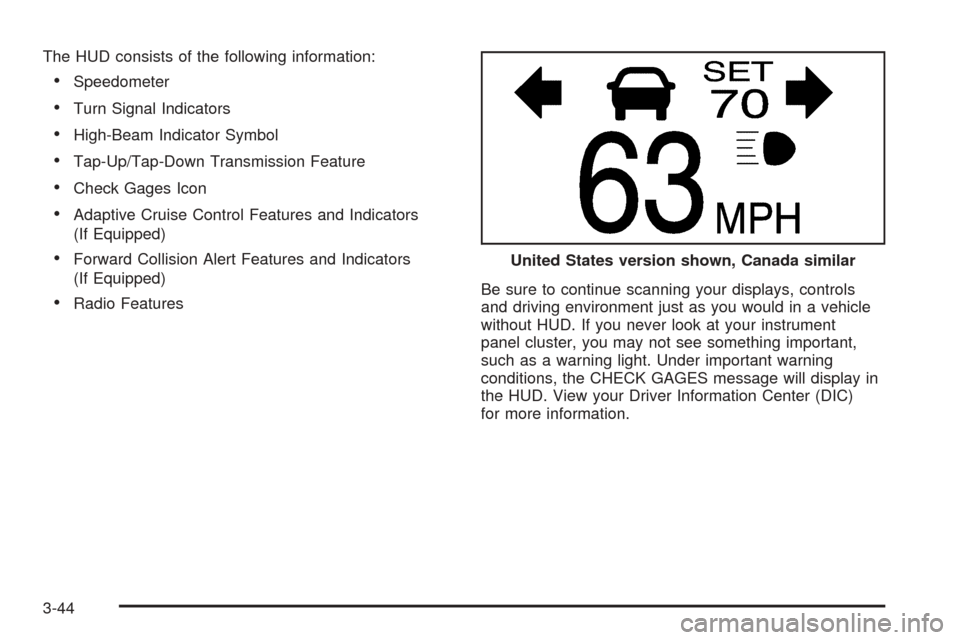
The HUD consists of the following information:
Speedometer
Turn Signal Indicators
High-Beam Indicator Symbol
Tap-Up/Tap-Down Transmission Feature
Check Gages Icon
Adaptive Cruise Control Features and Indicators
(If Equipped)
Forward Collision Alert Features and Indicators
(If Equipped)
Radio FeaturesBe sure to continue scanning your displays, controls
and driving environment just as you would in a vehicle
without HUD. If you never look at your instrument
panel cluster, you may not see something important,
such as a warning light. Under important warning
conditions, the CHECK GAGES message will display in
the HUD. View your Driver Information Center (DIC)
for more information.United States version shown, Canada similar
3-44
Page 179 of 446

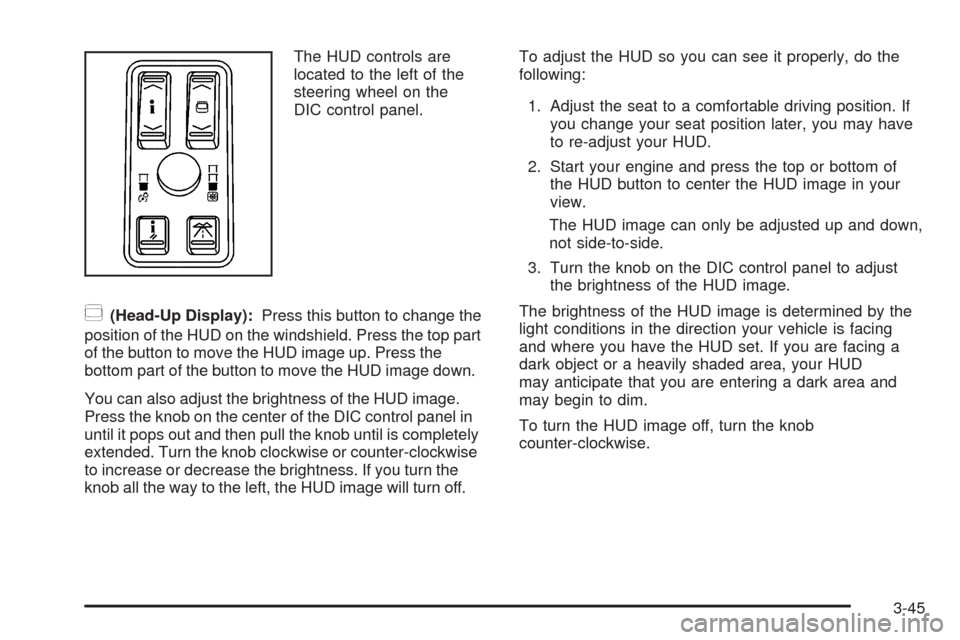
The HUD controls are
located to the left of the
steering wheel on the
DIC control panel.
~(Head-Up Display):Press this button to change the
position of the HUD on the windshield. Press the top part
of the button to move the HUD image up. Press the
bottom part of the button to move the HUD image down.
You can also adjust the brightness of the HUD image.
Press the knob on the center of the DIC control panel in
until it pops out and then pull the knob until is completely
extended. Turn the knob clockwise or counter-clockwise
to increase or decrease the brightness. If you turn the
knob all the way to the left, the HUD image will turn off.To adjust the HUD so you can see it properly, do the
following:
1. Adjust the seat to a comfortable driving position. If
you change your seat position later, you may have
to re-adjust your HUD.
2. Start your engine and press the top or bottom of
the HUD button to center the HUD image in your
view.
The HUD image can only be adjusted up and down,
not side-to-side.
3. Turn the knob on the DIC control panel to adjust
the brightness of the HUD image.
The brightness of the HUD image is determined by the
light conditions in the direction your vehicle is facing
and where you have the HUD set. If you are facing a
dark object or a heavily shaded area, your HUD
may anticipate that you are entering a dark area and
may begin to dim.
To turn the HUD image off, turn the knob
counter-clockwise.
3-45
Page 180 of 446

Polarized sunglasses could make the HUD image
harder to see.
As light shines out from the HUD, it is possible for light
to shine back in. In rare occurrences, when the sun
is at a speci�c angle and position, the sun’s rays can
shine back into the HUD. When this occurs, the display
device within the HUD will be temporarily illuminated.
The event will end when the vehicle’s angle to the
sun changes.
Clean the inside of the windshield as needed to remove
any dirt or �lm that reduces the sharpness or clarity
of the HUD image.
To clean the HUD, spray household glass cleaner
on a soft, clean cloth. Wipe the HUD lens gently,
then dry it.
Notice:When cleaning, be careful not to scratch
the HUD or camera lenses. Do not spray glass
cleaner directly on the HUD lens because the
cleaner could leak inside the unit and cause
damage.If the ignition is on and you cannot see the HUD image,
check to see if:
Something is covering the HUD unit.
The brightness is adjusted properly.
The HUD image is adjusted to the proper height.
Ambient light in the direction your vehicle is facing
is low.
A fuse is blown. SeeFuses and Circuit Breakers on
page 5-95.
Keep in mind that your windshield is part of the HUD
system. SeeWindshield Replacement on page 5-51.
The following Adaptive Cruise Control message
may appear in the HUD:
PEDAL APPLIED ACC OVERRIDE:This message
indicates that you are pressing your foot on the
accelerator pedal and overriding Adaptive Cruise
Control. While you are doing this, the system will not
automatically apply the brakes. Once you remove your
foot from the accelerator pedal, Adaptive Cruise
Control will return to normal operation and be able to
apply the brakes, if needed.
You may also see an Adaptive Cruise Control active
symbol, alert symbol or vehicle ahead symbol. See
Adaptive Cruise Control on page 3-20for more
information.
3-46