ECO mode CADILLAC STS 2005 1.G Owners Manual
[x] Cancel search | Manufacturer: CADILLAC, Model Year: 2005, Model line: STS, Model: CADILLAC STS 2005 1.GPages: 446, PDF Size: 2.58 MB
Page 72 of 446
If you have additional transmitters to program, this
process can be repeated until four transmitters have been
programmed. The DIC will then display MAX # FOBS
LEARNED and will exit the programming mode.
When you are done programming transmitters, press
the unlock button on each keyless access transmitter
twice. After performing this process, transmitters
previously programmed will no longer work with your
vehicle and must be reprogrammed.
Battery Replacement
Under normal use, the battery in your keyless access
transmitter should last about three years.
You can tell the battery is weak if the transmitter will not
work at the normal range in any location. If you have
to get close to your vehicle before the transmitter works,
it is probably time to change the battery. The DIC
may display KEY FOB BATTERY LOW.
A weak battery may also cause the DIC to display
NO FOBS DETECTED when you try to start the vehicle.
If this happens, place the transmitter in the console
bin transmitter pocket with the buttons facing to the
front of the vehicle. Then, with the vehicle in PARK (P)
or NEUTRAL (N), press the brake pedal and the
start button. SeeStarting the Engine on page 2-24,
for additional information about your vehicle’s
electronic keyless ignition with push button start.Although this will start the vehicle, it is recommended
that you replace the transmitter battery as soon as
possible.
Notice:When replacing the battery, use care not to
touch any of the circuitry. Static from your body
transferred to these surfaces may damage the
transmitter.
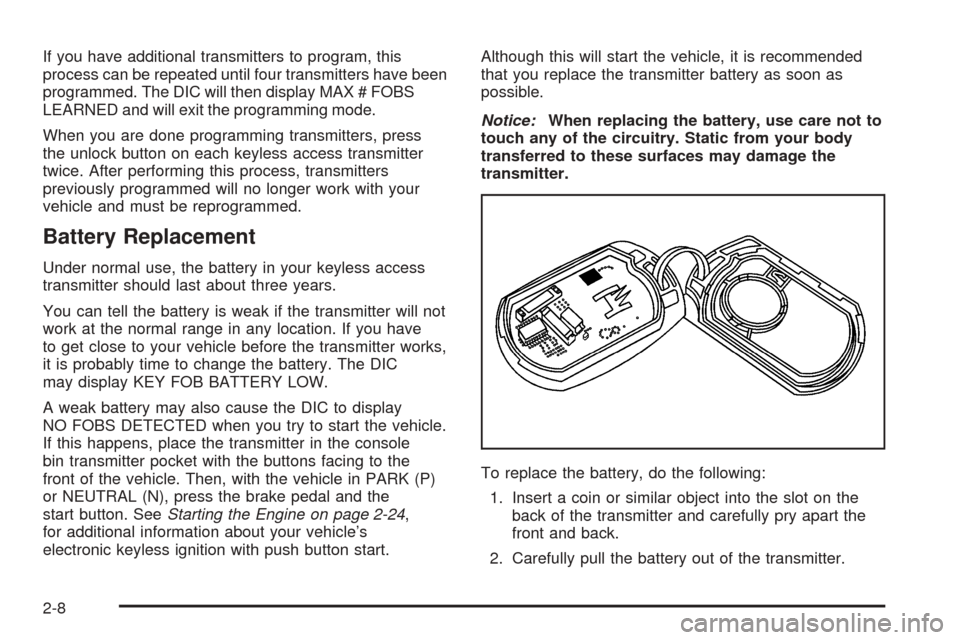
To replace the battery, do the following:
1. Insert a coin or similar object into the slot on the
back of the transmitter and carefully pry apart the
front and back.
2. Carefully pull the battery out of the transmitter.
2-8
Page 79 of 446

Squeeze the trunk release button located on the
rear of the trunk lid above the license plate, as
long as you have your keyless access transmitter
with you. Entry occurs when the button is being
pressed and the vehicle recognizes the transmitter.
The vehicle must be in PARK (P) and the valet
mode turned off.
If your vehicle has lost battery power, you can still
access the trunk by unlocking and lowering the rear seat
pass-through door and pulling the emergency trunk
release handle.
Rear Seat Pass-Through Door
This feature allows you to access the trunk without
opening the trunk lid.
To open the door, do the following:
1. Pull down the rear seat armrest.
2. If it is locked, insert and turn the key
counterclockwise in the lock on the door.
3. Press the button above the lock.
4. Lower the door.
To open the trunk lid, pull down the emergency trunk
release handle located in the trunk. See “Emergency
Trunk Release Handle” following.
Emergency Trunk Release Handle
Notice:Using the emergency trunk release handle
as a tie-down or anchor point when securing
items in the trunk may damage it. Use the
emergency trunk release handle only to help you
open the trunk lid.
There is a glow-in-the-dark trunk release handle located
inside the trunk near the back of the rear seats. This
handle will glow following exposure to light. Pull
down the release handle to open the trunk from the
inside of the vehicle.
2-15
Page 88 of 446
Starting the Engine
Move your shift lever to PARK (P) or NEUTRAL (N).
Your engine will not start in any other position — that is
a safety feature. To restart when you are already
moving, use NEUTRAL (N) only.
The keyless access transmitter must be in the vehicle
for the ignition to work.
Notice:Do not try to shift to PARK (P) if your
vehicle is moving. If you do, you could damage the
transmission. Shift to PARK (P) only when your
vehicle is stopped.
1. With your foot on the brake pedal, press the
START button. If no keyless access transmitter
is present, the DIC will display NO FOB
DETECTED. When the engine begins cranking, let
go of the button. The idle speed will go down as
your engine gets warm.
If the battery in the keyless access transmitter is
weak, the DIC will display FOB BATTERY
LOW. You can still drive the vehicle. See “Battery
Replacement” underKeyless Access System
Operation on page 2-4for more information.Notice:Holding the button in for longer than
15 seconds at a time will cause the vehicle’s battery
to be drained much sooner. This can also cause
damage to the starter motor. Wait 15 seconds
between each try to avoid draining your vehicle’s
battery or damaging the starter.
2. If the engine does not start and no DIC message is
displayed, wait 15 seconds before trying again.
Notice:Your engine is designed to work with the
electronics in your vehicle. If you add electrical
parts or accessories, you could change the way the
engine operates. Before adding electrical equipment,
check with your dealer. If you do not, your engine
might not perform properly.
Stopping Your Engine
Move the shift lever to PARK (P) and press the
OFF/ACCESSORY button. If the shifter is not in
PARK (P), the vehicle will go into accessory mode
and the DIC will display SHIFT TO PARK. Once the
shifter is moved to PARK (P), the vehicle will turn off.
If the keyless access transmitter is not detected
while going to off, the DIC will display NO FOB – OFF
OR RUN?.
SeeDIC Warnings and Messages on page 3-78for
more information.
2-24
Page 92 of 446
AUTOMATIC OVERDRIVE (D):This position is for
normal driving. If you need more power for passing,
and you are:
Going less than 35 mph (55 km/h), push the
accelerator pedal about halfway down.
Going about 35 mph (55 km/h) or more, push the
accelerator all the way down.
The transmission will shift down to a lower gear
and have more power.
Notice:Spinning the tires or holding the vehicle in
one place on a hill using only the accelerator
pedal may damage the transmission. If you are
stuck, do not spin the tires. When stopping on a hill,
use the brakes to hold the vehicle in place.
FOURTH (4):This position is also used for normal
driving. However, it offers more power and lower fuel
economy than AUTOMATIC OVERDRIVE (D).
Here are examples for using FOURTH (4) instead of
AUTOMATIC OVERDRIVE (D):
When driving on hilly, winding roads.
When going down a steep hill.
This position may also offer improved trailer towing
performance in certain driving conditions.
Driver Shift Control (DSC)
Notice:If you drive your vehicle at high rpms
without upshifting while using Driver Shift
Control (DSC), you could damage your vehicle.
Always upshift when necessary while using DSC.
Your automatic transmission has a Driver Shift
Control (DSC) feature that allows you to change
gears similar to a manual transmission. To use the
DSC feature:
1. Slide the shift lever over from AUTOMATIC
OVERDRIVE (D) to the right into the DSC area.
The DIC will display which mode the transmission
is in. SeeDriver Information Center (DIC) on
page 3-73.
If you do not move the shift lever forward or
rearward, the vehicle will be in sport mode. While
driving in sport mode, the transmission may remain
in a gear longer than it would in normal driving
mode based on braking, throttle input and vehicle
lateral acceleration.
2. Press the shift lever forward to upshift or rearward
to downshift.
The odometer on the instrument panel cluster will
change to show the requested gear range when moving
the shift lever forward or rearward.
2-28
Page 106 of 446
HomeLink®Wireless Control
System Operation
Do not use the HomeLink®Transmitter with any garage
door opener that does not have the “stop and reverse”
feature. This includes any garage door opener model
manufactured before April 1, 1982. If you have a newer
garage door opener with rolling codes, please be
sure to follow Steps 6 through 8 to complete the
programming of your HomeLink
®Transmitter.
Read the instructions completely before attempting to
program the HomeLink
®Transmitter. Because of
the steps involved, it may be helpful to have another
person available to assist you in programming the
transmitter.
Keep the original transmitter for use in other vehicles as
well as for future HomeLink
®programming. It is also
recommended that upon the sale of the vehicle, the
programmed HomeLink
®buttons should be erased for
security purposes. Refer to “Erasing HomeLink®Buttons”
or, for assistance, contact HomeLink®on the Internet
at: www.homelink.com or by calling 1-800-355-3515.
Be sure that people and objects are clear of the garage
door or gate operator you are programming. When
programming a garage door, it is advised to park outside
of the garage.It is recommended that a new battery be installed in
your hand-held transmitter for quicker and more
accurate transmission of the radio frequency.
Programming HomeLink®
Your vehicle’s engine should be turned off while
programming the transmitter. Follow these steps to
program up to three channels:
1. Press and hold down the two outside buttons,
releasing only when the indicator light begins to
�ash, after 20 seconds. Do not hold down the
buttons for longer than 30 seconds and do not
repeat this step to program a second and/or third
transmitter to the remaining two HomeLink
®buttons.
2. Position the end of your hand-held transmitter about
1 to 3 inches (3 to 8 cm) away from the HomeLink
®
buttons while keeping the indicator light in view.
3. Simultaneously press and hold both the desired
button on HomeLink
®and the hand-held transmitter
button. Do not release the buttons until Step 4
has been completed.
Some entry gates and garage door openers may
require you to substitute Step 3 with the procedure
noted in “Gate Operator and Canadian
Programming” later in this section.
2-42
Page 108 of 446
Gate Operator and Canadian
Programming
Canadian radio-frequency laws require transmitter
signals to “time out” or quit after several seconds of
transmission. This may not be long enough for
HomeLink
®to pick up the signal during programming.
Similarly, some U.S. gate operators are manufactured
to “time out” in the same manner.
If you live in Canada, or you are having difficulty
programming a gate operator by using the
“Programming HomeLink
®” procedures (regardless of
where you live), replace Step 3 under “Programming
HomeLink
®” with the following:
Continue to press and hold the HomeLink
®button
while you press and release every two seconds (cycle)
your hand-held transmitter until the frequency signal
has been successfully accepted by HomeLink
®.
The indicator light will �ash slowly at �rst and then
rapidly. Proceed with Step 4 under “Programming
HomeLink
®” to complete.
Using HomeLink®
Press and hold the appropriate HomeLink®button for
at least half of a second. The indicator light will come
on while the signal is being transmitted.
Erasing HomeLink®Buttons
To erase programming from the three buttons do the
following:
1. Press and hold down the two outside buttons until
the indicator light begins to �ash, after 20 seconds.
Do not hold the two outside buttons for longer
than 30 seconds.
2. Release both buttons.
HomeLink
®is now in the train (learning) mode and can
be programmed at any time beginning with Step 2
under “Programming HomeLink
®” shown earlier in this
section.
Individual buttons cannot be erased, but they can
be reprogrammed. See “Reprogramming a Single
HomeLink
®Button” following this section.
2-44
Page 120 of 446
EXT. (Exterior) LIGHTS AT UNLOCK
This feature turns on the exterior lamps when the
keyless access transmitter is used to unlock the vehicle.
The lamps will remain on for about 20 seconds unless
a door is opened, the ignition is turned to ACC, ON
or START or the keyless access transmitter is used to
lock the vehicle.
Programmable Modes
Mode 1:ON
Mode 2:OFF
Before your vehicle was shipped from the factory, it was
programmed to Mode 1. The mode to which the
vehicle was programmed may have been changed since
it left the factory.
To program the vehicle to a different mode, use the
following procedure:
1. Enter the PERSONAL SETTINGS MENU by
following the instructions listed previously under
“Entering the Personal Settings Menu.”
2. Turn the tune/select knob until EXT. LIGHTS AT
UNLOCK is highlighted.
3. Press the tune/select knob to switch back and forth
between on and off.
When the mode is turned on, a check mark will
appear next to the feature name.The mode you selected is now set. You can either exit
the programming mode by following the instructions
later in this section or program the next feature available
on your vehicle.
HORN CHIRPS AT LOCK
This feature sounds the horn once when the keyless
access transmitter is used to lock the vehicle. All doors
must be closed for this feature to work.
Programmable Modes
Mode 1:ON
Mode 2:OFF
Before your vehicle was shipped from the factory, it was
programmed to Mode 2. The mode to which the
vehicle was programmed may have been changed since
it left the factory.
To program the vehicle to a different mode, use the
following procedure:
1. Enter the PERSONAL SETTINGS MENU by
following the instructions listed previously under
“Entering the Personal Settings Menu.”
2. Turn the tune/select knob until HORN CHIRPS AT
LOCK is highlighted.
3. Press the tune/select knob to switch back and forth
between on and off.
When the mode is turned on, a check mark will
appear next to the feature name.
2-56
Page 121 of 446
The mode you selected is now set. You can either exit
the programming mode by following the instructions
later in this section or program the next feature available
on your vehicle.
TWILIGHT DELAY
This feature allows you to set the amount of time you
want the exterior lamps to remain on after you exit
the vehicle.
Programmable Modes
Mode 1:0:00 seconds (off)
Mode 2:0:05 seconds
Mode 3:0:15 seconds
Mode 4:0:30 seconds
Mode 5:1:30 minutes
Mode 6:2:00 minutes
Mode 7:3:00 minutes
Mode 8:4:00 minutes
Before your vehicle was shipped from the factory, it was
programmed to Mode 2. The mode to which the
vehicle was programmed may have been changed since
the vehicle left the factory.To determine the mode to which the vehicle is
programmed or to program the vehicle to a different
mode, use the following procedure:
1. Enter the PERSONAL SETTINGS MENU by
following the instructions listed previously under
“Entering the Personal Settings Menu.”
2. Turn the tune/select knob until TWILIGHT DELAY is
highlighted.
3. Press the tune/select knob to scroll through the
available delay settings and set your selection.
If you choose Mode 1, the exterior lamps will not
illuminate when you exit the vehicle. Only one mode
can be selected at a time.
The mode you selected is now set. You can either exit
the programming mode by following the instructions
later in this section or program the next feature available
on your vehicle.
2-57
Page 125 of 446
3. Press the tune/select knob to switch back and forth
between on and off.
When the mode is turned on, a check mark will
appear next to the feature name.
The mode you selected is now set. You can either exit
the programming mode by following the instructions
later in this section or program the next feature available
on your vehicle.
LOCK DELAY
This feature delays the locking of the vehicle’s doors for
up to �ve seconds after a power door lock switch or
the lock button on the keyless access transmitter
is pressed. The �ve second delay occurs after the last
door is closed. If the keyless access transmitter is
left inside of the vehicle, the doors will not lock.
Programmable Modes
Mode 1:ON
Mode 2:OFF
Before your vehicle was shipped from the factory, it was
programmed to Mode 1. The mode to which the
vehicle was programmed may have been changed since
it left the factory.To program the vehicle to a different mode, use the
following procedure:
1. Enter the PERSONAL SETTINGS MENU by
following the instructions listed previously under
“Entering the Personal Settings Menu.”
2. Turn the tune/select knob until LOCK DELAY is
highlighted.
3. Press the tune/select knob to switch back and forth
between on and off.
When the mode is turned on, a check mark will
appear next to the feature name.
The mode you selected is now set. You can either exit
the programming mode by following the instructions
later in this section or program the next feature available
on your vehicle.
2-61
Page 126 of 446
KEYLESS LOCK DELAY
This feature delays the locking of the vehicle’s doors for
up to �ve seconds after the lock button on the keyless
access transmitter is pressed. The �ve second delay
occurs after the last door is closed. If the keyless access
transmitter is left inside of the vehicle, the doors will
not lock.
Programmable Modes
Mode 1:ON
Mode 2:OFF
Before your vehicle was shipped from the factory, it was
programmed to Mode 2. The mode to which the
vehicle was programmed may have been changed since
it left the factory.
To program the vehicle to a different mode, use the
following procedure:
1. Enter the PERSONAL SETTINGS MENU by
following the instructions listed previously under
“Entering the Personal Settings Menu.”
2. Turn the tune/select knob until KEYLESS LOCK
DELAY is highlighted.
3. Press the tune/select knob to switch back and forth
between on and off.
When the mode is turned on, a check mark will
appear next to the feature name.The mode you selected is now set. You can either exit
the programming mode by following the instructions
later in this section or program the next feature available
on your vehicle.
FRONT PASS (Passenger) WINDOW LOCK
This feature allows you to choose whether or not to
have the front passenger window deactivated as part of
the window lockout button. If you would like the front
passenger window to be deactivated when the window
lockout button is pushed, turn this feature on. If this
feature is left off, the window lockout button located on
the door will deactivate only the rear windows. See
Power Windows on page 2-17for more information.
Programmable Modes
Mode 1:ON
Mode 2:OFF
Before your vehicle was shipped from the factory, it was
programmed to Mode 2. The mode to which the
vehicle was programmed may have been changed since
it left the factory.
2-62