set clock CADILLAC STS 2005 1.G Owners Manual
[x] Cancel search | Manufacturer: CADILLAC, Model Year: 2005, Model line: STS, Model: CADILLAC STS 2005 1.GPages: 446, PDF Size: 2.58 MB
Page 179 of 446
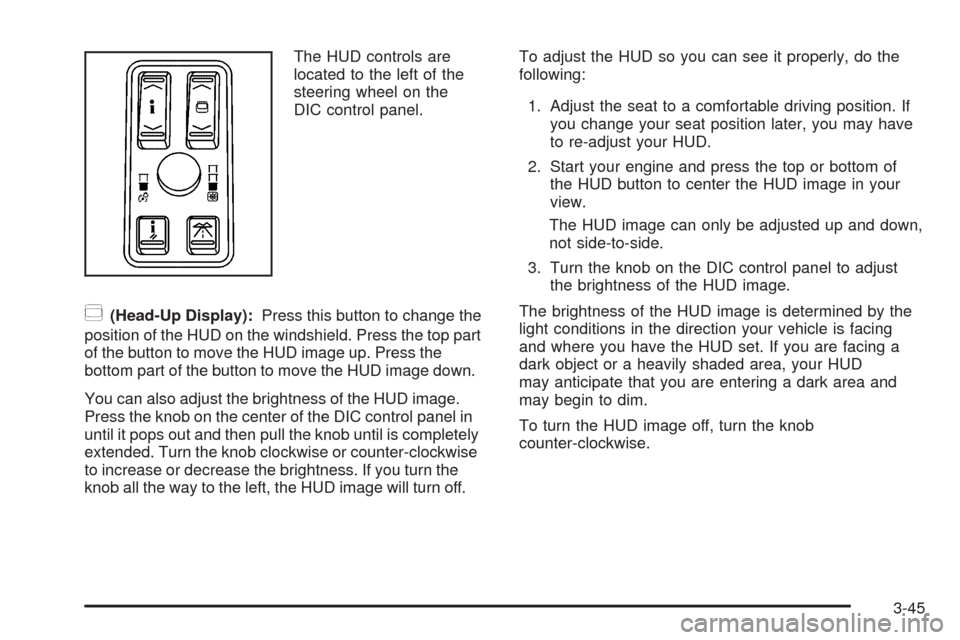
The HUD controls are
located to the left of the
steering wheel on the
DIC control panel.
~(Head-Up Display):Press this button to change the
position of the HUD on the windshield. Press the top part
of the button to move the HUD image up. Press the
bottom part of the button to move the HUD image down.
You can also adjust the brightness of the HUD image.
Press the knob on the center of the DIC control panel in
until it pops out and then pull the knob until is completely
extended. Turn the knob clockwise or counter-clockwise
to increase or decrease the brightness. If you turn the
knob all the way to the left, the HUD image will turn off.To adjust the HUD so you can see it properly, do the
following:
1. Adjust the seat to a comfortable driving position. If
you change your seat position later, you may have
to re-adjust your HUD.
2. Start your engine and press the top or bottom of
the HUD button to center the HUD image in your
view.
The HUD image can only be adjusted up and down,
not side-to-side.
3. Turn the knob on the DIC control panel to adjust
the brightness of the HUD image.
The brightness of the HUD image is determined by the
light conditions in the direction your vehicle is facing
and where you have the HUD set. If you are facing a
dark object or a heavily shaded area, your HUD
may anticipate that you are entering a dark area and
may begin to dim.
To turn the HUD image off, turn the knob
counter-clockwise.
3-45
Page 209 of 446
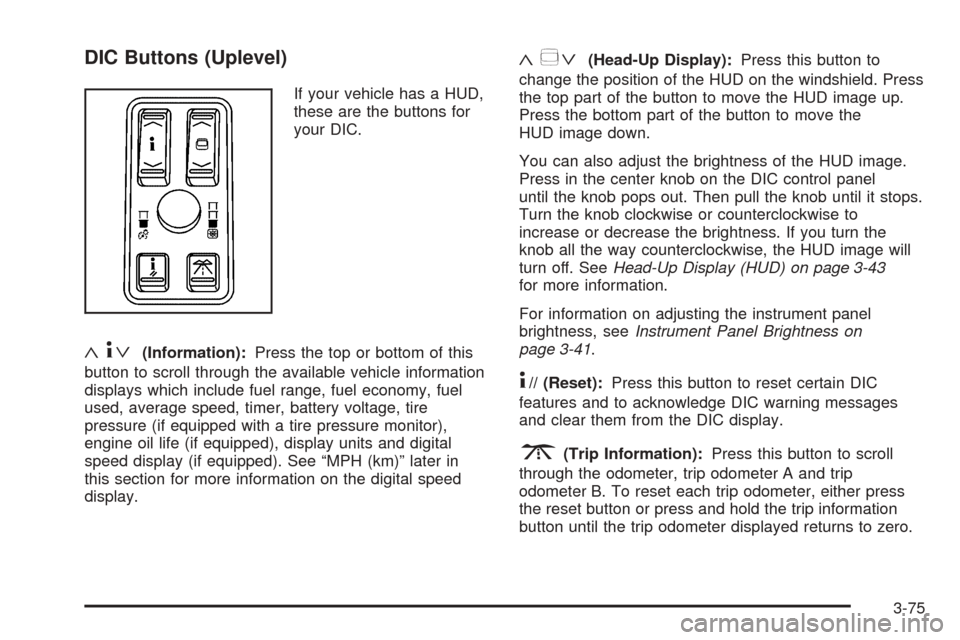
DIC Buttons (Uplevel)
If your vehicle has a HUD,
these are the buttons for
your DIC.
«4ª(Information):Press the top or bottom of this
button to scroll through the available vehicle information
displays which include fuel range, fuel economy, fuel
used, average speed, timer, battery voltage, tire
pressure (if equipped with a tire pressure monitor),
engine oil life (if equipped), display units and digital
speed display (if equipped). See “MPH (km)” later in
this section for more information on the digital speed
display.
«~ª(Head-Up Display):Press this button to
change the position of the HUD on the windshield. Press
the top part of the button to move the HUD image up.
Press the bottom part of the button to move the
HUD image down.
You can also adjust the brightness of the HUD image.
Press in the center knob on the DIC control panel
until the knob pops out. Then pull the knob until it stops.
Turn the knob clockwise or counterclockwise to
increase or decrease the brightness. If you turn the
knob all the way counterclockwise, the HUD image will
turn off. SeeHead-Up Display (HUD) on page 3-43
for more information.
For information on adjusting the instrument panel
brightness, seeInstrument Panel Brightness on
page 3-41.
4// (Reset):Press this button to reset certain DIC
features and to acknowledge DIC warning messages
and clear them from the DIC display.
3(Trip Information):Press this button to scroll
through the odometer, trip odometer A and trip
odometer B. To reset each trip odometer, either press
the reset button or press and hold the trip information
button until the trip odometer displayed returns to zero.
3-75
Page 227 of 446
Your vehicle has a feature called Retained Accessory
Power (RAP). With RAP, the audio system can be
played even after the ignition is turned off. SeeRetained
Accessory Power (RAP) on page 2-23for more
information.
Setting the Time
1. Press the tune/select knob (the right knob) to enter
the main menu.
2. Turn the tune/select knob until SET CLOCK
appears on the display.
3. Press the tune/select knob to select SET CLOCK.
4. Turn the tune/select knob to adjust the time.
5. Press the tune/select knob to update the time.
VEHICLE TIME UPDATED will appear on the
display.
If the CLOCK/RADIO DISP is con�gured into one of
the con�gurable keys, pressing the key will switch the
display back to the clock set function. The time and
date will always appear on the radio display. See
“Con�gurable Radio Display Keys” underRadio with
CD on page 3-94for more information on con�guring
the keys.
Setting the Date
1. Press the tune/select knob (the right knob) to enter
the main menu.
2. Turn the tune/select knob until SET DATE appears
on the display.
3. Press the tune/select knob to select SET DATE.
4. Turn the tune/select knob to adjust the date.
5. Press the tune/select knob to update the time.
VEHICLE DATE UPDATED will appear on the
display.
If the DATE is con�gured into one of the con�gurable
keys, pressing the key will switch the display back to
the date set function. The time and date will always
appear on the radio display. See “Con�gurable Radio
Display Keys” underRadio with CD on page 3-94
for more information on con�guring the keys.
3-93
Page 246 of 446
Radio Personalization
Accessing the Radio’s Main Menu
(Base Audio System)
There are two different procedures for accessing the
radio’s main menu depending upon whether or not your
vehicle has the Navigation system.
To access the main menu of the radio, do one of the
following:
Using the Base audio system, press the CNFG
button located on the radio or press the tune/select
knob located on the right side of the radio. Then
turn the tune/select knob clockwise or
counterclockwise to scroll through the menu items.
If your vehicle has the Navigation system, see the
Navigation System manual supplied with your
vehicle for more information on accessing the main
menu and for descriptions of the menu items for
the Navigation system.The main menu for the Base audio system consists of
the following menu items:
eBASS - MID - TREBLE
xBALANCE - FADER
eEQ EQUALIZER
H/A (HOME/AWAY) PRESETS
AUTOSTORE PRESETS
CAT CATEGORY
TA TRAFFIC ANNOUNCE
RECALL RDS (Radio Data System) MESSAGE
AF ALTERNATE FREQ. (Frequency)
ASEEK LOCAL/DISTANT
8SET CLOCK
BSET DATE
4INFO (Information)
LANG LANGUAGE
SETUP
3-112
Page 248 of 446
ASEEK LOCAL/DISTANT:This feature instructs the
audio system to seek only local radio stations with
the strongest signal or to seek all radio stations with a
strong signal in a large area. Use LOCAL when you are
in urban areas where there are several strong radio
station signals and you want to limit the number
of stations to those with the strongest signals only. Use
DISTANT when you are in rural areas where there
are fewer radio station signals available.
See “Local/Distant Selection” underRadio with CD on
page 3-94for more information.
8SET CLOCK:Use this menu item to set the time.
SeeSetting the Time on page 3-93for more information.
BSET DATE:Use this menu item to set the date.
SeeSetting the Time on page 3-93for more information.
4(Information):This menu item is used to display
XM™ satellite radio service and CD MP3 playback
information. See “
4(Information)” underRadio with CD
on page 3-94for more information.LANG (Language):To change the language displayed
on the radio, select LANGUAGE by pressing the
tune/select knob. Turn the tune/select knob to scroll
through the following available languages:
ENGLISH
GERMAN
FRENCH
SPANISH
JAPANESE
To make your selection, press the tune/select knob. If
you accidentally select a language that you did not want,
ENGLISH is always at the top of the language list.
SETUP:When you select this menu item, the following
submenu is available:
PERSONAL SETTINGS MENU
DRIVER SELECTION
DRIVER EXIT SETTINGS
CONFIGURE DISPLAY KEYS
SETUP Submenu Items
The following choices are available for programming
using the Base audio system.
3-114