tow CADILLAC STS 2006 1.G User Guide
[x] Cancel search | Manufacturer: CADILLAC, Model Year: 2006, Model line: STS, Model: CADILLAC STS 2006 1.GPages: 480, PDF Size: 2.74 MB
Page 102 of 480
AUTOMATIC OVERDRIVE (D):This position is for
normal driving. If you need more power for passing, and
you are:
Going less than 35 mph (55 km/h), push the
accelerator pedal about halfway down.
Going about 35 mph (55 km/h) or more, push the
accelerator all the way down.
The transmission will shift down to a lower gear
and have more power.
Notice:Spinning the tires or holding the vehicle in
one place on a hill using only the accelerator pedal
may damage the transmission. If you are stuck, do
not spin the tires. When stopping on a hill, use the
brakes to hold the vehicle in place.
FOURTH (4):This position is also used for normal
driving. However, it offers more power and lower fuel
economy than AUTOMATIC OVERDRIVE (D).
Here are examples for using FOURTH (4) instead of
AUTOMATIC OVERDRIVE (D):
When driving on hilly, winding roads.
When going down a steep hill.
This position may also offer improved trailer towing
performance in certain driving conditions.
Driver Shift Control (DSC)
Notice:If you drive your vehicle at high RPMs
without upshifting while using Driver Shift Control
(DSC), you could damage your vehicle. Always
upshift when necessary while using DSC.
Your automatic transmission has a Driver Shift Control
(DSC) feature that allows you to change gears similar to
a manual transmission. To use the DSC feature:
1. Slide the shift lever over from AUTOMATIC
OVERDRIVE (D) to the right into the DSC area.
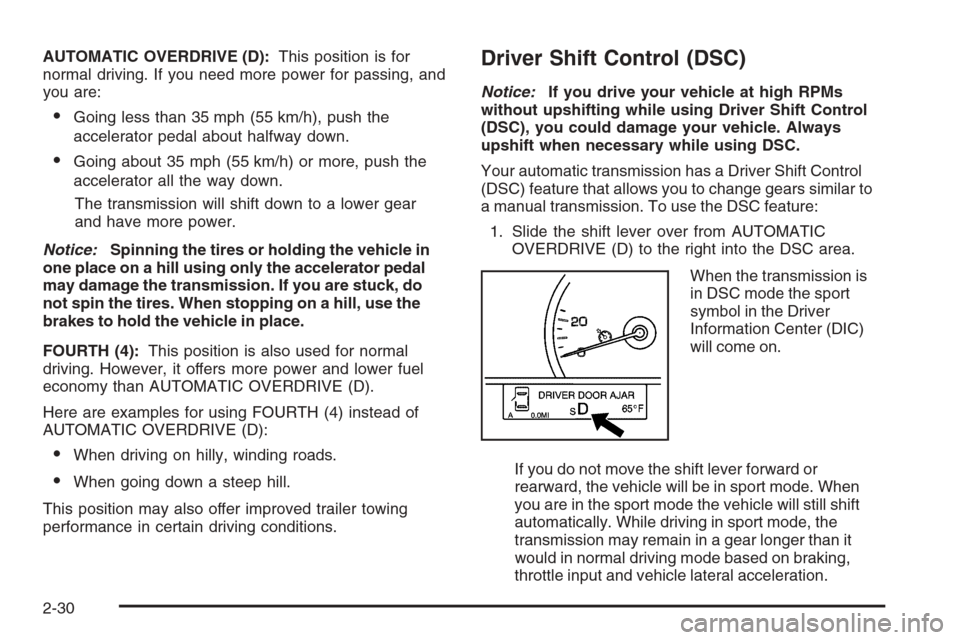
When the transmission is
in DSC mode the sport
symbol in the Driver
Information Center (DIC)
will come on.
If you do not move the shift lever forward or
rearward, the vehicle will be in sport mode. When
you are in the sport mode the vehicle will still shift
automatically. While driving in sport mode, the
transmission may remain in a gear longer than it
would in normal driving mode based on braking,
throttle input and vehicle lateral acceleration.
2-30
Page 104 of 480
Automatic Transmission
Operation (6-Speed Automatic)
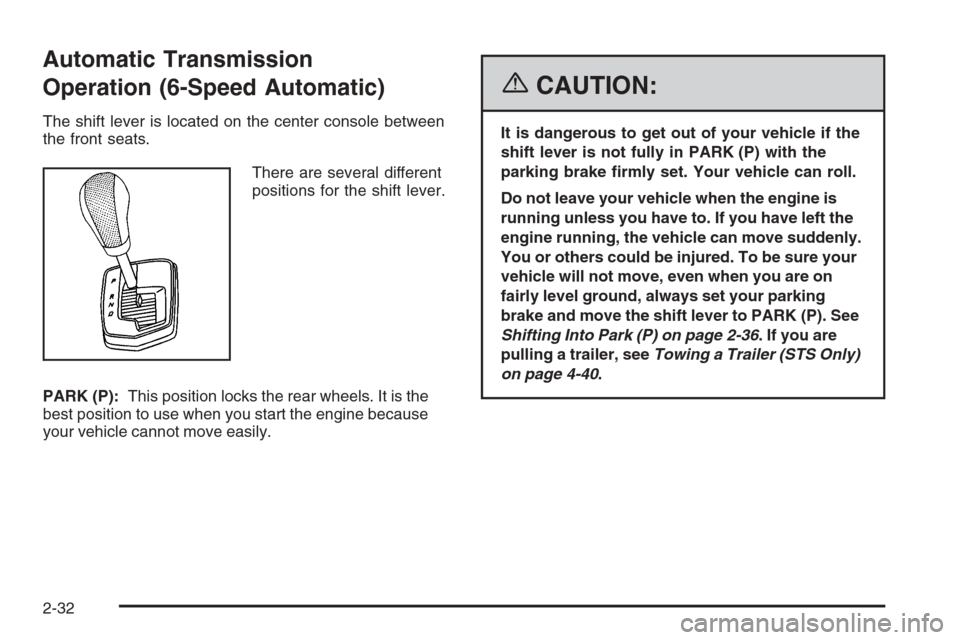
The shift lever is located on the center console between
the front seats.
There are several different
positions for the shift lever.
PARK (P):This position locks the rear wheels. It is the
best position to use when you start the engine because
your vehicle cannot move easily.
{CAUTION:
It is dangerous to get out of your vehicle if the
shift lever is not fully in PARK (P) with the
parking brake �rmly set. Your vehicle can roll.
Do not leave your vehicle when the engine is
running unless you have to. If you have left the
engine running, the vehicle can move suddenly.
You or others could be injured. To be sure your
vehicle will not move, even when you are on
fairly level ground, always set your parking
brake and move the shift lever to PARK (P). See
Shifting Into Park (P) on page 2-36. If you are
pulling a trailer, seeTowing a Trailer (STS Only)
on page 4-40.
2-32
Page 105 of 480
Ensure the shift lever is fully in PARK (P) before starting
the engine. Your vehicle has an automatic transmission
shift lock control system. You must fully apply your
regular brakes before you can shift from PARK (P) when
the vehicle is running. If you cannot shift out of PARK (P),
ease pressure on the shift lever. Push the shift lever all
the way into PARK (P) while pressing the button on the
shift lever as you maintain brake application. Then move
the shift lever into the gear you wish. SeeShifting Out of
Park (P) on page 2-38.
Notice:Shifting to REVERSE (R) while your vehicle
is moving forward could damage the transmission.
The repairs would not be covered by your warranty.
Shift to REVERSE (R) only after your vehicle is
stopped.
REVERSE (R):Use this gear to back up.
At low vehicle speeds, you can also use REVERSE (R)
to rock your vehicle back and forth to get out of snow, ice,
or sand without damaging your transmission. SeeIf Your
Vehicle is Stuck in Sand, Mud, Ice, or Snow on page 4-31
for additional information.
NEUTRAL (N):In this position, the engine does not
connect with the wheels. To restart when you are
already moving, use NEUTRAL (N) only. You can also
use NEUTRAL (N) when your vehicle is being towed.
{CAUTION:
Shifting into a drive gear while your engine is
running at high speed is dangerous. Unless
your foot is �rmly on the brake pedal, your
vehicle could move very rapidly. You could
lose control and hit people or objects. Do not
shift into a drive gear while your engine is
running at high speed.
Notice:Shifting out of PARK (P) or NEUTRAL (N)
with the engine running at high speed may damage
the transmission. The repairs would not be covered
by your warranty. Be sure the engine is not running
at high speed when shifting your vehicle.
AUTOMATIC OVERDRIVE (D):This position is for
normal driving. If you need more power for passing,
and you are:
Going less than 35 mph (55 km/h), push the
accelerator pedal about halfway down.
Going about 35 mph (55 km/h) or more, push the
accelerator all the way down.
The transmission will shift down to a lower gear
and have more power.
2-33
Page 108 of 480
To release the parking brake, hold the brake pedal
down with your right foot and push the parking brake
pedal with your left foot. When you lift your left foot,
the parking brake pedal will follow it to the released
position.
Notice:Driving with the parking brake on can
overheat the brake system and cause premature
wear or damage to brake system parts. Verify that
the parking brake is fully released and the brake
warning light is off before driving.
A warning chime will sound if the parking brake is set,
the ignition is on and the vehicle begins to move.
To stop the chime, fully release the parking brake.
If you are towing a trailer and parking on a hill,
seeTowing a Trailer (STS Only) on page 4-40for more
information.Shifting Into Park (P)
{CAUTION:
It can be dangerous to get out of your vehicle if
the shift lever is not fully in PARK (P) with the
parking brake �rmly set. Your vehicle can roll.
If you have left the engine running, the vehicle
can move suddenly. You or others could be
injured. To be sure your vehicle will not move,
even when you are on fairly level ground, use
the steps that follow. If you are pulling a trailer,
seeTowing a Trailer (STS Only) on page 4-40.
To shift into PARK (P), use the following steps:
1. Hold the brake pedal down with your right foot.
2. Move the shift lever into PARK (P) by pressing the
button on the front of the shift lever while pushing
the lever all the way toward the front of the vehicle.
Release the button.
3. With your right foot still holding the brake pedal
down, set the parking brake with your left foot.
SeeParking Brake on page 2-35for more
information.
4. Turn the ignition off.
2-36
Page 112 of 480
Running the Engine While Parked
It is better not to park with the engine running. But if you
ever have to, here are some things to know.
{CAUTION:
Idling the engine with the climate control
system off could allow dangerous exhaust into
your vehicle. See the earlier caution under
Engine Exhaust on page 2-39.
Also, idling in a closed-in place can let deadly
carbon monoxide (CO) into your vehicle even if
the climate control fan is at the highest setting.
One place this can happen is a garage.
Exhaust — with CO — can come in easily.
NEVER park in a garage with the engine
running.
Another closed-in place can be a blizzard. See
Winter Driving on page 4-27.
{CAUTION:
It can be dangerous to get out of your vehicle
if the shift lever is not fully in PARK (P) with
the parking brake �rmly set. Your vehicle can
roll. Do not leave your vehicle when the engine
is running unless you have to. If you have left
the engine running, the vehicle can move
suddenly. You or others could be injured. To
be sure your vehicle will not move, even when
you are on fairly level ground, always set your
parking brake after you move the shift lever to
PARK (P).
Follow the proper steps to be sure your vehicle will not
move. SeeShifting Into Park (P) on page 2-36.
If you are parking on a hill and if you are pulling a
trailer, also seeTowing a Trailer (STS Only) on
page 4-40.
2-40
Page 113 of 480
Mirrors
Automatic Dimming Rearview Mirror
with Intellibeam™ and OnStar
®
Your vehicle may have an Intellibeam™ inside rearview
mirror with OnStar®controls. For more information
about OnStar®, seeOnStar®System on page 2-45.
To turn on and enable Intellibeam™, press and release
the Intellibeam™ button on the inside rear view mirror.
If the vehicle has the IntelliBeam™ Intelligent High-Beam
Headlamp Control System, the on/off button can also be
used to turn off or reset this system. See “IntelliBeam™
Intelligent High-Beam Headlamp Control System” under
Headlamps on page 3-31.
Automatic Dimming Rearview Mirror
Your vehicle may have an automatic dimming
rearview mirror.
O(On/Off):Press and hold the button, located on the
lower left side of the mirror face, for about three seconds
to turn the automatic dimming feature on or off. The
indicator light will illuminate when this feature is active.
The automatic dimming feature is active each time the
vehicle is started.
Automatic Dimming Rearview Mirror
with OnStar
®
Your vehicle may have an automatic dimming rearview
mirror that also contains OnStar®controls. For more
information on OnStar®, seeOnStar®System on
page 2-45.
Mirror Operation
O
(On/Off):Press and hold the button, located on the
lower left side of the mirror face, for about three seconds
to turn the automatic dimming feature on or off. The
indicator light will illuminate when this feature is active.
The automatic dimming feature is active each time the
vehicle is started.
Cleaning the Mirror
When cleaning the mirror, use a paper towel or similar
material dampened with glass cleaner. Do not spray
glass cleaner directly on the mirror as that may cause
the liquid cleaner to enter the mirror housing.
2-41
Page 115 of 480
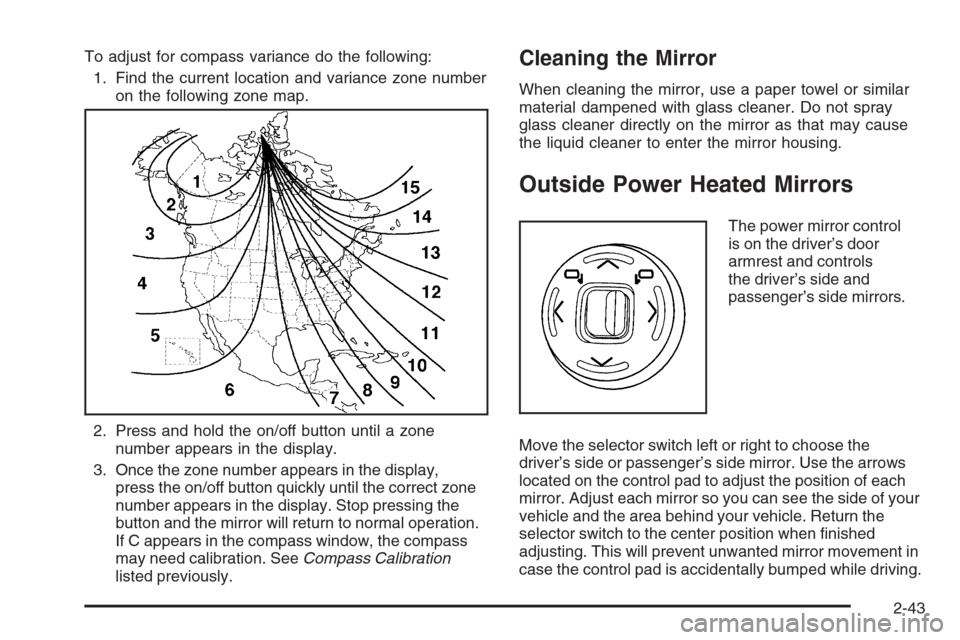
To adjust for compass variance do the following:
1. Find the current location and variance zone number
on the following zone map.
2. Press and hold the on/off button until a zone
number appears in the display.
3. Once the zone number appears in the display,
press the on/off button quickly until the correct zone
number appears in the display. Stop pressing the
button and the mirror will return to normal operation.
If C appears in the compass window, the compass
may need calibration. SeeCompass Calibration
listed previously.Cleaning the Mirror
When cleaning the mirror, use a paper towel or similar
material dampened with glass cleaner. Do not spray
glass cleaner directly on the mirror as that may cause
the liquid cleaner to enter the mirror housing.
Outside Power Heated Mirrors
The power mirror control
is on the driver’s door
armrest and controls
the driver’s side and
passenger’s side mirrors.
Move the selector switch left or right to choose the
driver’s side or passenger’s side mirror. Use the arrows
located on the control pad to adjust the position of each
mirror. Adjust each mirror so you can see the side of your
vehicle and the area behind your vehicle. Return the
selector switch to the center position when �nished
adjusting. This will prevent unwanted mirror movement in
case the control pad is accidentally bumped while driving.
2-43
Page 116 of 480
The preferred mirror positions can be stored with the
memory option. SeeMemory Seat, Mirrors and Steering
Wheel on page 2-70.
The mirrors can be manually folded inward to prevent
damage when going through car washes or con�ned
spaces. To fold, push the mirror toward the vehicle. To
return the mirror to its original position, push outward.
Be sure to return both mirrors to their original unfolded
position before driving.
When the rear window defogger is turned on, both
outside rear view mirrors are heated to help clear them
of ice, snow, or condensation. See “Rear Window
Defogger” underDual Climate Control System on
page 3-48.
Outside Automatic Dimming Mirror
The driver’s side mirror will adjust for the glare of
headlamps behind you. This feature is controlled by
the on and off settings on the automatic dimming
rearview mirror.
Outside Convex Mirror
{CAUTION:
A convex mirror can make things (like other
vehicles) look farther away than they really are.
If you cut too sharply into the right lane, you
could hit a vehicle on your right. Check your
inside mirror or glance over your shoulder
before changing lanes.
The passenger’s side mirror is convex. A convex mirror’s
surface is curved so more can be seen from the driver’s
seat. This mirror does not have a dimming feature.
Outside Parallel Park Assist Mirror
This feature assists the driver by improving rear obstacle
detection and is useful in viewing the curb when
parallel parking.
Press the left or right mirror symbol on the selector
control to choose the driver or passenger outside mirror.
When the vehicle is shifted into REVERSE (R), the
selected mirror will tilt to a factory programmed position.
2-44
Page 153 of 480
Push the control forward and the steering wheel moves
toward the front of the vehicle. Push the control
rearward and the steering wheel moves toward the rear
of the vehicle. To set the memory position, see
Vehicle Personalization on page 2-53andMemory
Seat, Mirrors and Steering Wheel on page 2-70.
Heated Steering Wheel
Your vehicle may have a heated steering wheel.
The button for this
feature is located on
the steering wheel.
Press the bottom of the button to turn the heated
steering wheel on or off. A light on the button will display
while the feature is on.
The steering wheel will take about three minutes to
reach its maximum temperature.
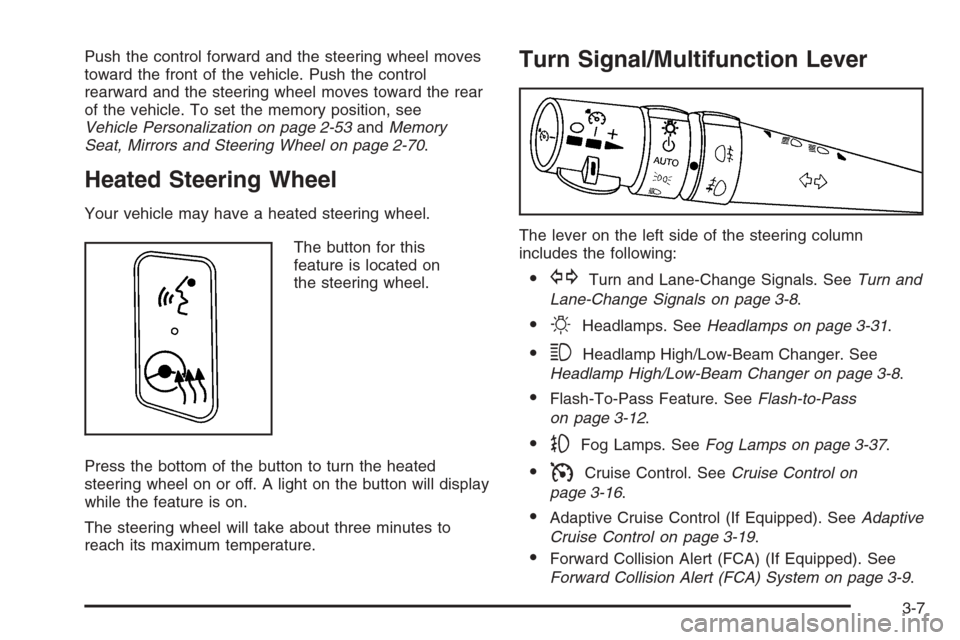
Turn Signal/Multifunction Lever
The lever on the left side of the steering column
includes the following:
GTurn and Lane-Change Signals. SeeTurn and
Lane-Change Signals on page 3-8.
OHeadlamps. SeeHeadlamps on page 3-31.
3Headlamp High/Low-Beam Changer. See
Headlamp High/Low-Beam Changer on page 3-8.
Flash-To-Pass Feature. SeeFlash-to-Pass
on page 3-12.
-Fog Lamps. SeeFog Lamps on page 3-37.
ICruise Control. SeeCruise Control on
page 3-16.
Adaptive Cruise Control (If Equipped). SeeAdaptive
Cruise Control on page 3-19.
Forward Collision Alert (FCA) (If Equipped). See
Forward Collision Alert (FCA) System on page 3-9.
3-7
Page 154 of 480

Turn and Lane-Change Signals
To signal a turn, move the lever all the way up or down.
The lever returns automatically when the turn is
complete.
An arrow on the instrument
panel cluster will �ash in
the direction of the
turn or lane change.
Raise or lower the lever until the arrow starts to �ash to
signal a lane change. Hold it there until the lane
change is complete. The lever returns to its original
position when it’s released.
Arrows that �ash rapidly when signaling for a turn or
lane change may be caused by a burned-out signal bulb.
Other driver’s won’t see the signal.
Replace burned-out bulbs to help avoid possible
accidents. Check the fuse and for burned-out bulbs if
the arrow fails to work when signaling a turn. SeeFuses
and Circuit Breakers on page 5-105for more
information.
Turn Signal On Chime
If the turn signal is left on for about 1 mile (1.6 km),
a warning chime will sound and the Turn Signal
On message will appear on the Driver Information
Center (DIC) display. See “Turn Signal On” underDIC
Warnings and Messages on page 3-79for more
information.
Headlamp High/Low-Beam Changer
Push forward on the turn signal/multifunction lever
to change the headlamps from low to high beam. Pull
the lever back and then release it to change from high to
low beam.
If you turn the vehicle off with the high beams on, the
next time you start your vehicle the low beams will
be on.
To re-activate high beams, pull lever toward you and
then push it forward again.
This light on the instrument
panel cluster will be on,
indicating high-beam
usage.
3-8