CADILLAC STS 2006 1.G Owners Manual
Manufacturer: CADILLAC, Model Year: 2006, Model line: STS, Model: CADILLAC STS 2006 1.GPages: 480, PDF Size: 2.74 MB
Page 421 of 480
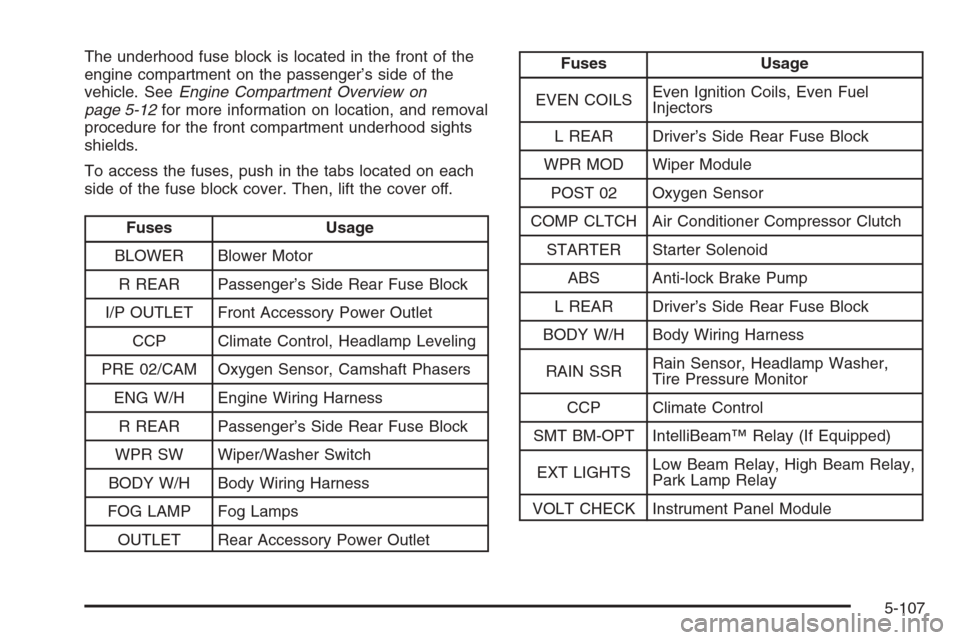
The underhood fuse block is located in the front of the
engine compartment on the passenger’s side of the
vehicle. SeeEngine Compartment Overview on
page 5-12for more information on location, and removal
procedure for the front compartment underhood sights
shields.
To access the fuses, push in the tabs located on each
side of the fuse block cover. Then, lift the cover off.
Fuses Usage
BLOWER Blower Motor
R REAR Passenger’s Side Rear Fuse Block
I/P OUTLET Front Accessory Power Outlet
CCP Climate Control, Headlamp Leveling
PRE 02/CAM Oxygen Sensor, Camshaft Phasers
ENG W/H Engine Wiring Harness
R REAR Passenger’s Side Rear Fuse Block
WPR SW Wiper/Washer Switch
BODY W/H Body Wiring Harness
FOG LAMP Fog Lamps
OUTLET Rear Accessory Power Outlet
Fuses Usage
EVEN COILSEven Ignition Coils, Even Fuel
Injectors
L REAR Driver’s Side Rear Fuse Block
WPR MOD Wiper Module
POST 02 Oxygen Sensor
COMP CLTCH Air Conditioner Compressor Clutch
STARTER Starter Solenoid
ABS Anti-lock Brake Pump
L REAR Driver’s Side Rear Fuse Block
BODY W/H Body Wiring Harness
RAIN SSRRain Sensor, Headlamp Washer,
Tire Pressure Monitor
CCP Climate Control
SMT BM-OPT IntelliBeam™ Relay (If Equipped)
EXT LIGHTSLow Beam Relay, High Beam Relay,
Park Lamp Relay
VOLT CHECK Instrument Panel Module
5-107
Page 422 of 480

Fuses Usage
ECM/TCMEngine Control Module,
Transmission Control Module,
Easy Key Module, Instrument
Panel Cluster
SPARE Spare
SPARE Spare
LT PARKDriver’s Side Park Lamp, Driver’s
Side Taillamp
LIC DIMMINGLicense Plate, Instrument
Panel Dimming
IPM ALDLInstrument Panel Module Assembly
Line Data Link Connector
HUDHeads-Up Display, Column
Lock Module
V8 ECMV8 Engine Control Module,
Evap. Solenoid
ABS Anti-lock Brake Controller
STR RLY Starter Relay
WASH
NOZ/AQSHeated Washer Nozzles, Air
Quality SensorFuses Usage
ODD COILSOdd Ignition Coils, Odd
Fuel Injectors
TCM IPCTransmission Control Module,
Instrument Panel, Engine Control
SPARE Spare
MAF Mass Air Flow Sensor
HIGH FAN Cooling Fan - High Speed
LOW FAN Cooling Fan - Low Speed
RT PARKPassenger’s Side Park Lamp,
Right Taillamp
HORN Horn
LT HI BEAM Driver’s Side Headlamp High Beam
LT LOW BEAM Driver’s Side Headlamp Low Beam
RT LOW BEAMPassenger’s Side Headlamp
Low Beam
RT HI BEAM Right Headlamp High Beam
HFV6 ECMHigh Feature V6 Engine
Control Module
5-108
Page 423 of 480
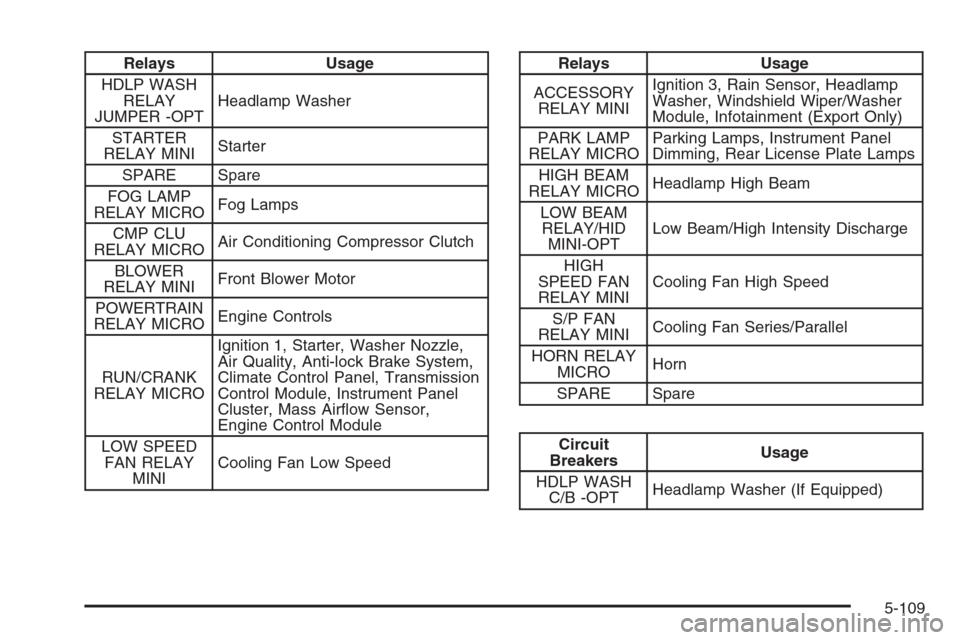
Relays Usage
HDLP WASH
RELAY
JUMPER -OPTHeadlamp Washer
STARTER
RELAY MINIStarter
SPARE Spare
FOG LAMP
RELAY MICROFog Lamps
CMP CLU
RELAY MICROAir Conditioning Compressor Clutch
BLOWER
RELAY MINIFront Blower Motor
POWERTRAIN
RELAY MICROEngine Controls
RUN/CRANK
RELAY MICROIgnition 1, Starter, Washer Nozzle,
Air Quality, Anti-lock Brake System,
Climate Control Panel, Transmission
Control Module, Instrument Panel
Cluster, Mass Air�ow Sensor,
Engine Control Module
LOW SPEED
FAN RELAY
MINICooling Fan Low SpeedRelays Usage
ACCESSORY
RELAY MINIIgnition 3, Rain Sensor, Headlamp
Washer, Windshield Wiper/Washer
Module, Infotainment (Export Only)
PARK LAMP
RELAY MICROParking Lamps, Instrument Panel
Dimming, Rear License Plate Lamps
HIGH BEAM
RELAY MICROHeadlamp High Beam
LOW BEAM
RELAY/HID
MINI-OPTLow Beam/High Intensity Discharge
HIGH
SPEED FAN
RELAY MINICooling Fan High Speed
S/P FAN
RELAY MINICooling Fan Series/Parallel
HORN RELAY
MICROHorn
SPARE Spare
Circuit
BreakersUsage
HDLP WASH
C/B -OPTHeadlamp Washer (If Equipped)
5-109
Page 424 of 480
Rear Underseat Fuse Block
Removing the Rear Seat Cushion
Notice:If you touch the exposed wires with the
metal on the seat cushion, you could cause a short
that could damage the battery and or wires. Avoid
contact between the rear seat and the fuse center
whenever you remove or reinstall the rear seat. Do
not remove covers from any of the covered parts,
and do not store anything under the seats.
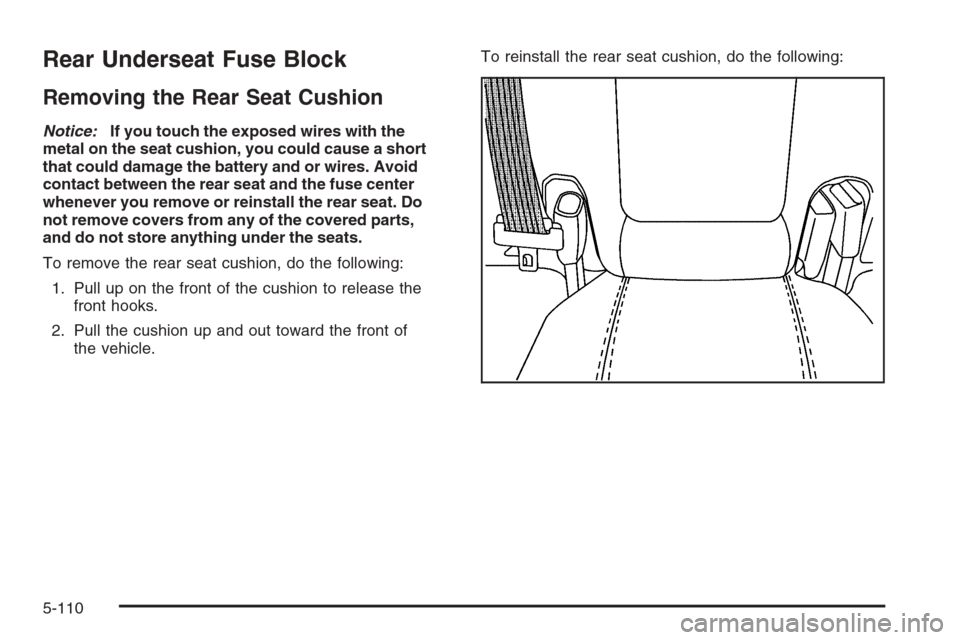
To remove the rear seat cushion, do the following:
1. Pull up on the front of the cushion to release the
front hooks.
2. Pull the cushion up and out toward the front of
the vehicle.To reinstall the rear seat cushion, do the following:
5-110
Page 425 of 480
{CAUTION:
A safety belt that is not properly routed
through the seat cushion or is twisted will not
provide the protection needed in a crash. If the
safety belt has not been routed through the
seat cushion at all, it will not be there to work
for the next passenger. The person sitting in
that position could be badly injured. After
reinstalling the seat cushion, always check to
be sure that the safety belts are properly
routed and are not twisted.
1. Buckle the center passenger position safety belt,
then route the safety belts through the proper slots
in the seat cushion. Do not let the safety belts
get twisted.
2. Slide the rear of the cushion up and under the
seatback so the rear-locating guides hook into
the wire loops on the back frame.3. With the seat cushion lowered, push rearward and
then press down on the seat cushion until the
spring locks on both ends engage.
4. Check to make sure the safety belts are properly
routed and that no portion of any safety belt is
trapped under the seat. Also make sure the seat
cushion is secured.
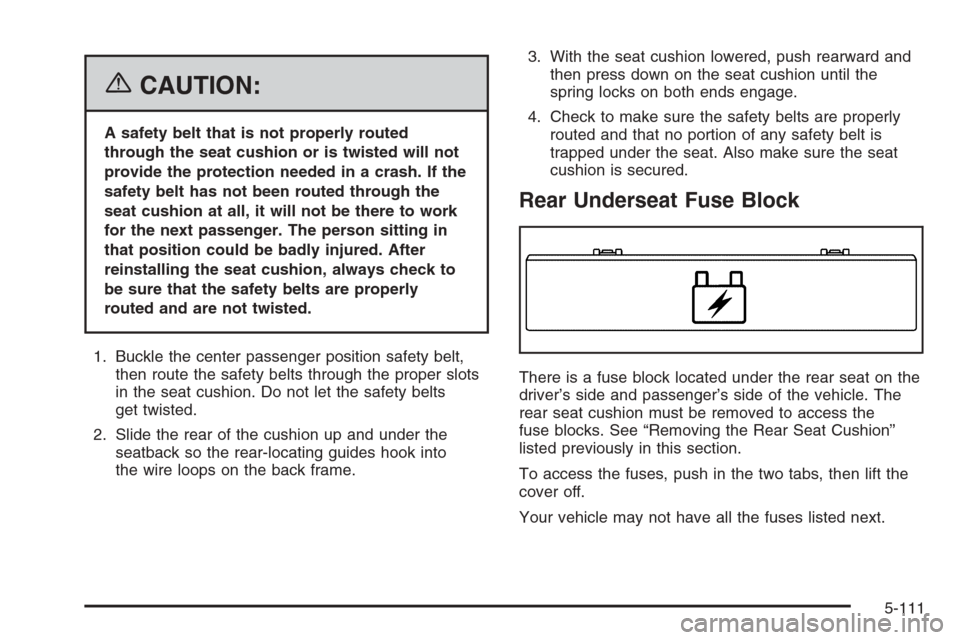
Rear Underseat Fuse Block
There is a fuse block located under the rear seat on the
driver’s side and passenger’s side of the vehicle. The
rear seat cushion must be removed to access the
fuse blocks. See “Removing the Rear Seat Cushion”
listed previously in this section.
To access the fuses, push in the two tabs, then lift the
cover off.
Your vehicle may not have all the fuses listed next.
5-111
Page 426 of 480

Driver’s Side
Fuses Usage
AMP Ampli�er
INTERCOOLER
PUMP (OPT)Intercooler Pump (Option)
THEFT/
SHIFTERTheft Sensors, Auto Shifter,
Power Sounder
MR-RTD MOD
(OPT)Magnetic Ride Control
Module (Option)
REAR DR MOD Rear Door Modules
ELC SOL
(OPT)Automatic Level Control, Exhaust
Solenoid (Option)
DRIVER DR
MODDriver Door Module
TV/VICS Infotainment (Export Only)Fuses Usage
REAR HTD
SEATSRear Heated Seats
SPARE Spare
SPARE Spare
IGN3Front Passenger Heated Seat, Auto
Shifter, Occupant Protection
RR SHLF
SPEAKERRear Shelf Speaker
DPM Memory Seat, Lumbar
TRUNK DR
VALETTrunk Release, Valet Lockout
Switch
REVERSE
LAMPReverse Lamps, Rear Parking Aid,
Inside Rearview Mirror
5-112
Page 427 of 480

Fuses Usage
AIR BAG Airbag
POSITION
LAMPS (OPT)Rear Taillamps
JOINT
CONNECTORJoint Connector
Relays Usage
INTERCOOLER
PUMP
MICRO (OPT)Intercooler Pump (Option)
ELC RELAY
MINI (OPT)Automatic Level Control
Compressor (Option)
L POSITION
RELAY MICROLeft Rear Taillamp, Position
Lamps (Option)
TRUNK DR
REL RELAY
MICROTrunk Release Motor
REV LAMP
RELAY MICROReverse Lamps, Rear Parking Aid,
Inside Rearview Mirror
Relays Usage
R POSITION
RELAY MICRORight Rear Taillamp, Position
Lamps (Option)
RUN RELAY
MICROIgnition 3
ELC RELAY
(OPT)Automatic Level Control (Option)
STNDBY
LAMP RLY
MICRO (OPT)Rear Taillamps, Position
Lamps (Option)
Circuit
BreakersUsage
SEATS C/B Power Seat
Diodes Usage
SPARE Spare
5-113
Page 428 of 480
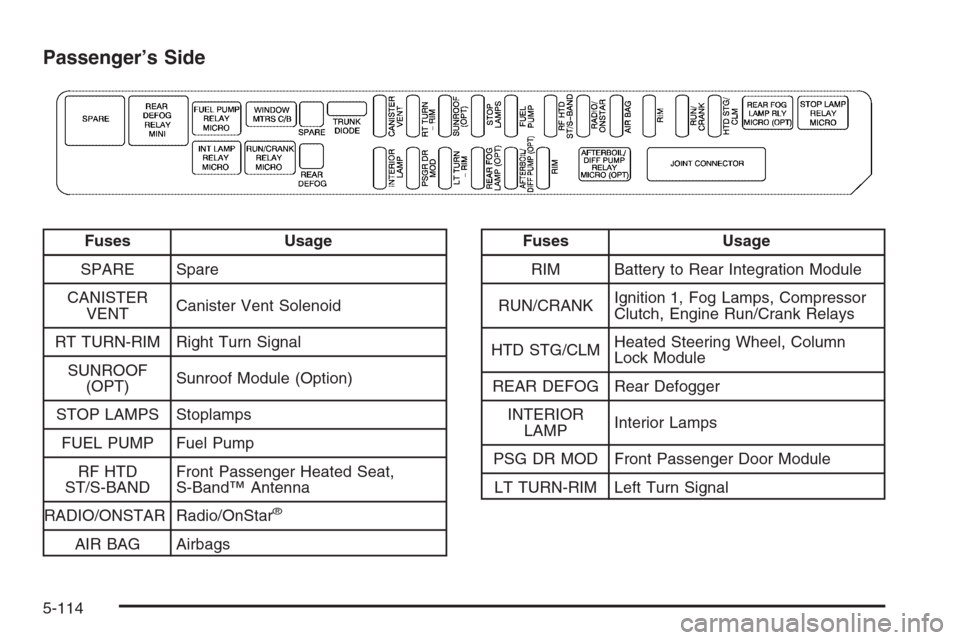
Passenger’s Side
Fuses Usage
SPARE Spare
CANISTER
VENTCanister Vent Solenoid
RT TURN-RIM Right Turn Signal
SUNROOF
(OPT)Sunroof Module (Option)
STOP LAMPS Stoplamps
FUEL PUMP Fuel Pump
RF HTD
ST/S-BANDFront Passenger Heated Seat,
S-Band™ Antenna
RADIO/ONSTAR Radio/OnStar
®
AIR BAG Airbags
Fuses Usage
RIM Battery to Rear Integration Module
RUN/CRANKIgnition 1, Fog Lamps, Compressor
Clutch, Engine Run/Crank Relays
HTD STG/CLMHeated Steering Wheel, Column
Lock Module
REAR DEFOG Rear Defogger
INTERIOR
LAMPInterior Lamps
PSG DR MOD Front Passenger Door Module
LT TURN-RIM Left Turn Signal
5-114
Page 429 of 480

Fuses Usage
REAR FOG
LAMP (OPT)Rear Fog Lamps (Option)
AFTERBOIL/
DIFF
PUMP (OPT)After Boil, Rear Differential
Cooling Pump
RIM Ignition to Rear Integration Module
JOINT
CONNECTORJoint Connector
Relays Usage
SPARE Spare
REAR DEFOG
RELAY MINIRear Defog
FUEL PUMP
RELAY MICROFuel Pump
REAR FOG
LAMP RLY
MICRO (OPT)Rear Fog Lamps (Option)
Relays Usage
STOP LAMP
RELAY MICROStoplamps
INT LAMP
RELAY MICROInterior Lamps
RUN/CRANK
RELAY MICROIgnition 1
AFTERBOIL/
DIFF PUMP
RELAY
MICRO (OPT)After Boil, Rear Differential Cooling
Pump (Option)
Circuit
BreakersUsage
WINDOW
MTRS C/BPower Window Motors Circuit
Breaker
Diodes Usage
TRUNK DIODE Trunk Release
5-115
Page 430 of 480
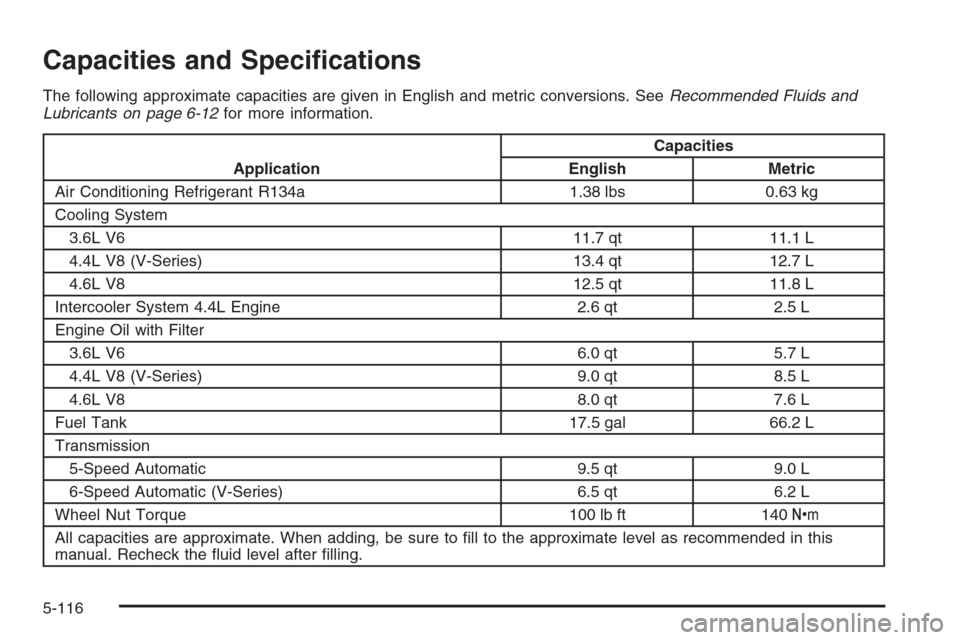
Capacities and Speci�cations
The following approximate capacities are given in English and metric conversions. SeeRecommended Fluids and
Lubricants on page 6-12for more information.
ApplicationCapacities
English Metric
Air Conditioning Refrigerant R134a 1.38 lbs 0.63 kg
Cooling System
3.6L V6 11.7 qt 11.1 L
4.4L V8 (V-Series) 13.4 qt 12.7 L
4.6L V8 12.5 qt 11.8 L
Intercooler System 4.4L Engine 2.6 qt 2.5 L
Engine Oil with Filter
3.6L V6 6.0 qt 5.7 L
4.4L V8 (V-Series) 9.0 qt 8.5 L
4.6L V8 8.0 qt 7.6 L
Fuel Tank 17.5 gal 66.2 L
Transmission
5-Speed Automatic 9.5 qt 9.0 L
6-Speed Automatic (V-Series) 6.5 qt 6.2 L
Wheel Nut Torque 100 lb ft 140Y
All capacities are approximate. When adding, be sure to �ll to the approximate level as recommended in this
manual. Recheck the �uid level after �lling.
5-116