set clock CADILLAC STS 2007 1.G Owners Manual
[x] Cancel search | Manufacturer: CADILLAC, Model Year: 2007, Model line: STS, Model: CADILLAC STS 2007 1.GPages: 560, PDF Size: 2.92 MB
Page 224 of 560
Be sure to continue scanning your displays,
controls and driving environment just as you would
in a vehicle without HUD. If you never look at your
instrument panel cluster, you may not see
something important, such as a warning light.
Under important warning conditions, the CHECK
GAGES message will display in the HUD. View
your Driver Information Center (DIC) for more
information.
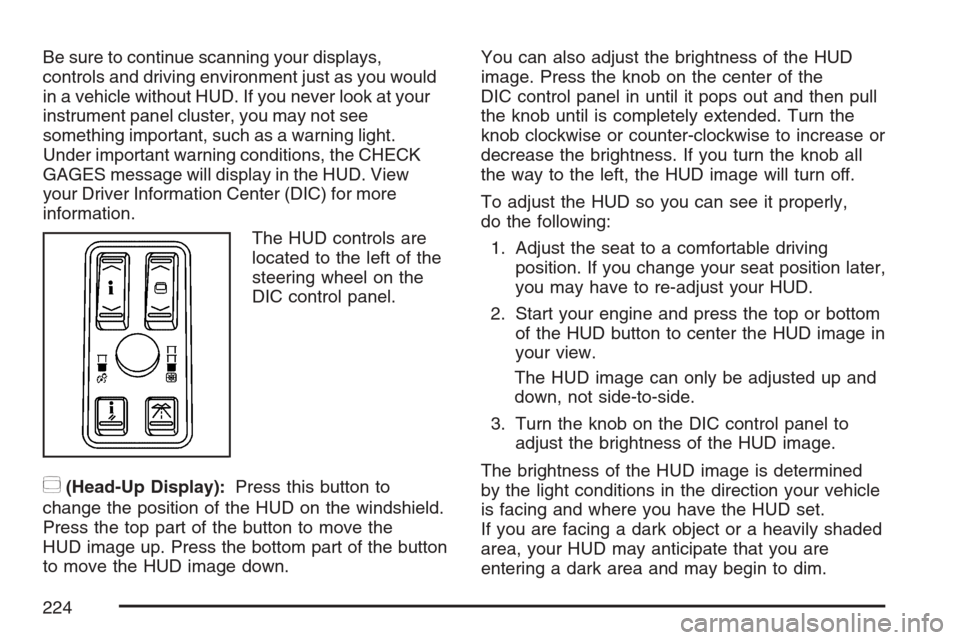
The HUD controls are
located to the left of the
steering wheel on the
DIC control panel.
~(Head-Up Display):Press this button to
change the position of the HUD on the windshield.
Press the top part of the button to move the
HUD image up. Press the bottom part of the button
to move the HUD image down.You can also adjust the brightness of the HUD
image. Press the knob on the center of the
DIC control panel in until it pops out and then pull
the knob until is completely extended. Turn the
knob clockwise or counter-clockwise to increase or
decrease the brightness. If you turn the knob all
the way to the left, the HUD image will turn off.
To adjust the HUD so you can see it properly,
do the following:
1. Adjust the seat to a comfortable driving
position. If you change your seat position later,
you may have to re-adjust your HUD.
2. Start your engine and press the top or bottom
of the HUD button to center the HUD image in
your view.
The HUD image can only be adjusted up and
down, not side-to-side.
3. Turn the knob on the DIC control panel to
adjust the brightness of the HUD image.
The brightness of the HUD image is determined
by the light conditions in the direction your vehicle
is facing and where you have the HUD set.
If you are facing a dark object or a heavily shaded
area, your HUD may anticipate that you are
entering a dark area and may begin to dim.
224
Page 281 of 560
Notice:Before adding any sound equipment
to your vehicle, such as an audio system,
CD player, CB radio, mobile telephone,
or two-way radio, make sure that it can be
added by checking with your dealer. Also,
check federal rules covering mobile radio and
telephone units. If sound equipment can be
added, it is very important to do it properly.
Added sound equipment can interfere with the
operation of your vehicle’s engine, radio, or
other systems, and even damage them.
Your vehicle’s systems can interfere with the
operation of sound equipment that has
been added.
Your vehicle has a feature called Retained
Accessory Power (RAP). With RAP, the audio
system can be played even after the ignition
is turned off. SeeRetained Accessory
Power (RAP) on page 112for more
information.Setting the Time
1. Press the tune/select knob (the right knob) to
enter the main menu.
2. Turn the tune/select knob until SET CLOCK
displays.
3. Press the tune/select knob to select
SET CLOCK.
4. Turn the tune/select knob to adjust the time.
5. Press the tune/select knob to update the time.
VEHICLE TIME UPDATED displays.
If the CLOCK/RADIO DISP is con�gured into
one of the con�gurable keys, pressing the
key switches the display back to the clock set
function. The time and date always appears on the
radio display. See “Con�gurable Radio Display
Keys” underRadio with CD on page 282for more
information on con�guring the keys.
281
Page 284 of 560
Playing the Radio
O
(Power):Press this knob to turn the system
on and off.
n(Volume):Turn this knob clockwise or
counterclockwise to increase or to decrease
the volume.
SRCE (Source):Press this button to select a
source, either radio or CD. The CD must be loaded
to select the source and to play. CD displays if
a CD is loaded. If a CD is not loaded, the display
does not change from the radio source.
Finding a Station
BAND:Press this button to select FM1, FM2, AM,
or XM1 or XM2 (if equipped).
w(Tune):Turn this knob to select radio stations.
©¨(Seek):Press the left single arrow button to
go to the previous station and stay there. Press the
right single arrow button to go to the next station
and stay there. The sound mutes while seeking.
The radio seeks stations only with a strong signal
that are in the selected band.
©¨(Scan):Press the double arrow scan button
to enter scan mode. SCAN displays. Press this
button to scan to the next station. The radio goes to
a station, plays for �ve seconds, then goes to the
next station. Press this button again to stop
scanning.
To scan preset stations, press and hold the double
arrow scan button for more than two seconds until a
beep sounds and PSCAN displays. The radio goes
to the �rst preset station, plays for �ve seconds,
then goes to the next preset station. Press this
button again to stop scanning presets.
The radio only scans stations with a strong signal
that are in the selected band.
ALOCAL/DISTANT Selection:With this feature
the radio can be set to search for local stations
or stations that are further away for a larger
selection.
To set this feature to LOCAL or DISTANT,
perform the following steps:
1. Press the tune/select knob to enter the
main menu.
2. Turn the tune/select knob until SEEK LOCAL
or SEEK DISTANT displays.
284
Page 306 of 560
The main menu for the Base audio system
consists of the following menu items:
eBASS - MID - TREBLE
xBALANCE - FADER
eEQ EQUALIZER
H/A (HOME/AWAY) PRESETS
AUTOSTORE PRESETS
CAT CATEGORY
TA TRAFFIC ANNOUNCE
RECALL RDS (Radio Data System)
MESSAGE
AF ALTERNATE FREQ. (Frequency)
ASEEK LOCAL/DISTANT
8SET CLOCK
BSET DATE
4INFO (Information)
LANG LANGUAGE
SETUP
Radio Main Menu Item Descriptions
(Base Audio System)
The following descriptions are for the Base audio
system. For information pertaining to the
Navigation audio system, see “Audio System” in
the Index of the Navigation System manual
supplied with your vehicle.
eBASS - MID (Midrange) - TREBLE:This
menu item lets you adjust the levels for the bass,
midrange and treble features of the audio
system. See “Setting the Tone (Bass/Treble)”
underRadio with CD on page 282for more
information.
xBALANCE - FADER:This menu item lets you
adjust the levels for the balance and fader
features of the audio system. See “Adjusting the
Speakers (Balance/Fade)” underRadio with CD on
page 282for more information.
eEQ (Equalizer):This menu item lets you
choose among �ve preset equalizations for the
audio system. See “Audio Equalizer” underRadio
with CD on page 282for more information.
306
Page 307 of 560
H/A (Home/Away) PRESETS:This menu item
lets you switch back and forth between your home
and away preset radio stations. See “Presets
Home/Away” underRadio with CD on page 282
for more information.
AUTOSTORE PRESETS:This menu item lets
you automatically store radio stations with
the strongest signals as presets. See “Autostore
Presets” underRadio with CD on page 282
for more information.
CAT (Category):This menu item lets you select
radio stations based on preset categories. See
“Activating Program Type (PTY) Stations”
underRadio with CD on page 282for more
information.
TA (Traffic Announcement):This menu item lets
you turn the TA feature on and off. See “TA
(Traffic Announcement)” underRadio with CD on
page 282for more information.
RECALL RDS MESSAGE:This menu item lets
you view an RDS radio station message broadcast
by a radio station. See “MSG (Message)” under
Radio with CD on page 282for more information.AF (Alternate Frequency):This menu item lets
you turn the AF feature on and off. See “Activating
Program Type (PTY) Stations (RDS and XM™)”
underRadio with CD on page 282for more
information.
ASEEK LOCAL/DISTANT:This feature instructs
the audio system to seek only local radio
stations with the strongest signal or to seek all
radio stations with a strong signal in a large area.
Use LOCAL while in urban areas where there
are several strong radio station signals and you
want to limit the number of stations to those
with the strongest signals only. Use DISTANT
while in rural areas where there are fewer
radio station signals available.
See “Local/Distant Selection” underRadio with CD
on page 282for more information.
8SET CLOCK:Use this menu item to set
the time.
SeeSetting the Time on page 281for more
information.
307