power CADILLAC XLR 2004 1.G Owner's Manual
[x] Cancel search | Manufacturer: CADILLAC, Model Year: 2004, Model line: XLR, Model: CADILLAC XLR 2004 1.GPages: 356, PDF Size: 2.36 MB
Page 111 of 356

Instrument Panel Overview...............................3-2
Hazard Warning Flashers................................3-4
Other Warning Devices...................................3-4
Horn.............................................................3-5
Power Tilt Wheel and Telescopic Steering
Column......................................................3-5
Turn Signal/Multifunction Lever.........................3-5
Exterior Lamps.............................................3-22
Interior Lamps..............................................3-25
Head-Up Display (HUD).................................3-27
Ultrasonic Rear Parking Assist (URPA)............3-30
Accessory Power Outlets...............................3-32
Ashtrays and Cigarette Lighter........................3-33
Climate Controls............................................3-33
Dual Climate Control System..........................3-33
Outlet Adjustment.........................................3-38
Passenger Compartment Air Filter...................3-38
Warning Lights, Gages, and Indicators............3-39
Instrument Panel Cluster................................3-40
Speedometer and Odometer...........................3-41
Trip Odometer..............................................3-41
Tachometer.................................................3-41
Safety Belt Reminder Light.............................3-41
Air Bag Readiness Light................................3-42
Air Bag Off Light..........................................3-43
Voltmeter Gage............................................3-44
Brake System Warning Light..........................3-45
Anti-Lock Brake System Warning Light.............3-46Traction Control System (TCS) Warning Light . . .3-46
Engine Coolant Temperature Gage..................3-47
Tire Pressure Light.......................................3-48
Malfunction Indicator Lamp.............................3-48
Engine Oil Pressure Gage.............................3-52
Security Light...............................................3-52
Fog Lamp Light............................................3-53
Lights On Reminder......................................3-53
Fuel Gage...................................................3-54
Driver Information Center (DIC).......................3-55
DIC Controls and Displays.............................3-55
DIC Warnings and Messages.........................3-57
Other Messages...........................................3-65
DIC Vehicle Personalization............................3-66
Trip Computer................................................3-70
Oil Life Indicator...........................................3-70
Audio System(s).............................................3-70
Navigation/Radio System...............................3-71
Theft-Deterrent Feature..................................3-71
Audio Steering Wheel Controls.......................3-71
Radio Reception...........................................3-72
Care of Your CDs.........................................3-72
Care of Your CD Player................................3-72
Diversity Antenna System..............................3-73
XMŸ Satellite Radio Antenna System.............3-73
Section 3 Instrument Panel
3-1
Page 115 of 356
Horn
The horn can be sounded by pressing on the center of
the steering wheel pad.
Power Tilt Wheel and Telescopic
Steering Column
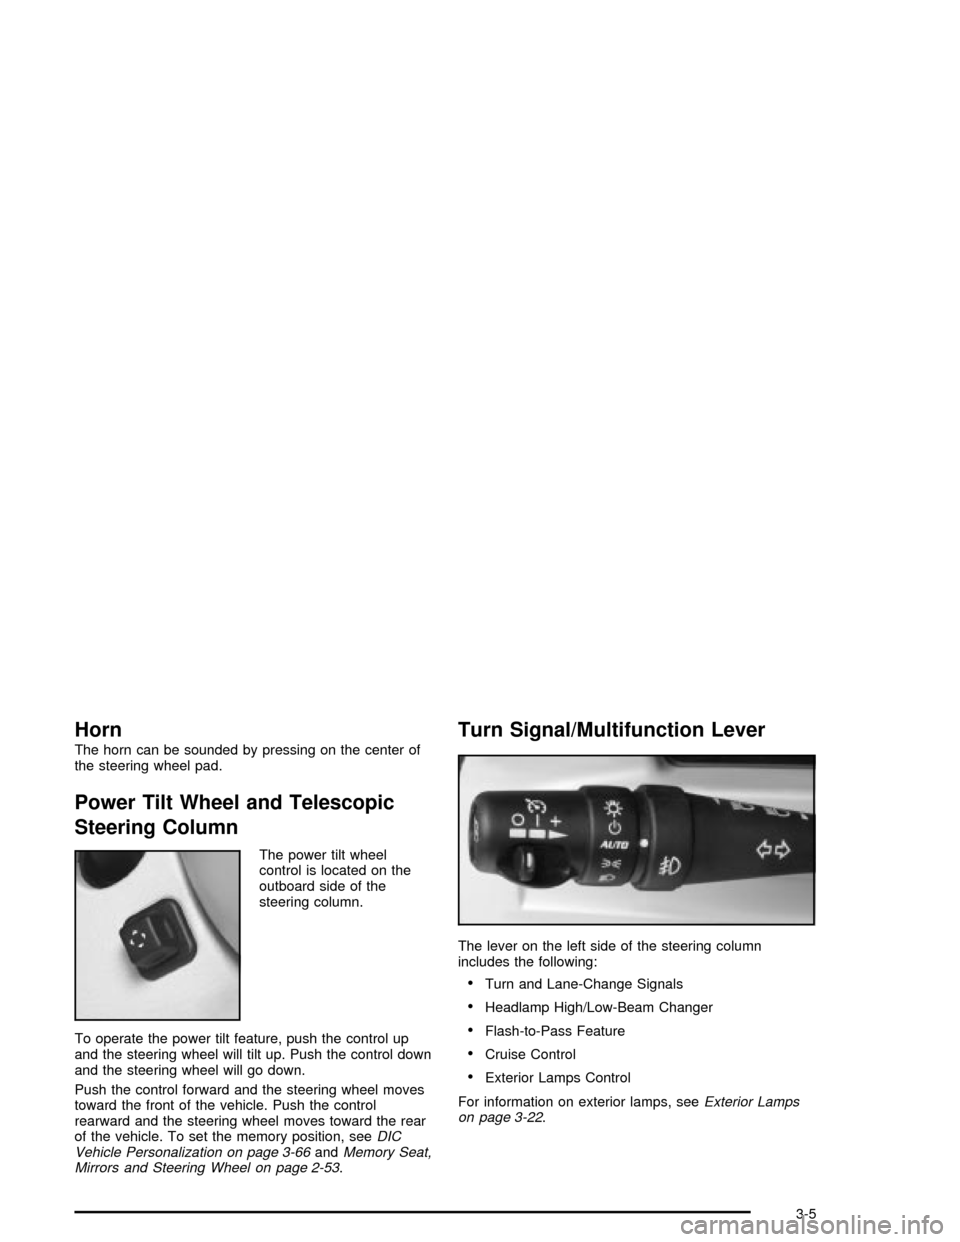
The power tilt wheel
control is located on the
outboard side of the
steering column.
To operate the power tilt feature, push the control up
and the steering wheel will tilt up. Push the control down
and the steering wheel will go down.
Push the control forward and the steering wheel moves
toward the front of the vehicle. Push the control
rearward and the steering wheel moves toward the rear
of the vehicle. To set the memory position, see
DIC
Vehicle Personalization on page 3-66andMemory Seat,
Mirrors and Steering Wheel on page 2-53.
Turn Signal/Multifunction Lever
The lever on the left side of the steering column
includes the following:
·Turn and Lane-Change Signals
·Headlamp High/Low-Beam Changer
·Flash-to-Pass Feature
·Cruise Control
·Exterior Lamps Control
For information on exterior lamps, see
Exterior Lamps
on page 3-22.
3-5
Page 136 of 356

Courtesy Lamps
When any door or the trunk lid is opened, the interior
lamps will go on unless it is bright outside.
You can also turn on the courtesy lamps by pressing
the interior lamp button on the right side of the
instrument panel cluster.
Exit/Entry Lighting
With entry lighting, the interior lamps will come on when
entering the vehicle. The interior lamps will come on
for about 20 seconds when the engine is turned off or a
door is ajar.
You can turn exit and entry lighting off by quickly turning
the headlamps on and off or by quickly turning the
courtesy lamps on and off.
Reading Lamps
Your inside rearview mirror includes two reading lamps.
The lamps will go on when a door is opened. When
the doors are closed, each lamp can be turned on
individually by pressing the button for that lamp.
Battery Run-Down Protection
Your vehicle has a feature to help prevent you from
draining the battery in case the underhood lamp, vanity
mirror lamps, cargo lamps, reading lamps, console
or glove box lamps are accidentally left on or in case
something is plugged into the accessory power outlet or
cigarette lighter. If you leave any of these lamps on,
they will automatically time-out after about 20 minutes.
To reset it, all of the above lamps must be turned
off or the ignition key must be in ON.
3-26
Page 142 of 356

Accessory Power Outlets
The accessory power outlet can be used to connect
electrical equipment such as a cellular phone or
CB radio.
The accessory power outlet is located inside the center
console storage compartment, on the forward left
side.
To use the outlet, remove the tethered cap. When not
using it, always cover the outlet with the protective cap.
Notice:When using an accessory power outlet,
maximum electrical load must not exceed 20 amps.
Always turn off any electrical equipment when
not in use. Leaving electrical equipment on for
extended periods will drain your vehicle's battery.
Certain electrical accessories may not be compatible
with the accessory power outlet and could result
in blown vehicle or adapter fuses. If you experience a
problem, see your dealer for additional information
on accessory power outlets.
Notice:Adding any electrical equipment to your
vehicle may damage it or keep other components
from working as they should. The repairs would not
be covered by your warranty. Check with your
dealer before adding electrical equipment.
When adding electrical equipment, be sure to follow the
installation instructions included with the equipment.
We recommend that you see a quali®ed technician or
your dealer for the proper installation of your equipment.
Notice:Improper use of the power outlet can
cause damage not covered by your warranty. Do not
hang any type of accessory or accessory bracket
from the plug because the power outlets are
designed for accessory power plugs only.
3-32
Page 144 of 356

Automatic Operation
AUTO (Automatic):When this button is pressed and
the temperature is set, the system will automatically
control the inside temperature, the air delivery mode, the
air-conditioning compressor and the fan speed. AUTO
will appear on the display.
1. Press the AUTO button.
2. Adjust the temperature to a comfortable setting
between 70ÉF (21ÉC) and 80ÉF (27ÉC).
Choosing the warmest or coldest temperature
setting will not cause the system to heat or cool any
faster. If you set the system at the warmest or
coldest temperature setting, the system will remain
in manual mode at that temperature and it will
not go into automatic mode.
In cold weather, the system will start at reduced fan
speeds to avoid blowing cold air into your vehicle
until warmer air is available. The system will
start out blowing air at the ¯oor but may change
modes automatically as the vehicle warms up
to maintain the chosen temperature setting. The
length of time needed for warm up will depend on
the outside temperature and the length of time
that has elapsed since your vehicle was last driven.
3. Wait for the system to regulate. This may take from
10 to 30 minutes. Then adjust the temperature, if
necessary.You can switch from English to metric units through the
Driver Information Center (DIC). SeeDIC Controls
and Displays on page 3-55for more information.
The air-conditioning system removes moisture from the
air, so you may sometimes notice a small amount of
water dripping underneath your vehicle while idling
or after turning off the engine. This is normal.
Do not cover the solar sensor located in the center of
the instrument panel, near the windshield. For more
information on the solar sensor, see ªSensorsº later in
this section.
Manual Operation
wPWRx(Power/Temperature):Press the PWR
button on the left side of the climate control panel to turn
the entire climate control system on or off. Press the
up or down arrow on the switch to manually increase or
decrease the temperature inside the vehicle.
Press the PWR button on the right side of the climate
control panel to turn the passenger's climate control
system on or off. Press the up or down arrow on
the switch to manually increase or decrease the
temperature for the passenger.
If the passenger's PWR button is off, the driver's
temperature switch controls the temperature for the
entire vehicle.
3-34
Page 171 of 356

MAX SPEED XX MPH (XX KM/H):A failure in the
magnetic ride control system has occurred when this
message appears. The Powertrain Control Module (PCM)
determines the speed to which your vehicle is limited.
Have your vehicle serviced if this message appears.
NO FOB DETECTED:This message is displayed if the
vehicle does not detect the presence of a keyless
access transmitter when you have attempted to start the
vehicle or a vehicle door has just closed. The following
conditions may cause this message to appear:
·Driver-added equipment, such as two-way radios or
power inverters, is causing interference. Try moving
the keyless access transmitter away from these
devices when starting the vehicle.
·The vehicle is experiencing Electro-Magnetic
Interference (EMI). Some locations, such as
airports, have EMI ®elds which may interfere with
your keyless access transmitter. If moving the
transmitter to different locations within the vehicle
does not help, place the transmitter in the glove box
transmitter pocket with the buttons facing to the
right while pressing the START button.NO FOB, OFF OR RUN?:This message is displayed
when you turn off the engine, but the vehicle does
not detect a keyless access transmitter in the vehicle.
The vehicle will remain in ACCESSORY until OFF
or START has been pressed or 10 minutes has expired.
If you select OFF, the vehicle cannot be started again
without a remote access transmitter in the vehicle.
OVER SPEED WARNING:This message is displayed
when the vehicle speed exceeds a certain limit as
required by some export countries. A chime will sound
when this message is displayed.
PRESS BRAKE TO START:The brake pedal must be
applied to start the vehicle. Make sure you are
pressing the brake pedal all the way down.
REDUCED ENGINE POWER:This message informs
you that the vehicle is reducing engine power because
the transmission is being placed in gear under
conditions that may cause damage to the vehicle's
engine, transmission or ability to accelerate.
RIGHT DOOR AJAR:The passenger's door is open or
ajar when this message appears. The vehicle must
be running and the transmission not in PARK (P) for this
message to display. A chime will sound if the vehicle's
speed is greater than 3 mph (5 km/h).
3-61
Page 172 of 356

SERVICE A/C:This message appears when the
electronic sensors that control the air conditioning and
heating systems are no longer working. Have the climate
control system serviced if you notice a drop in heating
and air conditioning efficiency.
SERVICE ABS:If the SERVICE ABS message is
displayed when you are driving, stop as soon as
possible and turn the ignition off. Then start the engine
again to reset the system. If the message stays on,
or comes back on again while you are driving,
your vehicle is in need of service.
If the SERVICE ABS message is being displayed, your
Traction Control System and Stabilitrak
žSystem will
also be disabled. The Driver Information Center
will scroll three messages: SERVICE ABS, SERVICE
TRACTION SYS and SERVICE STABILITRAK, and the
traction control warning light on the instrument panel
cluster will be illuminated. The driver can acknowledge
these messages by pressing the RESET button
three times. When the service message is displayed the
computer controlled systems will not assist the driver
and you should have the system repaired as soon
as possible. Adjust your driving accordingly.
SERVICE ELECT SYSTEM:This message will display
if an electrical problem has occurred within the
Powertrain Control Module (PCM) or the ignition switch.
Have your vehicle serviced by your dealership.SERVICE FUEL SYSTEM:The Powertrain Control
Module (PCM) has detected a problem within the fuel
system when this message appears. Have your
vehicle serviced by your dealership. This message will
also be displayed when the cluster is not getting
fuel information from the PCM.
SERVICE RADAR CRUISE:This message indicates
that the Adaptive Cruise Control (ACC) system is
disabled and needs service.
SERVICE RIDE CONTROL:This message indicates
there is a problem with the Magnetic Ride Control
System. Have your vehicle serviced by your dealership.
SERVICE TRACTION SYS:This message indicates
there is a problem with the Traction Control System
(TCS). Have your vehicle serviced by your dealership.
SERVICE STABILITRAK:If this message appears
it means there may be a problem with your stability
enhancement system. If you see this message, try to
reset the system (stop, turn off the engine, then start the
engine again). If the SERVICE STABILITRAK message
still comes on, it means there is a problem. You
should see your dealer for service. Reduce your speed
and drive accordingly. A single chime will also sound
when this message is displayed.
3-62
Page 173 of 356

SERVICE TRANSMISSION:This message indicates
that there is a problem with the transmission. Have your
vehicle serviced by your dealership.
SERVICE VEHICLE SOON:This message is displayed
when a non-emissions related powertrain malfunction
occurs. Have your vehicle serviced by a technician
as soon as possible.
SHIFT TO PARK:This message indicates that the
vehicle is not in PARK (P) when the engine is being
turned off. The vehicle will be in ACCESSORY.
Once the shifter is moved to PARK (P), the vehicle will
turn off.
STABILITRAK ACTIVE:You may see the
STABILITRAK ACTIVE message on the Driver
Information Center. It means that an advanced,
computer-controlled system has come on to help your
vehicle continue to go in the direction in which you
are steering. This stability enhancement system
activates when the computer senses that your vehicle is
just starting to spin, as it might if you hit a patch of
ice or other slippery spot on the road. When the system
is on, you may hear a noise or feel a vibration in the
brake pedal. This is normal.
When the STABILITRAK ACTIVE message is on, you
should continue to steer in the direction you want to go.
The system is designed to help you in bad weather
or other difficult driving situations by making the most ofwhatever road conditions will permit. If the
STABILITRAK ACTIVE message comes on, you will
know that something has caused your vehicle to start to
spin, so you should consider slowing down. A single
chime will also sound when this message is displayed.
STABILITRAK READY:If you receive this message
and hear a chime, the system has completed the
functional check of the Stabilitrak
žSystem.
STABILITRAK WARMING:When you ®rst start your
vehicle and drive away, especially during cold winter
weather, the STABILITRAK WARMING message may
be displayed in the DIC along with a chime and the
traction control warning light. This is normal. You can
acknowledge this message by pressing the RESET
button. The Stabilitrak
žperformance is affected until
the STABILITRAK READY message is displayed in
the DIC.
SVC TIRE MONITOR:If this message comes on, a
part on the Tire Pressure Monitor (TPM) is not working
properly. If you drive your vehicle while any of the
four sensors are missing or inoperable, the warning will
come on in approximately 10 minutes. If all four
sensors are missing, the warning will come on in
approximately 15 to 20 minutes. (All the sensors would
be missing, for example, if you put different wheels
on your vehicle without transferring the sensors.) If the
warning comes on and stays on, there may be a
problem with the TPM. See your dealer.
3-63
Page 180 of 356

Trip Computer
Oil Life Indicator
This feature lets you know when to change the engine
oil. It is based on the engine oil temperatures and
your driving patterns.
To see the display, press the information button several
times until OIL LIFE appears. If you see 99% OIL
LIFE, 99 percent of your current oil life remains.
The DIC may display a CHANGE OIL NOW message.
For more information, see
Scheduled Maintenance
on page 6-4. If you see CHANGE OIL NOW, it means
the oil life is gone and you should change the oil
right away. The system does not check how much oil
you have, so you will still have to check for that. To see
how, see
Engine Oil on page 5-13.
When the oil is changed, you will need to reset the
system. See
Engine Oil on page 5-13. Always keep a
written record of the mileage and date when you
changed your oil.
Audio System(s)
Notice:Before adding any sound equipment to
your vehicle, like a tape player, CB radio, mobile
telephone, or two-way radio, make sure that it can
be added by checking with your dealer. Also,
check federal rules covering mobile radio and
telephone units. If sound equipment can be added,
it is very important to do it properly. Added
sound equipment may interfere with the operation
of your vehicle's engine, radio, or other systems,
and even damage them. Your vehicle's systems may
interfere with the operation of sound equipment
that has been added improperly.
Figure out which audio system is in your vehicle, ®nd
out what your audio system can do, and how to operate
all of its controls.
Your vehicle has a feature called Retained Accessory
Power (RAP). With RAP, the audio system can be
played even after the ignition is turned off. See
ªRetained Accessory Power (RAP)º under
Ignition
Positions on page 2-19.
3-70
Page 182 of 356

Radio Reception
AM
The range for most AM stations is greater than for FM,
especially at night. The longer range can cause
station frequencies to interfere with each other. Static
can occur on AM stations caused by things like
storms and power lines. Try reducing the treble to
reduce this noise.
FM Stereo
FM stereo will give the best sound, but FM signals will
reach only about 10 to 40 miles (16 to 65 km). Tall
buildings or hills can interfere with FM signals, causing
the sound to fade in and out.
XMŸ Satellite Radio Service
XMŸ Satellite Radio Service gives digital radio
reception from coast to coast. Just as with FM, tall
buildings or hills can interfere with satellite radio signals,
causing the sound to fade in and out. The radio may
display NO XM SIGNAL to indicate interference.
Cellular Phone Usage
Cellular phone usage may cause interference with your
vehicle's radio. This interference may occur when
making or receiving phone calls, charging the phone's
battery, or simply having the phone on. This interference
is an increased level of static while listening to the
radio. If static is received while listening to the radio,
unplug the cellular phone and turn it off.
Care of Your CDs
Handle CDs carefully. Store them in their original cases
or other protective cases and away from direct
sunlight and dust. If the surface of a CD is soiled,
dampen a clean, soft cloth in a mild, neutral detergent
solution and clean it, wiping from the center to the edge.
Be sure never to touch the side without writing when
handling CDs. Pick up CDs by grasping the outer edges
or the edge of the hole and the outer edge.
Care of Your CD Player
The use of CD lens cleaners for CD players is not
advised, due to the risk of contaminating the lens of the
CD optics with lubricants internal to the CD mechanism.
3-72