engine CADILLAC XLR 2005 1.G Owner's Manual
[x] Cancel search | Manufacturer: CADILLAC, Model Year: 2005, Model line: XLR, Model: CADILLAC XLR 2005 1.GPages: 438, PDF Size: 3.69 MB
Page 101 of 438
Retractable Hardtop
The following procedures explain the proper operation
of the retractable hardtop. The retractable hardtop
will not operate if the valet lockout switch is on.
If the retractable hardtop is lowered or raised multiple
times, the engine should be running while doing so
to prevent drain on the vehicle’s battery.
{CAUTION:
Moving parts of the retractable hardtop can
be dangerous. People can be injured by the
hardtop and its mechanism. Keep people away
from your vehicle when you are lowering or
raising the top.
Lowering the Retractable Hardtop
Notice:Leaving the retractable hardtop down and
exposing the interior of your vehicle to outdoor
conditions may cause damage. Always close
the retractable hardtop if leaving your vehicle
outdoors.
1. Park on a level surface and shift the transmission
into PARK (P).
2. The vehicle’s engine must be on or in ACC.
3. Lower both sun visors.
Notice:Raising or lowering the top while the vehicle
is in motion can cause damage to the top or top
mechanism. Make sure the vehicle is in PARK (P) to
lower or raise the top.
Notice:Lowering the top if it is damp, wet, or dirty
can cause stains, mildew, and damage to the inside
of your vehicle. Dry off the top before lowering it.
Notice:If you lower the retractable hardtop in cold
weather (0°F/−18°C or lower), you may damage
top components. Do not lower the retractable
hardtop in cold weather.
2-45
Page 102 of 438
4. Make sure that nothing or no one is on or around
the top. Make sure the trunk cargo cover is in
place with nothing on top or in front of the cargo
cover. SeeRear Storage Area on page 2-44
for more information. Also, make sure the valet
lockout switch is off.
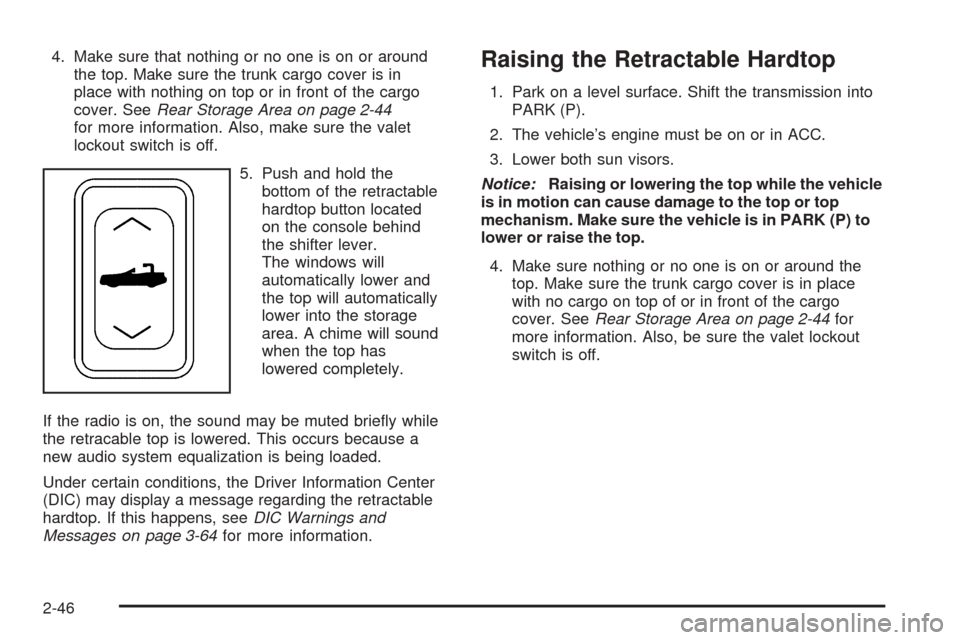
5. Push and hold the
bottom of the retractable
hardtop button located
on the console behind
the shifter lever.
The windows will
automatically lower and
the top will automatically
lower into the storage
area. A chime will sound
when the top has
lowered completely.
If the radio is on, the sound may be muted brie�y while
the retracable top is lowered. This occurs because a
new audio system equalization is being loaded.
Under certain conditions, the Driver Information Center
(DIC) may display a message regarding the retractable
hardtop. If this happens, seeDIC Warnings and
Messages on page 3-64for more information.Raising the Retractable Hardtop
1. Park on a level surface. Shift the transmission into
PARK (P).
2. The vehicle’s engine must be on or in ACC.
3. Lower both sun visors.
Notice:Raising or lowering the top while the vehicle
is in motion can cause damage to the top or top
mechanism. Make sure the vehicle is in PARK (P) to
lower or raise the top.
4. Make sure nothing or no one is on or around the
top. Make sure the trunk cargo cover is in place
with no cargo on top of or in front of the cargo
cover. SeeRear Storage Area on page 2-44for
more information. Also, be sure the valet lockout
switch is off.
2-46
Page 111 of 438
Use the following steps to program each button:
1. Adjust the driver’s seat including the seatback
recliner, lumbar and head restraint, both outside
mirrors and the steering wheel to a comfortable
position.
2. Press and hold button 1 until two beeps are heard,
then release the button.
A second mirror, seating and steering wheel position
can be programmed by repeating the above steps and
pressing button 2 (for driver 2). Each time a memory
button is pressed and released, a single beep will sound.
Each time button 1 or 2 is pressed and released while
the vehicle is in PARK (P), the memory positions will be
recalled after a brief delay. If the vehicle is not in
PARK (P), three beeps will be heard and the memory
position will not be recalled.
When the engine is started, the seat, mirrors, and
steering wheel may automatically adjust to their
programmed positions.
To stop recall movement of the memory feature at any
time, press one of the power seat controls, power
mirror control buttons, memory buttons, or power
steering column control.Two personalized exit positions can be set by �rst
recalling the driving position (by pressing 1 or 2), then
positioning the steering wheel and seat in the desired
exit positions and then pressing and holding the
exit button until two beeps are heard. The exit button is
located between buttons 1 and 2. With the vehicle in
PARK (P), the exit position for the previously set driver
can be recalled by pressing the exit button.
When you use the keyless access transmitter to unlock
your vehicle, automatic seat and steering wheel
movement to the exit position may occur. The numbers
on the back of the transmitter, 1 and 2, corresponds
to the numbers on the memory buttons.
Further programming for automatic seat and mirror
movement can be done using the Driver Information
Center (DIC).
For programming information, seeDIC Vehicle
Personalization on page 3-73.
2-55
Page 113 of 438
Instrument Panel Overview...............................3-4
Hazard Warning Flashers................................3-6
Other Warning Devices...................................3-6
Horn.............................................................3-6
Power Tilt Wheel and Telescopic Steering
Column......................................................3-7
Turn Signal/Multifunction Lever.........................3-7
Turn and Lane-Change Signals........................3-8
Headlamp High/Low-Beam Changer..................3-8
Flash-to-Pass.................................................3-9
Windshield Wipers..........................................3-9
Rainsense™ Wipers......................................3-10
Windshield Washer.......................................3-12
Headlamp Washer........................................3-12
Cruise Control..............................................3-12
Adaptive Cruise Control.................................3-16
Exterior Lamps.............................................3-28
Wiper Activated Headlamps............................3-29
Headlamps on Reminder................................3-29
Daytime Running Lamps (DRL).......................3-30
Fog Lamps..................................................3-31
Twilight Sentinel
®..........................................3-31
Exterior Lighting Battery Saver........................3-32
Instrument Panel Brightness...........................3-32
Courtesy Lamps...........................................3-33
Entry/Exit Lighting.........................................3-33
Reading Lamps............................................3-33Battery Run-Down Protection..........................3-33
Head-Up Display (HUD).................................3-34
Ultrasonic Rear Parking Assist (URPA)............3-37
Accessory Power Outlets...............................3-38
Ashtrays and Cigarette Lighter........................3-39
Climate Controls............................................3-40
Dual Climate Control System..........................3-40
Outlet Adjustment.........................................3-45
Passenger Compartment Air Filter...................3-45
Warning Lights, Gages, and Indicators............3-46
Instrument Panel Cluster................................3-46
Speedometer and Odometer...........................3-48
Trip Odometer..............................................3-48
Tachometer.................................................3-48
Safety Belt Reminder Light.............................3-48
Airbag Readiness Light..................................3-49
Airbag Off Light............................................3-50
Voltmeter Gage............................................3-51
Brake System Warning Light..........................3-52
Anti-Lock Brake System Warning Light.............3-53
Traction Control System (TCS) Warning Light......3-53
Engine Coolant Temperature Gage..................3-54
Tire Pressure Light.......................................3-55
Malfunction Indicator Lamp.............................3-55
Engine Oil Pressure Gage.............................3-58
Section 3 Instrument Panel
3-1
Page 140 of 438
Cleaning the System
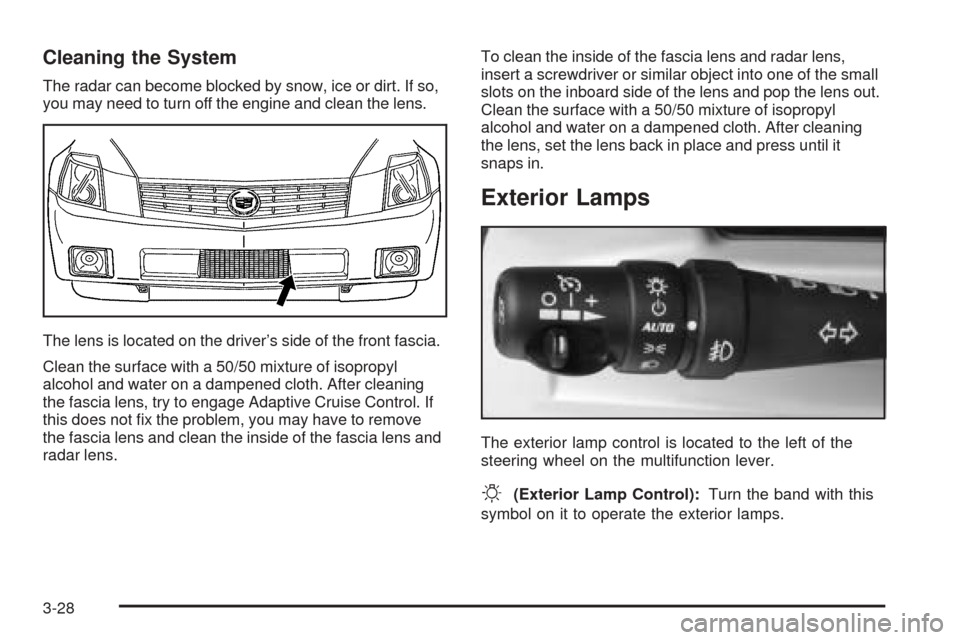
The radar can become blocked by snow, ice or dirt. If so,
you may need to turn off the engine and clean the lens.
The lens is located on the driver’s side of the front fascia.
Clean the surface with a 50/50 mixture of isopropyl
alcohol and water on a dampened cloth. After cleaning
the fascia lens, try to engage Adaptive Cruise Control. If
this does not �x the problem, you may have to remove
the fascia lens and clean the inside of the fascia lens and
radar lens.To clean the inside of the fascia lens and radar lens,
insert a screwdriver or similar object into one of the small
slots on the inboard side of the lens and pop the lens out.
Clean the surface with a 50/50 mixture of isopropyl
alcohol and water on a dampened cloth. After cleaning
the lens, set the lens back in place and press until it
snaps in.
Exterior Lamps
The exterior lamp control is located to the left of the
steering wheel on the multifunction lever.
O(Exterior Lamp Control):Turn the band with this
symbol on it to operate the exterior lamps.
3-28
Page 141 of 438
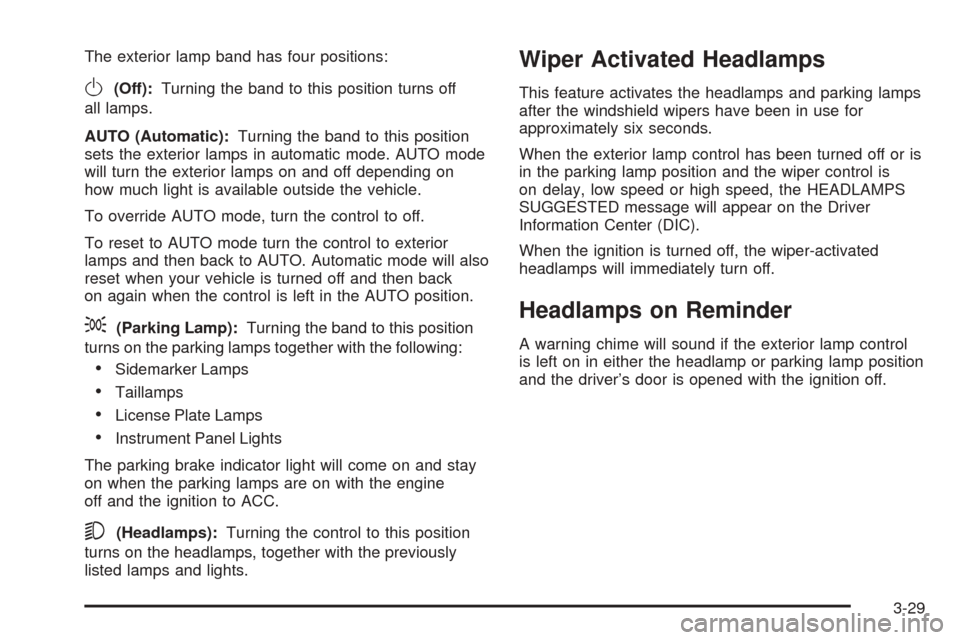
The exterior lamp band has four positions:
O(Off):Turning the band to this position turns off
all lamps.
AUTO (Automatic):Turning the band to this position
sets the exterior lamps in automatic mode. AUTO mode
will turn the exterior lamps on and off depending on
how much light is available outside the vehicle.
To override AUTO mode, turn the control to off.
To reset to AUTO mode turn the control to exterior
lamps and then back to AUTO. Automatic mode will also
reset when your vehicle is turned off and then back
on again when the control is left in the AUTO position.
;(Parking Lamp):Turning the band to this position
turns on the parking lamps together with the following:
Sidemarker Lamps
Taillamps
License Plate Lamps
Instrument Panel Lights
The parking brake indicator light will come on and stay
on when the parking lamps are on with the engine
off and the ignition to ACC.
5(Headlamps):Turning the control to this position
turns on the headlamps, together with the previously
listed lamps and lights.
Wiper Activated Headlamps
This feature activates the headlamps and parking lamps
after the windshield wipers have been in use for
approximately six seconds.
When the exterior lamp control has been turned off or is
in the parking lamp position and the wiper control is
on delay, low speed or high speed, the HEADLAMPS
SUGGESTED message will appear on the Driver
Information Center (DIC).
When the ignition is turned off, the wiper-activated
headlamps will immediately turn off.
Headlamps on Reminder
A warning chime will sound if the exterior lamp control
is left on in either the headlamp or parking lamp position
and the driver’s door is opened with the ignition off.
3-29
Page 145 of 438
Courtesy Lamps
When any door or the trunk lid is opened, the interior
lamps will go on unless it is bright outside.
You can also turn on the courtesy lamps by pressing
the interior lamp button on the right side of the
instrument panel cluster.
Entry/Exit Lighting
With entry lighting, the interior lamps will come on when
entering the vehicle. The interior lamps will come on
for about 20 seconds when the engine is turned off.
You can turn exit and entry lighting off by quickly turning
the courtesy lamps on and off.
Reading Lamps
Your inside rearview mirror includes two reading lamps.
The lamps will go on when a door is opened. When
the doors are closed, each lamp can be turned on
individually by pressing the button for that lamp.
Battery Run-Down Protection
Your vehicle has a feature to help prevent you from
draining the battery in case the underhood lamp, vanity
mirror lamps, cargo lamps, reading lamps, console
or glove box lamps are accidentally left on or in case
something is plugged into the accessory power outlet or
cigarette lighter. If you leave any of these lamps on,
they will automatically time-out after about 20 minutes.
To reset it, all of the above lamps must be turned
off or the ignition key must be in ON.
3-33
Page 147 of 438
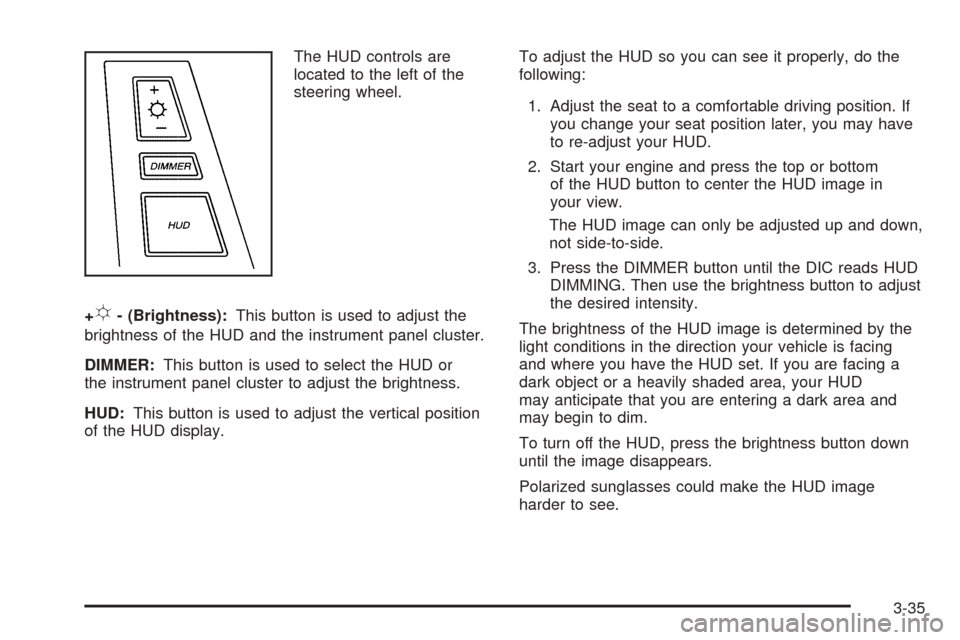
The HUD controls are
located to the left of the
steering wheel.
+
!- (Brightness):This button is used to adjust the
brightness of the HUD and the instrument panel cluster.
DIMMER:This button is used to select the HUD or
the instrument panel cluster to adjust the brightness.
HUD:This button is used to adjust the vertical position
of the HUD display.To adjust the HUD so you can see it properly, do the
following:
1. Adjust the seat to a comfortable driving position. If
you change your seat position later, you may have
to re-adjust your HUD.
2. Start your engine and press the top or bottom
of the HUD button to center the HUD image in
your view.
The HUD image can only be adjusted up and down,
not side-to-side.
3. Press the DIMMER button until the DIC reads HUD
DIMMING. Then use the brightness button to adjust
the desired intensity.
The brightness of the HUD image is determined by the
light conditions in the direction your vehicle is facing
and where you have the HUD set. If you are facing a
dark object or a heavily shaded area, your HUD
may anticipate that you are entering a dark area and
may begin to dim.
To turn off the HUD, press the brightness button down
until the image disappears.
Polarized sunglasses could make the HUD image
harder to see.
3-35
Page 153 of 438
3. Wait for the system to regulate. This may take from
10 to 30 minutes. Then adjust the temperature, if
necessary.
You can switch from English to metric units through the
Driver Information Center (DIC). SeeDIC Controls
and Displays on page 3-61for more information.
The air-conditioning system removes moisture from the
air, so you may sometimes notice a small amount of
water dripping underneath your vehicle while idling
or after turning off the engine. This is normal.
Do not cover the solar sensor located in the center of
the instrument panel, near the windshield. For more
information on the solar sensor, see “Sensors” later in
this section.Manual Operation
wPWRx(Power/Temperature):Press the PWR
button on the left side of the climate control panel to turn
the entire climate control system on or off. Press the
up or down arrow on the switch to manually increase or
decrease the temperature inside the vehicle.
Press the PWR button on the right side of the climate
control panel to turn the passenger’s climate control
system on or off. Press the up or down arrow on
the switch to manually increase or decrease the
temperature for the passenger.
If the passenger’s PWR button is off, the driver’s
temperature switch controls the temperature for the
entire vehicle.
«9ª(Fan):Press this switch to increase or
decrease the fan speed. Pressing this switch cancels
automatic operation and places the system in manual
mode. Press AUTO to return to automatic operation.
If the air�ow seems low when the fan speed is at
the highest setting, the passenger compartment air �lter
may need to be replaced. For more information, see
Passenger Compartment Air Filter on page 3-45
andScheduled Maintenance on page 7-4.
3-41
Page 155 of 438
Sensors
There are sensors to measure the temperature and
sun’s effect on passenger comfort.
The solar sensor on your vehicle monitors the solar
radiation then uses the information to maintain the
selected temperature when operating in AUTO mode by
initiating needed adjustments to the temperature, the
fan speed and the air delivery system. The system may
also supply cooler air to the side of the vehicle facing
the sun. The recirculation mode will also be activated, as
necessary. Do not cover the solar sensor located on
the top of the instrument panel near the windshield
or the system will not work properly.
There is also a sensor located behind the front bumper.
This sensor reads the outside air temperature and
helps maintain the temperature inside the vehicle. The
outside temperature will be displayed in the navigation
system only when the engine is running. Any cover
on the front of the vehicle could give a false reading of
the temperature.If the outside temperature goes up, the display
temperature will not change until:The vehicle’s speed is above 10 mph (16 km/h) for
�ve minutes.
The vehicle’s speed is above 32 mph (51 km/h) for
two and one-half minutes.
These delays prevent false readings. If the temperature
goes down, the outside temperature will be shown
when you start the vehicle. If it has been turned off for
less than three hours, the temperature will be recalled
from the previous vehicle operation.
There is also an inside temperature sensor located to
the left of the ignition button. The automatic climate
control system uses this sensor to receive information,
so if you block or cover it, the system will not function
properly.
3-43