engine CADILLAC XLR V 2007 1.G Owner's Manual
[x] Cancel search | Manufacturer: CADILLAC, Model Year: 2007, Model line: XLR V, Model: CADILLAC XLR V 2007 1.GPages: 512, PDF Size: 3.84 MB
Page 100 of 512

Torque Lock
If you are parking on a hill and you do not shift
your transmission into PARK (P) properly,
the weight of the vehicle may put too much force
on the parking pawl in the transmission. You
may �nd it difficult to pull the shift lever out
of PARK (P). This is called “torque lock.” To
prevent torque lock, set the parking brake and then
shift into PARK (P) properly before you leave
the driver’s seat. To �nd out how, see “Shifting Into
PARK (P)” listed previously in this section.
When you are ready to drive, move the shift lever
out of PARK (P) before you release the parking
brake.
If torque lock does occur, you may need to have
another vehicle push yours a little uphill to
take some of the pressure from the parking pawl
in the transmission, so you can pull the shift
lever out of PARK (P).
Shifting Out of Park (P)
Your vehicle has an automatic transmission shift
lock control system. You have to fully apply
your regular brake before you can shift from
PARK (P) when the vehicle is running. See
Automatic Transmission Operation on page 92.
If you cannot shift out of PARK (P), ease pressure
on the shift lever – push the shift lever all the
way into PARK (P) and release the shift lever
button as you maintain brake application. Then
press the shift lever button and move the
shift lever into the gear desired.
If you ever hold the brake pedal down but still
cannot shift out of PARK (P), try this:
1. Press the regular bake.
2. Press the Acc. button twice to place the
ignition in accessory mode.
3. Apply and hold the brake until the end of
Step 4.
4. Shift to NEUTRAL (N).
5. Start the engine and then shift to the drive
gear you want.
6. Have your vehicle inspected by your dealer as
soon as possible.
100
Page 102 of 512

Engine Exhaust
{CAUTION:
Engine exhaust can kill. It contains the
gas carbon monoxide (CO), which you
cannot see or smell. It can cause
unconsciousness and death.
You might have exhaust coming in if:
Your exhaust system sounds strange
or different.
Your vehicle gets rusty underneath.
Your vehicle was damaged in a
collision.
CAUTION: (Continued)
CAUTION: (Continued)
Your vehicle was damaged when
driving over high points on the road
or over road debris.
Repairs were not done correctly.
Your vehicle or exhaust system has
been modi�ed improperly.
If you ever suspect exhaust is coming into
your vehicle:
Drive it only with all the windows
down to blow out any CO; and
Have your vehicle �xed immediately.
102
Page 103 of 512

Running the Engine While Parked
It is better not to park with the engine running. But if
you ever have to, here are some things to know.
{CAUTION:
Idling the engine with the climate control
system off could allow dangerous exhaust
into your vehicle. See the earlier caution
underEngine Exhaust on page 102.
Also, idling in a closed-in place can let
deadly carbon monoxide (CO) into your
vehicle even if the climate control fan is at
the highest setting. One place this can
happen is a garage. Exhaust — with
CO — can come in easily. NEVER park in
a garage with the engine running.
Another closed-in place can be a blizzard.
SeeWinter Driving on page 349.
{CAUTION:
It can be dangerous to get out of your
vehicle if the shift lever is not fully in
PARK (P) with the parking brake �rmly
set. Your vehicle can roll. Do not leave
your vehicle when the engine is running
unless you have to. If you have left the
engine running, the vehicle can move
suddenly. You or others could be injured.
To be sure your vehicle will not move,
even when you are on fairly level ground,
always set your parking brake and move
the shift lever to PARK (P).
Follow the proper steps to be sure your vehicle
will not move. SeeShifting Into Park (P) on
page 99.
103
Page 124 of 512

Retractable Hardtop
The following procedures explain the proper
operation of the retractable hardtop. The
retractable hardtop will not operate if the valet
lockout switch is on.
If the retractable hardtop is lowered or raised
multiple times, the engine should be running while
doing so to prevent drain on the vehicle’s
battery.
{CAUTION:
When the retractable hardtop is opened or
closed, people can be injured by the parts
that move: the hardtop and its mechanism,
the trunk lid, and the side windows. Keep
people away from these parts when you are
lowering or raising the top.
Lowering the Retractable Hardtop
Notice:Leaving the retractable hardtop down
and exposing the interior of your vehicle to
outdoor conditions may cause damage. Always
close the retractable hardtop if leaving your
vehicle outdoors.
1. Park on a level surface and shift the
transmission into PARK (P).
2. The vehicle’s engine must be on or in Acc.
3. Lower both sun visors.
Notice:Raising or lowering the top while the
vehicle is in motion can cause damage to
the top or top mechanism. Make sure the
vehicle is in PARK (P) to lower or raise the top.
Notice:Lowering the top if it is damp, wet,
or dirty can cause stains, mildew, and damage
to the inside of your vehicle. Dry off the top
before lowering it.
4. Make sure that nothing or no one is on or
around the top. Make sure the trunk cargo
cover is in place with nothing on top or in front
of the cargo cover. SeeRear Storage Area
on page 123for more information. Also, make
sure the valet lockout switch is off.
124
Page 125 of 512

5. Push and hold the
bottom of the
retractable hardtop
button located
on the console
behind the shifter
lever.
The windows will automatically lower and the top
will automatically lower into the storage area.
A chime will sound when the top has lowered
completely.
If the radio is on, the sound may be muted brie�y
while the retractable top is lowered. This occurs
because a new audio system equalization is being
loaded.
Under certain conditions, the Driver Information
Center (DIC) may display messages regarding the
retractable hardtop. If the CLOSE CARGO
DIVIDER, TOO COLD TO MOVE TOP, TOP
INOP - VALET ON, TOP INOP OUT OF PARK,TOP MOTOR OVER TEMP or TOP NOT SECURE
messages display, seeDIC Warnings and
Messages on page 206for more information.
If the retractable hardtop does not operate, and
there are no messages displayed on the
Driver Information Center (DIC), then perform the
“Power Window Initialize” steps underPower
Windows on page 82.
Raising the Retractable Hardtop
1. Park on a level surface. Shift the transmission
into PARK (P).
2. The vehicle’s engine must be on or in Acc.
3. Lower both sun visors.
Notice:Raising or lowering the top while the
vehicle is in motion can cause damage to
the top or top mechanism. Make sure the
vehicle is in PARK (P) to lower or raise the top.
4. Make sure nothing or no one is on or
around the top. Make sure the trunk
cargo cover is in place with no cargo on top
of or in front of the cargo cover. SeeRear
Storage Area on page 123for more
information. Also, be sure the valet lockout
switch is off.
125
Page 136 of 512

Passenger Airbag Status Indicator............. 189
Charging System Light.............................. 191
Voltmeter Gage......................................... 192
Brake System Warning Light..................... 192
Anti-Lock Brake System Warning Light...... 193
Traction Control System (TCS)
Warning Light........................................ 194
Engine Coolant Temperature Gage............ 195
Tire Pressure Light.................................... 196
Malfunction Indicator Lamp........................ 196
Engine Oil Pressure Gage......................... 200
Security Light............................................ 201
Fog Lamp Light......................................... 201
Lights On Reminder.................................. 202
Highbeam On Light................................... 202
Fuel Gage................................................. 202Driver Information Center (DIC).................. 203
DIC Controls and Displays........................ 204
DIC Warnings and Messages.................... 206
Other Messages........................................ 219
DIC Vehicle Personalization....................... 220
Trip Computer............................................. 224
Oil Life Indicator........................................ 224
Audio System(s)......................................... 225
Theft-Deterrent Feature............................. 226
Audio Steering Wheel Controls.................. 227
Radio Reception........................................ 228
Care of Your CDs..................................... 229
Care of the CD Player.............................. 230
Diversity Antenna System.......................... 230
XM™ Satellite Radio Antenna System....... 230
Section 3 Instrument Panel
136
Page 164 of 512

Cleaning the System
The radar can become blocked by snow, ice or
dirt. If so, you may need to turn off the engine and
clean the lens.
The lens is located on the driver’s side of the front
fascia.
Clean the surface with a 50/50 mixture of isopropyl
alcohol and water on a dampened cloth. After
cleaning the fascia lens, try to engage Adaptive
Cruise Control. If this does not �x the problem, you
may have to remove the fascia lens and clean
the inside of the fascia lens and radar lens.To clean the inside of the fascia lens and radar
lens, insert a tool into one of the small slots on the
inboard side of the lens and pop the lens out.
Clean the surface with a 50/50 mixture of isopropyl
alcohol and water on a dampened cloth. After
cleaning the lens, set the lens back in place and
press until it snaps in.
Exterior Lamps
The exterior lamp control is located to the left of
the steering wheel on the multifunction lever.
164
Page 165 of 512

O(Exterior Lamp Control):Turn the band with
this symbol on it to operate the exterior lamps.
The exterior lamp band has four positions:
O(Off):Turning the band to this position turns
off all lamps.
AUTO (Automatic):Turning the band to this
position sets the exterior lamps in automatic mode.
AUTO mode will turn the exterior lamps on and
off depending on how much light is available
outside the vehicle. Turning the band to AUTO
mode also enables the Adaptive Forward Lighting
system. SeeAdaptive Forward Lighting System
on page 167.
To override AUTO mode, turn the control to off.
To reset to AUTO mode turn the control to exterior
lamps and then back to AUTO. Automatic mode
will also reset when your vehicle is turned off
and then back on again when the control is left in
the AUTO position.
SeeTwilight Sentinel
®on page 168.
;(Parking Lamp):Turning the band to this
position turns on the parking lamps together with
the following:
Sidemarker Lamps
Taillamps
License Plate Lamps
Instrument Panel Lights
The parking brake indicator light will come on and
stay on when the parking lamps are on with the
engine off and the ignition to Acc.
5(Headlamps):Turning the control to this
position turns on the headlamps, together with the
previously listed lamps and lights.
165
Page 170 of 512

Instrument Panel Brightness
The button for this feature is located on the
instrument panel to the left of the steering column.
+
!- (Brightness):Press this button to change
the brightness of the instrument panel lights.
Press the DIMMER button until PANEL DIMMING
appears on the Driver Information Center (DIC).
Then use the brightness button to adjust the
instrument panel brightness. Press the top of the
button to brighten the lights or the bottom of
the button to dim the lights. SeeHead-Up Display
(HUD) on page 171for more information.
Be sure not to have the brightness turned all the
way down with the lamps on during the day.
Your DIC may not be visible.
Courtesy Lamps
When any door or the trunk lid is opened, the
interior lamps will go on unless it is bright outside.
Press the interior lamp button on the right side
of the instrument panel, to turn the courtesy lamps
on or off.
Entry/Exit Lighting
With entry lighting, the interior lamps will come on
when entering the vehicle. The interior lamps
will come on for about 20 seconds when the
engine is turned off.
You can turn exit and entry lighting off by quickly
turning the courtesy lamps on and off.
170
Page 173 of 512

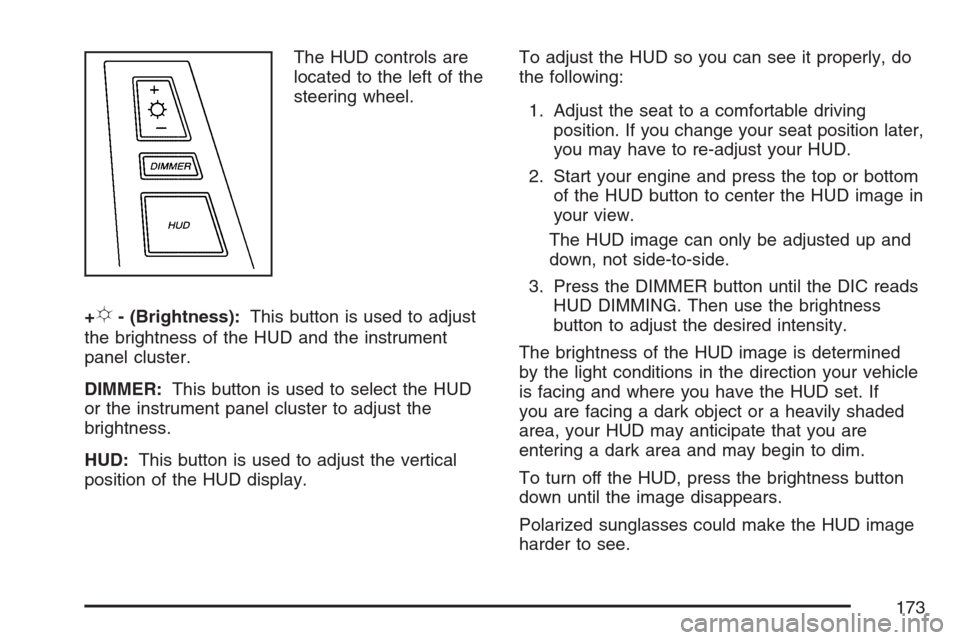
The HUD controls are
located to the left of the
steering wheel.
+
!- (Brightness):This button is used to adjust
the brightness of the HUD and the instrument
panel cluster.
DIMMER:This button is used to select the HUD
or the instrument panel cluster to adjust the
brightness.
HUD:This button is used to adjust the vertical
position of the HUD display.To adjust the HUD so you can see it properly, do
the following:
1. Adjust the seat to a comfortable driving
position. If you change your seat position later,
you may have to re-adjust your HUD.
2. Start your engine and press the top or bottom
of the HUD button to center the HUD image in
your view.
The HUD image can only be adjusted up and
down, not side-to-side.
3. Press the DIMMER button until the DIC reads
HUD DIMMING. Then use the brightness
button to adjust the desired intensity.
The brightness of the HUD image is determined
by the light conditions in the direction your vehicle
is facing and where you have the HUD set. If
you are facing a dark object or a heavily shaded
area, your HUD may anticipate that you are
entering a dark area and may begin to dim.
To turn off the HUD, press the brightness button
down until the image disappears.
Polarized sunglasses could make the HUD image
harder to see.
173