window CADILLAC XLR V 2007 1.G Owner's Manual
[x] Cancel search | Manufacturer: CADILLAC, Model Year: 2007, Model line: XLR V, Model: CADILLAC XLR V 2007 1.GPages: 512, PDF Size: 3.84 MB
Page 146 of 512
When Rainsense™ is active, the headlamps will
turn on automatically. If it is dark, they will
remain on. See “Wiper-Activated Headlamps”
underExterior Lamps on page 164for more
information.
Notice:Do not place stickers or other items
on the exterior glass surface directly in front of
the moisture sensor. Doing this could cause
the moisture sensor to malfunction.
Windshield Washer
K(Washer Fluid):The lever on the right side
of the steering column also controls the windshield
washer. There is a button at the end of the
lever. To spray washer �uid on the windshield,
press the button and hold it. The washer will spray
until you release the button. The wipers will
continue to clear the window for about six seconds
after the button is released and then stop or
return to your preset speed.
{CAUTION:
In freezing weather, do not use your
washer until the windshield is warmed.
Otherwise the washer �uid can form ice
on the windshield, blocking your vision.
If the �uid in the windshield washer �uid reservoir
is low, the message LOW WASHER FLUID will
appear on the Driver Information Center (DIC)
display. It will take 60 seconds after the bottle is
re�lled for this message to turn off. For information
on the correct washer �uid mixture to use, see
Windshield Washer Fluid on page 397and
Recommended Fluids and Lubricants on page 473.
Headlamp Washer
The headlamps washer only functions every fourth
time the washer button is depressed and if the
headlamps are on.
146
Page 180 of 512
Manual Operation
wPWRx(Power/Temperature):Press the
PWR button on the left side of the climate control
panel to turn the entire climate control system
on or off. Press the up or down arrow on the switch
to manually increase or decrease the temperature
inside the vehicle.
Press the PWR button on the right side of the
climate control panel to turn the passenger’s
climate control system on or off. Press the up or
down arrow on the switch to manually increase or
decrease the temperature for the passenger.
If the passenger’s PWR button is off, the driver’s
temperature switch controls the temperature for the
entire vehicle.
«9ª(Fan):Press this switch to increase or
decrease the fan speed. Pressing this switch
cancels automatic operation and places the system
in manual mode. Press AUTO to return to
automatic operation.
If the air�ow seems low when the fan speed is at
the highest setting, the passenger compartment
air �lter may need to be replaced. For moreinformation, seePassenger Compartment Air Filter
on page 184andScheduled Maintenance on
page 465.
ªN«(Mode):Pressing the switch and changing
the mode cancels automatic operation and
places the system in manual mode. Press the
AUTO button to return to automatic operation.
To change the current mode, select one of
the following:
H(Vent):This mode directs air to the instrument
panel outlets.
%(Bi-Level):This mode directs about half of the
air to the instrument panel outlets, and then directs
most of the remaining air to the �oor outlets. In
automatic operation, cooler air is directed to the
upper outlets and warmer air to the �oor outlets.
6(Floor):This mode directs most of the air to
the �oor outlets with some air directed to the side
window outlets, and some of the air directed to
the windshield.
The mode switch can also be used to select the
defog mode. Information on defogging and
defrosting can be found later in this section.
180
Page 182 of 512
There is also a sensor located behind the front
bumper. This sensor reads the outside air
temperature and helps maintain the temperature
inside the vehicle. The outside temperature will be
displayed in the navigation system only when
the engine is running. Any cover on the front of the
vehicle could give a false reading of the
temperature.
If the outside temperature goes up, the display
temperature will not change until:
The vehicle’s speed is above 15 mph
(24 km/h) for �ve minutes.
The vehicle’s speed is above 32 mph
(51 km/h) for two and one-half minutes.
These delays prevent false readings. If the
temperature goes down, the outside temperature
will be shown when you start the vehicle. If it
has been turned off for less than three hours, the
temperature will be recalled from the previous
vehicle operation.
There is also an inside temperature sensor
located to the left of the ignition button. The
automatic climate control system uses this sensor
to receive information, so if you block or cover
it, the system will not function properly.
Defogging and Defrosting
Fog on the inside of windows is a result of high
humidity (moisture) condensing on the cool window
glass. This can be minimized if the climate control
system is used properly. There are two modes to
clear fog or frost from your windshield. Use the
�oor/defog mode to clear the windows of fog or
moisture and warm the passengers. Use defrost to
remove fog or frost from the windshield more
quickly.
-(Floor/Defog):Press the mode button until the
defog mode appears on the display. This mode
directs the air between the windshield, �oor outlets
and side windows. When you select this mode,
the system turns off recirculation and runs the air
conditioning compressor unless the outside
temperature is near or below freezing.
1(Defrost):Press this button to direct most of
the air to the windshield, with some air directed
to the side windows. In this mode, the system will
automatically turn off the recirculation and run
the air conditioning compressor, unless the outside
temperature is near or below freezing. Do not
drive the vehicle until all the windows are clear.
182
Page 183 of 512

Rear Window Defogger
The rear window defogger uses a warming grid to
remove fog or frost from the rear window.
The rear window defogger will only work when the
engine is running.
=(Rear Window Defogger):Press this button
to turn the rear window defogger on or off. Be
sure to clear as much snow from the rear window
as possible.
The rear window defogger will turn off about
10 minutes after the button is pressed when
traveling less than 30 mph (48 km/h). If turned
on again, the defogger will only run for about
�ve minutes before turning off. The defogger can
also be turned off by pressing the button again
or by turning off the engine.The heated outside rearview mirrors will heat to
help clear fog or frost from the surface of the
mirrors when the rear window defogger is on.
The rear window defogger and heated mirrors are
automatically disabled when the retractable
hardtop is moving or down.
Notice:Do not use anything sharp on the
inside of the rear window. If you do, you could
cut or damage the warming grid, and the
repairs would not be covered by your warranty.
Do not attach a temporary vehicle license,
tape, a decal or anything similar to the
defogger grid.
183
Page 209 of 512

ENGINE PROTECTION REDUCE
ENGINE RPM
If this message displays, the control system has
determined that continued operation at the existing
engine speed may lead to engine overheating.
Lower the engine speed by upshifting the
transmission or drive at a lower speed.
HEADLAMPS SUGGESTED
This message displays if it is dark enough outside
and the headlamps and Twilight Sentinel®
controls are off. This message informs the driver
that turning on the exterior lamps is recommended.
It has become dark enough outside to require
the headlamps and/or other exterior lamps. This
message also displays if the optional Rainsense™
wiping feature is on and the Twilight Sentinel
®
is off.
HIGH TRANS (Transmission) TEMP
(Temperature)
This message displays when the transmission �uid
in your vehicle is too hot. Stop and allow your
vehicle to idle until it cools down or until this
message is removed.
HIGH VOLTAGE
This message displays when the electrical
charging system is overcharging. To avoid being
stranded, have the electrical system checked
by your dealer. You can reduce the charging
overload by using the accessories. Turn on the
lamps and radio, set the climate control on AUTO
and the fan speed on HI, and turn the rear
window defogger on. You can monitor battery
voltage on the DIC by pressing the information
button. The normal range is 11.5 to 15.5 volts
when the engine is running.
HOT ENGINE–A/C OFF
This message displays when the engine coolant
becomes hotter than the normal operating
temperature. You can continue to drive your
vehicle. If this message continues to display, have
the system repaired by your dealer as soon as
possible to avoid compressor damage.
ICE POSSIBLE
This message displays when the outside air
temperature is cold enough to create icy road
conditions. Adjust your driving accordingly.
209
Page 251 of 512

Editing Memory Points
This feature allows you to edit the contents stored
in memory. The following options are available:
Icon Editing of a Memory Point
Each memory point is displayed with a default
icon. To edit an icon, do the following:
1. Select the category of the memory point.
2. Select the item you want to edit.
3. Touch the icon. The EDIT MEMORY POINT
icon screen will appear.
4. Touch the icon you would like to use. The
system will then return to the EDIT MEMORY
POINT menu.
5. Touch Return to go back to the previous
screen.
You will see the new memory point icon on
the map.
When selecting an icon, you can choose from
18 different icons, three of which are sound icons.
The same icon may be used for other memory
points as well.
Name Editing of a Memory Point
To modify the name of a stored memory point, do
the following:
1. Select the category of the memory point.
2. Select the item you want to edit.
3. Touch the NAME screen button and use the
alpha keypad to edit the name. Names may
contain up to 15 alpha and/or numeric
characters.
4. Touch Return to go to the previous screen.
Moving Memory Points
To move a memory point from one category to
another, do the following:
1. Select the category of the memory point.
2. Select the memory point you want to edit.
3. Touch CATEGORY. A list of categories will
appear. The current category for the item will
be highlighted and cannot be selected.
4. Touch the screen button for the category you
want the memory point placed in. A pop-up
window will appear displaying the change
in category.
5. Touch Return to go back to the previous
screen.
251
Page 252 of 512
Adjusting a Memory Point
To relocate a memory point’s location, do the
following:
1. Select the category of the memory point.
2. Select the memory point you want to edit.
3. Touch POSITION. A map screen with
the position of this memory point will appear.
4. Touch anywhere on the screen to activate the
scroll feature and relocate the memory point.
SeeMaps on page 271.
5. Touch Enter to save the memory point’s new
location.
6. Touch Return to go back to the previous
screen.
Changing the Phone Number of a Memory
Point
To edit or add the phone number of a memory
point, do the following:
1. Select the category of the memory point.
2. Select the memory point you want to edit.3. Touch PHONE and use the numeric keypad
to edit or add the number.
4. Touch the RETURN button to take you back
to the previous screen when you have
�nished.
Deleting Single Memory Points
To delete a single memory point, do the following:
1. Press the ROUTE key.
2. Touch EDIT MEMORY POINT.
3. Select the category of the memory point.
4. Touch DELETE.
5. Select the memory point you want to delete. A
con�rmation window will appear.
6. Touch YES to delete the memory point or NO
to return to the previous menu.
7. Touch Return to go back to the previous
screen.
252
Page 253 of 512
Deleting All Memory Points
To delete all of the memory points in a category,
do the following:
1. Press the ROUTE key.
2. Touch EDIT MEMORY POINT.
3. Select the desired category.
4. Touch the DELETE ALL screen button. A
con�rmation window will appear.
5. Touch YES to delete the memory points or
NO to return to the previous menu.
6. Touch Return to go back to the previous
screen.
Edit Category
To edit the name of a category, do the following:
1. Press the ROUTE key.
2. Touch EDIT MEMORY POINT.
3. Select the category you want to edit.4. Touch the EDIT CATEGORY screen button
and use the alpha keypad to edit the
category name.
The name can consist of up to 15 alpha
and/or numeric characters.
5. Touch Return to go back to the previous
screen.
Marked Point
A marked point is a memory point which has been
stored by selecting the MARK screen button
while traveling on a planned route. You can also
use the scroll feature to plan a destination on
the map after reaching the destination, or
by moving a memory point to a marked point
category. See “Editing Memory Points” earlier in
this section for more information.
253
Page 255 of 512
Adding a Waypoint
To add a waypoint to your route, do the following:
1. Touch Add Waypoint.
2. Enter a destination. SeeEnter Destination on
page 259.
A map will appear showing the location of the
waypoint.
3. Touch Enter to add your waypoint.
4. Touch the ADD screen button to insert the
waypoint in the desired order.
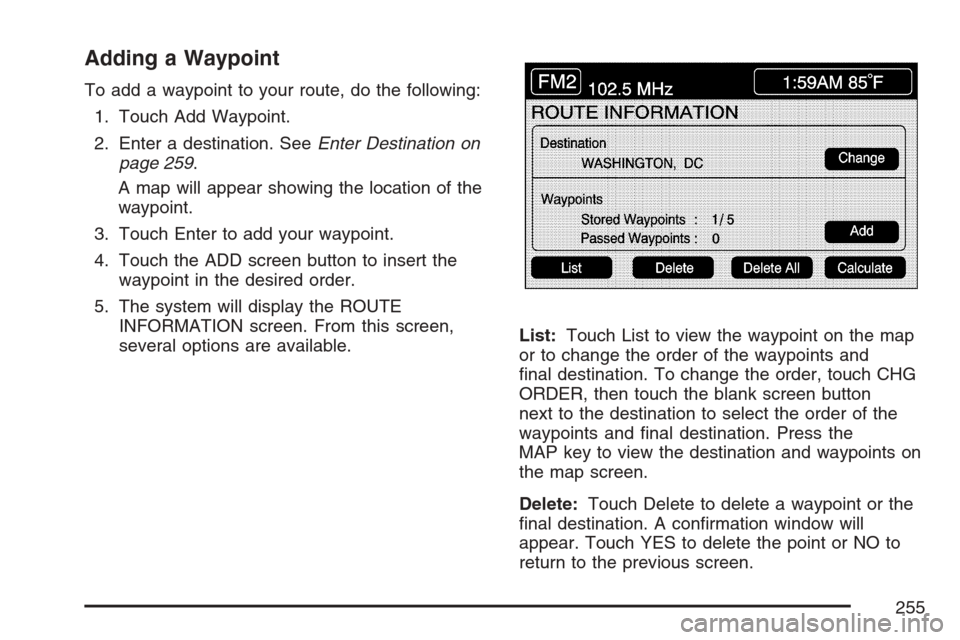
5. The system will display the ROUTE
INFORMATION screen. From this screen,
several options are available.List:Touch List to view the waypoint on the map
or to change the order of the waypoints and
�nal destination. To change the order, touch CHG
ORDER, then touch the blank screen button
next to the destination to select the order of the
waypoints and �nal destination. Press the
MAP key to view the destination and waypoints on
the map screen.
Delete:Touch Delete to delete a waypoint or the
�nal destination. A con�rmation window will
appear. Touch YES to delete the point or NO to
return to the previous screen.
255
Page 256 of 512

Delete All:Touch Delete All to delete all of the
waypoints and the �nal destination. A con�rmation
window will appear. Touch YES to delete all
waypoints or NO to return to the previous screen.
Change:Touch Change to change the �nal
destination. Enter a destination. SeeEnter
Destination on page 259.
Add:Touch Add to add additional waypoints.
Refer to the steps for adding a waypoint
listed previously in this section.
Calculate:Touch Calculate to begin route
calculation. This feature will only be available if
the �nal destination has been set.Editing a Waypoint
This feature allows you to edit waypoints that have
already been set. To edit a waypoint, do the
following:
1. Touch Edit Waypoint.
2. Touch the MAP key to view the destination
location on the map screen.
3. Touch CHANGE ORDER to change the order
of the waypoints and the �nal destination.
You can also use the map scroll to change a
waypoint from one location to another.
Deleting a Waypoint
To delete a waypoint from your route, do the
following:
1. Touch Delete Waypoint.
2. Select the waypoint you want to delete. A
con�rmation window will appear.
3. Touch YES to delete the waypoint or NO to
return to the previous menu.
256