dic CADILLAC XT5 2018 Owner's Manual
[x] Cancel search | Manufacturer: CADILLAC, Model Year: 2018, Model line: XT5, Model: CADILLAC XT5 2018Pages: 380, PDF Size: 6.21 MB
Page 258 of 380
Cadillac XT5 Owner Manual (GMNA-Localizing-U.S./Canada/Mexico-
11349110) - 2018 - CRC - 9/28/17
VEHICLE CARE 257
If the system is ever reset accidentally,
the oil must be changed at 5 000 km
(3,000 mi) since the last oil change.
Remember to reset the oil life system
whenever the oil is changed.
How to Reset the Engine Oil Life
System
Reset the system whenever the engine
oil is changed so that the system can
calculate the next engine oil change.
To reset the system:1. Using the DIC controls on the right side of the steering wheel,
display REMAINING OIL LIFE on
the DIC. See Driver Information
Center (DIC) 0141. When
remaining oil life is low, the
CHANGE ENGINE OIL SOON
message will appear on the
display.
2. Press SEL on the DIC controls and hold SEL down for a few
seconds to clear the CHANGE
ENGINE OIL SOON message and
reset the oil life at 100%.
Be careful not to reset the oil life
display accidentally at any time
other than after the oil is changed. It cannot be reset
accurately until the next oil
change.
The oil life system can also be reset as
follows: 1. Display REMAINING OIL LIFE on the DIC. See Driver Information
Center (DIC) 0141.
2. Fully press and release the accelerator pedal three times
within five seconds.
If the CHANGE ENGINE OIL
SOON message is not on, the
system is reset.
The system is reset when the
CHANGE ENGINE OIL SOON message
is off.
If the CHANGE ENGINE OIL SOON
message comes back on when the
vehicle is started, the engine oil life
system has not been reset. Repeat the
procedure.
Automatic Transmission
Fluid
A transmission fluid leak is the only
reason for fluid loss. If a leak occurs,
take the vehicle to your dealer and
have it repaired as soon as possible.
See your dealer to have the fluid and
filter changed at the intervals listed in
the Maintenance Schedule 0330.
Engine Air Cleaner/Filter
The engine air cleaner/filter is in the
engine compartment on the passenger
side of the vehicle. See Engine
Compartment Overview 0253.
When to Inspect the Engine Air
Cleaner/Filter
For intervals on changing and
inspecting the engine air cleaner/filter,
see Maintenance Schedule 0330.
How to Inspect the Engine Air
Cleaner/Filter
Do not start the engine or have the
engine running with the engine air
cleaner/filter housing open. Before
Page 261 of 380
Cadillac XT5 Owner Manual (GMNA-Localizing-U.S./Canada/Mexico-
11349110) - 2018 - CRC - 9/28/17
260 VEHICLE CARE
Never dispose of engine coolant by
putting it in the trash, pouring it on
the ground, or pouring into sewers,
streams, or bodies of water. Have the
coolant changed by an authorized
service center, familiar with legal
requirements regarding used coolant
disposal. This will help protect the
environment and your health.
Checking Coolant
The vehicle must be on a level surface
when checking the coolant level.
Check to see if coolant is visible in the
coolant surge tank. If the coolant
inside the coolant surge tank isboiling, do not do anything else until
it cools down. If coolant is visible but
the coolant level mark is not at or
above the indicated mark, add a 50/
50 mixture of clean, drinkable water
and DEX-COOL coolant. Be sure the
cooling system is cool before this is
done. See
Engine Overheating 0261.
The coolant surge tank is located in
the engine compartment on the driver
side of the vehicle. See Engine
Compartment Overview 0253.
How to Add Coolant to the
Surge Tank
{Warning
Spilling coolant on hot engine parts
can burn you. Coolant contains
ethylene glycol and it will burn if
the engine parts are hot enough.
{Warning
Steam and scalding liquids from a
hot cooling system are under
pressure. Turning the pressure cap,
even a little, can cause them to
come out at high speed and you
could be burned. Never turn the cap
when the cooling system, including
the pressure cap, is hot. Wait for
the cooling system and pressure
cap to cool.
Caution
Failure to follow the specific
coolant fill procedure could cause
the engine to overheat and could
cause system damage. If coolant is
not visible in the surge tank,
contact your dealer.
The coolant surge tank pressure cap
can be removed when the cooling
system, including the surge tank
pressure cap and upper radiator hose,
is no longer hot.
Page 262 of 380
Cadillac XT5 Owner Manual (GMNA-Localizing-U.S./Canada/Mexico-
11349110) - 2018 - CRC - 9/28/17
VEHICLE CARE 261
1. Turn the pressure cap slowlycounterclockwise. If a hiss is
heard, wait for that to stop.
A hiss means there is still some
pressure left.
2. Keep turning the pressure cap slowly and remove it.
3. Fill the coolant surge tank withthe proper mixture to the mark
pointed to on the front of the
coolant surge tank.
4. With the coolant surge tank pressure cap off, start the engine
and let it run until you can feel
the upper radiator hose getting
hot. Watch out for the engine
cooling fans. By this time, the
coolant level inside the coolant
surge tank may be lower. If the
level is lower, add more of the
proper mixture to the coolant
surge tank until the level reaches
the mark pointed to on the front
of the coolant surge tank.
5. Replace the pressure cap tightly.
6. Verify coolant level after the engine is shut off and the
coolant is cold. If necessary,
repeat coolant fill procedure
Step 1-–6.Caution
If the pressure cap is not tightly
installed, coolant loss and engine
damage may occur. Be sure the cap
is properly and tightly secured.
Engine Overheating
The vehicle has several indicators to
warn of the engine overheating.
There is an engine coolant
temperature gauge and an engine
coolant temperature warning light on
the instrument cluster. See Engine
Coolant Temperature Gauge 0129 and
Engine Coolant Temperature Warning
Light 0138. The vehicle may also
display a message on the Driver
Information Center (DIC).
If the decision is made not to lift the
hood when this warning appears, get
service help right away. See Roadside
Service 0347.
If the decision is made to lift the
hood, make sure the vehicle is parked
on a level surface. Then check to see if
the engine cooling fan is running.
Page 264 of 380
Cadillac XT5 Owner Manual (GMNA-Localizing-U.S./Canada/Mexico-
11349110) - 2018 - CRC - 9/28/17
VEHICLE CARE 263
Washer Fluid
What to Use
When windshield washer fluid is
needed, be sure to read the
manufacturer's instructions before
use. If operating the vehicle in an area
where the temperature may fall below
freezing, use a fluid that has sufficient
protection against freezing.
Adding Washer Fluid
The appropriate message will appear
in the Driver Information Center (DIC)
when the fluid level is low.
Open the cap with the washer symbol
on it. Add washer fluid until the tank
is full. SeeEngine Compartment
Overview 0253 for reservoir location.
Caution
.
Do not use washer fluid that
contains any type of water
repellent coating. This can
cause the wiper blades to
chatter or skip.
. Do not use engine coolant
(antifreeze) in the windshield
washer. It can damage the
windshield washer system
and paint.
. Do not mix water with
ready-to-use washer fluid.
Water can cause the solution
to freeze and damage the
washer fluid tank and other
parts of the washer system.
. When using concentrated
washer fluid, follow the
manufacturer instructions for
adding water.
. Fill the washer fluid tank only
three-quarters full when it is
very cold. This allows for
fluid expansion if freezing
(Continued)
Caution (Continued)
occurs, which could damage
the tank if it is
completely full.
Brakes
Disc brake pads have built-in wear
indicators that make a high-pitched
warning sound when the brake pads
are worn and new pads are needed.
The sound can come and go or can be
heard all the time when the vehicle is
moving, except when applying the
brake pedal firmly.
{Warning
The brake wear warning sound
means that soon the brakes will not
work well. That could lead to a
crash. When the brake wear
warning sound is heard, have the
vehicle serviced.
Page 265 of 380
Cadillac XT5 Owner Manual (GMNA-Localizing-U.S./Canada/Mexico-
11349110) - 2018 - CRC - 9/28/17
264 VEHICLE CARE
Caution
Continuing to drive with worn-out
brake pads could result in costly
brake repair.
Some driving conditions or climates
can cause a brake squeal when the
brakes are first applied or lightly
applied. This does not mean
something is wrong with the brakes.
Properly torqued wheel nuts are
necessary to help prevent brake
pulsation. When tires are rotated,
inspect brake pads for wear and
evenly tighten wheel nuts in the
proper sequence to torque
specifications. See Capacities and
Specifications 0341.
Brake pads should be replaced as
complete sets.
Brake Pedal Travel
See your dealer if the brake pedal does
not return to normal height, or if
there is a rapid increase in pedal
travel. This could be a sign that brake
service may be required.
Replacing Brake System Parts
Always replace brake system parts
with new, approved replacement parts.
If this is not done, the brakes may not
work properly. The braking
performance expected can change in
many other ways if the wrong
replacement brake parts are installed
or if parts are improperly installed.
Brake Fluid
The brake master cylinder reservoir is
filled with GM approved DOT 3 brake
fluid as indicated on the reservoir cap.
See Engine Compartment Overview
0 253 for the location of the reservoir.
Checking Brake Fluid
With the vehicle in P (Park) on a level
surface, the brake fluid level should be
between the minimum and maximum
marks on the brake fluid reservoir. There are only two reasons why the
brake fluid level in the reservoir may
go down:
.
Normal brake lining wear. When
new linings are installed, the fluid
level goes back up.
. A fluid leak in the brake hydraulic
system. Have the brake hydraulic
system fixed. With a leak, the
brakes will not work well.
Always clean the brake fluid reservoir
cap and the area around the cap
before removing it.
Do not top off the brake fluid. Adding
fluid does not correct a leak. If fluid is
added when the linings are worn,
there will be too much fluid when
new brake linings are installed. Add or
remove fluid, as necessary, only when
work is done on the brake hydraulic
system.
Page 269 of 380
Cadillac XT5 Owner Manual (GMNA-Localizing-U.S./Canada/Mexico-
11349110) - 2018 - CRC - 9/28/17
268 VEHICLE CARE
Rear Wiper Blade Replacement
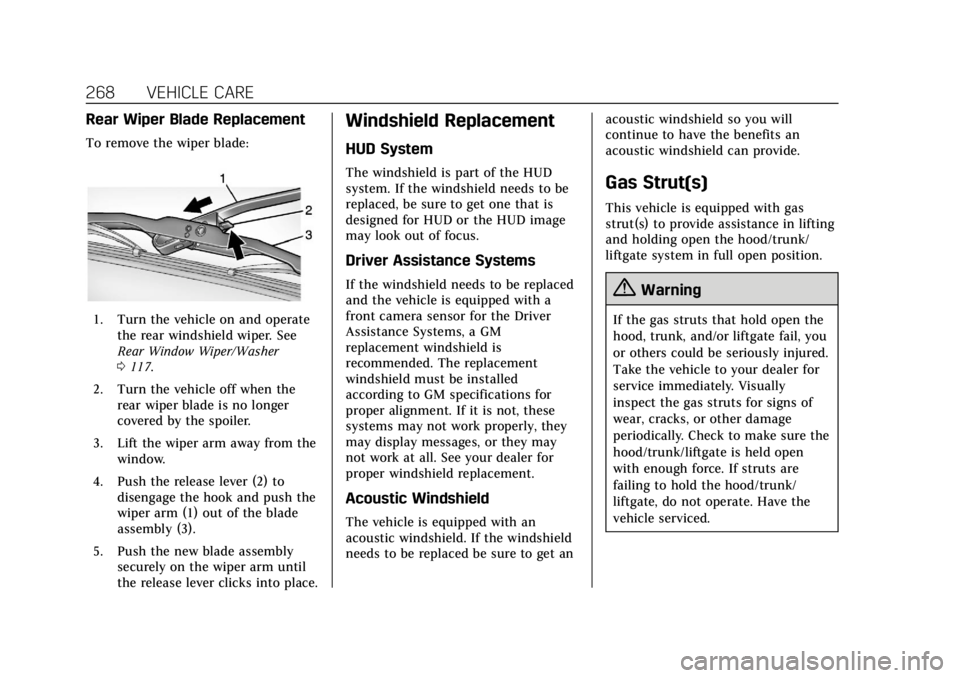
To remove the wiper blade:
1. Turn the vehicle on and operatethe rear windshield wiper. See
Rear Window Wiper/Washer
0117.
2. Turn the vehicle off when the rear wiper blade is no longer
covered by the spoiler.
3. Lift the wiper arm away from the window.
4. Push the release lever (2) to disengage the hook and push the
wiper arm (1) out of the blade
assembly (3).
5. Push the new blade assembly securely on the wiper arm until
the release lever clicks into place.
Windshield Replacement
HUD System
The windshield is part of the HUD
system. If the windshield needs to be
replaced, be sure to get one that is
designed for HUD or the HUD image
may look out of focus.
Driver Assistance Systems
If the windshield needs to be replaced
and the vehicle is equipped with a
front camera sensor for the Driver
Assistance Systems, a GM
replacement windshield is
recommended. The replacement
windshield must be installed
according to GM specifications for
proper alignment. If it is not, these
systems may not work properly, they
may display messages, or they may
not work at all. See your dealer for
proper windshield replacement.
Acoustic Windshield
The vehicle is equipped with an
acoustic windshield. If the windshield
needs to be replaced be sure to get an acoustic windshield so you will
continue to have the benefits an
acoustic windshield can provide.
Gas Strut(s)
This vehicle is equipped with gas
strut(s) to provide assistance in lifting
and holding open the hood/trunk/
liftgate system in full open position.
{Warning
If the gas struts that hold open the
hood, trunk, and/or liftgate fail, you
or others could be seriously injured.
Take the vehicle to your dealer for
service immediately. Visually
inspect the gas struts for signs of
wear, cracks, or other damage
periodically. Check to make sure the
hood/trunk/liftgate is held open
with enough force. If struts are
failing to hold the hood/trunk/
liftgate, do not operate. Have the
vehicle serviced.
Page 283 of 380
Cadillac XT5 Owner Manual (GMNA-Localizing-U.S./Canada/Mexico-
11349110) - 2018 - CRC - 9/28/17
282 VEHICLE CARE
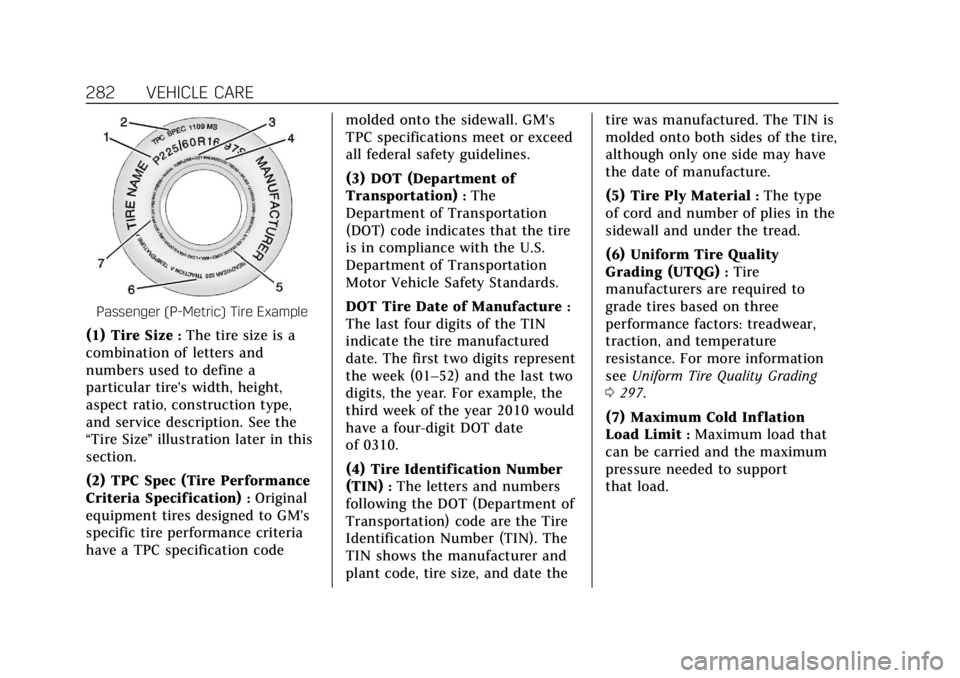
Passenger (P-Metric) Tire Example
(1) Tire Size:The tire size is a
combination of letters and
numbers used to define a
particular tire's width, height,
aspect ratio, construction type,
and service description. See the
“Tire Size ”illustration later in this
section.
(2) TPC Spec (Tire Performance
Criteria Specification)
:Original
equipment tires designed to GM's
specific tire performance criteria
have a TPC specification code molded onto the sidewall. GM's
TPC specifications meet or exceed
all federal safety guidelines.
(3) DOT (Department of
Transportation)
:The
Department of Transportation
(DOT) code indicates that the tire
is in compliance with the U.S.
Department of Transportation
Motor Vehicle Safety Standards.
DOT Tire Date of Manufacture
:
The last four digits of the TIN
indicate the tire manufactured
date. The first two digits represent
the week (01–52) and the last two
digits, the year. For example, the
third week of the year 2010 would
have a four-digit DOT date
of 0310.
(4) Tire Identification Number
(TIN)
:The letters and numbers
following the DOT (Department of
Transportation) code are the Tire
Identification Number (TIN). The
TIN shows the manufacturer and
plant code, tire size, and date the tire was manufactured. The TIN is
molded onto both sides of the tire,
although only one side may have
the date of manufacture.
(5) Tire Ply Material
:The type
of cord and number of plies in the
sidewall and under the tread.
(6) Uniform Tire Quality
Grading (UTQG)
:Tire
manufacturers are required to
grade tires based on three
performance factors: treadwear,
traction, and temperature
resistance. For more information
see Uniform Tire Quality Grading
0 297.
(7) Maximum Cold Inf lation
Load Limit
:Maximum load that
can be carried and the maximum
pressure needed to support
that load.
Page 285 of 380
Cadillac XT5 Owner Manual (GMNA-Localizing-U.S./Canada/Mexico-
11349110) - 2018 - CRC - 9/28/17
284 VEHICLE CARE
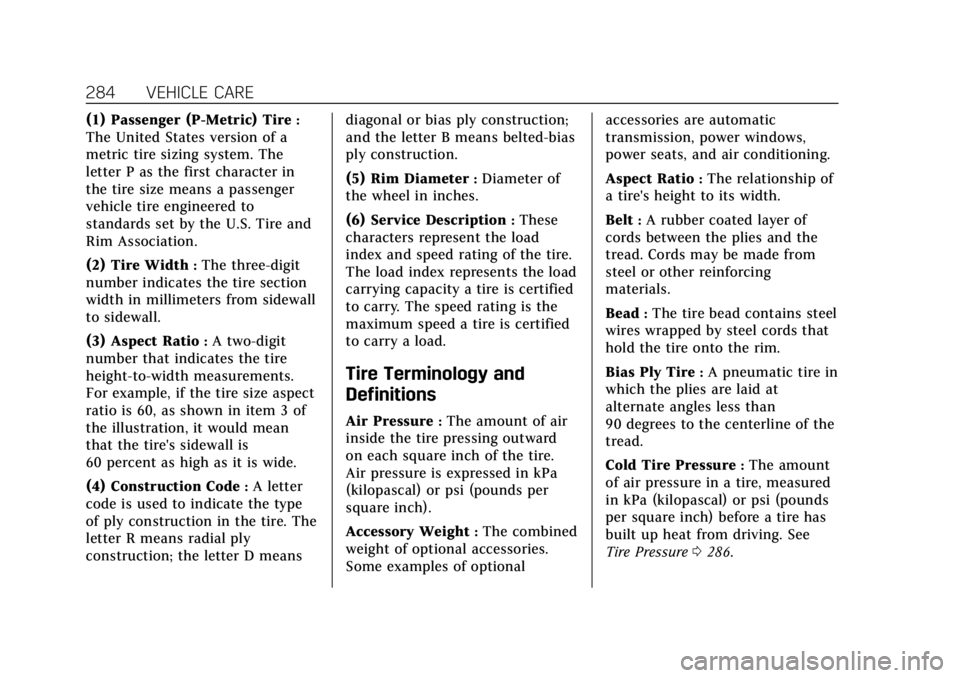
(1) Passenger (P-Metric) Tire:
The United States version of a
metric tire sizing system. The
letter P as the first character in
the tire size means a passenger
vehicle tire engineered to
standards set by the U.S. Tire and
Rim Association.
(2) Tire Width
:The three-digit
number indicates the tire section
width in millimeters from sidewall
to sidewall.
(3) Aspect Ratio
:A two-digit
number that indicates the tire
height-to-width measurements.
For example, if the tire size aspect
ratio is 60, as shown in item 3 of
the illustration, it would mean
that the tire's sidewall is
60 percent as high as it is wide.
(4) Construction Code
:A letter
code is used to indicate the type
of ply construction in the tire. The
letter R means radial ply
construction; the letter D means diagonal or bias ply construction;
and the letter B means belted-bias
ply construction.
(5) Rim Diameter
:Diameter of
the wheel in inches.
(6) Service Description
:These
characters represent the load
index and speed rating of the tire.
The load index represents the load
carrying capacity a tire is certified
to carry. The speed rating is the
maximum speed a tire is certified
to carry a load.
Tire Terminology and
Definitions
Air Pressure:The amount of air
inside the tire pressing outward
on each square inch of the tire.
Air pressure is expressed in kPa
(kilopascal) or psi (pounds per
square inch).
Accessory Weight
:The combined
weight of optional accessories.
Some examples of optional accessories are automatic
transmission, power windows,
power seats, and air conditioning.
Aspect Ratio
:The relationship of
a tire's height to its width.
Belt
:A rubber coated layer of
cords between the plies and the
tread. Cords may be made from
steel or other reinforcing
materials.
Bead
:The tire bead contains steel
wires wrapped by steel cords that
hold the tire onto the rim.
Bias Ply Tire
:A pneumatic tire in
which the plies are laid at
alternate angles less than
90 degrees to the centerline of the
tread.
Cold Tire Pressure
:The amount
of air pressure in a tire, measured
in kPa (kilopascal) or psi (pounds
per square inch) before a tire has
built up heat from driving. See
Tire Pressure 0286.
Page 287 of 380
Cadillac XT5 Owner Manual (GMNA-Localizing-U.S./Canada/Mexico-
11349110) - 2018 - CRC - 9/28/17
286 VEHICLE CARE
molding that is higher or deeper
than the same moldings on the
other sidewall of the tire.
Passenger (P-Metric) Tire
:A tire
used on passenger cars and some
light duty trucks and
multipurpose vehicles.
Recommended Inf lation
Pressure
:Vehicle manufacturer's
recommended tire inflation
pressure as shown on the tire
placard. See Tire Pressure 0286
and Vehicle Load Limits 0184.
Radial Ply Tire
:A pneumatic tire
in which the ply cords that extend
to the beads are laid at 90 degrees
to the centerline of the tread.
Rim
:A metal support for a tire
and upon which the tire beads are
seated.
Sidewall
:The portion of a tire
between the tread and the bead. Speed Rating
:An alphanumeric
code assigned to a tire indicating
the maximum speed at which a
tire can operate.
Traction
:The friction between
the tire and the road surface. The
amount of grip provided.
Tread
:The portion of a tire that
comes into contact with the road.
Treadwear Indicators
:Narrow
bands, sometimes called wear
bars, that show across the tread of
a tire when only 1.6 mm (1/16 in)
of tread remains. See When It Is
Time for New Tires 0294.
UTQGS (Uniform Tire Quality
Grading Standards)
:A tire
information system that provides
consumers with ratings for a tire's
traction, temperature, and
treadwear. Ratings are determined
by tire manufacturers using
government testing procedures.
The ratings are molded into the
sidewall of the tire. See Uniform
Tire Quality Grading 0297. Vehicle Capacity Weight
:The
number of designated seating
positions multiplied by
68 kg (150 lb) plus the rated cargo
load. See Vehicle Load Limits 0184.
Vehicle Maximum Load on the
Tire
:Load on an individual tire
due to curb weight, accessory
weight, occupant weight, and
cargo weight.
Vehicle Placard
:A label
permanently attached to a vehicle
showing the vehicle capacity
weight and the original equipment
tire size and recommended
inflation pressure. See “Tire and
Loading Information Label” under
Vehicle Load Limits 0184.
Tire Pressure
Tires need the correct amount of
air pressure to operate effectively.
Page 288 of 380
Cadillac XT5 Owner Manual (GMNA-Localizing-U.S./Canada/Mexico-
11349110) - 2018 - CRC - 9/28/17
VEHICLE CARE 287
Caution
Neither tire underinflation nor
overinflation is good.
Underinflated tires, or tires that
do not have enough air, can
result in:
.Tire overloading and
overheating which could
lead to a blowout.
.Premature or
irregular wear.
.Poor handling.
.Reduced fuel economy.
Overinflated tires, or tires that
have too much air, can result in:
.Unusual wear.
.Poor handling.
.Rough ride.
.Needless damage from
road hazards. The Tire and Loading Information
label on the vehicle indicates the
original equipment tires and the
correct cold tire inflation
pressures. The recommended
pressure is the minimum air
pressure needed to support the
vehicle's maximum load carrying
capacity. See
Vehicle Load Limits
0 184.
How the vehicle is loaded affects
vehicle handling and ride comfort.
Never load the vehicle with more
weight than it was designed to
carry.
When to Check
Check the tires once a month or
more. Do not forget the compact
spare, if the vehicle has one. The
cold compact spare tire pressure
should be at 420 kPa (60 psi). See
Compact Spare Tire 0313. How to Check
Use a good quality pocket-type
gauge to check tire pressure.
Proper tire inflation cannot be
determined by looking at the tire.
Check the tire inflation pressure
when the tires are cold, meaning
the vehicle has not been driven for
at least three hours or no more
than 1.6 km (1 mi).
Remove the valve cap from the
tire valve stem. Press the tire
gauge firmly onto the valve to get
a pressure measurement. If the
cold tire inflation pressure
matches the recommended
pressure on the Tire and Loading
Information label, no further
adjustment is necessary. If the
inflation pressure is low, add air
until the recommended pressure is
reached. If the inflation pressure
is high, press on the metal stem in
the center of the tire valve to
release air.