Reverse CADILLAC XT5 2018 Owner's Guide
[x] Cancel search | Manufacturer: CADILLAC, Model Year: 2018, Model line: XT5, Model: CADILLAC XT5 2018Pages: 380, PDF Size: 6.21 MB
Page 225 of 380
Cadillac XT5 Owner Manual (GMNA-Localizing-U.S./Canada/Mexico-
11349110) - 2018 - CRC - 9/28/17
224 DRIVING AND OPERATING
Parking Brake (EPB) may be set. When
it is safe, press the accelerator pedal
firmly at any time to override RAB.
{Warning
There may be instances where
unexpected or undesired automatic
braking occurs. If this happens,
either press the brake pedal or
firmly press the accelerator pedal to
release the brakes from the RAB
system. Before releasing the brakes,
check the RVC and check the area
around the vehicle to make sure it
is safe to proceed.
Rear Cross Traffic Alert (RCTA)
If equipped, RCTA displays a red
warning triangle with a left or right
pointing arrow on the infotainment
display to warn of traffic coming from
the left or right. This system detects
objects coming from up to 20 m (65 ft)
from the left or right side of the
vehicle. When an object is detected,
either three beeps sound from the left
or right or three Safety Alert Seat pulses occur on the left or right side,
depending on the direction of the
detected vehicle.
Use caution while backing up when
towing a trailer, as the RCTA
detection zones that extend out from
the back of the vehicle do not move
further back when a trailer is towed.
See
Radio Frequency Statement 0353.
Turning the Features On or Off
TouchXon the center stack to turn
on or off the Front and Rear Parking
Assist, Reverse Automatic Braking
(RAB), Rear Cross Traffic Alert
(RCTA), and the Backing Warning
System at the same time. The
indicator light next to the button
comes on when the features are on
and turns off when the features have
been disabled.
Turn off parking assist, RCTA, and
RAB when towing a trailer.
To turn the RPA symbols or guidance
lines (on some models) on or off, see
“Rear Camera ”under Vehicle
Personalization 0148. RCTA can also be turned on or off
through vehicle personalization. See
“Collision/Detection Systems”
under
Vehicle Personalization 0148.
Automatic Parking Assist (APA)
If equipped, APA searches for and
steers the vehicle into parallel and
perpendicular parking spots. When
using APA, you must still shift gears,
and control the brakes and
accelerator. The Driver information
Center (DIC) and audible beeps help
to guide parking maneuvers.
Do not use APA when towing a trailer.
{Warning
APA does not apply the brakes. APA
may not detect objects in the
parking space, objects that are soft
or narrow, objects high off the
ground such as flatbed trucks,
or objects below ground level such
as large potholes. Always verify that
the parking space is appropriate for
parking a vehicle. APA does not
(Continued)
Page 226 of 380

Cadillac XT5 Owner Manual (GMNA-Localizing-U.S./Canada/Mexico-
11349110) - 2018 - CRC - 9/28/17
DRIVING AND OPERATING 225
Warning (Continued)
respond to changes in the parking
space, such as movement of an
adjacent vehicle, or a person or
object entering the parking space.
APA does not detect or avoid traffic
that is behind or alongside of the
vehicle. Always be prepared to stop
the vehicle during the parking
maneuver.
Touch
Oon the center stack to
enable the system to search for a
parking space that is large enough and
within 1.5 m (5 ft) of the vehicle. The
vehicle speed must be below
30 km/h (18 mph). The system cannot:
. Detect whether it is a legal parking
space.
. Park exactly lined up with the
vehicle next to it if the spot is
approached at an angle or if the
parking space is angled.
. Park exactly centered in a spot
that is marked too large. .
Always detect short curbs.
If the vehicle is equipped with
perpendicular parking mode, touch
and hold
Oduring the search
process to switch the APA parking
mode between perpendicular and
parallel parking.
APA searches for parking spaces to
the right of the vehicle. To search for
a parking space to the left, turn on the
left turn signal.
After completely passing a large
enough space, an audible beep occurs
and a red symbol displays in the DIC.
If the vehicle is in R (Reverse), but
does not steer into the expected
space, this may be because the system is maneuvering the vehicle into a
previously detected space. The APA
system does not need service.
APA will instruct the vehicle to stop
once a large enough space is found.
Follow the instructions in the DIC.
When instructed to drive in reverse,
shift to R (Reverse) to engage
automatic steering. The steering wheel
will vibrate briefly as a reminder to
remove hands from the steering
wheel. Check surroundings and
continue braking or accelerating as
needed, and be prepared to stop to
avoid vehicles, pedestrians, or objects.
If the vehicle exceeds 10 km/h
(6 mph), APA is automatically
disengaged. A DIC progress arrow
displays the status of the parking
maneuver. Depending on the space
Page 259 of 380
Cadillac XT5 Owner Manual (GMNA-Localizing-U.S./Canada/Mexico-
11349110) - 2018 - CRC - 9/28/17
258 VEHICLE CARE
removing the engine air cleaner/filter,
make sure that the engine air cleaner/
filter housing and nearby components
are free of dirt and debris. Remove the
engine air cleaner/filter. Lightly tap
and shake the engine air cleaner/filter
(away from the vehicle), to release
dust and dirt. Inspect the engine air
cleaner/filter for damage, and replace
if damaged. Do not clean the engine
air cleaner/filter or components with
water or compressed air.
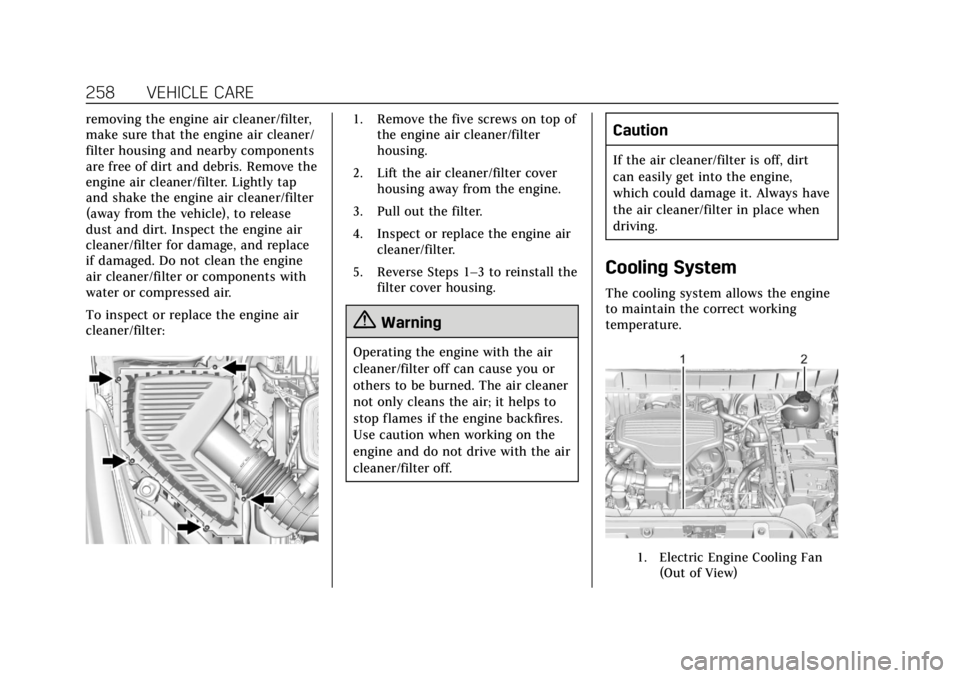
To inspect or replace the engine air
cleaner/filter:1. Remove the five screws on top ofthe engine air cleaner/filter
housing.
2. Lift the air cleaner/filter cover housing away from the engine.
3. Pull out the filter.
4. Inspect or replace the engine air cleaner/filter.
5. Reverse Steps 1–3 to reinstall the filter cover housing.
{Warning
Operating the engine with the air
cleaner/filter off can cause you or
others to be burned. The air cleaner
not only cleans the air; it helps to
stop flames if the engine backfires.
Use caution when working on the
engine and do not drive with the air
cleaner/filter off.
Caution
If the air cleaner/filter is off, dirt
can easily get into the engine,
which could damage it. Always have
the air cleaner/filter in place when
driving.
Cooling System
The cooling system allows the engine
to maintain the correct working
temperature.
1. Electric Engine Cooling Fan
(Out of View)
Page 268 of 380
Cadillac XT5 Owner Manual (GMNA-Localizing-U.S./Canada/Mexico-
11349110) - 2018 - CRC - 9/28/17
VEHICLE CARE 267
Park on a fairly steep hill, with the
vehicle facing downhill. Keeping your
foot on the regular brake, set the
parking brake.
.To check the parking brake's
holding ability: With the engine
running and the transmission in
N (Neutral), slowly remove foot
pressure from the regular brake
pedal. Do this until the vehicle is
held by the parking brake only.
. To check the P (Park) mechanism's
holding ability: With the engine
running, shift to P (Park). Then
release the parking brake followed
by the regular brake.
Contact your dealer if service is
required.Wiper Blade Replacement
Windshield wiper blades should be
inspected for wear or cracking.
It is a good idea to clean or replace
the wiper blade assembly on a regular
basis or when worn. For proper
windshield wiper blade length and
type, see Maintenance Replacement
Parts 0338.
Caution
Allowing the wiper arm to touch
the windshield when no wiper blade
is installed could damage the
windshield. Any damage that occurs
would not be covered by the vehicle
warranty. Do not allow the wiper
arm to touch the windshield.
Front Wiper Blade Replacement
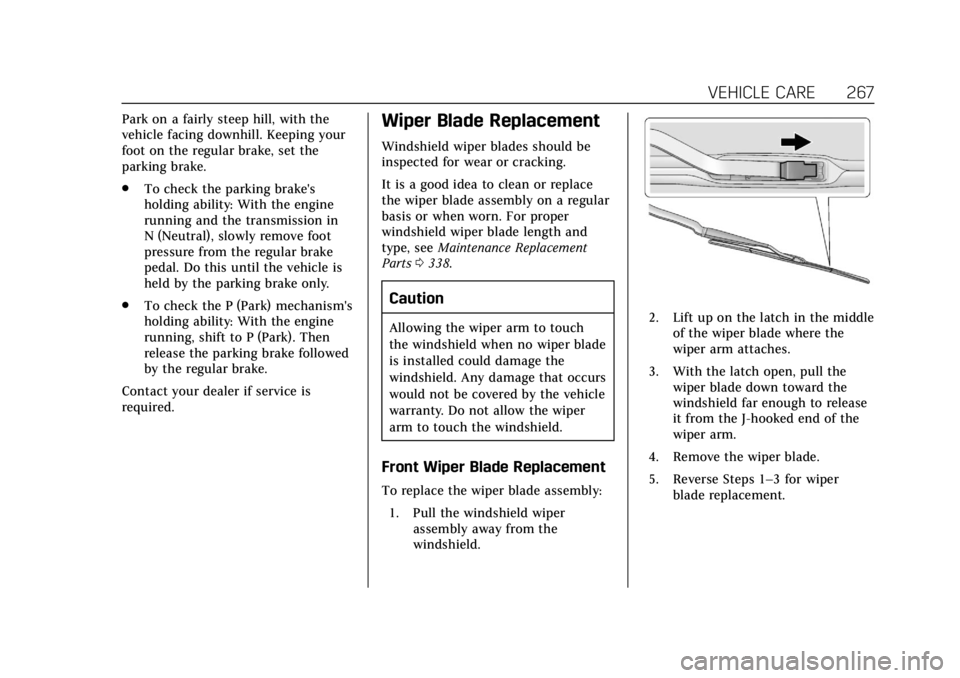
To replace the wiper blade assembly:
1. Pull the windshield wiper assembly away from the
windshield.
2. Lift up on the latch in the middleof the wiper blade where the
wiper arm attaches.
3. With the latch open, pull the wiper blade down toward the
windshield far enough to release
it from the J-hooked end of the
wiper arm.
4. Remove the wiper blade.
5. Reverse Steps 1–3 for wiper blade replacement.
Page 272 of 380
Cadillac XT5 Owner Manual (GMNA-Localizing-U.S./Canada/Mexico-
11349110) - 2018 - CRC - 9/28/17
VEHICLE CARE 271
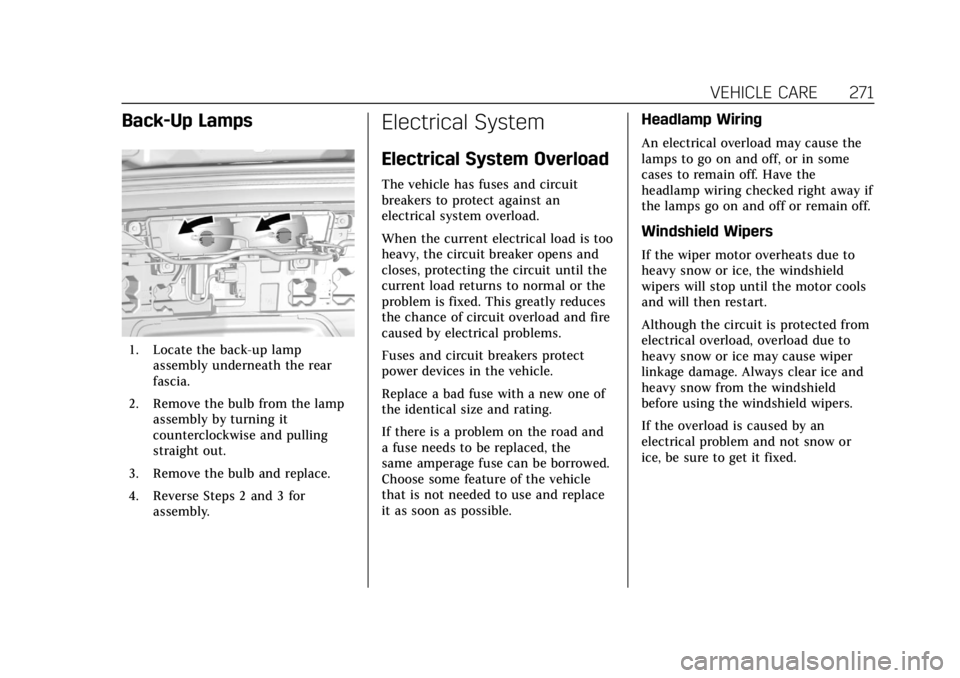
Back-Up Lamps
1. Locate the back-up lampassembly underneath the rear
fascia.
2. Remove the bulb from the lamp assembly by turning it
counterclockwise and pulling
straight out.
3. Remove the bulb and replace.
4. Reverse Steps 2 and 3 for assembly.
Electrical System
Electrical System Overload
The vehicle has fuses and circuit
breakers to protect against an
electrical system overload.
When the current electrical load is too
heavy, the circuit breaker opens and
closes, protecting the circuit until the
current load returns to normal or the
problem is fixed. This greatly reduces
the chance of circuit overload and fire
caused by electrical problems.
Fuses and circuit breakers protect
power devices in the vehicle.
Replace a bad fuse with a new one of
the identical size and rating.
If there is a problem on the road and
a fuse needs to be replaced, the
same amperage fuse can be borrowed.
Choose some feature of the vehicle
that is not needed to use and replace
it as soon as possible.
Headlamp Wiring
An electrical overload may cause the
lamps to go on and off, or in some
cases to remain off. Have the
headlamp wiring checked right away if
the lamps go on and off or remain off.
Windshield Wipers
If the wiper motor overheats due to
heavy snow or ice, the windshield
wipers will stop until the motor cools
and will then restart.
Although the circuit is protected from
electrical overload, overload due to
heavy snow or ice may cause wiper
linkage damage. Always clear ice and
heavy snow from the windshield
before using the windshield wipers.
If the overload is caused by an
electrical problem and not snow or
ice, be sure to get it fixed.
Page 279 of 380

Cadillac XT5 Owner Manual (GMNA-Localizing-U.S./Canada/Mexico-
11349110) - 2018 - CRC - 9/28/17
278 VEHICLE CARE
FusesUsage
F1 –
F2 Trailer battery 1 Fuses
Usage
F3 Driver seat belt motor
F4 Rear blower
F5 Rear drive control
F6 Passenger seat belt motor
F7 Right window
F8 Rear defogger
F9 Left window
F10 –
F11 Trailer reverse
F12 –
F13 –
F14 –
F15 –
F16 –
F17 Camera
F18 Trailer module
F19 Ventilated seats
F20 –
F21 Trailer connector Fuses
Usage
F22 –
F23 –
F24 Passenger window switch
F25 –
F26 Trailer brake
F27 Driver ventilated seat/ Lumbar
F28 Passive entry/Passive start
F29 –
F30 Canister vent
F31 –
F32 Heated mirror
F33 –
F34 Liftgate module
F35 Fuel system control module
F36 Passenger ventilated seat/Lumbar
F37 –
Page 302 of 380
Cadillac XT5 Owner Manual (GMNA-Localizing-U.S./Canada/Mexico-
11349110) - 2018 - CRC - 9/28/17
VEHICLE CARE 301
{Warning
Changing a tire can be dangerous.
The vehicle can slip off the jack and
roll over or fall causing injury or
death. Find a level place to change
the tire. To help prevent the vehicle
from moving:1. Set the parking brake firmly.
2. Put an automatictransmission in P (Park) or a
manual transmission in
1 (First) or R (Reverse).
3. Turn off the engine and do not restart while the vehicle
is raised.
4. Do not allow passengers to remain in the vehicle.
5. Place wheel blocks, if equipped, on both sides of
the tire at the opposite corner
of the tire being changed. This vehicle may come with a jack
and spare tire or a tire sealant and
compressor kit. To use the jacking
equipment to change a spare tire
safely, follow the instructions below.
Then see
Tire Changing 0308. To use
the tire sealant and compressor kit,
see Tire Sealant and Compressor Kit
0 301.
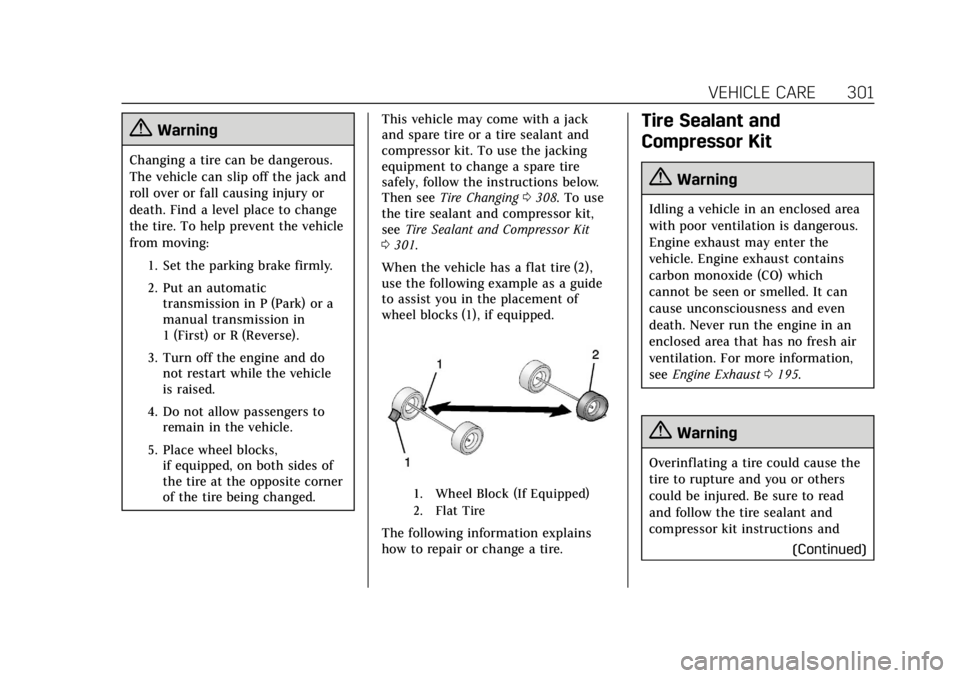
When the vehicle has a flat tire (2),
use the following example as a guide
to assist you in the placement of
wheel blocks (1), if equipped.
1. Wheel Block (If Equipped)
2. Flat Tire
The following information explains
how to repair or change a tire.
Tire Sealant and
Compressor Kit
{Warning
Idling a vehicle in an enclosed area
with poor ventilation is dangerous.
Engine exhaust may enter the
vehicle. Engine exhaust contains
carbon monoxide (CO) which
cannot be seen or smelled. It can
cause unconsciousness and even
death. Never run the engine in an
enclosed area that has no fresh air
ventilation. For more information,
see Engine Exhaust 0195.
{Warning
Overinflating a tire could cause the
tire to rupture and you or others
could be injured. Be sure to read
and follow the tire sealant and
compressor kit instructions and
(Continued)
Page 309 of 380

Cadillac XT5 Owner Manual (GMNA-Localizing-U.S./Canada/Mexico-
11349110) - 2018 - CRC - 9/28/17
308 VEHICLE CARE
4. Turn the retainer nutcounterclockwise to remove the
tire sealant and compressor
kit bag.
5. Remove the tire sealant and compressor kit from the bag.
To store the tire sealant and
compressor kit, reverse the steps.
Tire Changing
Removing the Spare Tire and
Tools
To access the spare tire and tools: 1. Open the liftgate. See Liftgate
0 41.
2. See Cargo Management System
0 110.
3. Pull up on the handle to lift the
load floor.
4. Turn the wing nut (4)counterclockwise to remove the
jack (1), wheel wrench (2), and
strap (3). Place the tool container
near the tire being changed.
Page 317 of 380
Cadillac XT5 Owner Manual (GMNA-Localizing-U.S./Canada/Mexico-
11349110) - 2018 - CRC - 9/28/17
316 VEHICLE CARE
{Warning
Using a match near a battery can
cause battery gas to explode. People
have been hurt doing this, and
some have been blinded. Use a
flashlight if you need more light.
Battery fluid contains acid that can
burn you. Do not get it on you.
If you accidentally get it in your
eyes or on your skin, flush the place
with water and get medical help
immediately.
{Warning
Fans or other moving engine parts
can injure you badly. Keep your
hands away from moving parts
once the engine is running.
5. Connect one end of the red positive (+) cable to the remote
positive (+) terminal on the
discharged battery. 6. Connect the other end of the red
positive (+) cable to the
positive (+) terminal of the good
battery.
7. Connect one end of the black negative (–) cable to the
negative (–) terminal of the good
battery.
8. Connect the other end of the black negative (–) cable to the
remote negative (–) ground
terminal on the driver side shock
tower for the discharged battery.
9. Start the engine in the vehicle with the good battery and run
the engine at idle speed for at
least four minutes.
10. Try to start the vehicle that had the dead battery. If it will not
start after a few tries, it probably
needs service.
Caution
If the jumper cables are connected
or removed in the wrong order,
electrical shorting may occur and
damage the vehicle. The repairs
would not be covered by the vehicle
warranty. Always connect and
remove the jumper cables in the
correct order, making sure that the
cables do not touch each other or
other metal.
Jumper Cable Removal
Reverse the sequence exactly when
removing the jumper cables.
After starting the disabled vehicle and
removing the jumper cables, allow it
to idle for several minutes.
Page 375 of 380

Cadillac XT5 Owner Manual (GMNA-Localizing-U.S./Canada/Mexico-
11349110) - 2018 - CRC - 9/28/17
374 INDEX
Manual Mode . . . . . . . . . . . . . . . . . . . . . . . 200
Memory Features . . . . . . . . . . . . . . . . . . . . 11
Memory Seats . . . . . . . . . . . . . . . . . . . . . . . . 62
MessagesEngine Power . . . . . . . . . . . . . . . . . . . . . 147
Vehicle . . . . . . . . . . . . . . . . . . . . . . . . . . . . . 147
Vehicle Speed . . . . . . . . . . . . . . . . . . . . . 148
Mirror Rear Camera . . . . . . . . . . . . . . . . . . . . . . . . 51
Mirrors Automatic Dimming . . . . . . . . . . . . . . . . 50
Automatic Dimming Rearview . . . . . 51
Convex . . . . . . . . . . . . . . . . . . . . . . . . . . . . . . . 49
Folding . . . . . . . . . . . . . . . . . . . . . . . . . . . . . . 49
Heated . . . . . . . . . . . . . . . . . . . . . . . . . . . . . . . 50
Manual Rearview . . . . . . . . . . . . . . . . . . . 51
Power . . . . . . . . . . . . . . . . . . . . . . . . . . . . . . . . 49
Tilt in Reverse . . . . . . . . . . . . . . . . . . . . . . 50
Mirrors, Interior Rearview . . . . . . . . . . . 51
Mode . . . . . . . . . . . . . . . . . . . . . . . . . . . . . . . . 207 Driver Control . . . . . . . . . . . . . . . . . . . . . 207
Monitor System, Tire Pressure . . . . . 288
N
Navigation OnStar . . . . . . . . . . . . . . . . . . . . . . . . . . . . . 359
Net, Convenience . . . . . . . . . . . . . . . . . . . 111
New Vehicle Break-In . . . . . . . . . . . . . . . 188
O
Odometer . . . . . . . . . . . . . . . . . . . . . . . . . . . . 127 Trip . . . . . . . . . . . . . . . . . . . . . . . . . . . . . . . . 127
Off-Road Recovery . . . . . . . . . . . . . . . . . . . . . . . . . . . 180
Oil Engine . . . . . . . . . . . . . . . . . . . . . . . . . . . . . 254
Engine Oil Life System . . . . . . . . . . . 256
Engine Oil Pressure Gauge . . . . . . . 128
Pressure Light . . . . . . . . . . . . . . . . . . . . . 139
Older Children, Restraints . . . . . . . . . . . 89
Online Owner Center . . . . . . . . . . . . . . . 346
OnStar . . . . . . . . . . . . . . . . . . . . . . . . . . . . . . . 356
OnStar Additional Information . . . . 363
OnStar Connections . . . . . . . . . . . . . . . . 360
OnStar Diagnostics . . . . . . . . . . . . . . . . . 362
OnStar Emergency . . . . . . . . . . . . . . . . . . 358
OnStar Navigation . . . . . . . . . . . . . . . . . . 359
OnStar Overview . . . . . . . . . . . . . . . . . . . . 357
OnStar Security . . . . . . . . . . . . . . . . . . . . . 359
Ordering Service Publications . . . . . . . . . . . . . . 352
Outlets Power . . . . . . . . . . . . . . . . . . . . . . . . . . . . . . 119
Overheating, Engine . . . . . . . . . . . . . . . . 261
P
Park Shifting Into . . . . . . . . . . . . . . . . . . . . . . 193
Shifting Out of . . . . . . . . . . . . . . . . . . . . 194
Parking
Brake and P (Park)Mechanism Check . . . . . . . . . . . . . . . 266
Extended . . . . . . . . . . . . . . . . . . . . . . . . . . 195
Over Things That Burn . . . . . . . . . . . 194
Parking Assist . . . . . . . . . . . . . . . . . . . . . . . 220
Parking or Backing
Assistance Systems . . . . . . . . . . . . . . . 220
Passenger Airbag Status Indicator . . . . . . . . . . . . . . . . . . . . . . . . . . . 132
Passenger Compartment Air Filter . . . . . . . . . . . . . . . . . . . . . . . . . . . . . . . 176
Passenger Sensing System . . . . . . . . . . 83
Pedestrian Ahead Indicator . . . . . . . . 137
Perchlorate Materials Requirements, California . . . . . . . . . 251
Personalization Vehicle . . . . . . . . . . . . . . . . . . . . . . . . . . . . . 148
Power Door Locks . . . . . . . . . . . . . . . . . . . . . . . . . . 39
Mirrors . . . . . . . . . . . . . . . . . . . . . . . . . . . . . . 49
Outlets . . . . . . . . . . . . . . . . . . . . . . . . . . . . . 119
Protection, Battery . . . . . . . . . . . . . . . . 166
Retained Accessory (RAP) . . . . . . . . 193