instrument panel CADILLAC XT5 2019 Owner's Guide
[x] Cancel search | Manufacturer: CADILLAC, Model Year: 2019, Model line: XT5, Model: CADILLAC XT5 2019Pages: 388, PDF Size: 6.29 MB
Page 175 of 388
Cadillac XT5 Owner Manual (GMNA-Localizing-U.S./Canada/Mexico-
12146119) - 2019 - crc - 7/27/18
174 CLIMATE CONTROLS
Air Vents
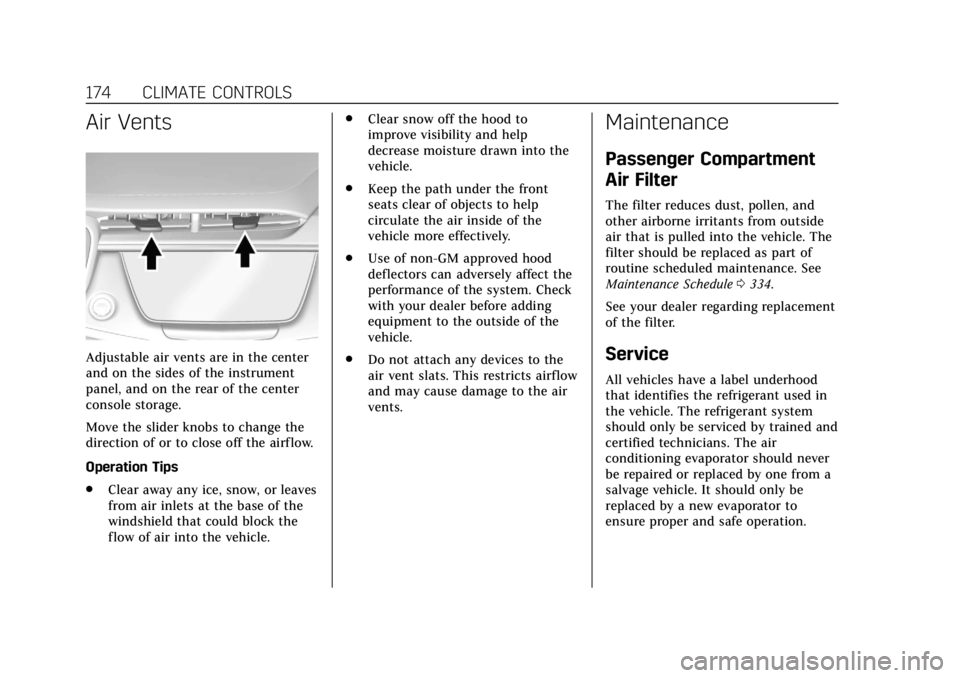
Adjustable air vents are in the center
and on the sides of the instrument
panel, and on the rear of the center
console storage.
Move the slider knobs to change the
direction of or to close off the airf low.
Operation Tips
.Clear away any ice, snow, or leaves
from air inlets at the base of the
windshield that could block the
flow of air into the vehicle. .
Clear snow off the hood to
improve visibility and help
decrease moisture drawn into the
vehicle.
. Keep the path under the front
seats clear of objects to help
circulate the air inside of the
vehicle more effectively.
. Use of non-GM approved hood
deflectors can adversely affect the
performance of the system. Check
with your dealer before adding
equipment to the outside of the
vehicle.
. Do not attach any devices to the
air vent slats. This restricts airflow
and may cause damage to the air
vents.
Maintenance
Passenger Compartment
Air Filter
The filter reduces dust, pollen, and
other airborne irritants from outside
air that is pulled into the vehicle. The
filter should be replaced as part of
routine scheduled maintenance. See
Maintenance Schedule 0334.
See your dealer regarding replacement
of the filter.
Service
All vehicles have a label underhood
that identifies the refrigerant used in
the vehicle. The refrigerant system
should only be serviced by trained and
certified technicians. The air
conditioning evaporator should never
be repaired or replaced by one from a
salvage vehicle. It should only be
replaced by a new evaporator to
ensure proper and safe operation.
Page 183 of 388
Cadillac XT5 Owner Manual (GMNA-Localizing-U.S./Canada/Mexico-
12146119) - 2019 - crc - 7/27/18
182 DRIVING AND OPERATING
.Turn on Traction Control. See
Traction Control/Electronic Stability
Control 0205.
. Antilock Brake System (ABS)
improves vehicle stability during
hard stops, but the brakes should
be applied sooner than when on
dry pavement. See Antilock Brake
System (ABS) 0202.
. Allow greater following distance
and watch for slippery spots. Icy
patches can occur on otherwise
clear roads in shaded areas. The
surface of a curve or an overpass
can remain icy when the
surrounding roads are clear. Avoid
sudden steering maneuvers and
braking while on ice.
. Turn off cruise control.
. Select All-Wheel Drive (AWD)
mode.
See Driver Mode Control 0207 and
All-Wheel Drive 0201.
Blizzard Conditions
Stop the vehicle in a safe place and
signal for help. Stay with the vehicle
unless there is help nearby. If possible, use Roadside Service. See
Roadside
Service 0354. To get help and keep
everyone in the vehicle safe:
. Turn on the hazard warning
flashers.
. Tie a red cloth to an outside
mirror.
{Warning
Snow can trap engine exhaust
under the vehicle. This may cause
exhaust gases to get inside. Engine
exhaust contains carbon monoxide
(CO), which cannot be seen or
smelled. It can cause
unconsciousness and even death.
If the vehicle is stuck in snow:
. Clear snow from the base of
the vehicle, especially any
blocking the exhaust pipe.
. Open a window about 5 cm
(2 in) on the vehicle side that
is away from the wind, to
bring in fresh air.
(Continued)
Warning (Continued)
.Fully open the air outlets on
or under the instrument
panel.
. Adjust the climate control
system to circulate the air
inside the vehicle and set the
fan speed to the highest
setting. See “Climate Control
Systems.”
For more information about CO, see
Engine Exhaust 0194.
To save fuel, run the engine for short
periods to warm the vehicle and then
shut the engine off and partially close
the window. Moving about to keep
warm also helps.
If it takes time for help to arrive,
when running the engine, push the
accelerator pedal slightly so the
engine runs faster than the idle speed.
This keeps the battery charged to
restart the vehicle and to signal for
help with the headlamps. Do this as
little as possible, to save fuel.
Page 214 of 388
Cadillac XT5 Owner Manual (GMNA-Localizing-U.S./Canada/Mexico-
12146119) - 2019 - crc - 7/27/18
DRIVING AND OPERATING 213
Be mindful of speed limits,
surrounding traffic speeds, and
weather conditions when selecting the
set speed.
Resuming a Set Speed
If the ACC is set at a desired speed
and then the brakes are applied, ACC
is disengaged without erasing the set
speed from memory.
To begin using ACC again, press RES+
up briefly. The vehicle returns to the
previous set speed.
.If the vehicle is moving, it returns
to the previous set speed.
. If the vehicle is stopped with the
brake pedal applied, press RES+
and release the brake pedal. ACC
will hold the vehicle until RES+ or
the accelerator pedal is pressed.
A green ACC indicator and the set
speed display on the instrument
cluster. The vehicle ahead indicator
may be flashing if a vehicle ahead was
present and moved. See “Approaching
and Following a Vehicle ”later in this
section. Once ACC has resumed, if there is no
vehicle ahead, if the vehicle ahead is
beyond the selected following gap,
or if the vehicle has exited a sharp
curve, then the vehicle speed will
increase to the set speed.
Increasing Speed While ACC is at a
Set Speed
If ACC is already activated, do one of
the following:
.
Use the accelerator to get to the
higher speed. Press SET– . Release
the control and the accelerator
pedal. The vehicle will now cruise
at the higher speed.
When the accelerator pedal is
pressed, ACC will not brake
because it is overridden. The ACC
indicator will turn blue on the
instrument panel and heads up
display, if equipped. See Vehicle
Messages 0146.
. Press and hold RES+ until the
desired set speed appears on the
display, then release it. .
To increase vehicle speed in small
increments, press RES+ to the first
detent. For each press, the vehicle
goes 1 km/h (1 mph) faster.
. To increase vehicle speed in larger
increments, press RES+ to the
second detent. For each press, the
vehicle speed increases to the next
5 km/h (5 mph) mark on the
speedometer.
The set speed can also be increased
while the vehicle is stopped.
. If stopped with the brake applied,
press RES+ until the desired set
speed is displayed.
. If ACC is holding the vehicle at a
stop and there is another vehicle
directly ahead, pressing RES+ will
increase the set speed. Pressing
RES+ when there is no longer a
vehicle ahead will cause the ACC
to resume.
When it is determined that there is no
vehicle ahead or the vehicle ahead is
beyond the selected following gap,
then the vehicle speed will increase to
the set speed.
Page 242 of 388
Cadillac XT5 Owner Manual (GMNA-Localizing-U.S./Canada/Mexico-
12146119) - 2019 - crc - 7/27/18
DRIVING AND OPERATING 241
important for your safety and that of
your passengers. Read this section
carefully before pulling a trailer.
When towing a trailer:
.Become familiar with and follow
all state and local laws that apply
to trailer towing. These
requirements vary from state to
state.
. State laws may require the use of
extended side view mirrors. Even if
not required, you should install
extended side view mirrors if your
visibility is limited or restricted
while towing.
. Do not tow a trailer during the
first 800 km (500 mi) of vehicle
use to prevent damage to the
engine, axle, or other parts.
. It is recommended to perform the
first oil change before heavy
towing.
. During the first 800 km (500 mi)
of trailer towing, do not drive over
80 km/h (50 mph) and do not
make starts at full throttle. .
Vehicles can tow in D (Drive).
If the transmission downshifts too
often, a lower gear may be
selected using Manual Mode See
Manual Mode 0199.
If equipped, the following driver
assistance features should be turned
off when towing a trailer:
. Adaptive Cruise Control (ACC)
. Super Cruise Control
. Lane Keep Assist (LKA)
. Park Assist
. Automatic Parking Assist (APA)
. Reverse Automatic Braking (RAB)
If equipped, the following driver
assistance features should be turned
to alert or off when towing a trailer:
. Forward Automatic Braking
System (FAB)
. Intelligent Brake Assist (IBA)
. Front Pedestrian Braking (FPB)
If equipped with Lane Change Alert
(LCA), the LCA detection zones that
extend back from the side of the
vehicle do not move further back when a trailer is towed. Use caution
while changing lanes when towing a
trailer.
If equipped with Rear Cross Traffic
Alert (RCTA), use caution while
backing up when towing a trailer, as
the RCTA detection zones that extend
out from the back of the vehicle do
not move further back when a trailer
is towed.
{Warning
To prevent serious injury or death
from carbon monoxide (CO), when
towing a trailer:
. Do not drive with the liftgate,
trunk/hatch, or rear-most
window open.
. Fully open the air outlets on
or under the instrument
panel.
(Continued)
Page 251 of 388
Cadillac XT5 Owner Manual (GMNA-Localizing-U.S./Canada/Mexico-
12146119) - 2019 - crc - 7/27/18
250 DRIVING AND OPERATING
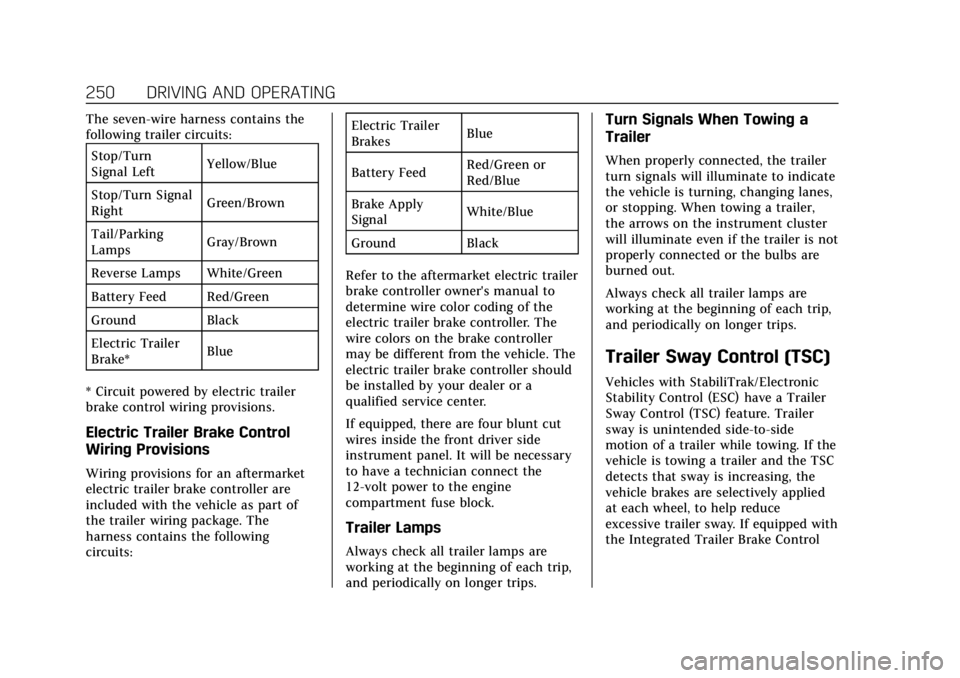
The seven-wire harness contains the
following trailer circuits:Stop/Turn
Signal Left Yellow/Blue
Stop/Turn Signal
Right Green/Brown
Tail/Parking
Lamps Gray/Brown
Reverse Lamps White/Green
Battery Feed Red/Green
Ground Black
Electric Trailer
Brake* Blue
* Circuit powered by electric trailer
brake control wiring provisions.
Electric Trailer Brake Control
Wiring Provisions
Wiring provisions for an aftermarket
electric trailer brake controller are
included with the vehicle as part of
the trailer wiring package. The
harness contains the following
circuits: Electric Trailer
Brakes
Blue
Battery Feed Red/Green or
Red/Blue
Brake Apply
Signal White/Blue
Ground Black
Refer to the aftermarket electric trailer
brake controller owner's manual to
determine wire color coding of the
electric trailer brake controller. The
wire colors on the brake controller
may be different from the vehicle. The
electric trailer brake controller should
be installed by your dealer or a
qualified service center.
If equipped, there are four blunt cut
wires inside the front driver side
instrument panel. It will be necessary
to have a technician connect the
12-volt power to the engine
compartment fuse block.
Trailer Lamps
Always check all trailer lamps are
working at the beginning of each trip,
and periodically on longer trips.
Turn Signals When Towing a
Trailer
When properly connected, the trailer
turn signals will illuminate to indicate
the vehicle is turning, changing lanes,
or stopping. When towing a trailer,
the arrows on the instrument cluster
will illuminate even if the trailer is not
properly connected or the bulbs are
burned out.
Always check all trailer lamps are
working at the beginning of each trip,
and periodically on longer trips.
Trailer Sway Control (TSC)
Vehicles with StabiliTrak/Electronic
Stability Control (ESC) have a Trailer
Sway Control (TSC) feature. Trailer
sway is unintended side-to-side
motion of a trailer while towing. If the
vehicle is towing a trailer and the TSC
detects that sway is increasing, the
vehicle brakes are selectively applied
at each wheel, to help reduce
excessive trailer sway. If equipped with
the Integrated Trailer Brake Control
Page 254 of 388
Cadillac XT5 Owner Manual (GMNA-Localizing-U.S./Canada/Mexico-
12146119) - 2019 - crc - 7/27/18
VEHICLE CARE 253
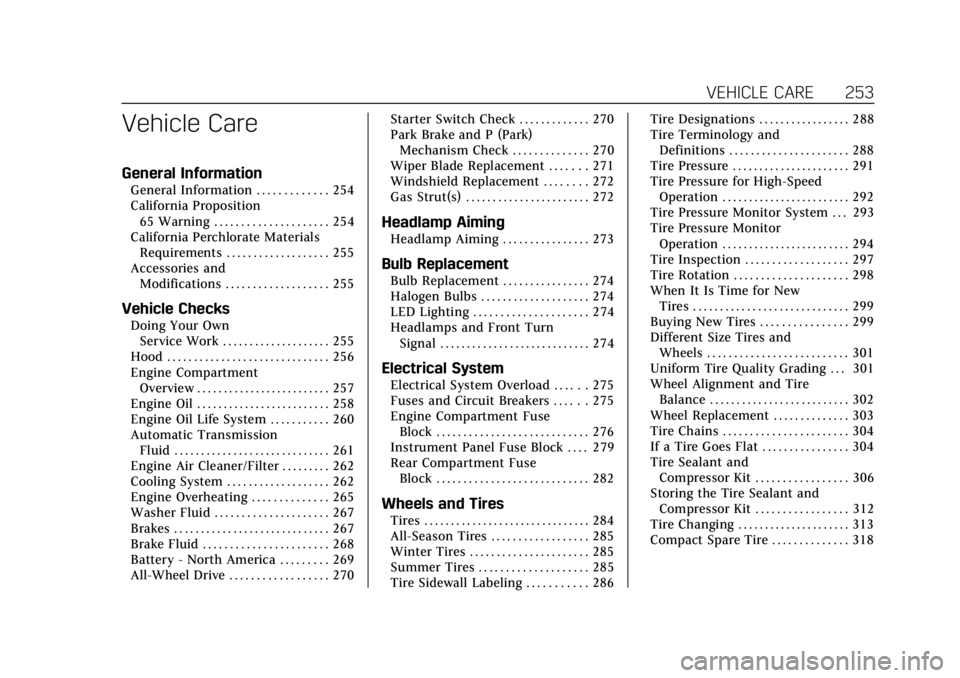
Vehicle Care
General Information
General Information . . . . . . . . . . . . . 254
California Proposition65 Warning . . . . . . . . . . . . . . . . . . . . . 254
California Perchlorate Materials Requirements . . . . . . . . . . . . . . . . . . . 255
Accessories and Modifications . . . . . . . . . . . . . . . . . . . 255
Vehicle Checks
Doing Your OwnService Work . . . . . . . . . . . . . . . . . . . . 255
Hood . . . . . . . . . . . . . . . . . . . . . . . . . . . . . . 256
Engine Compartment Overview . . . . . . . . . . . . . . . . . . . . . . . . . 257
Engine Oil . . . . . . . . . . . . . . . . . . . . . . . . . 258
Engine Oil Life System . . . . . . . . . . . 260
Automatic Transmission Fluid . . . . . . . . . . . . . . . . . . . . . . . . . . . . . 261
Engine Air Cleaner/Filter . . . . . . . . . 262
Cooling System . . . . . . . . . . . . . . . . . . . 262
Engine Overheating . . . . . . . . . . . . . . 265
Washer Fluid . . . . . . . . . . . . . . . . . . . . . 267
Brakes . . . . . . . . . . . . . . . . . . . . . . . . . . . . . 267
Brake Fluid . . . . . . . . . . . . . . . . . . . . . . . 268
Battery - North America . . . . . . . . . 269
All-Wheel Drive . . . . . . . . . . . . . . . . . . 270 Starter Switch Check . . . . . . . . . . . . . 270
Park Brake and P (Park)
Mechanism Check . . . . . . . . . . . . . . 270
Wiper Blade Replacement . . . . . . . 271
Windshield Replacement . . . . . . . . 272
Gas Strut(s) . . . . . . . . . . . . . . . . . . . . . . . 272
Headlamp Aiming
Headlamp Aiming . . . . . . . . . . . . . . . . 273
Bulb Replacement
Bulb Replacement . . . . . . . . . . . . . . . . 274
Halogen Bulbs . . . . . . . . . . . . . . . . . . . . 274
LED Lighting . . . . . . . . . . . . . . . . . . . . . 274
Headlamps and Front Turn Signal . . . . . . . . . . . . . . . . . . . . . . . . . . . . 274
Electrical System
Electrical System Overload . . . . . . 275
Fuses and Circuit Breakers . . . . . . 275
Engine Compartment FuseBlock . . . . . . . . . . . . . . . . . . . . . . . . . . . . 276
Instrument Panel Fuse Block . . . . 279
Rear Compartment Fuse Block . . . . . . . . . . . . . . . . . . . . . . . . . . . . 282
Wheels and Tires
Tires . . . . . . . . . . . . . . . . . . . . . . . . . . . . . . . 284
All-Season Tires . . . . . . . . . . . . . . . . . . 285
Winter Tires . . . . . . . . . . . . . . . . . . . . . . 285
Summer Tires . . . . . . . . . . . . . . . . . . . . 285
Tire Sidewall Labeling . . . . . . . . . . . 286 Tire Designations . . . . . . . . . . . . . . . . . 288
Tire Terminology and
Definitions . . . . . . . . . . . . . . . . . . . . . . 288
Tire Pressure . . . . . . . . . . . . . . . . . . . . . . 291
Tire Pressure for High-Speed Operation . . . . . . . . . . . . . . . . . . . . . . . . 292
Tire Pressure Monitor System . . . 293
Tire Pressure Monitor Operation . . . . . . . . . . . . . . . . . . . . . . . . 294
Tire Inspection . . . . . . . . . . . . . . . . . . . 297
Tire Rotation . . . . . . . . . . . . . . . . . . . . . 298
When It Is Time for New Tires . . . . . . . . . . . . . . . . . . . . . . . . . . . . . 299
Buying New Tires . . . . . . . . . . . . . . . . 299
Different Size Tires and Wheels . . . . . . . . . . . . . . . . . . . . . . . . . . 301
Uniform Tire Quality Grading . . . 301
Wheel Alignment and Tire Balance . . . . . . . . . . . . . . . . . . . . . . . . . . 302
Wheel Replacement . . . . . . . . . . . . . . 303
Tire Chains . . . . . . . . . . . . . . . . . . . . . . . 304
If a Tire Goes Flat . . . . . . . . . . . . . . . . 304
Tire Sealant and Compressor Kit . . . . . . . . . . . . . . . . . 306
Storing the Tire Sealant and Compressor Kit . . . . . . . . . . . . . . . . . 312
Tire Changing . . . . . . . . . . . . . . . . . . . . . 313
Compact Spare Tire . . . . . . . . . . . . . . 318
Page 257 of 388
Cadillac XT5 Owner Manual (GMNA-Localizing-U.S./Canada/Mexico-
12146119) - 2019 - crc - 7/27/18
256 VEHICLE CARE
If equipped with remote vehicle start,
open the hood before performing any
service work to prevent remote
starting the vehicle accidentally. See
Remote Vehicle Start033.
Keep a record with all parts receipts
and list the mileage and the date of
any service work performed. See
Maintenance Records 0345.
Caution
Even small amounts of
contamination can cause damage to
vehicle systems. Do not allow
contaminants to contact the fluids,
reservoir caps, or dipsticks.
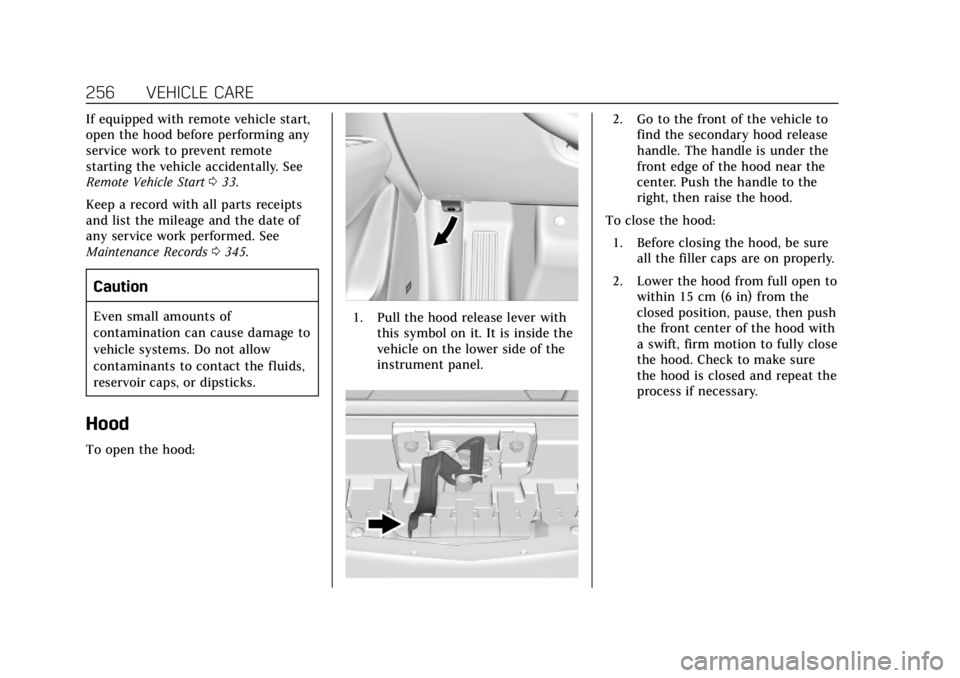
Hood
To open the hood:
1. Pull the hood release lever with
this symbol on it. It is inside the
vehicle on the lower side of the
instrument panel.
2. Go to the front of the vehicle tofind the secondary hood release
handle. The handle is under the
front edge of the hood near the
center. Push the handle to the
right, then raise the hood.
To close the hood: 1. Before closing the hood, be sure all the filler caps are on properly.
2. Lower the hood from full open to within 15 cm (6 in) from the
closed position, pause, then push
the front center of the hood with
a swift, firm motion to fully close
the hood. Check to make sure
the hood is closed and repeat the
process if necessary.
Page 280 of 388
Cadillac XT5 Owner Manual (GMNA-Localizing-U.S./Canada/Mexico-
12146119) - 2019 - crc - 7/27/18
VEHICLE CARE 279
FusesUsage
F65 Engine control module powertrain 1
F66 Engine control module powertrain 2
F67 Powertrain TRCM
F68 –
F69 –
F70 –
F71 –
F72 –
F73 –
F74 –
F75 –
F76 –
F77 –
Relays Usage
K1 Starter 1
K2 Run/Crank
K3 Starter 3 Relays
Usage
K4 LED/Automatic headlamps
K5 –
K6 Coolant pump
K7 Engine control module
K8 Air conditioning
K9 –
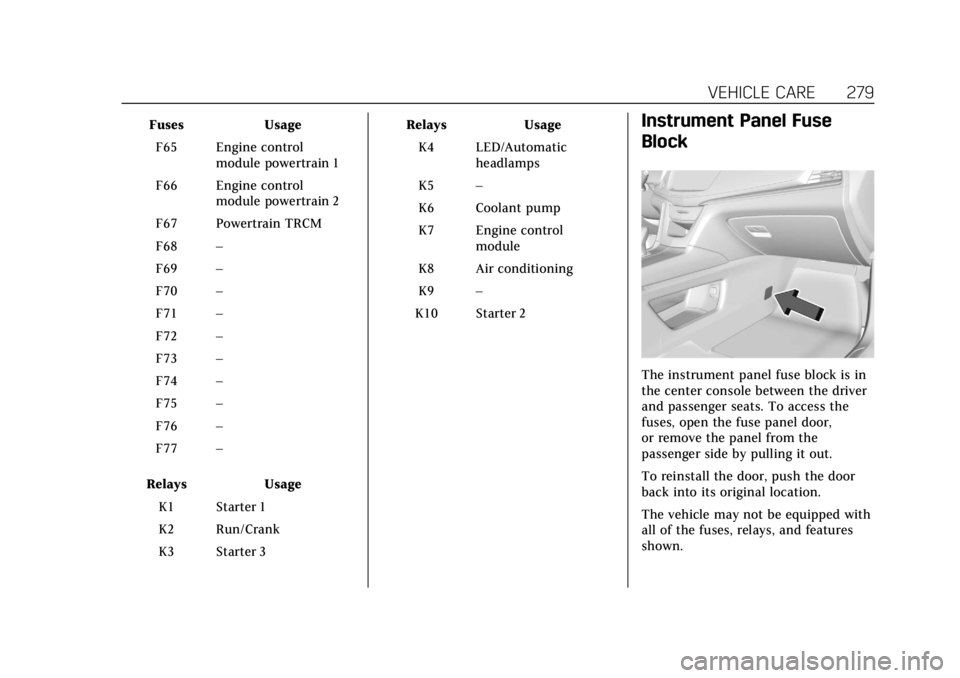
K10 Starter 2Instrument Panel Fuse
Block
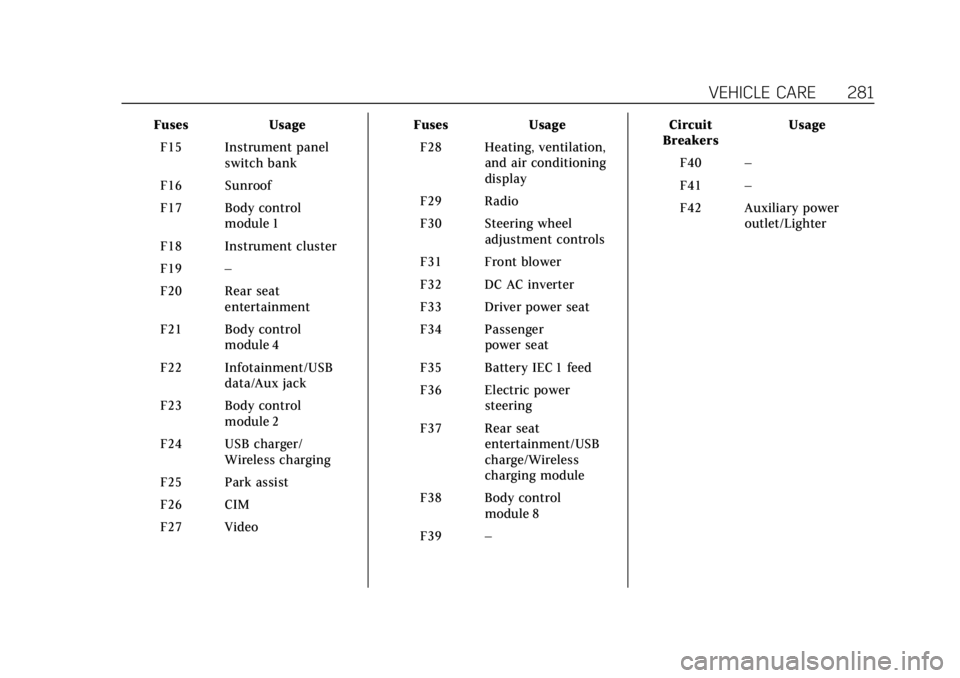
The instrument panel fuse block is in
the center console between the driver
and passenger seats. To access the
fuses, open the fuse panel door,
or remove the panel from the
passenger side by pulling it out.
To reinstall the door, push the door
back into its original location.
The vehicle may not be equipped with
all of the fuses, relays, and features
shown.
Page 282 of 388
Cadillac XT5 Owner Manual (GMNA-Localizing-U.S./Canada/Mexico-
12146119) - 2019 - crc - 7/27/18
VEHICLE CARE 281
FusesUsage
F15 Instrument panel switch bank
F16 Sunroof
F17 Body control module 1
F18 Instrument cluster
F19 –
F20 Rear seat entertainment
F21 Body control module 4
F22 Infotainment/USB data/Aux jack
F23 Body control module 2
F24 USB charger/ Wireless charging
F25 Park assist
F26 CIM
F27 Video Fuses
Usage
F28 Heating, ventilation, and air conditioning
display
F29 Radio
F30 Steering wheel adjustment controls
F31 Front blower
F32 DC AC inverter
F33 Driver power seat
F34 Passenger power seat
F35 Battery IEC 1 feed
F36 Electric power steering
F37 Rear seat entertainment/USB
charge/Wireless
charging module
F38 Body control module 8
F39 – Circuit
Breakers Usage
F40 –
F41 –
F42 Auxiliary power outlet/Lighter
Page 332 of 388

Cadillac XT5 Owner Manual (GMNA-Localizing-U.S./Canada/Mexico-
12146119) - 2019 - crc - 7/27/18
VEHICLE CARE 331
Instrument Panel, Leather, Vinyl,
Other Plastic Surfaces, Low
Gloss Paint Surfaces, and
Natural Open Pore Wood
Surfaces
Use a soft microfiber cloth dampened
with water to remove dust and loose
dirt. For a more thorough cleaning,
use a soft microfiber cloth dampened
with a mild soap solution.
Caution
Soaking or saturating leather,
especially perforated leather, as well
as other interior surfaces, may
cause permanent damage. Wipe
excess moisture from these surfaces
after cleaning and allow them to
dry naturally. Never use heat,
steam, or spot removers. Do not use
cleaners that contain silicone or
wax-based products. Cleaners
containing these solvents can
permanently change the appearance
and feel of leather or soft trim, and
are not recommended.Do not use cleaners that increase
gloss, especially on the instrument
panel. Reflected glare can decrease
visibility through the windshield
under certain conditions.
Caution
Use of air fresheners may cause
permanent damage to plastics and
painted surfaces. If an air freshener
comes in contact with any plastic
or painted surface in the vehicle,
blot immediately and clean with a
soft cloth dampened with a mild
soap solution. Damage caused by
air fresheners would not be covered
by the vehicle warranty.
Cargo Cover and
Convenience Net
If equipped, wash with warm water
and mild detergent. Do not use
chlorine bleach. Rinse with cold water,
and then dry completely.
Care of Seat Belts
Keep belts clean and dry.
{Warning
Do not bleach or dye seat belt
webbing. It may severely weaken
the webbing. In a crash, they might
not be able to provide adequate
protection. Clean and rinse seat belt
webbing only with mild soap and
lukewarm water. Allow the webbing
to dry.
Floor Mats
{Warning
If a floor mat is the wrong size or is
not properly installed, it can
interfere with the pedals.
Interference with the pedals can
cause unintended acceleration and/
or increased stopping distance
which can cause a crash and injury.
Make sure the floor mat does not
interfere with the pedals.