warning CADILLAC XT5 2020 Convenience & Personalization Guide
[x] Cancel search | Manufacturer: CADILLAC, Model Year: 2020, Model line: XT5, Model: CADILLAC XT5 2020Pages: 20, PDF Size: 3.45 MB
Page 2 of 20

2
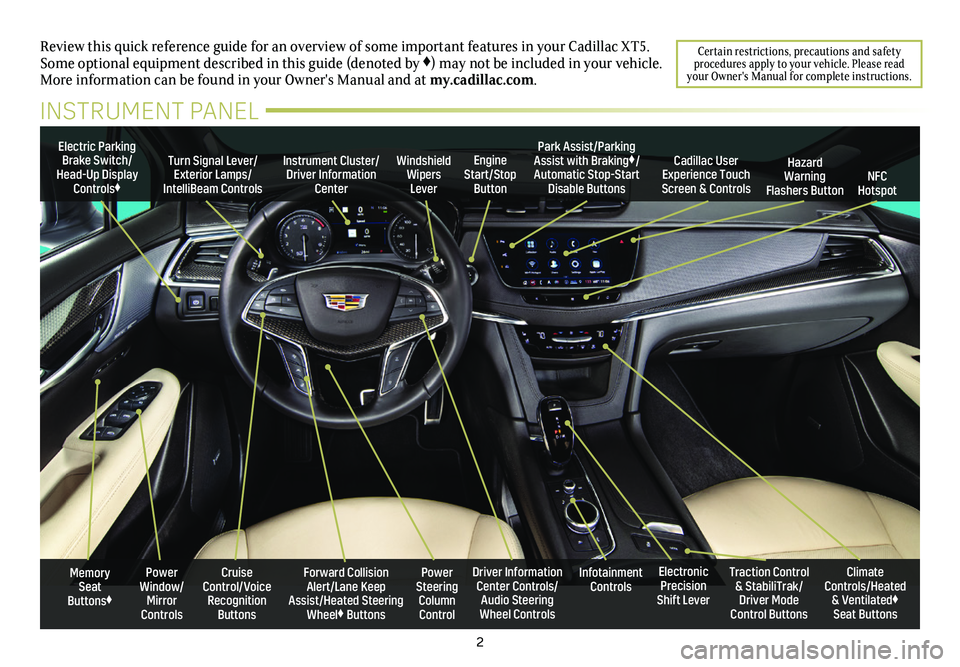
Memory Seat Buttons♦
Electric Parking Brake Switch/Head-Up Display Controls♦
Instrument Cluster/Driver Information Center
Engine Start/Stop Button
Cruise Control/Voice Recognition Buttons
Forward Collision Alert/Lane Keep Assist/Heated Steering Wheel♦ Buttons
Windshield Wipers Lever
Power Steering Column Control
Turn Signal Lever/Exterior Lamps/ IntelliBeam Controls
Review this quick reference guide for an overview of some important feat\
ures in your Cadillac XT5. Some optional equipment described in this guide (denoted by ♦) may not be included in your vehicle. More information can be found in your Owner's Manual and at my.cadillac.com.
INSTRUMENT PANEL
Cadillac User Experience Touch Screen & Controls
Traction Control & StabiliTrak/Driver Mode Control Buttons
Climate Controls/Heated & Ventilated♦ Seat Buttons
Electronic Precision Shift Lever
Driver Information Center Controls/Audio Steering Wheel Controls
Infotainment Controls
Park Assist/Parking Assist with Braking♦/Automatic Stop-Start Disable Buttons
Hazard Warning Flashers ButtonNFC Hotspot
Power Window/Mirror Controls
Certain restrictions, precautions and safety procedures apply to your vehicle. Please read your Owner's Manual for complete instructions.
Page 16 of 20

16
DRIVER ASSISTANCE SYSTEMS
SAFETY ALERT SEAT – The driver’s seat pulses (left, right, or both sides) to alert you of the direction of potential hazards.
Audible alerts may be selected instead of seat pulsing alerts. To change the alert settings, go to Settings > Vehicle > Collision/Detection Systems > Alert Type.
FORWARD COLLISION ALERT – The Vehicle Ahead Indicator is green when a vehicle is detected and is amber when following a vehicle ahead much too closely. When approaching a vehicle directly ahead too rapidly, a red alert flashes on the windshield and the Safety Alert Seat pulses or rapid beeps sound (if selected).
Press the Collision Alert button on the steering wheel to set the alert timing to Far, Medium or Near. This is also the Adaptive Cruise Control–Advanced♦ Follow Distance Gap
setting.
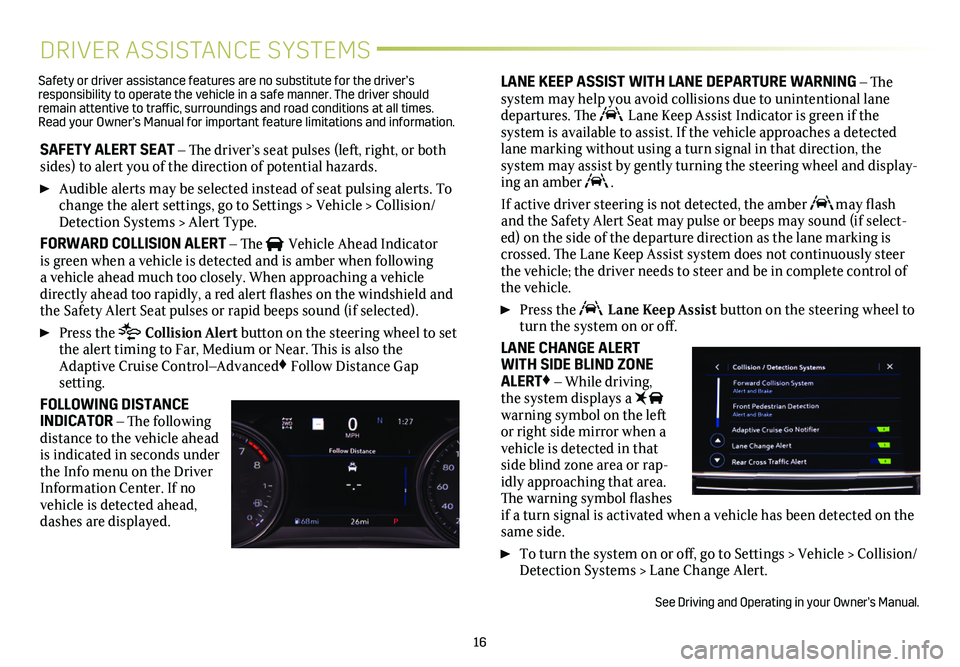
FOLLOWING DISTANCE INDICATOR – The following distance to the vehicle ahead is indicated in seconds under the Info menu on the Driver Information Center. If no vehicle is detected ahead, dashes are displayed.
LANE KEEP ASSIST WITH LANE DEPARTURE WARNING – The system may help you avoid collisions due to unintentional lane departures. The Lane Keep Assist Indicator is green if the
system is available to assist. If the vehicle approaches a detected lane marking without using a turn signal in that direction, the
system may assist by gently turning the steering wheel and display-ing an amber .
If active driver steering is not detected, the amber may flash and the Safety Alert Seat may pulse or beeps may sound (if select-ed) on the side of the departure direction as the lane marking is crossed. The Lane Keep Assist system does not continuously steer the vehicle; the driver needs to steer and be in complete control of the vehicle.
Press the Lane Keep Assist button on the steering wheel to turn the system on or off.
LANE CHANGE ALERT WITH SIDE BLIND ZONE ALERT♦ – While driving, the system displays a warning symbol on the left or right side mirror when a vehicle is detected in that side blind zone area or rap-idly approaching that area. The warning symbol flashes if a turn signal is activated when a vehicle has been detected on the same side.
To turn the system on or off, go to Settings > Vehicle > Collision/Detection Systems > Lane Change Alert.
See Driving and Operating in your Owner’s Manual.
Safety or driver assistance features are no substitute for the driver’s responsibility to operate the vehicle in a safe manner. The driver should remain attentive to traffic, surroundings and road conditions at all times. Read your Owner’s Manual for important feature limitations and information\
.
Page 19 of 20

19
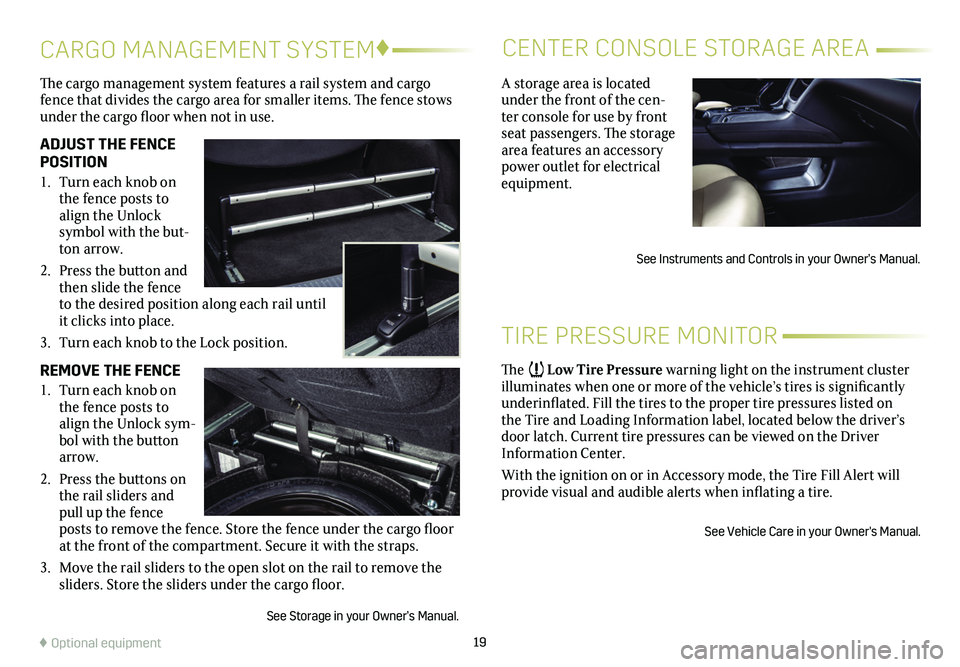
The cargo management system features a rail system and cargo fence that divides the cargo area for smaller items. The fence stows under the cargo floor when not in use.
ADJUST THE FENCE POSITION
1. Turn each knob on the fence posts to align the Unlock
symbol with the but-ton arrow.
2. Press the button and then slide the fence to the desired position along each rail until it clicks into place.
3. Turn each knob to the Lock position.
REMOVE THE FENCE
1. Turn each knob on the fence posts to align the Unlock sym-bol with the button arrow.
2. Press the buttons on the rail sliders and pull up the fence posts to remove the fence. Store the fence under the cargo floor at the front of the compartment. Secure it with the straps.
3. Move the rail sliders to the open slot on the rail to remove the sliders. Store the sliders under the cargo floor.
See Storage in your Owner’s Manual.
CARGO MANAGEMENT SYSTEM♦CENTER CONSOLE STORAGE AREA
♦ Optional equipment
A storage area is located under the front of the cen-ter console for use by front seat passengers. The storage area features an accessory power outlet for electrical equipment.
See Instruments and Controls in your Owner’s Manual.
TIRE PRESSURE MONITOR
The Low Tire Pressure warning light on the instrument cluster illuminates when one or more of the vehicle’s tires is significantly underinflated. Fill the tires to the proper tire pressures listed on the Tire and Loading Information label, located below the driver’s door latch. Current tire pressures can be viewed on the Driver Information Center.
With the ignition on or in Accessory mode, the Tire Fill Alert will provide visual and audible alerts when inflating a tire.
See Vehicle Care in your Owner's Manual.