display CADILLAC XT5 2020 Service Manual
[x] Cancel search | Manufacturer: CADILLAC, Model Year: 2020, Model line: XT5, Model: CADILLAC XT5 2020Pages: 384, PDF Size: 6.52 MB
Page 145 of 384
144 LIGHTING
If after signaling a turn or lane
change, the arrow flashes rapidly or
does not come on, a signal bulb may
be burned out.
Replace any burned out bulbs. If a
bulb is not burned out, check the fuse.
SeeFuses and Circuit Breakers 0274.
Cornering Lamps
Cornering lamps automatically come
on when all of the following occur:
.
The low-beam headlamps are on.
. The turn signals are activated or
the steering wheel is at a turning
angle.
. The vehicle speed is below
40 km/h (25 mph).
Interior Lighting
Instrument Panel
Illumination Control
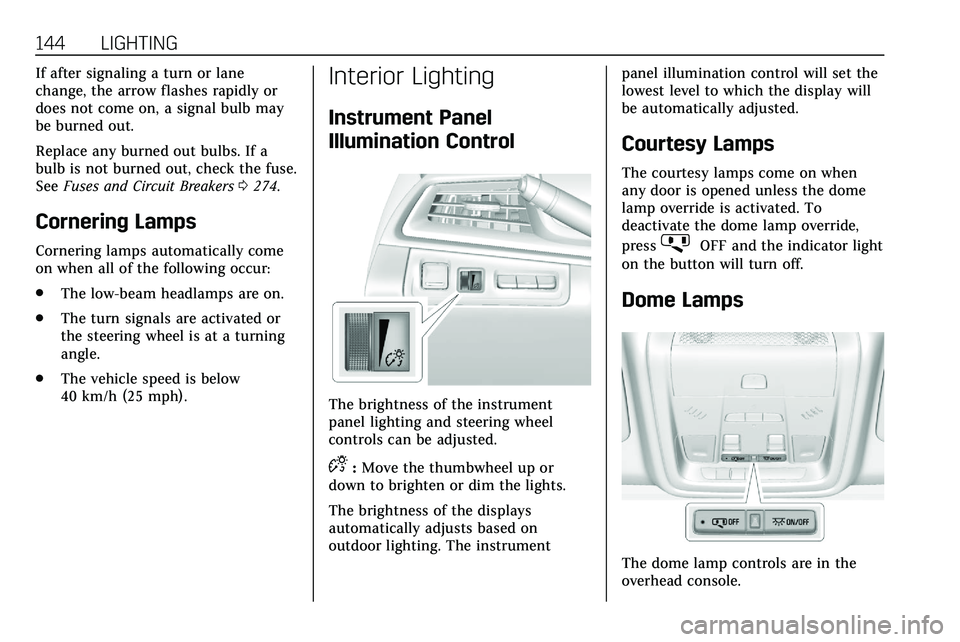
The brightness of the instrument
panel lighting and steering wheel
controls can be adjusted.
D:Move the thumbwheel up or
down to brighten or dim the lights.
The brightness of the displays
automatically adjusts based on
outdoor lighting. The instrument panel illumination control will set the
lowest level to which the display will
be automatically adjusted.
Courtesy Lamps
The courtesy lamps come on when
any door is opened unless the dome
lamp override is activated. To
deactivate the dome lamp override,
press
jOFF and the indicator light
on the button will turn off.
Dome Lamps
The dome lamp controls are in the
overhead console.
Page 149 of 384
148 CLIMATE CONTROLS
Climate Controls
Climate Control Systems
Dual Automatic Climate ControlSystem . . . . . . . . . . . . . . . . . . . . . . . . . . 148
Rear Climate Control System . . . . 154
Air Vents
Air Vents . . . . . . . . . . . . . . . . . . . . . . . . . . 156
Maintenance
Passenger Compartment Air Filter . . . . . . . . . . . . . . . . . . . . . . . . . . . . . 156
Service . . . . . . . . . . . . . . . . . . . . . . . . . . . . 156
Climate Control Systems
Dual Automatic Climate Control System
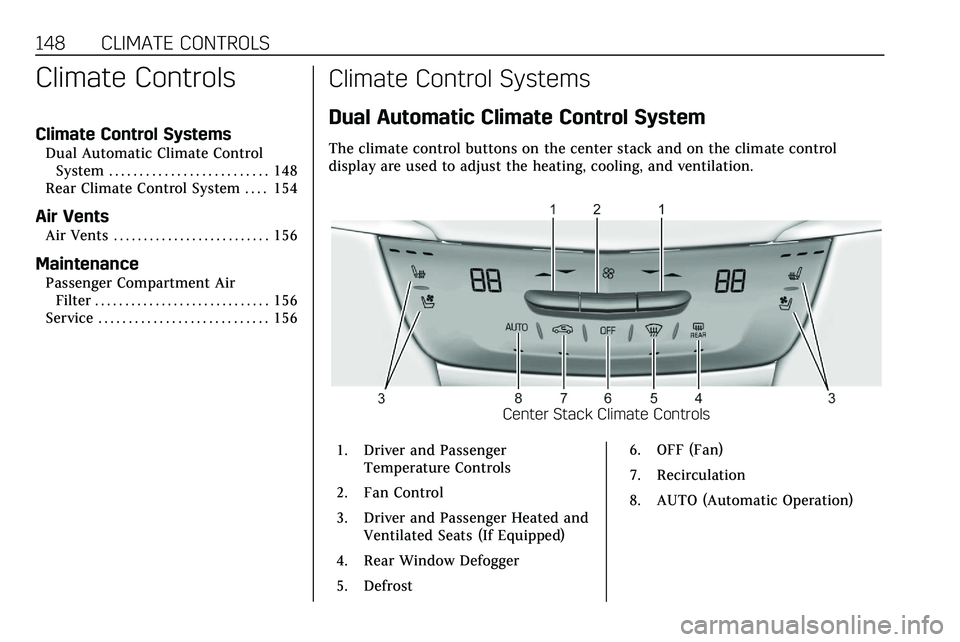
The climate control buttons on the center stack and on the climate control
display are used to adjust the heating, cooling, and ventilation.
Center Stack Climate Controls
1. Driver and Passenger Temperature Controls
2. Fan Control
3. Driver and Passenger Heated and Ventilated Seats (If Equipped)
4. Rear Window Defogger
5. Defrost 6. OFF (Fan)
7. Recirculation
8. AUTO (Automatic Operation)
Page 150 of 384
CLIMATE CONTROLS 149
Climate Control Display
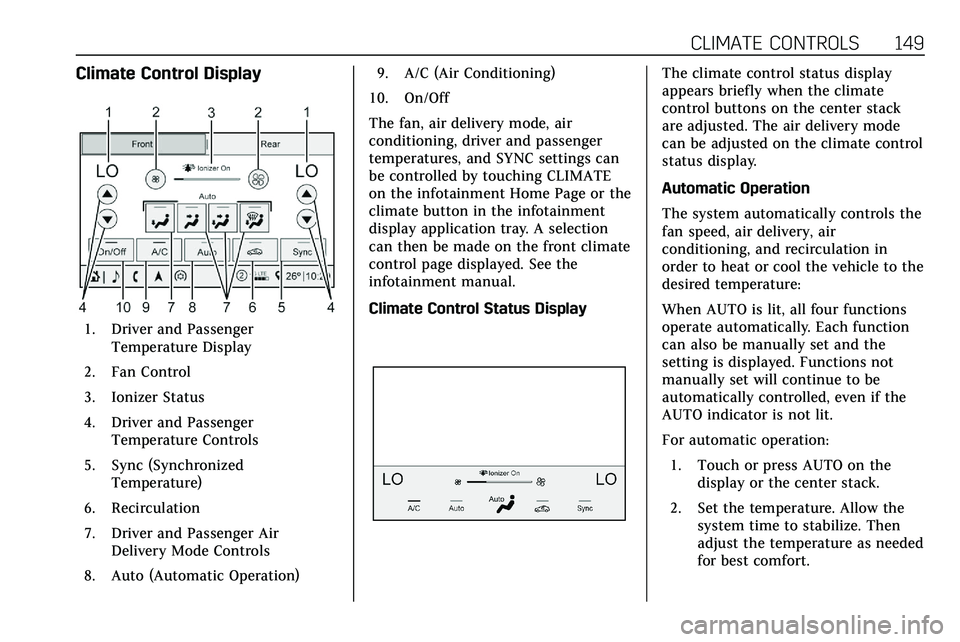
1. Driver and PassengerTemperature Display
2. Fan Control
3. Ionizer Status
4. Driver and Passenger Temperature Controls
5. Sync (Synchronized Temperature)
6. Recirculation
7. Driver and Passenger Air Delivery Mode Controls
8. Auto (Automatic Operation) 9. A/C (Air Conditioning)
10. On/Off
The fan, air delivery mode, air
conditioning, driver and passenger
temperatures, and SYNC settings can
be controlled by touching CLIMATE
on the infotainment Home Page or the
climate button in the infotainment
display application tray. A selection
can then be made on the front climate
control page displayed. See the
infotainment manual.
Climate Control Status Display
The climate control status display
appears briefly when the climate
control buttons on the center stack
are adjusted. The air delivery mode
can be adjusted on the climate control
status display.
Automatic Operation
The system automatically controls the
fan speed, air delivery, air
conditioning, and recirculation in
order to heat or cool the vehicle to the
desired temperature:
When AUTO is lit, all four functions
operate automatically. Each function
can also be manually set and the
setting is displayed. Functions not
manually set will continue to be
automatically controlled, even if the
AUTO indicator is not lit.
For automatic operation: 1. Touch or press AUTO on the display or the center stack.
2. Set the temperature. Allow the system time to stabilize. Then
adjust the temperature as needed
for best comfort.
Page 151 of 384

150 CLIMATE CONTROLS
To improve fuel efficiency and to cool
the vehicle faster, recirculation may be
automatically selected in warm
weather. The recirculation light will
not come on. Press
@to select
recirculation; press it again to select
outside air.
English units can be changed to
metric units through the instrument
cluster. See “Cluster Application
Displays” underInstrument Cluster
0 108.
OFF : Press to turn the fan on or off.
The front and rear climate displays
turn off when the fan is turned off
and the system will stop air from
flowing into the cabin. If on is
selected, or any other buttons are
pressed, the climate control system
will turn on and operate at the
current setting. The temperature
control and air delivery mode can still
be adjusted.
w/x: The temperature can be
adjusted separately for the driver and
the passenger. Press to increase or
decrease the temperature. Press and
hold to rapidly increase or decrease
the temperature. The driver and passenger
temperatures can also be adjusted by
touching the buttons on the climate
control display.
SYNC :
Touch SYNC on the climate
control display to link all climate zone
settings to the driver settings. Adjust
the driver side temperature control to
change the linked temperature. When
the front or rear passenger settings
are adjusted, the SYNC indicator light
turns off when the temperatures are
unlinked.
Rear : If equipped, touch Rear on the
front climate control display to open
the rear climate control display. The
rear climate control settings can now
be adjusted from the front passenger
area. See Rear Climate Control System
0 154.
Manual Operation
Q 9 R:Press the fan controls on the
center stack or the climate control
display to increase or decrease the fan
speed. Press and hold the controls to
adjust speed more quickly. The fan
speed setting displays. Pressing either
button cancels automatic fan control and the fan can be controlled
manually. Press AUTO to return to
automatic operation. To turn off the
fan and climate control system, press
and hold the fan down control on the
center stack or the climate control
display until it goes off.
Air Delivery Mode Control :
When
the climate information is displayed,
touch the desired air delivery mode on
the climate control display to change
the direction of the airf low. The
selected air delivery mode button is
lit. Touching any of the air delivery
buttons cancels automatic air delivery
control and the direction of the
airf low can be controlled manually.
Press AUTO to return to automatic
operation.
To change the current mode, select
one of the following:Y: Air is directed to the instrument
panel outlets.
\: Air is divided between the
instrument panel outlets and the floor
outlets.
[: Air is directed to the floor
outlets.
Page 152 of 384

CLIMATE CONTROLS 151
-:Clears the windows of fog or
moisture. Air is directed to the
windshield and floor outlets.
0: Clears the windshield of fog or
frost more quickly. Air is directed to
the windshield. Press
0to turn on or
off. Changing the air delivery mode
also turns the defrost off.
A/C : Touch A/C Mode on the climate
control display to turn the automatic
air conditioning on or off. If the fan is
turned off or the outside temperature
falls below freezing, the air
conditioner will not run.
Press AUTO to return to automatic
operation and the air conditioner runs
as needed.
@: Press to alternate between
recirculating air inside the vehicle or
pulling in outside air. The indicator
light on the button is lit when
recirculation mode is active. This
helps to quickly cool the air inside the
vehicle or reduce the outside air and
odors that might enter. Pressing this control cancels
automatic recirculation. Press AUTO
to return to automatic operation;
recirculation runs automatically as
needed.
Manual recirculation mode is not
available when in Defrost or Defog
modes.
Auto Defog :
The climate control
system may have a sensor to
automatically detect high humidity
inside the vehicle. When high
humidity is detected, the climate
control system may adjust to outside
air supply and turn on the air
conditioner. If the climate control
system does not detect possible
window fogging, it returns to normal
operation. To turn Auto Defog off or
on, see “Climate and Air Quality”
under Vehicle Personalization 0131.
Ionizer : If equipped with an ionizer,
this feature helps to clean the air
inside the vehicle and remove
contaminants such as pollen, odors,
and dust. If the climate control
system is on and the ionizer is
enabled, the ionizer status indicator
will be lit on the climate control display. To turn the ionizer on or off,
see
“Climate and Air Quality” under
Vehicle Personalization 0131.
Rear Window Defogger
K:Press to turn the rear window
defogger on or off. An indicator light
on the button comes on to show that
the rear window defogger is on.
The defogger only works when the
ignition is on. The defogger turns off
if the ignition is in off or ACC/
ACCESSORY.
The rear window defogger can be set
to automatic operation. See “Climate
and Air Quality” underVehicle
Personalization 0131. When Auto Rear
Defog is selected, the rear window
defogger turns on automatically when
the interior temperature is cold and
the outside temperature is about 4 °C
(40 °F) and below.
The upper grid lines on the rear
window are antenna lines and are not
intended to heat when the defogger is
activated.
Page 155 of 384

154 CLIMATE CONTROLS
Rear Climate Control System
If equipped, the rear climate control system is on the rear of the center console.
The settings can be adjusted with the rear climate control buttons on the rear of
the center console and on the rear climate display.
Rear Climate Controls
1. Rear Seat Passenger Heated Seat Controls
2. Air Delivery Mode Control
3. AUTO (Automatic Operation) 4. Fan Control
5. Rear Seat Passenger Temperature
Controls
Rear Climate Display
1. Rear Temperature Display
2. Fan Control
3. Sync (Synchronized Temperatures)
4. Rear Control Lockout
5. Air Delivery Mode Control
6. Auto (Rear Automatic Operation)
7. On/Off
8. Rear Climate Temperature Control
Rear : Touch Rear on the front
climate control display to open the
rear climate control display. The rear
Page 156 of 384

CLIMATE CONTROLS 155
climate control settings can now be
adjusted from the front
passenger area.
REAR
O:Touch REAROon the rear
climate display to turn the rear
climate control on or off.
SYNC : Touch SYNC on the rear
climate display to match the rear
climate control temperature to the
front climate control driver
temperature. The SYNC button will
be lit.
Rear Control Lockout : Touch to lock
or unlock control of the rear climate
control system from the rear seat
passengers. When locked, the rear
climate control can only be adjusted
from the front seat.
Automatic Operation
AUTO : Press to turn on or off. The
air delivery is controlled
automatically. The AUTO indicator
appears on the display. If the air
delivery mode or fan speed is
manually adjusted, this cancels full
automatic operation. Manual Operation
]:
Press the rear fan control up or
down to increase or decrease the
airf low to the rear panel outlets. The
rear climate airf low can also be
adjusted by touching
ªor«on the
rear climate display.
Temperature Controls : Press up or
down to adjust the rear passenger
temperature. The rear passenger
temperature can also be adjusted by
touching
Qfor warmer air orRfor
cooler air on the rear climate display.
Air Delivery Mode Control : Press up
or down to select the desired air
delivery mode. The air delivery mode
can also be changed by touching
[,
\, orYon the rear climate display.
This changes the direction of the
airf low in the rear seating area.
If the rear floor air delivery mode is
selected, the rear fan speed indicator
will change when adjusted, but the
airf low amount directed to the floor
will not. This is normal operation for
the system. To activate the rear floor air delivery
mode, touch
[on the rear climate
display.
Page 176 of 384
DRIVING AND OPERATING 175
the Remote Keyless Entry (RKE)
system. SeeRemote Keyless Entry
(RKE) System Operation 010.
To shift out of P (Park), the vehicle
must be turned on and the brake
pedal must be applied.
Stopping the Engine/OFF (No
Indicator Light) : When the vehicle is
stopped, press ENGINE START/STOP
once to turn the engine off.
If the vehicle is in P (Park), the
ignition will turn off, and Retained
Accessory Power (RAP) will remain
active. See Retained Accessory Power
(RAP) 0180.
If the vehicle is in R (Reverse),
D (Drive) or M (Manual Mode), the
vehicle will shift to P (Park), the
ignition will turn off, and Retained
Accessory Power (RAP) will remain
active. See Retained Accessory Power
(RAP) 0180.
If the vehicle is in N (Neutral), the
ignition will return to ACC/
ACCESSORY and display the message
SHIFT TO PARK in the Driver Information Center (DIC). When the
vehicle is shifted into P (Park), the
ignition will turn off.
{Warning
Turning off the vehicle while
moving may cause loss of power
assist in the brake and steering
systems and disable the airbags.
While driving, only shut the vehicle
off in an emergency.
If the vehicle must be shut off in an
emergency: 1. Brake using a firm and steady pressure. Do not pump the
brakes repeatedly. This may
deplete power assist, requiring
increased brake pedal force.
2. Shift the vehicle to N (Neutral). This can be done while the
vehicle is moving. After shifting
to N (Neutral), firmly apply the
brakes and steer the vehicle to a
safe location.
3. Come to a complete stop and shift to P (Park). 4. Set the parking brake. See
Electric Parking Brake 0191.
Press ENGINE START/STOP to
turn the vehicle off.
If the vehicle cannot be pulled over
and must be shut off while driving,
press and hold ENGINE START/STOP
for longer than two seconds, or press
twice in five seconds.
ACC/ACCESSORY (Amber Indicator
Light) : This mode allows you to use
some electrical accessories when the
engine is off.
With the ignition off, pressing
ENGINE START/STOP once without
the brake pedal applied will place the
ignition system in ACC/ACCESSORY.
The ignition will switch from ACC/
ACCESSORY to OFF after 10 minutes
to prevent battery rundown.
ON/RUN/START (Green Indicator
Light) : This mode is for driving and
starting. With the ignition off and the
brake pedal applied, pressing ENGINE
START/STOP once will place the
ignition system in ON/RUN/START.
Once engine cranking begins, release
the button. Engine cranking will
Page 177 of 384
176 DRIVING AND OPERATING
continue until the engine starts. The
ignition will then remain on. See
Starting the Engine0176.
Service Mode
This mode is available to verify the
proper operation of the malfunction
indicator lamp as may be required for
emissions inspection purposes and for
service and diagnostics. See Automatic
Transmission 0184.
With the vehicle off, and the brake
pedal not applied, pressing and
holding ENGINE START/STOP for
more than five seconds will place the
vehicle in Service Mode. The
instruments and audio systems will
operate as they do in ON/RUN, but
the vehicle will not be able to be
driven. The engine will not start in
Service Mode. Press ENGINE START/
STOP again to turn the vehicle off.
Starting the Engine
Place the transmission in the proper
gear, P (Park) or N (Neutral). To restart
the engine when the vehicle is already
moving, use N (Neutral).
Caution
Do not try to shift to P (Park) if the
vehicle is moving. If you do, you
could damage the transmission.
Shift to P (Park) only when the
vehicle is stopped.
Caution
If you add electrical parts or
accessories, you could change the
way the engine operates. Any
resulting damage would not be
covered by the vehicle warranty. See
Add-On Electrical Equipment 0246.
To start the vehicle: 1. With the Keyless Access system, the RKE transmitter must be in
the vehicle. Press ENGINE
START/STOP with the brake
pedal applied. When the engine
begins cranking, let go of the
button. The idle speed will go down as the engine warms up.
Do not race the engine
immediately after starting it.
If the RKE transmitter is not in
the vehicle, if there is
interference, or if the RKE
battery is low, a Driver
Information Center (DIC)
message will display. See
Remote
Keyless Entry (RKE) System
Operation 010.Caution
Cranking the engine for long
periods of time, by pressing
ENGINE START/STOP immediately
after cranking has ended, can
overheat and damage the cranking
motor, and drain the battery. Wait
at least 15 seconds between each
try, to let the cranking motor
cool down.
2. If the engine does not start after five to 10 seconds, especially in
very cold weather (below −18 °C
or 0 °F), it could be flooded with
too much gasoline. Try pushing
Page 178 of 384
DRIVING AND OPERATING 177
the accelerator pedal all the way
to the floor and hold it there,
then press ENGINE START/STOP
for up to a maximum of
15 seconds. Wait at least
15 seconds between each try, to
allow the cranking motor to cool
down. When the engine starts,
let go of the button and the
accelerator. If the vehicle starts
briefly but then stops again, do
the same thing. This clears the
extra gasoline from the engine.
Do not race the engine
immediately after starting it.
Operate the engine and
transmission gently until the oil
warms up and lubricates all
moving parts.
Stop/Start System
The Stop/Start system will shut off
the engine to help conserve fuel.
It has components designed for the
increased number of starts.
{Warning
The automatic engine Stop/Start
feature causes the engine to shut
off while the vehicle is still on. Do
not exit the vehicle before shifting
to P (Park). The vehicle may restart
and move unexpectedly. Always
shift to P (Park), and then turn the
ignition off before exiting the
vehicle.
Auto Engine Stop/Start
When the brakes are applied and the
vehicle is at a complete stop, the
engine may turn off. When stopped,
the tachometer displays AUTO STOP.
See Tachometer 0111. When the brake
pedal is released or the accelerator
pedal is pressed, the engine will
restart.
To maintain vehicle performance,
other conditions may cause the engine
to automatically restart before the
brake pedal is released.
Auto Stops may not occur and/or Auto
Starts may occur because: .
The climate control settings
require the engine to be running
to cool or heat the vehicle interior.
. The vehicle battery charge is low.
. The vehicle battery has recently
been disconnected.
. Minimum vehicle speed has not
been reached since the last
Auto Stop.
. The accelerator pedal is pressed.
. The engine or transmission is not
at the required operating
temperature.
. The outside temperature is not in
the required operating range.
. The vehicle is in any gear other
than D (Drive).
. Driver modes have been selected.
. The vehicle is on a steep hill or
grade.
. The driver door has been opened
or the driver seat belt has been
unbuckled.
. The hood has been opened.