key CADILLAC XT5 2020 Service Manual
[x] Cancel search | Manufacturer: CADILLAC, Model Year: 2020, Model line: XT5, Model: CADILLAC XT5 2020Pages: 384, PDF Size: 6.52 MB
Page 135 of 384
134 INSTRUMENTS AND CONTROLS
Touch the controls on the
infotainment display to adjust the
volume.
Hands Free Liftgate/Trunk Control
The liftgate may be operated with a
kicking motion under the left corner
of the rear bumper. SeeLiftgate023.
Select Off, On-Open and Close,
or On-Open Only.
Reverse Tilt Mirror
When on, both the driver and
passenger, driver, or passenger outside
mirrors will tilt downward when the
vehicle is shifted to R (Reverse) to
improve visibility of the ground near
the rear wheels. They will return to
their previous driving position when
the vehicle is shifted out of
R (Reverse) or the engine is turned off.
See Reverse Tilt Mirrors 035.
Touch Off, On - Driver and Passenger,
On - Driver, or On - Passenger. Remote Mirror Folding
When on, the outside mirrors will
automatically fold or unfold when the
Remote Keyless Entry (RKE)
transmitter
QorKbutton is pressed
and held. See Folding Mirrors 034.
Touch Off or On.
Rain Sense Wipers
This setting automatically turns on
the wipers when moisture is detected
and the wiper switch is in
intermittent mode.
Touch Disabled or Enabled.
Auto Wipe in Reverse Gear
When on and the front wiper is on,
the rear wiper will automatically
activate when the vehicle is shifted to
R (Reverse).
Select Off or On.
Lighting
Touch and the following may display:
. Vehicle Locator Lights
. Exit Lighting Vehicle Locator Lights
This setting flashes the headlamps of
your vehicle when you press
Kon the
Remote Keyless Entry (RKE)
transmitter.
Touch Off or On.
Exit Lighting
This setting specifies how long the
headlamps stay on after the vehicle is
turned off and exited.
Touch Off, 30 Seconds, 60 Seconds,
or 120 Seconds.
Power Door Locks
Touch and the following may display:
. Open Door Anti Lock Out
. Auto Door Unlock
. Delayed Door Lock
Open Door Anti Lock Out
This setting prevents the driver door
from locking when the door is open.
If this setting is on, the Delayed Door
Lock menu will not be available.
Touch Off or On.
Page 136 of 384

INSTRUMENTS AND CONTROLS 135
Auto Door Unlock
This setting allows selection of which
doors will automatically unlock when
the vehicle is shifted into P (Park).
Touch Off, All Doors, or Driver Door.
Delayed Door Lock
This setting delays the locking of the
vehicle’s doors.
Touch Off or On.
Remote Lock, Unlock, Start
Touch and the following may display:
.Remote Unlock Light Feedback
. Remote Lock Feedback
. Remote Door Unlock
. Remote Start Auto Cool Seats
. Remote Start Auto Heat Seats
. Remote Window Operation
. Passive Door Unlock
. Passive Door Lock
. Remote Left in Vehicle Alert Remote Unlock Light Feedback
This setting flashes the exterior lamps
when the vehicle is unlocked with the
RKE transmitter.
Touch Off or Flash Lights.
Remote Lock Feedback
This setting specifies how the vehicle
responds when the vehicle is locked
with the RKE transmitter.
Touch Off, Lights and Horn, Lights
Only, or Horn Only.
Remote Door Unlock
This setting specifies whether all
doors, or just the driver door, unlock
when pressing
Kon the RKE
transmitter.
Touch All Doors or Driver Door.
Remote Start Auto Cool Seats
This setting automatically turns on
the ventilated seats when using the
remote start function on warm days.
See Heated and Ventilated Front Seats
0 49 and
Remote Vehicle Start 017.
Touch Off or On. Remote Start Auto Heat Seats
This setting automatically turns on
the heated seats when using the
remote start function on cold days.
See
Heated and Ventilated Front Seats
0 49 and
Remote Vehicle Start 017.
If equipped with Auto Heated Steering
Wheel, this feature will turn on when
the Remote Start Auto Heated Seats
turn on.
Touch Off or On.
Remote Window Operation
If equipped, this feature enables
remote operation of the windows with
the RKE transmitter. See Remote
Keyless Entry (RKE) System Operation
0 10.
Touch Off or On.
Passive Door Unlock
This setting specifies which doors
unlock when using the button on the
driver door handle to unlock the
vehicle.
Touch All Doors or Driver Door Only.
Page 137 of 384
136 INSTRUMENTS AND CONTROLS
Passive Door Lock
This setting specifies if the vehicle will
automatically lock, or lock and
provide an alert after all the doors are
closed, and you walk away from the
vehicle with the RKE transmitter. See
Remote Keyless Entry (RKE) System
Operation010.
Touch Off, On with Horn Chirp, or On.
Remote Left in Vehicle Alert
This feature sounds an alert when the
RKE transmitter is left in the vehicle.
This menu also enables Remote No
Longer in Vehicle Alert.
Touch Off or On.
Seating Position
Touch and the following may display:
. Seat Entry Memory
. Seat Exit Memory
Seat Entry Memory
This feature automatically recalls the
previously stored 1 or 2 button
positions when the ignition is changed
from off to on or ACC/ACCESSORY.
See Memory Seats 046. Touch Off or On.
Seat Exit Memory
This feature automatically recalls the
previously stored exit button positions
when the ignition is changed from on
or ACC/ACCESSORY to off if the driver
door is open or opened. See
Memory
Seats 046.
Touch Off or On.
Teen Driver
See “Teen Driver” under“Settings ”in
the infotainment manual.
Valet Mode
This will lock the infotainment system
and steering wheel controls. It may
also limit access to vehicle storage
locations, if equipped.
To enable valet mode:
1. Enter a four-digit code on the keypad.
2. Touch Enter to go to the confirmation screen.
3. Re-enter the four-digit code. Touch Lock or Unlock to lock or
unlock the system. Touch Back to go
back to the previous menu.
Page 146 of 384
LIGHTING 145
To operate, press the following
buttons:
jOFF :Press to turn off the dome
lamps when a door is open. An
indicator light on the button will turn
on when the dome lamp override is
activated. Press
jOFF again to
deactivate this feature and the
indicator light will turn off. The dome
lamps will come on when doors are
opened.
+ ON/OFF : Press to turn the dome
lamps on manually.
Reading Lamps
There are front and rear reading
lamps on the overhead console and
over the rear passenger doors. These
lamps come on automatically when
any door is opened.
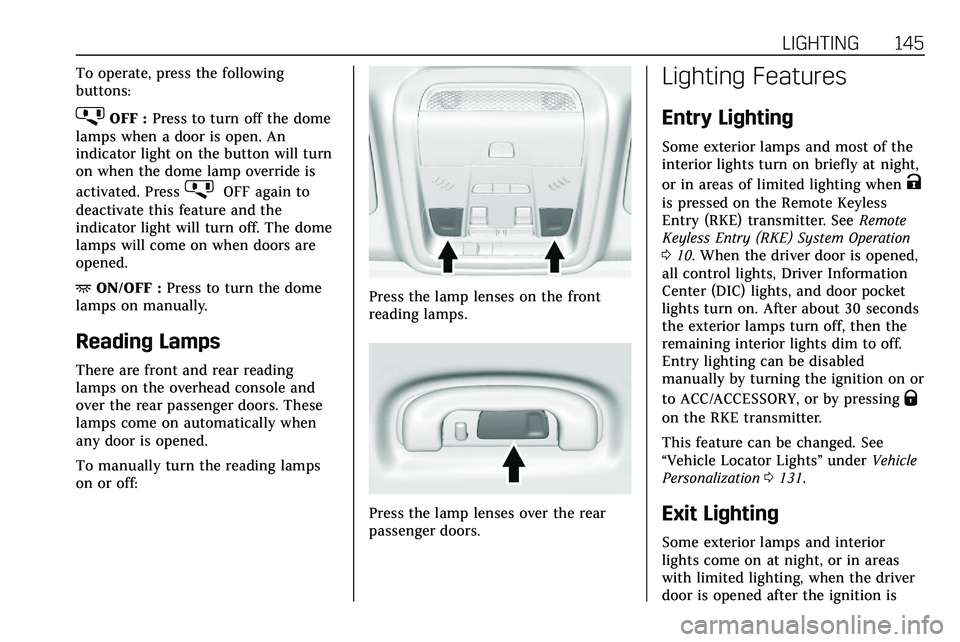
To manually turn the reading lamps
on or off:
Press the lamp lenses on the front
reading lamps.
Press the lamp lenses over the rear
passenger doors.
Lighting Features
Entry Lighting
Some exterior lamps and most of the
interior lights turn on briefly at night,
or in areas of limited lighting when
K
is pressed on the Remote Keyless
Entry (RKE) transmitter. See Remote
Keyless Entry (RKE) System Operation
0 10. When the driver door is opened,
all control lights, Driver Information
Center (DIC) lights, and door pocket
lights turn on. After about 30 seconds
the exterior lamps turn off, then the
remaining interior lights dim to off.
Entry lighting can be disabled
manually by turning the ignition on or
to ACC/ACCESSORY, or by pressing
Q
on the RKE transmitter.
This feature can be changed. See
“Vehicle Locator Lights” underVehicle
Personalization 0131.
Exit Lighting
Some exterior lamps and interior
lights come on at night, or in areas
with limited lighting, when the driver
door is opened after the ignition is
Page 164 of 384
DRIVING AND OPERATING 163
Defensive drivers avoid most skids by
taking reasonable care suited to
existing conditions, and by not
overdriving those conditions. But
skids are always possible.
If the vehicle starts to slide, follow
these suggestions:
.Ease your foot off the accelerator
pedal and steer the way you want
the vehicle to go. The vehicle may
straighten out. Be ready for a
second skid if it occurs.
. Slow down and adjust your driving
according to weather conditions.
Stopping distance can be longer
and vehicle control can be affected
when traction is reduced by water,
snow, ice, gravel, or other material
on the road. Learn to recognize
warning clues —such as enough
water, ice, or packed snow on the
road to make a mirrored surface
— and slow down when you have
any doubt.
. Try to avoid sudden steering,
acceleration, or braking, including
reducing vehicle speed by shifting to a lower gear. Any sudden
changes could cause the tires to
slide.
Remember: Antilock brakes help avoid
only the braking skid.
Off-Road Driving
All-Wheel Drive vehicles can be used
for off-road driving. Vehicles without
All-Wheel Drive and vehicles not
equipped with All Terrain (AT) or
On-Off Road (OOR) tires must not be
driven off-road except on a level, solid
surface. To contact the tire
manufacturer for more information
about the original equipment tires, see
the Limited Warranty and Owner
Assistance Information manual.
Controlling the vehicle is the key to
successful off-road driving. One of the
best ways to control the vehicle is to
control the speed.
{Warning
When driving off-road, bouncing
and quick changes in direction can
easily throw you out of position.
This could cause you to lose control
and crash. You and your passengers
should always wear seat belts.
Before Driving Off-Road
. Have all necessary maintenance
and service work completed.
. Fuel the vehicle, fill fluid levels,
and check inflation pressure in all
tires, including the spare,
if equipped.
. Read all the information about
All-Wheel Drive vehicles in this
manual.
. Make sure all underbody shields,
if equipped, are properly attached.
. Know the local laws that apply to
off-road driving.
Page 175 of 384
174 DRIVING AND OPERATING
{Warning
Things inside the vehicle can
strike and injure people in a
sudden stop or turn, or in a
crash.
.Put things in the cargo
area of the vehicle. In the
cargo area, put them as far
forward as possible. Try to
spread the weight evenly.
.Never stack heavier things,
like suitcases, inside the
vehicle so that some of
them are above the tops of
the seats.
.Do not leave an unsecured
child restraint in the
vehicle.
.Secure loose items in the
vehicle.
.Do not leave a seat folded
down unless needed.
Starting and Operating
New Vehicle Break-In
Caution
The vehicle does not need an
elaborate break-in. But it will
perform better in the long run if
you follow these guidelines: . Do not drive at any one
constant speed, fast or slow,
for the first 800 km (500 mi).
Do not make full-throttle
starts. Avoid downshifting to
brake or slow the vehicle.
. Avoid making hard stops for
the first 300 km (200 mi) or
so. During this time the new
brake linings are not yet
broken in. Hard stops with
new linings can mean
premature wear and earlier
replacement. Follow this
breaking-in guideline every
time you get new brake
linings.
(Continued)
Caution (Continued)
Following break-in, engine speed
and load can be gradually
increased.
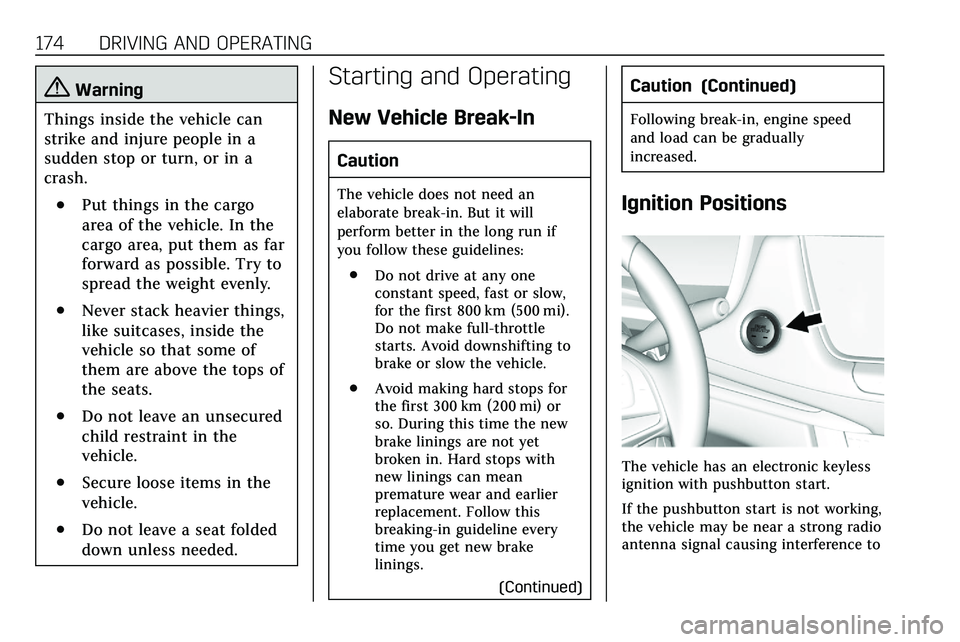
Ignition Positions
The vehicle has an electronic keyless
ignition with pushbutton start.
If the pushbutton start is not working,
the vehicle may be near a strong radio
antenna signal causing interference to
Page 176 of 384
DRIVING AND OPERATING 175
the Remote Keyless Entry (RKE)
system. SeeRemote Keyless Entry
(RKE) System Operation 010.
To shift out of P (Park), the vehicle
must be turned on and the brake
pedal must be applied.
Stopping the Engine/OFF (No
Indicator Light) : When the vehicle is
stopped, press ENGINE START/STOP
once to turn the engine off.
If the vehicle is in P (Park), the
ignition will turn off, and Retained
Accessory Power (RAP) will remain
active. See Retained Accessory Power
(RAP) 0180.
If the vehicle is in R (Reverse),
D (Drive) or M (Manual Mode), the
vehicle will shift to P (Park), the
ignition will turn off, and Retained
Accessory Power (RAP) will remain
active. See Retained Accessory Power
(RAP) 0180.
If the vehicle is in N (Neutral), the
ignition will return to ACC/
ACCESSORY and display the message
SHIFT TO PARK in the Driver Information Center (DIC). When the
vehicle is shifted into P (Park), the
ignition will turn off.
{Warning
Turning off the vehicle while
moving may cause loss of power
assist in the brake and steering
systems and disable the airbags.
While driving, only shut the vehicle
off in an emergency.
If the vehicle must be shut off in an
emergency: 1. Brake using a firm and steady pressure. Do not pump the
brakes repeatedly. This may
deplete power assist, requiring
increased brake pedal force.
2. Shift the vehicle to N (Neutral). This can be done while the
vehicle is moving. After shifting
to N (Neutral), firmly apply the
brakes and steer the vehicle to a
safe location.
3. Come to a complete stop and shift to P (Park). 4. Set the parking brake. See
Electric Parking Brake 0191.
Press ENGINE START/STOP to
turn the vehicle off.
If the vehicle cannot be pulled over
and must be shut off while driving,
press and hold ENGINE START/STOP
for longer than two seconds, or press
twice in five seconds.
ACC/ACCESSORY (Amber Indicator
Light) : This mode allows you to use
some electrical accessories when the
engine is off.
With the ignition off, pressing
ENGINE START/STOP once without
the brake pedal applied will place the
ignition system in ACC/ACCESSORY.
The ignition will switch from ACC/
ACCESSORY to OFF after 10 minutes
to prevent battery rundown.
ON/RUN/START (Green Indicator
Light) : This mode is for driving and
starting. With the ignition off and the
brake pedal applied, pressing ENGINE
START/STOP once will place the
ignition system in ON/RUN/START.
Once engine cranking begins, release
the button. Engine cranking will
Page 177 of 384
176 DRIVING AND OPERATING
continue until the engine starts. The
ignition will then remain on. See
Starting the Engine0176.
Service Mode
This mode is available to verify the
proper operation of the malfunction
indicator lamp as may be required for
emissions inspection purposes and for
service and diagnostics. See Automatic
Transmission 0184.
With the vehicle off, and the brake
pedal not applied, pressing and
holding ENGINE START/STOP for
more than five seconds will place the
vehicle in Service Mode. The
instruments and audio systems will
operate as they do in ON/RUN, but
the vehicle will not be able to be
driven. The engine will not start in
Service Mode. Press ENGINE START/
STOP again to turn the vehicle off.
Starting the Engine
Place the transmission in the proper
gear, P (Park) or N (Neutral). To restart
the engine when the vehicle is already
moving, use N (Neutral).
Caution
Do not try to shift to P (Park) if the
vehicle is moving. If you do, you
could damage the transmission.
Shift to P (Park) only when the
vehicle is stopped.
Caution
If you add electrical parts or
accessories, you could change the
way the engine operates. Any
resulting damage would not be
covered by the vehicle warranty. See
Add-On Electrical Equipment 0246.
To start the vehicle: 1. With the Keyless Access system, the RKE transmitter must be in
the vehicle. Press ENGINE
START/STOP with the brake
pedal applied. When the engine
begins cranking, let go of the
button. The idle speed will go down as the engine warms up.
Do not race the engine
immediately after starting it.
If the RKE transmitter is not in
the vehicle, if there is
interference, or if the RKE
battery is low, a Driver
Information Center (DIC)
message will display. See
Remote
Keyless Entry (RKE) System
Operation 010.Caution
Cranking the engine for long
periods of time, by pressing
ENGINE START/STOP immediately
after cranking has ended, can
overheat and damage the cranking
motor, and drain the battery. Wait
at least 15 seconds between each
try, to let the cranking motor
cool down.
2. If the engine does not start after five to 10 seconds, especially in
very cold weather (below −18 °C
or 0 °F), it could be flooded with
too much gasoline. Try pushing
Page 233 of 384

232 DRIVING AND OPERATING
Warning (Continued)
.Do not leave the fuel pump
unattended.
. Avoid using electronic devices
while refueling.
. Do not re-enter the vehicle
while pumping fuel.
. Keep children away from the
fuel pump and never let
children pump fuel.
. Before touching the fill
nozzle, touch a metallic
object to discharge static
electricity from your body.
. Fuel can spray out if the fill
nozzle is inserted too quickly.
This spray can happen if the
tank is nearly full, and is
more likely in hot weather.
Insert the fill nozzle slowly
and wait for any hiss noise to
stop before beginning to
flow fuel. If equipped, the fuel door unlocks
when the vehicle doors are unlocked.
See
Remote Keyless Entry (RKE) System
Operation 010.
To open the fuel door, push and
release the rearward center edge of
the door.
The capless refueling system does not
have a fuel cap. Fully insert and latch
the fill nozzle, then begin fueling.
{Warning
Overfilling the fuel tank by more
than three clicks of a standard fill
nozzle may cause:
. Vehicle performance issues,
including engine stalling and
damage to the fuel system.
. Fuel spills.
. Under certain conditions, fuel
fires.
Be careful not to spill fuel. Wait
five seconds after you have finished
pumping before removing the fill
nozzle. Clean fuel from painted
surfaces as soon as possible. See
Exterior Care 0323. Push the fuel door
closed until it latches.
{Warning
If a fire starts while you are
refueling, do not remove the fill
nozzle. Shut off the flow of fuel by
(Continued)
Page 250 of 384
VEHICLE CARE 249
California Perchlorate
Materials Requirements
Certain types of automotive
applications, such as airbag initiators,
seat belt pretensioners, and lithium
batteries contained in electronic keys,
may contain perchlorate materials.
Perchlorate Material–special
handling may apply. See
www.dtsc.ca.gov/hazardouswaste/
perchlorate.
Accessories and
Modifications
Adding non-dealer accessories or
making modifications to the vehicle
can affect vehicle performance and
safety, including such things as
airbags, braking, stability, ride and
handling, emissions systems,
aerodynamics, durability, and
electronic systems like antilock
brakes, traction control, and stability
control. These accessories or
modifications could even cause
malfunction or damage not covered by
the vehicle warranty. Damage to suspension components
caused by modifying vehicle height
outside of factory settings will not be
covered by the vehicle warranty.
Damage to vehicle components
resulting from modifications or the
installation or use of non-GM certified
parts, including control module or
software modifications, is not covered
under the terms of the vehicle
warranty and may affect remaining
warranty coverage for affected parts.
GM Accessories are designed to
complement and function with other
systems on the vehicle. See your
dealer to accessorize the vehicle using
genuine GM Accessories installed by a
dealer technician.
Also, see
Adding Equipment to the
Airbag-Equipped Vehicle 071.
Vehicle Checks
Doing Your Own
Service Work
{Warning
It can be dangerous to work on
your vehicle if you do not have the
proper knowledge, service manual,
tools, or parts. Always follow
owner’s manual procedures and
consult the service manual for your
vehicle before doing any
service work.
If doing some of your own service
work, use the proper service manual.
It tells you much more about how to
service the vehicle than this manual
can. To order the proper service
manual, see Publication Ordering
Information 0358.
This vehicle has an airbag system.
Before attempting to do your own
service work, see Servicing the
Airbag-Equipped Vehicle 071.